Brayer techniques in ink and acrylics for art journaling, mixed media, and collage work
My brayer is one of my favorite art tools – it’s incredibly versatile and can provide precision results and serendipitous beauty depending on what brayer technique I’m using. The brayer is an incredibly multi-purpose tool and I’d like to share with you all the brayer techniques I know – so far – and add to this page as I learn more about this amazing artistic tool.
What exactly is a brayer? A quick introduction to brayers…
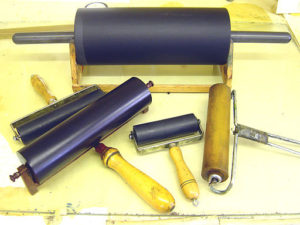
Basically, a brayer is a paint roller. Not the soft, fuzzy kind like for painting walls and ceilings, but similar. They are smaller, handheld tools that are frequently used for printmaking, but are growing in popularity as a scrapbooking, rubber stamping, and mixed media tool.
Mixed Media Brayer Technique with Kaleidacolor Inkpad
I made the colorful layered background on this art print in just seconds. It took me longer to photograph it than to create it! I used a simple brayer technique involving a specialty ink pad called Kaleidacolor. Each Kaleidacolor pad comes with five individual color that snap together to create a lovely rainbow striped stamp pad. The innovative design allows you to unsnap the colors when you’re not using it so that the inks don’t bleed together like they do with other multicolor ink pads.
TIP: Always store any ink pad upside down and wrapped with a rubber band to keep the lid tight. This increases the lifespan of you ink pad by allowing the ink to settle towards the top of the pad, and minimizing evaporation due to a loose lid.
An example of using the Kaleidacolor Brayer Technique
Here’s a video that some one made with a brayer technique very similar to how I created the rainbow poster. She is using a glossy cardstock and going for a smoother, more blended brayer technique but I purposefully left my colors a bit uneven and blocky and brayered on watercolor paper to get more texture and layers. (Also, she stamps a resist image before starting with her brayer technique.) Either way is very fun, and as you can probably tell there is a lot of room for playing around with this technique.
Acrylic Paint Brayer Techniques
Using a brayer with acrylic paints to create amazing layered texture
Acrylic Paints Acrylic paints are pretty much my number one pigment of choice, be it cheap craft paints or the higher-quality, artist-grade acrylic paints. I’m always on the lookout for new and exciting ways to use it. Using a brayer to apply acrylic paints to your artwork can have all kind of interesting effects – it’s a bit of an adventure because it can be very hard to predict exactly what will happen, but I’ve rarely been disappointed. (The only times were when I used too much paint – a little acrylic paint goes a LONG way with a brayer, it can be far too easy to use too much and end up with a muddy mess.)
Probably my first encounter with using a brayer with acrylic paint was during a the first annual retreat for my local ATC group. One of our members led about fifteen of us through the exercise “Mail Art To The Self” from the book Kaleidoscope: Ideas & Projects to Spark Your Creativity. The exercise was created by artist Juliana Coles and I can’t recommend it enough – I’ve done it several times since and it’s always invigorating. Part of the exercise involves applying paint to a large surface as fast as you can, and she suggests using a brayer for that. Our exercise leader let me borrow hers and I was thrilled with the results!
As you can see from the close-up on the left here, the white paint I brayered onto my project picked up and highlighted all the textures on the surface. To achieve that highlighting effect I used a very small amount of paint and not too much pressure when rolling the brayer. You can also see some interesting peaks and valleys in the paint, which I love the look of. That’s another great thing you get with brayering that you can’t really replicate with any other painting tool. The amount of peaks and valleys varies depending on how much paint you use, and thicker, high-quality paint will also give this effect more.
Note that this is an example of what brayering looking like with just one color – the browns and greens you see are the original cardboard surface and the paint I’d applied with brushes and my fingers before I got my hands on the brayer.
Click on the image, it will take you to the full image of this page so you can see all the details.
An art journaling video showing an acrylic paint brayer technique
For a while I ended up forgetting about my brayer – I learned so much in one weekend that it was hard to keep track of it all! But when a friend of mine posted this video to her blog it got me right back to it!
https://www.youtube.com/watch?v=A56wx1v0Fo8
Art Journal Page: Anecdotal Evidence
The art journal spread I created using my brayer and bright craft acrylics
If you look closely, you may notice this is where the photo at the top of the page came from!
Here’s the journal spread I created after I watched the above video the first time. I grabbed a handful of my favorite bright colors of craft paint and dripped just a little bit of each color at a time, rolling the brayer back and forth at varying angles each time I added a new color. The brayering process smoothed the paint out so thinly that it dried very quickly and I could add more colors almost instantly without getting muddy results. It probably helped that it was a chilly day and my space heater made my studio nice and dry and warm!
Thanks for stopping by my brayer technique guide!
I hope you found the info you were looking for today, and that I’ve inspired you to go make fun and exciting new art and craft projects using your brayer. Please let me know what you think, and be sure to let me know if there are any brayer techniques I’ve missed! Thanks!

