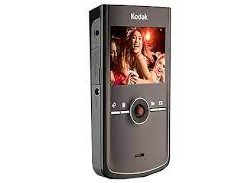
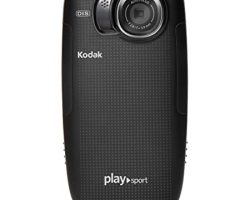
Kodak Zi8 Camcorder Review
Kodak’s Zi8 is a high definition pocket camcorder that records 1920 x 1080p video at 30 frames per second (fps) in the H.264 format. The Zi8 competes with products such as Pure Digital’s Flip UltraHD and Sony’s Webbie HD. Kodak’s pocket camcorder has a few tricks that the others don’t – such as digital image stabilization, face detection, and an external microphone input.
Kodak Zi8 At a Glance
The Good:[ Excellent video quality, easy to use, strong feature set, large LCD screen.
The Bad: Slightly clumsy user interface, little internal memory.
Video & Photo Quality
Using a 1/2.5-inch, 5-megapixel CMOS sensor, the Zi8 records 1080p HD video.This is one of the first 1080p pocket camcorders on the market and the video quality is definitely impressive for a model in this class.
If you want to extend recording times, you can opt for one of three lower resolution settings: 720p/60fps mode (the faster frame rate is good for shooting motion), a 720p/30fps mode or a WVGA mode.
A nice addition to the Zi8 is face detection, which, when activated, can improve exposure around a face it detects in a frame. This function can be disabled as it will draw down the battery faster when it’s used.
The Zi8 also snaps 5-megapixel still photos when set to photo mode (it can’t snap them while you’re filming).
You shouldn’t expect much from these stills – with no flash and a fairly slow performance, it’s not going to wow you.
Design
Like other models in the pocket camcorder category, Kodak kept the functionality and buttons to a minumum. Four dedicated buttons on the back of the unit let you access menu settings, delete videos and still photos, return to filming and play back stored videos.
The menu, and quality settings, are navigated using a joystick at the center of the unit. All-in-all, a very intuitive design that just about anyone can figure out in short order, even if the buttons could stand to be a bit larger.
The Zi8 weighs in just shy of a svelte five ounces with battery. At 2.4 × 4.5 × 0.9 inches, it’s the size of a nice, lean point-and-shoot digital camera. You’ll have your choice of red, black and blue.
Removable Battery
Another nice design touch is a removable lithium ion batter (accessed by removing the unit’s faceplate). For longer trips where you can run low on battery, you have the option of swapping in a new one rather than finding a spot to recharge. You can charge the battery when the Zi8 is connected to a PC via its flip-out USB connector or by using the supplied AC adapter.
Menus
The menu in the Zi8 consists of nine icons for switching off image stabilization, engaging face detection and accessing other functions. Unfortunately, while Kodak had ample room to add some descriptive wording above each menu icon, in most cases they choose not to. None of the icons are that mysterious, but still, for a novice user it would be nice to use the generous LCD screen to its fullest potential.
Memory
The Zi8 comes with a meager 128MB worth of internal memory – barely enough to record a few seconds of HD video or a couple of still images. To enjoy recording of any length, you’ll need to use an SDHC memory card (not included). The Zi8 supports SDHC cards up to 32GB, which would give you close to five hours of recording at the highest quality setting.
The use of flash memory cards helps keep the price of the unit down, but that only helps if you already own a memory card.
Optics
Like all pocket camcorders, the Zi8 does not offer an optical zoom lens. Instead, it features a 4x digital zoom. The zoom itself is of limited utility and when it’s engaged, it isn’t terribly smooth.
The Zi8 also packs digital image stabilization. Again, it’s not as effective as the optical variety, but it’s also not as important a feature in a pocket camcorder because you don’t have an optical zoom lens. You can see it in action here. On the whole, it’s better to have some form of stabilization than none, so Kodak gets the thumbs up for adding it.
Kodak Zi8: A Powerful Pocket Camcorder
Kodak’s Zi8 manages to outdo most of its rivals in the pocket camcorder market by adding some feature-enhancements without burdening the camcorder with complexity. It could stand to tweak its interface, build bigger buttons and make the exterior more resistant to finger prints. If you have no interest in anything but the simplest pocket camcorder for creating Web-friendly videos, the Flip UltraHD would still give you the best bang for your buck. But if you’re thirsting for a pocket camcorder with equal (and in some cases, better) quality than the Flip with more features to boot, the Zi8 is the model for you.


 in the H.264 format. The Zi8 competes with products such…)