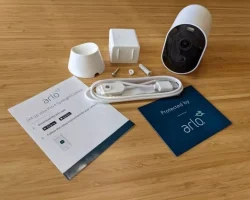
How To Install Battery In Arlo Pro 2 Camera
Installing a battery in your Arlo Pro 2 camera is a simple process that only requires a few steps. First, locate the battery door on the back of the camera. Next, use a Phillips head screwdriver to remove the two screws that are holding the door in place. Once the screws are removed, the door will come off and you will be able to access the battery compartment.
Inside the battery compartment, you will see a battery slot and a contact point. The battery slot is where the battery will go, and the contact point is where the battery will make contact with the camera in order to power it on. To install the battery, simply insert it into the battery slot and then push it down until it makes contact with the contact point.
Once the battery is installed, you can then put the battery door back on and screw it into place. That’s it! Your Arlo Pro 2 camera is now battery-powered and ready to use.
If you’ve just purchased an Arlo Pro 2 camera, you’re probably eager to get it set up and start using it. In this blog post, we’ll show you how to install the battery in your Arlo Pro 2 camera.
The first thing you’ll need to do is remove the battery cover from the camera. To do this, simply twist the cover counter-clockwise and it will come off.
Once the cover is off, you’ll see the battery compartment. Inside, there is a small metal tab that you’ll need to slide in order to release the battery.
Once the tab is slid, the battery will pop up slightly. Grab the battery and pull it out of the compartment.
Now take your new battery and insert it into the compartment, making sure that the metal tab lines up with the hole in the battery.
Once the battery is inserted, push down on it until you hear it click into place.
Now replace the battery cover by twisting it clockwise until it’s snug.
And that’s it! You’ve now successfully installed the battery in your Arlo Pro 2 camera.


