Travel Tripod Guide | Ultralight Camera Tripods

Travel Tripod Guide | Ultralight Camera Tripods

Better Travel Photo Tip: Get a Small and Lightweight Tripod

Ever wonder why some travel photographers manage to take better travel photos than others? The easy answer is skill, and a lightweight travel tripod. Many experienced photographers would even suggest that a tripod is more important than what camera you have or your level of photographic skill.

Relying on steady hands, built-in stabilization, or cranking up (the grain-producing) iso simply won’t cut it when it comes to for example low light landscape photography. In many situations you want maximum depth of field and if you want the best image quality, you do not want to play with the ISO. The only solution is using a sturdy camera support. .

Until recently though, the problem with tripods was that they were bulky and heavy. Luckily, carbon-fiber and ultralight metals have come down in price and should be within reach of any enthusiast photographer.

of their images. Not being able to maximize depth of field is another big reason. Not taking time to compose and think the image through is another big reason for sloppy tourist snaps. All of these problems are helped by taking a tripod along as you travel.

You don’t have to use a full-size model, any camera support is better than nothing – just make sure that you get something that is built to hold your camera weight in a steady manner.

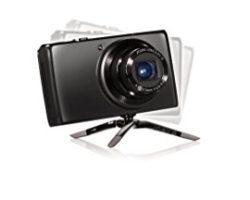
Tiny supports for compacts and smartphones

Some people think that the smaller the camera the easier it is to keep stable when taking a picture. The fact is that the lighter the camera – the more difficult it is to hold still and shake blur is very common with compacts and smartphones. The simple solution is a small camera tripod or support that fits in your bag – or even pocket!

The Best full Size Carbon Tripod for Travel

I use a Benro Travel Angel, the model that came out before this one and it has seen massive rugged use in the field. It still works like new. The compact Benro shown here is their latest carbon travel tripod which is similar to mine, but also has the feature of being a tripod and a monopod in one. The design is pure genius and you simply detach one of the legs and fasten the ball-head to it. This is also one of the few tripods that become flat when folded down for easier travel packing.

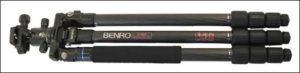
The Benro carbon Travel Flat II Tripod Kit is a extremely compact full-size model and folds down to a mere 16 inches. It takes 17 pound loads, offers almost any angle including ground level, and weighs just 3.4 pounds, which is very low weight for a full sized pro-quality tripod.

Flexible Joby Gorilla Tripods for Different Camera Types

The Gorilla tripods by Joby are extremely popular and the best travel tripod if you look at number of sales. Personally though, I prefer a full-size tripod but that is a matter of taste.

What makes the Gorilla pods so popular are the flexible legs that allow you to wrap around and seek support on almost any surface.

Having owned 2 of these ultra light weight tripods in different sizes, my tip is to not buy too small since the legs do sag a little bit with age. The weight difference is minimal so go for one size bigger than recommended.

See complete line of Joby Gorilla Tripods

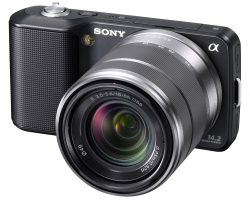
Joby has recently also launched a new series of very compact camera micro tripods. Available in three different sizes, the biggest one show here supports cameras up to just under 2 pounds and is perfect for small hybrid superzooms and mirrorless system cameras such as Sony NEX, Olympus PEN and Pansonic G series.

This latest micro tripod from Joby is designed to stay on the camera at all times, when you fold it down it fits under the camera base.
Weighing just 2.3 ounces, this may be the ultimate emergency tripod for all forms of adventure travel where weight and small size is important.

Best camera for macro photography

Best camera for macro photography

The best camera for macro photography for close up images

If you are looking for the best camera for macro photography you have come to the right place since this article focuses solely on the best macro cameras, and macro lenses, currently available to take your macro images to the next level.

Digital cameras, especially digital slr cameras, are expensive so if you want to buy the best camera for macro photography make sure you take a look at the rest of this article before shelling out your hard earned cash. After all, you don’t want to waste it right?

If you really want to get the most out of your macro photography there are other things you need to consider besides the camera. Lenses are one such consideration, and the best macro lenses are also covered in this article.

If your macro subjects consist of moving things, such as insects, butterflies and the like, the best macro camera needs a high burst rate. The top end Canon and Nikon digital SLRs are full frame and have a high burst rate but these are very expensive. Cheaper alternatives include crop sensor cameras with dual processors and these are the best value for money cameras.
macro shot of flower If you take macro images of static subjects, such as flowers and still life things, the best camera for macro photography need not have a high burst rate. In these circumstances the best camera for macro photography is the one with the best image quality, and highest number of pixels.

Point and shoot cameras and mirrorless cameras have a macro photography mode however these don’t capture “true” macro photographs. I would not recommend either a point and shoot or a mirrorless camera for macro photography, and the only real options are digital slr cameras, as detailed below;

Best camera for macro photography – Canon dslrs

Arguably you can use any digital slr camera for macro photography however many photographers claim the best camera for macro photography is a full frame slr camera since these have the largest sensors and produce some exceptional images. If you are capturing macro and close up images of flowers and still life subjects then I agree the best camera for macro photography is the full frame digital slr camera.

If, however, you are taking macro and close up images of insects I think the best camera for macro photography is one with the highest burst rate. Capturing images of insects can be tricky and to get the keeper shots you need to fire off a load of shots in quick succession and choose the best. You can buy full frame digital slr cameras with a high burst rate, such as the Canon 1D X, but these cost several thousand dollars and are out of reach of most enthusiasts. There are alternatives, but these are not full frame cameras.

Best camera for macro photography – Canon 5d

If you want an affordable full frame camera the Canon eod 5d is the camera of choice, which is Canon’s top selling digital slr camera of all time and when you get to have a go with this camera it is easy to see why. The 21MP sensor captures a lot of information and the image quality of the 5d is simply awesome. This camera captures images that will impress family and friends, and images that you can easily sell on and make some extra cash.

The Canon 5d is superb. It is a relatively small dslr camera that is tough, durable and well built. Like all Canon dslr cameras the Canon 5d is user friendly, intuitive and all the necessary controls are close to hand, which means you won’t have to go delving through the menu system.
The Canon 5d has a poor burst rate, but then given the cost of the 5d this isn’t surprising. Because of the poor burst rate the Canon 5d isn’t best suited to insect photography. If, however, you want to capture macro images of flowers and still life subjects the Canon 5d is the tool with which to do it.

Best camera for macro photography – Canon 7d

When I go chasing insects and mini beasts my camera of choice is the Canon 7d. With an 8 frames per second burst rate the 7d is ideal. The 7d has an 18mP sensor, and whilst it is not quite as impressive as that of the 5d, it is more than enough to capture some stunning macro images.
Like all Canon digital slr cameras the 7d is tough, durable and built to last. It also has a sensible menu system and user friendly interface, which makes it a doddle to use. All settings controls are close to hand, which means there is no need to go through the menu to change anything.
You can also use the Canon 7d for taking macro images of flowers and still life subjects, but it is insect photography where this camera is really good.

Best camera for macro photography – Nikon dslrs

Nikon D7000

If you prefer Nikon branded cameras my recommendation is the Nikon D7000. The Nikon D7000 is a top rated, and very popular, Nikon dslr camera you can use for macro photography. The D7000 has a high burst rate, which makes it ideal for insect photography, however you can also use it for close up and macro photos of flowers and still life subjects.

Like all Nikon dslr cameras the D7000 is a top quality camera that is made out of high quality materials and contains great optics, which means this camera is built to last and is capable of capturing some stunning photographs. If you prefer Nikon branded cameras and need a camera that has a high burst rate the Nikon D7000 is a camera you should look at.

Top macro lenses to get the most out of your macro photography

Macro lens When taking macro images you have to remember that you need a decent macro lens to get the most out of your best camera for macro photography. Macro lenses are prime, i.e. a fixed focal length, fast and very sharp. The image quality of all macro lenses is simply stunning and you won’t be disappointed with any of them. Macro lenses are available in a range of focal lengths from 50mm to 150mm so there is something for all types of macro subjects. Below are the best macro lenses currently available.

Top Canon macro lenses


Canon 100mm f2.8L IS USM macro lens

If you shoot a canon dslr camera the Macro lens of choice is the Canon 100mm f2.8L IS USM lens. With a 100mm focal length this lens has a large working distance, i.e. distance between the end fo the lens and the subject, which gives you a lot of room to move and also makes lighting that much simpler.

Being an L series Canon lens the 100mm f2.8L IS USM is bullet proof and built to last. The image quality is second to none and many photographers claim it is Canon sharpest lens of all, and I have to say I agree. The image stabilisation technology helps to keep camera shake at bay, and this technology works exceptionally well. If you want the best macro lens to go on your best camera for macro photography the Canon 100mm f2.8L IS USM lens is the lens to buy.

Nikon lenses for macro photography

Nikon 105mm f2.8G ED-IF AF-S VR macro lens

If you shoot a Nikon dslr camera the top end macro lens is the Nikon 105mm f2.8G ED-IF AF-S VR lens. This top quality lens is simply awesome and if you are serious about your macro photography this is the lens to buy.

The build quality is great, the image quality is amazing and boy, this is one sharp lens. In fact, many people consider it Nikon’s sharpest lens and I would have to agree. This lens produces images that are tack sharp from the centre to the edges.

The 105mm focal length gives a big working distance, i.e. distance between the end of the lens and the subject, which makes it perfect for insect photography, although this lens can obviously be used for taking macro images of flowers and still life subjects as well. The vibration reduction “VR” technology keeps camera shale at bay and ensures images are tack sharp at all times.

If you want the best Nikon branded macro lens for your Nikon camera you have to have the Nikon 105mm f2.8 lens. It really is an awesome lens that won’t disappoint.

Top Sigma macro lenses

If you want an alternative to a Nikon branded or Canon branded macro lens there are a few third party manufacturers out there, but the best is Sigma by far. Sigma has some excellent lenses and all of them are available in both Nikon and Canon fit.

Sigma 105mm macro

Sigma 50mm macro

Sigma 70mm macroSigma 70mm macro

Varsha, My Photography Journal

Varsha, My Photography Journal

Backtracking my photography learning process through a model

I decided to seriously learn photography back in December 2011. I purchased my first digital camera, which was Sony NEX-3, and started to read some photography books. Until today, I have participated in three professional photo shoots and five photo exhibitions. One of the most remarkable person during my learning period of this art is Varsha.

Varsha was my first “unofficial” model. I practiced a lot of basic theory and concept of capturing image with her as the main subject. Sometimes I asked her to pose, but most of the times I took her pictures in candid. Indeed, the photos of Varsha show the progress of my photography learning skill, from a real newbie until now. In this article, I would like to share some of my photographs of Varsha. Please kindly share your comments and feedback about my work.

A story about Varsha

Varsha is a student who studied Bachelor of Arts in Telugu (one of national languages of India) in Hyderabad between 2009 to 2012. She pursued her degree under the scholarship of Indian government in Koti Women’s College Hyderabad. I met her for the first time in 2011 through one of my classmate who also originates from Mauritius.

Varsha is physically very attractive and perfect to be a model for my photos. She is also very friendly, thus it makes me more comfortable in taking her pictures. The first time I took her photo was during a trip to Medak, a remote district about three hours driving from Hyderabad. At that moment, I felt that her face was very camera friendly. Therefore, I decided to take her photos regularly as a part of my learning process.

Varsha originates from Mauritius, a very beautiful island, a paradise on earth. Mauritius is located on the south east of the main continent of Africa. This country is full of amazing beaches, beautiful jungles, and wonderful people. Most people in Mauritius have Indian blood, and they speak French as the first language. I worked with Varsha in two different photo shoot, both of them when my skill was at very newbie level.

Photoshoots with Varsha

I spent a lot of time with my Mauritian friends because they are very good people and student. They invited me a lot to have some lunch, and we went out together to watch movies, concerts, and other interesting spots in Hyderabad. The first time I seriously took photos of Varsha was in November 2011, when I and three of my Mauritian friends (including Varsha) watched Zeb and Haniya concert in Ravindra Bharati, Hyderabad. At that moment, I successfully captured some very great candid photos of her.

After being able to take a bunch of great photos, I successfully convinced her to be a model for my photo shoot titled “The Night Song”. It was my very first photo shoot that I did only two weeks after I purchased my first DSLR camera. She performed surprisingly above my expectation. Her photos that I took during “The Night Song” were really great, and some of them were even selected for my international exhibition in Hong Kong and Singapore.

Another moment when I successfully captured great images of her was during Ugadi, one of the traditional festival for South Indian community. She dressed in saree very nicely, and we went to the temple and visited a lot of friends and relatives who celebrated Ugadi. During our trip, I took a lot of beautiful candid photos of her.

About two months after Ugadi, we worked for our second photo shoot titled “The Mystique of Love”. It was done for my photography assignment in my course and located in landscape garden, Osmania University. The photo shoot was rather challenging for me, compared to the first one due to the technical aspects and my lack of experience as a photographer. But from this work, I really learned a lot of useful things in photography.

Varsha finished her course in summer 2012 and went to her country immediately. Unfortunately, I didn’t have the chance to say my last goodbye and to take more photos of her because I was abroad.

Some tips to improve your photography skill

Try to take photos every day
More photos you take, the better your skill in photography. If you really want to be a good photographer, try to allocate at least half an hour per day for hunting pictures. By taking a lot of good photos, your technical skills, experience, and sensitivity as a photographer would improve. One more thing, try to think this habit as something fun, not as a boring responsibility.

Spend some time to review and select your best photos
Among of those photos you take regularly, you have to carefully select which photo to keep and which to delete. Be selective, and don’t hesitate to delete not so good photos. If you want to publish them in social media or online album, then you have to be more selective. Only publish your best photos, or the one that has special meanings for you.

Use a prime lens
Instead of zoom lenses, it is better to start learning photography by using prime lenses. Prime lenses will make you use your legs more in order to make the subject closer or farther from your camera frame. They don’t have zoom feature so you are forced to move a lot when taking images. By using prime lenses, you will learn how to depend more on your body and eyes rather than the zoom.

Learn to use manual focus
Manual focus is the best way to get the perfect focus. Although in modern days some autofocus of an expensive camera also performs well, but nothing can beat the accuracy of manual focus. Thus, learn to take photos with widest aperture as possible (to enable you detecting the focus point more easily), choose a single subject, then try to get the best focus of a specific part of the subject.

Focus on the eyes of the subject
After learning the principle of focusing, it is advisable for a beginner to practice with a living subject such as human and animal. At your very first few weeks of learning, try to take a close-up photos of the face. When taking photos of living things, the most important thing is to make sure that your camera focus is on the eyes of the subject. When you do it right, your photo will look better.

Things to Do With Pictures

Things to Do With Pictures

What Fun Stuff Can You Do with All of Those Pictures?

You’ve made the step and gone to digital photos. You can view them on your computer, e-mail them to friends, and take them to the store to get prints or maybe even print them at home. But after that you think, what can I do with these images that would be fun or interesting? How else can I enjoy them?

Well, let’s talk about that. There are a lot of great products, activities, services and more that will allow you to use those digital images in so many ways. Read on to learn more.

Photo Sharing Sites That Offer More

Photo sharing sites give you a place to keep your photos, a place to share them. However, some photo sharing sites offer more things to do with pictures. Shutterfly.com for instance also allows you to make a variety of things using your photos. Photo books, cards, calendars, coasters, tote bags, mouse pads, stickers, canvas prints, mugs, key rings, ornaments, puzzles, keepsake boxes, address labels, and notebooks are just some of the options.

Scrapbooking and collages are another creative way of dealing with your photos. Photomix, Google’s Picasa, Snapfish, and ScrapBlog are just a few that offer this ability.

Get Some Motion from Your Pictures

If you remember the little books you made as a kid by drawing a series of pictures in sequence, stapling them together, and then flipping through them to simulate motion, then you understand this concept.

This is another one of those fun things to do with pictures; make your own, more adult, version of these flip books. There are a number of sites that can produce some pretty nice flip books either from a series of digital photos or the still images grabbed from your camera’s video recordings. Flippies, Glitterfy, and FlipClips are just three of the options.

Of course there are also a number of tutorials out there to help you if you want to go it on your own. Two of the most useful that can be found are at a blog called The Curious and another called Short Courses.

If you’d like to make a 3-D movie from your images you can try Make3D but if you want to make a movie with some great music added you can try Animoto or even Google Picasa.

Wacky Things to Do With Pictures

Your pictures may be sentimental, they may be precious, but they should also be fun. At CaptionBubble you can make a joke of almost any picture by adding captions just like you see in cartoons.

There are a number of fun services at Flickr based BigHugeLabs. You can make a magazine cover, add captions, or make motivational posters among other things with your images.

If you want to really get silly, you can also use a number of sites to distort photos to create that “house of mirrors” effect. Sites like Gooifier allow you to do this without having to even download anything. Or perhaps you would rather insert your face, or the face of someone you know, into a well known picture, on the body of another person, or somewhere else where it doesn’t belong at FaceinHole. However, if you want a lifesized cutout of someone you’ll need to go to PhotoCutOuts or to get a caricature, visit osoq.

If you have kids, another kind of cool project can be found at FlattenMe where you can use your kids pictures to insert them into existing books. Suddenly your son or daughter can be the main character in the storyline.

Getting Artsy with Your Photos

There are a number of more artistic things to do with pictures. Various sites will allow you to change your favorite photos into works of art. PhotoWow can give you some great looking pop art of your favorites, while PhotoFiddle gives you even more options for the style of art you prefer; oil paintings, watercolor paintings, abstract collages, and so forth.

A site called ReColored allows you to colorize your black and white photos. On the other hand, if you just want a photo enlarged and placed on canvas to hang on the wall, you can try CanvasRUs.

For those who prefer a line drawing, there are a number of tools to help get the job done. Here is a Photoshop tutorial for doing just that.

Be Sure You Put Your Photos Best Face On

Digital photo frames have become more interesting and more affordable in the past few years. They offer larger screens with higher resolution in many instances, allowing you to enjoy your photos in their most vibrant splendor. These modern frames are capable of storing more images and can be set up to display slideshows so that you can enjoy more of your photos.

In addition, some frames offer filters for special effects, the ability to add music for a full presentation, and remote controls for convenience. Digital photo frames really are the best way to capitalize on the digital nature of your photos. Because fading won’t occur with the digital file and those images will always be at their best, this is one of the smart things to do with pictures.

Portable Digital Devices That Let You Enjoy Your Pictures Everywhere

A digital camera gives you that potential connection with the other modern devices you may own. Clearly, uploading those photos to a media player or other portable device allows you to take those images with you to share with others or to enjoy while you’re out and about.

On the other hand, some of the traditional ways of enjoying printed images aren’t lost just because you’ve gone digital. In fact many of these just got better because you can tote along more images with less bulk when your photos are in the digital format. For instance, an old picture wallet could hold a handful of 2×3 photos before it became an unwanted bulk. A digital photo wallet on the other hand allows you store many times more pictures and it’s size doesn’t change. Aside from true wallets, there are also wallet sized digital photo albums that are easy to take along; they’re definitely a much lighter load than a traditional photo album which is three or four times the size.

Another item to keep your pictures close at hand is a digital photo keychain. These are affordable little devices and they don’t require much technical knowledge to use. They do best in displaying up close, portrait type shots due to the small screen size but they’re definitely a fun little gadget.

Editing: Making Those Photos Look The Way You Want

Many of us don’t go out and buy the more sophisticated editing tools that are available but instead use whatever came with our camera. However, editing is among the best things to do with pictures if you want to enjoy them.

There are some sites out there than can help you do things with pictures that are a bit fun. Picnik is one of those sites. It allows you to do some editing, which includes adding interesting borders, effects, shapes, and fonts to spice up your images. Of course, one of the best things is that you don’t have to download anything to your computer or take a course to understand it.

Of course there are other online photo editing tools such as FotoFlexer and SplashUp.

Another possibility is to study up a bit and consider some photo editing software to really get the most from your pictures.

The Story of Dragon and Angel – My Photographs of Two Contrasting Beauties

The Story of Dragon and Angel – My Photographs of Two Contrasting Beauties

The Story of a Dragon Princess and an Angel

In this article, I would like to tell a story of my third photo shoot project in India titled “The Story of Dragon and Angel”. I did this work just a month after I published my photography work titled “The Dragon Princess”. This is a sequel of my previous work, and my main idea was to expose two different types of beauties those are contrasting each other.

Compared to the previous photo shoot, I felt that the photos I created are more satisfying. I tried different techniques that I’ve never tried before and went a little bit more extreme in post-processing the images. Besides the photographs, I also want to talk about my concepts and preparation of this photo shoot. I am looking forward for your feedback and comments, as always.

The concept

A little story behind the photo shoot
The Story of Dragon and Angel After publishing my first photography work titled “The Dragon Princess”, I felt that I wanted to create something more impressive. Thus, I came with the concept of juxtaposing two different kinds of beauty; the traditional and the modern style. However, I still wanted this work to have relation with my previous work because I felt there was something “unfinished” from the story of The Dragon Princess.

Thus, I contacted Pema, my classmate from Bhutan who is also the model of the previous photo shoot. I explained about her concept, and asked her whether she has a friend who is suitable with my concept. Then she introduced me to her friend, Disket, Disket is a lovely young lady from Ladakh, a region in the northern part of India. At that time she was still studying in of one of the most famous law schools in Hyderabad.

I talked to Disket about my plan. At that time, three of us were in the middle of our final year examinations, each of us planned to leave Hyderabad right after finishing our exam. Tbus, finding the date for the photo shoot was a little bit difficult as we have very limited time. After long discussion and considering various options, we decided to do the photo shoot in between our exams.

Technically, I didn’t do much preparation for this photo shoot. I just made sure that the battery was fully charged, and focused more on finding good references for an outdoor photo shoot with two models. Besides my favorite Canon EOS 550D, I also brought the Sony NEX-3 as I wanted to compare the image quality of those camera.

The Photo Shoot

It was an extremely hot day
The Story of Dragon and Angel

I arrived at the location of the photo shoot on 3.30 PM after a long drive from my place. It was a very hot day, approximately around 36 degree Celsius, not the best weather for an outdoor photo shoot. It was difficult to us to perform at our best due to the hot weather, especially Pema because she had to wore very thick Kira (a set of Bhutanese traditional dress).

I started by taking photos of each of the model individually in various poses. As I did two previous photo shoots with Pema, it wasn’t so difficult for us to work together. Surprisingly, I didn’t have any problem working with Disket at all, as she looked very photogenic and comfortable in front of the camera. After finishing with the individual photos, I moved to the next stage : posing the models together. I found that it was very difficult for an amateur like me to be able to create a good composition with two main subjects on the screen, and the most difficult thing was to determine the good focus point.

As I explained before, I wanted to juxtapose two completely different styles of beauties. So, I projected Pema with her traditional green-colored Kira to be the one that looks tougher and more dominant, beautiful but and has special power, just as the most oriental princesses in the TV dramas. On the other hand, Disket with her white dress should be more feminine and angelic; just as the characteristics of the most Western princesses in a story.

We tried different poses of the model, with flowers, apples, knife, and blue colored liquid in a glass. I tried to create various metaphors with those properties, and compile a story from those photos. We finished taking all of the pictures in three hours, and it took about three days for me to do the post processing of the image before publishing them online.

Tips for doing an outdoor photo shoot on a hot day

Here are some things that I learned as an amateur from doing a photo shoot on a very hot day. Hopefully they are useful for you.

1. If you are not working with professional models, make sure they know each other well
I was lucky because Pema and Disket are good friends, thus they could be more relaxed during the photo shoot. Because they were good friend, the pressures due to the various uncomfortable cirumstances (including the hot weather) became less because they can freely laugh and express their opinion to each other.

2. Bring your portable devices filled with references photos in case you ran out of idea in the middle of the photo shoot
Especially if you are working alone and doesn’t have style director or assistant during the photo shoot. Try to save all of the references photos that you find online a day before the photo shoot in a device that can be easily carried and viewed. For me, I stored those photos in my iPad. Whenever I feel I run out of idea, I just take my iPad out and refer to the images. Note down also various poses that you want to take.

3. Watch the ISO level
In a bright, sunny day, be sure to set the ISO level as low as possible to reduce the image noise. Always set your ISO manually, and I believe you don’t need to go higher than 200 in a hot day. Also try to use light meter to determine the best level of exposure in your camera.

4. Don’t forget to carry a towel and a bottle of water, for you and the model
You will be surprised to know that you require a lot of energy to take photos. You need to move a lot, and this make you would sweat a lot. A towel and a bottle of water could keep you away from dehidration so you would able to work at your best performance.

5. Take rests
No need to be hurry. If the weather is extremely hot, take 10 minutes a break every half an hour or so, to keep you and your model away from exhaustion. Use the resting period to look for the references, review your photos, and talk to the models to make them feel more comfortable working with you.

The Shadow Princess – My Black and White Fashion Photography in Thailand

The Shadow Princess – My Black and White Fashion Photography in Thailand

My Photography Work in Thailand.

The photos in this article were taken during my photography project in Thailand. An art gallery sent me there to do a photo shoot with “Oriental Princess” as a theme. I asked one of my model friend from Bhutan to come along with mein order to accomplish this project. We went there for four night and five days in two different city, Pattaya and Bangkok. I created two series of photo shoot, the first titled “The Empress of Light”, consists of color photographs. The second album, which I want to share in this article is called “The Shadow Princess”, where the photos are darker and were taken in monochrome. Unfortunately, I can’t publish the best photos in this article because they have been published by my sponsor for an art magazine, and should not be published anywhere else. Thus, I could only present some of the photos that weren’t selected by the magazine. Hopefully you like them, and I’m looking forward to your feedback.

The Idea, Planning, and Creating the Concept

My Experience Working in Thailand

We were given only four effective days to work, and as an amateur photographer I found the time limit was very strict. Based on my plan, we had to do the photo shoot in eight different location in two cities, including on the beach and in a popular tourist spot.

We didn’t waste any time as we immediately departed to Pattaya as soon as we landed in Bangkok international airport. The journey took about ninety minutes by taxi. I had to say that Thailand has a very impressive transportation system, broad highway that allows the cab to drive in maximum speed without endangering the life of the driver and passenger. As soon as we reach Pattaya, we did our first photo shoot in the hotel. Based on my plan, I would do “The Empress of Light” photoshoot in the morning and afternoon, meanwhile “The Shadow Princess” would be done in the evening, where natural light were no longer exist.

The concept of this album was to present a beautiful, good looking oriental princess with her royal dress. Although the princess is very beautiful, she is also very cold, kind of cruel, and very proud with her royal blood. She is also very smart, emotionless, and can take important decision only based on her logic for the sake of her own kingdom.

It wasn’t very hard to get the concept correctly, as physically the model has a kind of face that fits with my concept perfectly. She named Pema, and we previously had been working on three different photo shoot. She brought her tradtional dress from her country, Bhutan. The dress was very great, beautifully created, and very lavish. It reflects perfectly the royal dress of an oriental princess.

The execution of the photo shoot

We spent the first night at Pattaya in the Southern Beach. To be honest, the beach was not very impressive compared to Bali, Indonesia or Goa, India. The beaches of Pattaya appear to be wilder and more dangerous compared to the other beaches I have visited before. Somehow, the beach perfectly reflects the personality of the shadow princess that I wanted to present in my photographs. The weather on that night was very friendly, and everything seemed to work properly. Thus, I could finish the shoot in less than an hour.
We spent the next day photo shoot in the hotel garden. It was much more easier compared to the photo shoot on the beach, as I had more freedom to experiment with the surrounding lights. I took about sixty pictures to complete the session.

The next morning, we immediately headed to Bangkok for the “real work”. I have visited Bangkok many times, but I felt this time the city was not as friendly as usual to me. The weather was incredibly hot, even at night. It was very difficult for the model to stay in the mood while wearing such a thick dresses in a hot night. The first night where we did an outdoor shoot was very hard, and took about three hours to get the images I really wanted. Thus, in second and third photo shoots I decided to spend more time indoor, in an air conditioned room.

We completed all of our work in our fourth day, then we had one free day to explore Bangkok before returning to Hyderabad.

Some tips based on my experience

Don’t be afraid to take a close-up image
Your photos would be more interesting if you take a close-up shoot of your subject. Don’t be afraid to put your camera in front of your subject’s nose for an extremely close-up result. Black and white photos always have more impact when the viewers feel that there is only small distance between them and the subjects. However, it is recommended using lens that is not wider than fifty millimeters to avoid distortion.

Focus on the eyes
It’s a classic rule that should be understood by any photographer. Any time you take a photo of a person, be sure that the focus of your camera is on her eyes. When you get it right, the photo will look great.

In the low light, most of the time viewing from LCD is more accurate than from viewfinder
For me, I prefer to put the camera on a tripod and view it from the LCD whenever I have to shoot in a low light condition. It is easier to get the focus by looking at the LCD, because there is a magnifying facility to check whether you really get the perfect focus or not.

It’s all about the subject’s expression
Black and white photos would leave more impact to the viewer if the subject shows a strong expression. Whether it is an anger, a cold stare, a wide smile, or tearful face; try to involve a strong facial expression whenever you take a close-up black and white photographs.

The Queen of Fire – My Autumn Photo Shoot Project

The Queen of Fire – My Autumn Photo Shoot Project

A Story About the Worshipper of Fire

I did this photo shoot at the same time I worked on my Halloween photography project, at the same location, with the same model. The only difference is the theme of the photo shoot. In this project, I wanted to create a story of a woman who gains her strength from fire to perform various magic and ritual. I also used some properties such as a dagger and candle to enhance the mysterious atmosphere.

This project was created for my photography class assignment. It was a monthly individual project and has to be submitted to get the certificate. As I had only four days before the date line of submission, the preparation of this photo shoot was very rushed. Fortunately, I managed to get some good pictures.

I wanted to share some of my work in this article, and I am waiting for your comments and critiques about them. Hopefully you like the pics.

The Concept and Preparation

The Lady in Red
I was inspired by Melisandre, the “Red Woman” from Game of Thrones TV series. I am a big fan of this program, and Melisandre is one of my favorite characters. Beautiful, mysterious, hot, wicky, and ambitious; those are the characteristic of the “Red Woman” that I wanted to show in this project.

In order to achieve the scary, mystical, and horror atmosphere; I arranged every elements of the photos in very contrasting composition. The bright, flaming red dress of the model successfully formed a beautiful harmony with the dark lighting, low exposure that can be found in the most of the background of the photos. To enhance the grim, funerel, and horror atmosphere I added some particular properties in the photos such as candle light, knife, and witty mysterious looking doll. This effect is later strengthened by applying blood on the face of the models. The story within the photos can be freely interpreted by the viewers. It can be a story of blood lusting woman, about a girl who performs dark sacrament and turn herself into undead, or maybe a story of ancient ritualof particular clan.

The final result of the combination between the horror, the fashion, and the model is indeed surprising. The photos show a figure of scary, mysterious woman. The models radiate strong horror atmosphere, brings out the feeling of fear to the viewers, reflects her lust for blood; but at the same time she looks very beautiful, attractive, and implies the luxurious gratification of sensuous desires.

Behind the Scene

The process I did for this project

The first time I did for this project was rewatching all the episodes of Game of Thrones where Melisandre strongly influence the plot. I wanted to capture her mysterious beauty and her loyalty to worship the fire. Then I contacted my friend, Dechen, a Bhutanese girl which I found suitable for this role. As I told you that we have very limited amount of preparation, I planned everything almost on the spot.

The location of the photo shoot is only a small room, as I don’t need too spectacular background. I wanted to focus more on the model so I didn’t want the background to distract the viewer’s attention from her. I used two type of lenses for this work, the standard kit lens, and a fixed lens. The whole photoshoot took about three hours, including the make-up and properties preparation. The most interesting thing was an encounter with an old uncle who worked as a professional photographer for National Geographic. He told me that he used to take a lot of photos with his Leica camera, and he gave me a lot of advice about this art.

The post-processing stage was only about an hour. I used Adobe Lightroom, which is very handy for this kind of work. I create an editing template, save it as a preset, then applied to all photos. The next step is just working on the small detail on each photos, which took only about half an hour. In conclusion, I am very satisfied with this project.

My personal photography tips

Some tips to make you enjoy this art more and take better photographs

Be creative
It sounds easy, but kind of hard to do. Being creative is not only about creating something new. It is also about changing the perspective of a people toward something. In terms of photography, creativity connects with innovation. You need to see your subject from different perspective, frame them into an unexpected composition, and attempt to surprise people who view your photos.

Be passionate
Passion is very important in any kind of arts. In photography, you need to have passion if you want to succeed. Try to enjoy every moment of practice and every moment of learning. Think that every time you press your shutter camera button, you are a step closer toward your dream. The more images you click, the happier you are. Thus, if you have passion, it’s only a matter of time to be successful.

It’s not about the camera, but the person behind it
Don’t ever think not to take picture because you don’t have a good camera. Indeed, good camera is important to help you take good pictures, however it is not a compulsory thing. An okay (or even poor) camera can take a lot of beautiful pictures if it is used by a good photographer. In the contrary, a good camera would never create even a single beautiful photo if the person behind it has no passion, knowledge, and creativity.

Always try to have fun in photography
Be happy whenever you take photos, and those photos would make you happy. As simple as that. Have fun, then you could create amazing photography works within no time.

The Night Song – My Tips for Doing Budget Photo Shoot

The Night Song – My Tips for Doing Budget Photo Shoot

The Night Song

Have you ever wanted to create good, artistic photos but you only have limited amount of money? In this article, I would like to share my experience of doing a photo shoot with two models with very limited budget, in a very normal location with lighting from house lamps, and taken with cheapest entry level DSLR. This photo shoot was also my first experience working with models and DSLR camera. Could you imagine how limited was my knowledge about photography during this photo shoot?

I would like to emphasize that the most important thing in photography is not your gears. It’s your passion and creativity, and those two are the best weapon to create great photos. I am also looking forward to your comments and feedback so I could improve my works in the future.

The Concept

The story behind the scene
The Night Song

I bought my first DSLR camera in January 2012. My initial purpose for buying that kind of sophisticated camera was to make documentary of my final Bachelor of Arts research. Just a week after getting my DSLR, I accidentally found a very interesting video about photography on Youtube, from DigitalRevTV. The man in the video seems enjoying himself very much, taking photos of beautiful model with very cheap camera. Suddenly I felt that I wanted to create some photography works too.

The first thing came to my mind was about finding the models. As I was an amateur and didn’t have enough experience of handling DSLR camera, I decided to ask for help from my friends to be the model for my photography project. So, I contacted Nooreen and Varsha, two of my beautiful friends from Mauritius and offered this opportunity. Luckily, they agreed.

I wanted to talk a little bit about the model. Nooreen and Varsha are two students from Mauritius, a very beautiful small island in southern part of Africa. Mauritius used to be a colony of British and France. When the British ruled India, they sent some local Indian workers to work in Mauritius. At that time, there was no people on this island. Only jungles and animals. So, those Indian workers were the first colony in Mauritius, and they live, create a family, and until now inhibit this beautiful island.

After some years, British Empire decided to give Mauritius to France. Thus, under France regime, those Mauritian workers have to speak in France. The habit of speaking France has become a culture, even after their independence. Today, France is the national language of Mauritius.

I find that Mauritian people such as Nooreen and Varsha are the luckiest people in the world. They have beautiful, exotic face from their Indian ancestors. They speak Franch, the most beautiful, sexiest language in the world. They inherited the education and political system from British Empire, which is very systematic. Plus, they live in a small island with very beautiful nature; beaches, mountains, and jungle. What a very fortunate nation!

Back to the story of the model. Nooreen and Varsha are very good friends. They live together, study in the same college, and they understand each other very well. I wanted to use these facts to help a strong, artistic, and memorable photos. Thus, I decided to create a theme about intimate relationship between two women.

The Photo Shoot

The execution of the concept

As I told you before, I didn’t have any experience for doing photo shoot with any DSLR camera at that time. Thus, I wanted to focus more on the concept and messages of the photos rather than the technical aspects. I wanted to work as comfortable as possible, so I decided to do the photo shoot in Nooreen and Varsha’s house, in their small living room. I didn’t want to do it outside, because I thought that it was my first experience, and I didn’t want to embarass myself and the model.

The photo shoot took about three hours and it would be faster if I had more practical knowledge about DSLR camera. I spent a lot of unecessary times to adjust the ISO, control the focus, and set the exposure. I did all in manual mode, as I didn’t aware that the Aperture Priority mode would work more efficient. One of my most stupid mistake in this photo shoot was the fact that I forgot to turn on the Image Stabilizer, and at that time I didn’t even have a tripod. Luckily, I was able to take some good shots, and it took me about three hours to select, edit, and publish the photos.

Black Kimono for B&W Photoshoot

Here are some great kimono, a traditional Japanese dress for black and white photography. The wardrobe of the model is very important, especially if you later want to convert the images into monochrome. I strongly suggest that you find some dress with interesting pattern, especially for a photo shoot with plain background. Be sure to find a dress that looks cute and elegant.

Tips to do budget photo shoot

1. Find a strong, solid concept that can be executed in an empty room
Instead of focusing on the properties of the photo shoot, you should focus more on the model. Exploit your creativity and push it to its limit so that you can create good photos by only framing the model and a plain background. For this concept, you will need model who has strong, memorable expression. If the model also have beautiful and exotic face, it would be very helpful as well.

2. Try to find good references
Watch videos, read books, or go to photo exhibition. Read also about various article and tutorial about creating beautiful photos with cheap camera and limited budget. I strongly recommend that you watch “Pro Photographer Cheap Camera Series” from DigitalRevTV channel on Youtube.

3. Make it black and white
Black and white photos always appear to be more artistic, and by desaturating the color you can focus more on the subject. Simple photos with an empty background also look better in black and white rather than in color. For a better result, you can play with the contrast, brightness, exposure, and clarity of the photos during the post-processing.

4. Remember, your passion and creativity are more important than the physical aspects of the photos
It is you who can make the photos look great. Not the camera, not the place of the photo shoot, and not the dress worn by the models. Of course they will help you create something better and more beautiful, but remember that your passion and creativity are your main weapon.

The Black Dresses

Here are some alternative dresses that would be suitable for your model if you are planning to do a simple photo shoot with plain background. My advice: don’t choose a type of dress that has too much distracting patterns. Try to stick with a type of dress that look simple, elegant, and slightly hot.

The Mystique of Love – My Photography Class Project

The Mystique of Love – My Photography Class Project

My Experience Doing Outdoor Photoshoot at Night

I joined a photography class for beginner in June 2012 to learn the basic knowledge of this art. At the end of two months course, they gave an assignment to make a photography album consists of at least ten photos. There should be a meaningful story in the album, and the theme of the story is about Indian culture. There is no restriction for the subject of the photos and we should be able to finish this project within one week.

Thus, I decided to do this work, titled “The Mystique of Love”. I worked with two models (actually, they are my friends) to create a story about Indian culture. In this article, I wanted to share some of the photographs for this assignment. I am looking forward to your comments, feedback, and opinions.

The Preparation and Concept

It’s should be about “India”

Creating a photo shoot with a specific theme is not an easy work. You need to allocate a lot of time to do proper research, planning the costumes, locations, and poses. Moreover, I only had one week before the date line of this project. So, I contacted Nooreen and Varsha, two of my friends from Mauritius whom I worked with in a previous photo shoot titled “The Night Song”. I requested their help to participate in this project as models, and luckily both of them had completed their exams, so they could help me.

The story of these photos was created based on a traditional Indian folklore, about a painter who brings her subject to life with a magic power. For this project, I wanted to combine the modern as well as the traditional aspects of Indian culture. Thus, one of the model would wear a modern shirt, symbolizing a modern, liberal woman in the society; and one of the model would wear a traditional “saree”. I also wanted to capture both of the models in a frame, but they should not be aware of other’s existence. There should be no direct contact between the model, just as they live in different dimensions.

The Execution of the Concept

It’s more challenging than my other photo shoots.

To be honest, the pressure to do this work was much higher compared to my other works. It was because a requirement to get at least “B” for this assignment, otherwise I won’t be qualified to get the certificate. I was forced to think some very different concept that I have never done before, and this one should be better than my previous works.

I decided to do something different by doing an outdoor photo shoot at night. We went to Landscape Garden in Osmania University to get the “forest look” for these photos. Unfortunately, we had only less than an hour to complete the work because the garden were closed on 7 PM. I worked in a rush to complete my plan, before moving to another location.

The next location was just outside the garden, near a small tree. I wanted to create some “mythical” and “dream-like” environment without having to work with Adobe Photoshop. So, a tree under the orange bright light of street lamp would be suitable for this concept. Everything seemed well until a group of man who live in that area came and approached me. They watched from faraway, whistled to the models, said something in their local language, and laughed. Thankfully, me and the models did not understand their language, so we could carry on. Nonetheless, it wasn’t the most comfortable condition to work, for both the photographer and the models. Thus, I had to finish the photo shoot as soon as possible to avoid worse situation. Fortunately, we could finish our work in forty five minutes.

I submitted my photos the next morning, and I was very happy to know that they met the requirements of the course. I got a good mark, and happily received my certificate,

Tips to do an outdoor photo shoot at night

If you are a beginner photographer, try to avoid it
Technically, doing an outdoor photo shoot at night is a very difficult thing, especially for newbie. You will need a very good digital camera that enables you to shoot in high ISO without too much noise in the photo. Sometimes you will also need a very good lighting, as the default camera flash is not good enough for any serious photography work. So, if you can find another theme, just avoid to take photo in this condition.

Tripod is a must
You need to make the camera to be stable because small shakes can make your images to be blurry and out of focus. Even with a tripod, this happens a lot. So, tripod is a compulsory thing for any low-light photography.

Think about the environment
Be sure that the place you are going to do the photoshoot is a safe place. Try to do it in a family garden, tourist spot, or university park. Never try to do this kind of work in an unknown place, where you don’t know exactly who is its owner. Always have an assistant, and it would be better if the assistant is the local resident where you do the photo shoot.

Always set your camera to the best image quality
It is recommended taking the pictures in RAW format, so that later you have more freedom to work with the exposure. Post-processing is a vital work whenever you take photos in the dark. You might want to crop, desaturate, or highlight them. Thus, you should always select the highest resolution and highest image detail.