Chinese, Korean, and Japanese Tiger Art

Chinese, Korean, and Japanese Tiger Art

Welcome to this lens dedicated to the tiger art of China, Korea, and Japan! Tiger art from these three countries has become famous all around the world and many tiger paintings, sculptures, statues, and other forms of art have been made in these countries over the centuries. Many have been purchased by art collectors the world over.

In this lens we’ll study the tiger art from each country, the characteristics of tiger art in these countries, and the meaning of the tiger in the traditions and folklore of China, Japan, and Korea.

Thank you for your visit and I hope you find this lens informative!

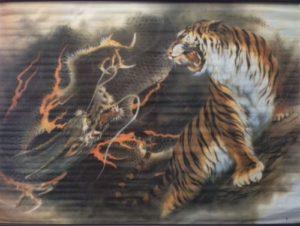
Lens intro image: Edo-period Japanese artist Utagawa Kuniyoshi’s (1797-1861) tiger print. Image used courtesy of Visipix.com

Table of Contents

Korean Tiger Art
Chinese and Japanese Tiger Posters on Amazon
Chinese Tiger Art
Japanese Tiger Art
Kishi Ganku Tiger Painting
Tiger Statues and Sculptures
Tiger Tattoos
In Conclusion
Tiger Art Link List
From the Same Author
New Guestbook

Korean Tiger Art

Traditional Korean Minhwa (folk) painting of a tiger and a magpie. In Korea, tiger art has been very popular over the millinea, especially in traditional Joseon-era Korean folk art (known as “Minhwa”).

Tigers made some of their earliest appearances in Koguryo paintings where they were being chased down by archers on horseback. Many of these mural paintings can still be found today on Koguryo-era temple walls in modern-day North Korea.

Tigers are an important character in traditional Korean beliefs and folklore and the mythical white tiger is traditionally the guardian of the East. Until the 1920s, the Siberian white tiger called Korea home and the tiger is mentioned in the creation myth of Ko-choson, which is one of Korea’s first dynasties. Tigers are one of the most common and prominent subjects of folk paintings, and are often portrayed as being friendly, approachable, and even silly or stupid. This stands in contrast to the artwork of most other countries where the tiger is portrayed as being an intelligent, proud, and fierce animal! In many folk paintings, the tiger is a companion to the mountain spirits. Many Korean folk paintings feature a magpie (a bird that’s considered to be an auspicious omen and a bearer of good news) cackling at a tiger, or the tiger with a lion or rooster. Tiger skins were also painted by minhwa artists and were much more affordable to the common person than real tiger skins. These paintings were supposed to invoke the tiger’s guardian powers.

However, the tiger also has more serious portrayals in Korea. Many Koreans believe the tiger is a mountain god that can determine the fate of a person. Also to many Koreans, the tiger is the guardian spirit of Korea. Tiger decorations can be found in many Buddhist temples and shamanistic ritual sites across Korea and tigers are also found on mural walls of many of Korea’s ancient kingdoms such as Koguryo and Paekche. And of course the tiger has also been the silly, clumsy animal in many a Korean folk painting and folktale.

In 1988, the tiger took on a new significance for Koreans when a tiger was chosen to be the mascot for the 1988 Seoul Summer Olympics. The tiger was named Hodori (derived from “horang-i dori,” or “boy tiger,” in Korean) and he was featured on many an Olympic souvenir item that year! There was also a female tiger named Hosuni, but she was rarely used.

Chinese and Japanese Tiger Posters on Amazon

Here are some nice reproductions of the famous Chinese and Japanese tiger paintings of centuries ago (as well as some modern-day artwork) available in poster format from Amazon:
Chinese Tiger Art

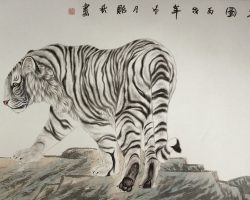
A Song Dynasty, Shaoxing Period-era (1159 AD) illustration of a tiger from a medical book. In Chinese culture, the tiger is revered as a creature of great courage, prowess, and beauty. It is the king of the wild and is a creature of masculine principles. The Chinese tiger has the power to drive away demons and ghosts and brings good fortune and luck to all those who keep its image close at hand. Furthermore, the tiger represents the basic drive to progress, achieve, and succeed. Also according to traditional Chinese beliefs, a tiger lives to be 1,000 years old and when it reaches the age of 500, it turns white. Therefore any tigers in Chinese white tiger artwork are said to have passed the age of 500 years.

Tiger statues dating back some 7,000 years have been found in China and tigers are carved on many a tomb or monument. Many of the Chinese deities and legendary figures such as the Taoist “First Master of Heaven” Zhang Daoling, the God of Wealth Chao Gongming, and (occasionally) the mythological exorciser/ghost vanquisher Zhong Kui are often depicted riding a tiger in Chinese art.

For all these reasons, Chinese tiger art is displayed prominently in many Chinese businesses, offices, and homes. In addition, tigers appear on children’s clothing and many women in southern China place paper tiger images in their homes on the birthday of the tiger (March 6th, or the second moon of the lunar calendar) to prevent quarrels and to keep vermin such as snakes and rats away.

In Guizhou province, many of China’s ethnic minorities such as the Miao incorporate tiger motifs into batik artwork. Many of these pieces are very stunning and intricate.

Tiger paintings in China can range from folk art paintings to simple watercolors to modern paintings most people nowadays associate with the Chinese tiger. All of these paintings have one thing in common: they capture the ferocity and gracefulness of the tiger for all to see!

Japanese Tiger Art

Tiger art is also prominent in Japanese culture. The white tiger in particular is a common motif in Japanese paintings and artwork due to its status as a deity in the Shinto religion. Ironically enough, tigers aren’t native to Japan, which is why many Japanese artists from centuries past copied their works from the Chinese paintings.

Three Japanese artists who became particularly famous for tiger paintings during the Edo period were Kishi Ganku (1749 or 56-1839), Maruyama Okyo (1733-1795), and Katayama Yokoku. Ganku had the head of a tiger which became the basis of many of his paintings while Okyo had a tiger pelt which made drawing a tiger’s skin very easy. Yokoku’s paintings often depicted tigers as a traditional symbol of strength, and the tigers in his paintings are often shown emerging from bamboo.

In addition, other prominent Edo-era Japanese artists such as Okyo’s student Kameoka Kirei (1770-1835), Ganku’s son-in-law Kishi Renzan (1805-59), Kano Tsunenobu (1636-1713), and Katsushika Hokusai (1760-1849) painted some very famous tiger paintings. Hokusai’s “Old Tiger in the Snow” and “Running Tiger” as well as Kirei’s “Tiger Looking to the Moon” are staple Japanese tiger paintings from this period.

The popularity of tiger art continued during the Meiji era (1868-1912) in Japan. Artists such as woodblock (Ukiyo-e) artist Koson Ohara (1877-1945) made some amazing tiger paintings and woodblock prints during this period.

Since tigers are not native to Japan, it was not very easy to find a live tiger to get all the facial and body features down exactly as it was in China. However, there was an abundance of tiger skins and the Japanese artists of the time often based their paintings on these skins. This is why in many of the paintings the tiger’s skin is beautifully accurate, but in other paintings the tiger has a flat nose, abnormally large eyes, large paws, and small ears!

Tigers were also frequently used on the banners and wall paintings of samurai, to whom the tiger represented ferocity, strength, courage, and stubbornness, as it still does to the Japanese people to this very day.

Today tigers are still painted by many Japanese artists both on canvas and brush and in modern-day computer vector drawings. These artists have picked up where artists of centuries past such as Ganku and Okyo have left off!

Kishi Ganku Tiger Painting

This is one of Kishi Ganku’s paintings of a tiger. Notice the flat head and small ears on this tiger. This is very typical for Japanese tiger paintings from that period of time.

Tiger Statues and Sculptures

In addition to paintings, tiger statues and sculptures are commonplace in China, Japan, and Korea. Generally speaking, the statues and sculptures have all the same meaning as the paintings, but some have had and still have traditional uses.

In Japan during the Edo Period (1600-1848 AD), small tiger dolls made of papier mache known as Harikonotora were carried by travelers on the Tokaido highway. These were especially popular among samurai lords who believed the tiger could travel a thousand miles with ease and the dolls would inspire his entourage to do the same. Also many years ago in Japan, small tiger sculptures were given to boys on Boy’s Day (now known as Children’s Day) as a token to protect them from evil spirits and to foster growth and maturity.

Tiger Tattoos

Chinese and Japanese tiger art designs are very popular tattoo designs. Generally speaking, tiger tattoos can be found in virtually every country in Asia and have been for many centuries. However, Japanese tiger tattoos (i.e. tattoos with Japanese tiger designs) are the most popular and prevalent of all the tiger tattoos.

Tattooing in Japan has a very complex history that would take a very long time to explain on this lens. The popularity of Japanese tiger tattoos in particular stem from the tiger paintings described above. The tattoos drew inspiration from the Chinese and Japanese tiger paintings described above. However, it wasn’t until toward the end of the Edo period that tattooing became popular in Japan. The tattoo designs that have become famous over the years were widely influenced by the Ukiyo-e (traditional Japanese woodblock art) prints of the time. Another source of inspiration were the Chinese tiger paintings of the time. After seeing these elaborate paintings, many people – Japanese and non-Japanese alike – were inspired to have tattoos of these drawings drawn on their bodies.

During the 17th century or so, tattooing in Japan became both taboo and forbidden by law due to the popularity of Chinese culture in Japan and the popularity of tattoos among the underclass and the Yakuza mafia syndicates. Laws prohibiting tattoos in Japan were lifted after 1945, but this taboo still exists up to the present day. Despite this traditional taboo, a growing number of young people in Japan are becoming more and more open-minded about tattoos and getting some of their own.

The tiger in the tattoos often represent power and dominance. A resting tiger may represent dominance whereas an attacking tiger may represent power and aggression. This symbolism has made the tiger tattoos very popular in Asia over the centuries.

In Conclusion

Tiger have been a part of Chinese, Japanese, and Korean cultures for almost as long as they’ve been in existence. They’ve been in the artwork of these countries for many thousands of years and hopefully will remain in their artwork for many more centuries to come!

Thank you for stopping by and please come back! I will update this lens when time permits. Please remember to check in again for any new updates!

All images copyright: Wikimedia Commons.

Tiger Art Link List

You can read more about Asian tiger art and art from Asia in general at the sites below:

Japanese Tiger Art
Interested in tiger paintings from Japan? Be informed about the various mediums in which the Japanese have produced Japanese tiger art.

Tiger in Chinese culture – Wikipedia, the free encyclopedia
Wikipedia entry about the tiger in Chinese culture.

Chinese Tiger Art
The tiger has been a potent symbol in Chinese art throughout the history of the nation. The animal is one of the twelve characters of the zodiac calendar. As such the tiger is considered to have an authoritative personality that is considered to be t

About Korean Paintings
Another resource for Korean art that’s very in-depth and reliable.

Japanese Tiger Statue – The Old Tokaido
Blog entry about Japanese tiger statues.

Korean Focus eBulletin: White Tiger to Roar Loud and Proud in 2010
Very fascinating and in-depth article about the tiger in Korea and its place in Korean beliefs, culture, and society.

Japanese tattoos – what do they mean? Japanese Tattoos Designs & Symbols – Japanese tattoo meanings
Japanese tattoos – what do they mean? Tattoo Designs & Symbols – Japanese tattoo meanings

Japanese Tiger Tattoos
Interested in a tiger tattoo from Japan? Discover the age old traditions associated with Japanese tiger tattoos.

Tigers in Japanese Art at the Saint Louis Art Museum
Article about Japanese tiger art and the artists who painted them.

The Beautiful Oriental Art of Koson Ohara
Very comprehensive site about Koson Ohara. Featured on this site are a biography and many of his paintings.

The Asian History Blog
A new blog from yours truly pertaining to the history of Asia.

From the Same Author
While you’re at it, I would appreciate it very much if you would check out some of my other lenses related to Asian culture! All feedback on these is greatly appreciated.

The Sony Action Camera Users Are Loving Right Now

The Sony Action Camera Users Are Loving Right Now

We all know that Sony makes great cameras. But did you know that they also make some of the best action cameras on the market? That’s right, Sony’s line of action cameras are loved by users for their great image quality, rugged design, and easy-to-use controls.

If you’re in the market for a new action camera, then you should definitely check out Sony’s offerings. In this article, we’ll take a look at some of the best Sony action cameras on the market right now.

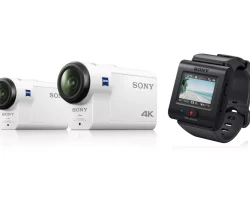
Sony FDR-X3000

The Sony FDR-X3000 is one of the best action cameras on the market right now. It’s got 4K video recording, SteadyShot image stabilization, and a wide-angle Zeiss lens. It’s also got built-in Wi-Fi and NFC for easy sharing of your videos and photos.

Sony HDR-AS50

The Sony HDR-AS50 is another great action camera from Sony. It’s got Full HD video recording, a Zeiss lens, SteadyShot image stabilization, and built-in Wi-Fi and NFC. It’s also got a waterproof housing that’s good for depths up to 30 meters.

Sony FDR-X1000V

The Sony FDR-X1000V is another great action camera from Sony. It’s got 4K video recording, a Zeiss lens, SteadyShot image stabilization, and built-in Wi-Fi and NFC. It’s also got a waterproof housing that’s good for depths up to 60 meters.

Sony HDR-AS200V

The Sony HDR-AS200V is another great action camera from Sony. It’s got Full HD video recording, a Zeiss lens, SteadyShot image stabilization, and built-in Wi-Fi and NFC. It’s also got a waterproof housing that’s good for depths up to 30 meters.

Sony HDR-AS100V

The Sony HDR-AS100V is another great action camera from Sony. It’s got Full HD video recording, a Zeiss lens, SteadyShot image stabilization, and built-in Wi-Fi and NFC. It’s also got a waterproof housing that’s good for depths up to 30 meters.

These are just some of the great Sony action cameras on the market right now. If you’re in the market for a new action camera, then you should definitely check out Sony’s offerings.

The Best Video Cameras For Capturing Action In Low Light

The Best Video Cameras For Capturing Action In Low Light

It’s that time of year again. The weather is getting colder, the days are shorter, and the nights are longer. That can only mean one thing: it’s time to start thinking about the best video cameras for capturing action in low light.

There are a few things to consider when choosing a video camera for low light use. The first is sensor size. A larger sensor will be able to gather more light, resulting in better low light performance. The second is the lens. A faster lens (one with a lower f-stop number) will also gather more light and result in better low light performance.

Best cameras for low light

With those factors in mind, here are our picks for the best video cameras for low light:

Sony a7S II

The Sony a7S II is a full-frame mirrorless camera that features a 12.2-megapixel sensor. It’s capable of capturing 4K video, and it has excellent low light performance thanks to its large sensor and fast lens options.

Panasonic Lumix GH5

The Panasonic Lumix GH5 is a Micro Four Thirds camera that features a 20.3-megapixel sensor. It can capture 4K video at 60 frames per second, and it has excellent low light performance thanks to its large sensor and fast lens options.

Canon EOS 1D X Mark II

The Canon EOS 1D X Mark II is a full-frame DSLR that features a 20.2-megapixel sensor. It can capture 4K video at 60 frames per second, and it has excellent low light performance thanks to its large sensor and fast lens options.

Nikon D5

The Nikon D5 is a full-frame DSLR that features a 20.8-megapixel sensor. It can capture 4K video at 30 frames per second, and it has excellent low light performance thanks to its large sensor and fast lens options.

Sony Alpha a9

The Sony Alpha a9 is a full-frame mirrorless camera that features a 24.2-megapixel sensor. It can capture 4K video at 30 frames per second, and it has excellent low light performance thanks to its large sensor and fast lens options.

Tips to choose cameras for action sports photography

In fact, many professional photographers use mid-range or even entry-level cameras to capture amazing action shots. The key is to know how to use your camera and its features to get the most out of it.

Here are a few tips on how to choose the best video camera for action sports photography:

Look for a camera with a fast shutter speed. This will help you capture sharp images of fast-moving subjects.

Choose a camera with good low-light performance. Action sports often take place in low-light conditions, so a camera that can perform well in these conditions is essential.

Consider a camera with 4K video
capabilities
. 4K video is becoming more and more popular, and action sports photography is the perfect genre to take advantage of this high-resolution format.

Look for a camera with built-in GPS. This can be helpful for tracking your location and adding GPS data to your photos and videos.

Choose a camera that is rugged and weather-sealed. Action sports can be tough on equipment, so a camera that can withstand the elements is a must.

Keep these tips in mind when shopping for a video camera for action sports photography, and you’ll be sure to find the perfect camera for your needs.

In fact, many of the best action sports cameras are actually quite affordable. That being said, there are still a few things to consider when purchasing an action sports camera. Here are a few tips:

Action sports cameras are designed to be durable and withstand a lot of abuse. They should be able to withstand being dropped, being submerged in water, and being exposed to extreme temperatures.

The camera should be able to record high-quality video. This is especially important if you plan on using the footage for professional purposes.

The camera should be easy to use. It should have a user-friendly interface and be relatively easy to operate.

The camera should be affordable. As mentioned before, many of the best action sports cameras are actually quite affordable.

Keep these things in mind when shopping for an action sports camera and you should be able to find a great camera that fits your needs and budget.

The Pros And Cons Of SLR Digital Cameras

The Pros And Cons Of SLR Digital Cameras

Digital single-lens reflex cameras (DSLRs) are one of the most popular types of cameras on the market. They are loved by professional photographers and serious amateurs for their image quality, versatility, and control. But DSLRs are not the perfect cameras for everyone. Here are some of the pros and cons of DSLRs to help you decide if one is right for you.

Pros of DSLR Cameras

Image Quality: DSLRs produce some of the best images of any type of camera. This is because they have large image sensors that allow for more light and detail to be captured. DSLRs also have powerful image processors that produce high-quality images.

Versatility: DSLRs are versatile cameras that can be used for a variety of photography genres, including landscape, portrait, sports, and wildlife. They also have a wide range of lens options that allow you to further customize your photography.

Control: DSLRs give you a lot of control over your images. With manual controls, you can adjust the shutter speed, aperture, and ISO to get the perfect shot. You can also shoot in RAW format, which gives you even more control over your images in post-processing.

Cons of DSLR Cameras

Size and Weight: DSLRs are larger and heavier than other types of cameras, which can be a drawback if you want a compact camera that you can easily carry around with you.

Cost: DSLRs are more expensive than other types of cameras, which can be a barrier for some people.

Learning Curve: DSLRs can be complex cameras to use, and they require a bit of a learning curve to get the most out of them.

Now that you know some of the pros and cons of DSLR cameras, you can decide if one is right for you. If you need a high-quality camera with a lot of control and versatility, a DSLR may be the perfect choice. But if you want a smaller and less expensive camera, you may want to consider another type of camera.

Some feel that the large sensor and interchangeable lenses give them an edge over compact cameras, while others find the smaller size and cheaper price of the latter more appealing. So, which is better?

SLR cameras have a few advantages over their compact cousins. Firstly, their large sensors allow for better image quality, as they can capture more light and detail. Secondly, the interchangeable lenses give you much more flexibility in terms of the types of shots you can take. Finally, the SLR’s through-the-lens viewfinder gives you a more accurate representation of what your final image will look like.

On the downside, SLRs are generally more expensive than compacts, and their larger size can be a bit of a burden when you’re trying to take candid shots or be discreet. They also have a tendency to produce more blurred images, as the mirror inside the camera can cause the image to shake.

So, which is the better type of camera? It really depends on your needs and preferences. If you’re looking for the best possible image quality, then an SLR is the way to go. But if you’re worried about cost or portability, then a compact might be a better choice.

10 Best SLR Digital Cameras On The Market Today

10 Best SLR Digital Cameras On The Market Today

When it comes to choosing the best digital SLR camera, there are many factors to consider such as price, features, and brand. In this article, we will take a look at the 10 best digital SLR cameras on the market today.

1. Canon EOS 5D Mark IV

The Canon EOS 5D Mark IV is one of the best digital SLR cameras on the market, and it is perfect for professionals and enthusiasts alike. It features a 30.4 megapixel full-frame CMOS sensor, 4K video recording, and an advanced autofocus system. It is also compatible with Canon’s EF lens range, which gives you a huge amount of choice when it comes to lenses.

2. Nikon D850

The Nikon D850 is another excellent digital SLR camera, and it is perfect for both professionals and enthusiasts. It features a 45.7 megapixel full-frame CMOS sensor, 4K video recording, an advanced autofocus system, and is compatible with Nikon’s huge range of lenses.

3. Canon EOS 6D Mark II

The Canon EOS 6D Mark II is a great choice for those who want a full-frame digital SLR camera without spending a huge amount of money. It features a 26.2 megapixel full-frame CMOS sensor, Full HD video recording, and an advanced autofocus system. It is also compatible with Canon’s EF lens range.

4. Nikon D750

The Nikon D750 is another excellent choice for those who want a full-frame digital SLR camera without spending a fortune. It features a 24.3 megapixel full-frame CMOS sensor, Full HD video recording, and an advanced autofocus system. It is also compatible with Nikon’s huge range of lenses.

5. Canon EOS 80D

The Canon EOS 80D is a great choice for those who want a mid-range digital SLR camera. It features a 24.2 megapixel APS-C CMOS sensor, Full HD video recording, and an advanced autofocus system. It is also compatible with Canon’s EF-S lens range.

6. Nikon D7200

The Nikon D7200 is a great choice for those who want a mid-range digital SLR camera. It features a 24.2 megapixel APS-C CMOS sensor, Full HD video recording, and an advanced autofocus system. It is also compatible with Nikon’s huge range of lenses.

7. Canon EOS 77D

The Canon EOS 77D is a great choice for those who want a mid-range digital SLR camera. It features a 24.2 megapixel APS-C CMOS sensor, Full HD video recording, and an advanced autofocus system. It is also compatible with Canon’s EF-S lens range.

8. Nikon D5600

The Nikon D5600 is a great choice for those who want a mid-range digital SLR camera. It features a 24.2 megapixel APS-C CMOS sensor, Full HD video recording, and an advanced autofocus system. It is also compatible with Nikon’s huge range of lenses.

9. Canon EOS Rebel T7i

The Canon EOS Rebel T7i is a great choice for those who want a budget-friendly digital SLR camera. It features a 24.2 megapixel APS-C CMOS sensor, Full HD video recording, and an advanced autofocus system. It is also compatible with Canon’s EF-S lens range.

10. Nikon D3500

The Nikon D3500 is a great choice for those who want a budget-friendly digital SLR camera. It features a 24.2 megapixel APS-C CMOS sensor, Full HD video recording, and an advanced autofocus system. It is also compatible with Nikon’s huge range of lenses.

How To Choose The Best SLR Digital Camera For Your Needs

How To Choose The Best SLR Digital Camera For Your Needs

SLR digital cameras are a dime a dozen these days. With so many manufacturers, models and features to choose from, it can be tough to know which one is right for you. But don’t worry, we’re here to help. In this article, we’ll run through everything you need to know to choose the best SLR digital camera for your needs.

First things first, what is an SLR digital camera? SLR stands for ‘single-lens reflex’. This means that the camera has a mirror inside it that reflects the image from the lens up into the viewfinder. This is the main difference between an SLR and a compact camera – with a compact camera, you’re looking at the image through the lens itself.

The advantage of an SLR is that you can see exactly what the camera is going to see when you take the photo. This makes it much easier to compose your shots, and you’ll also be able to see if anything is in the way of the lens (like your finger!).

So, now that you know what an SLR is, let’s take a look at some of the things you need to consider when choosing one…

1. Price

As with anything, price is going to be a big factor in your decision. SLR cameras can range from a few hundred dollars to several thousand, so you need to decide how much you’re willing to spend.

Of course, the more you spend, the better the camera is likely to be. But that doesn’t mean you need to spend a fortune to get a good camera – there are plenty of great options at lower price points.

2. Features

As we mentioned, there are a lot of different SLR cameras on the market, and each one has its own unique feature set. So, you need to decide which features are important to you.

Do you want a camera with built-in Wi-Fi so you can easily share your photos? Do you need a camera that can shoot video as well as photos? Do you want a camera with a touchscreen display?

Think about what you want to use the camera for, and make sure you choose one with the features you need.

3. Sensor size

The sensor is the part of the camera that captures the image. The bigger the sensor, the more light it can capture, and the better the quality of the image will be.

Most entry-level SLR cameras have what’s called an APS-C sensor. This is a good all-round size, and it’s what we’d recommend if you’re just starting out.

If you’re looking for the best possible image quality, you’ll want a camera with a full-frame sensor. These are usually found in more expensive cameras, but they’re definitely worth the investment if you’re serious about photography.

4. Lens compatibility

One of the great things about SLR cameras is that they’re usually compatible with a wide range of lenses. This means you can buy different lenses to suit different situations.

For example, you might want a telephoto lens for taking photos of wildlife, or a wide-angle lens for landscape photography.

When you’re choosing an SLR camera, make sure you check which lenses are compatible with it. That way, you can be sure you’ll be able to buy the lenses you need in the future.

5. Weight and size

If you’re going to be carrying your camera around with you a lot, then you’ll want to consider the weight and size. Some SLR cameras can be quite large and heavy, so make sure you choose one that’s comfortable for you to carry.

6. Battery life

Another important consideration is battery life. If you’re going to be using your camera a lot, you’ll need a camera with a good battery life. Otherwise, you’ll be constantly having to recharge it.

7. User-friendliness

If you’re new to photography, you’ll want to choose a camera that’s easy to use. Look for a camera with an intuitive menu system and clear, easy-to-understand controls.

Also, make sure the camera has a good viewfinder. This is what you’ll be looking through when you take a photo, so it needs to be clear and bright.

How To Use Your Arlo Pro 2 Camera

How To Use Your Arlo Pro 2 Camera

Arlo Pro 2 is a versatile camera that can be used for a variety of purposes.

Here are some tips on how to use your Arlo Pro 2 Camera to take better pictures:

1. Use the right settings.

There are a few different settings that you can use on your Arlo Pro 2 Camera to take better pictures. If you’re taking pictures of a person or object that is in motion, you’ll want to use the “Action” setting. This setting will help to freeze the action and prevent blurring. If you’re taking pictures of a still object, you can use the “Still” setting. This setting will help to capture all the details of the object.

2. Use the right lens.

The Arlo Pro 2 Camera comes with two different lenses: a wide-angle lens and a telephoto lens. The wide-angle lens is great for taking pictures of large groups of people or objects. The telephoto lens is great for taking pictures of distant objects.

3. Use the right lighting.

The Arlo Pro 2 Camera has a built-in flash that can be used to take pictures in low-light conditions. However, if you’re taking pictures in bright sunlight, you’ll want to use the “Sun” setting. This setting will help to reduce the amount of glare in your pictures.

4. Use the right composition.

When you’re taking a picture, you’ll want to make sure that the subject is in the center of the frame. This will help to ensure that the subject is the focal point of the picture. You’ll also want to make sure that there is some space around the subject. This will help to create a more pleasing composition.

5. Use the right editing tools.

After you’ve taken a picture, you can use the editing tools on the Arlo Pro 2 Camera to make some final adjustments. These tools can be used to crop the picture, adjust the exposure, and even add some special effects.

By following these tips, you can use your Arlo Pro 2 Camera to take better pictures.

How To Keep Your Arlo Pro 2 Camera Working Like New

How To Keep Your Arlo Pro 2 Camera Working Like New

If you’ve recently invested in an Arlo Pro 2 security camera, congratulations! You’ve made a wise decision to protect your home or business with one of the best security cameras on the market. But like any piece of technology, your Arlo Pro 2 camera will require some occasional maintenance to keep it working like new.

Here are a few tips to help you keep your camera in tip-top shape:

1. Keep the lens clean

One of the most important things you can do to keep your Arlo Pro 2 camera working like new is to keep the lens clean. Dust, dirt, and fingerprints can all impede the camera’s ability to take clear pictures or videos. Use a soft, dry cloth to gently wipe the lens clean as needed.

2. Avoid extreme temperatures

Your Arlo Pro 2 camera is designed to withstand a wide range of temperatures, but extreme heat or cold can still cause problems. If possible, try to keep your camera out of direct sunlight or in a shady area to avoid overheating. And if you live in a cold climate, be sure to keep your camera away from any heat sources, like a furnace, to prevent it from getting too cold.

3. Keep the camera dry

It’s important to keep your Arlo Pro 2 camera dry to prevent damage from moisture. If your camera is exposed to rain or snow, be sure to wipe it down as soon as possible to remove any moisture. And if you live in a humid climate, be sure to keep your camera in a dry, well-ventilated area to prevent condensation from building up on the lens or internal components.

4. Update the firmware

Like any piece of technology, your Arlo Pro 2 camera benefits from regular firmware updates. Arlo releases new firmware updates periodically to improve the camera’s performance and add new features. To check for new firmware updates, open the Arlo app and tap the Settings icon. Then, tap Devices and select your camera. If a new firmware update is available, you’ll see an option to update the firmware.

5. Reset the camera

If your Arlo Pro 2 camera isn’t working properly, you may need to reset it to factory defaults. This will restore the camera to its original state and may fix any issues you’re having. To reset your camera, open the Arlo app and tap the Settings icon. Then, tap Devices and select your camera. Finally, tap the Reset button and confirm that you want to reset the camera.

By following these simple tips, you can keep your Arlo Pro 2 camera working like new for years to come.

JVC Everio GZ-HM1S Overview

JVC Everio GZ-HM1S Overview

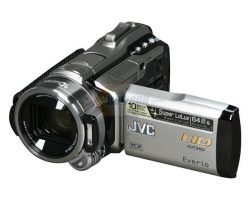
The JVC Everio GZ-HM1S is a high definition camcorder that records 1920 x 1080 video in the AVCHD format. It is one of the most expensive models in JVC’s lineup, even though it was introduced in 2010.

The GZ-HM1S carries a suggested retail price of $1199. Full technical specifications for the GZ-HM1S can be found here.

JVC Everio GZ-HM1S Video Features

The Everio GZ-HM1S uses the full AVCHD format for 1920 x 1080 high definition recording. It supports 24Mbps recording, the highest bit-rate available in the AVCHD video format. The HM1S features the same 10.6-megapixel 1/2.3-inch back-illuminatedCMOS image sensor found on most of the top-of-the-line 2011 Everios. Unlike JVC’s mid-range models, the HM1S cannot record in standard definition (not that you’d really miss it).

The camcorder uses JVC’s “Intelligent Auto” mode for automatically matching scene modes such as portrait, sunset, scenery, forest and macro mode, to shooting environments.

You can snap 9-megapixel still photos with the HM1S, and it has a built-in flash to aid in low light photography.

While it’s not quite a replacement for a standalone digital camera, it will deliver sharper pictures than camcorders without a built-in flash.

Optical Features

You’ll find a 10x optical zoom Konica Minolta HD lens on the Everio GZ-HM1S. This optical zoom is joined by two digital zoom technologies: a dynamic zoom can boost magnification to 16x without sacrificing video quality. There’s also a standard digital zoom, which increases magnification to 200x. The lens uses JVC’s “Enhanced Advanced Image Stabilizer” for keeping your footage relatively shake-free. According to the company, the image stabilization technology can compensate for camera shake at wide-angles and is four times as effective in combating shake than the Advanced Stabilization found on less expensive models in the Everio line. In our experience, JVC has some of the best image stabilization technology in the camcorder market.

The HM1S’s lens is conveniently protected by an automatic lens cap.

Memory and Display

The GZ-HM1S offers 64GB of internal flash memory in addition to a single SDHC memory card slot.

Unfortunately, it doesn’t accept higher-capacity SDXC cards for additional storage capacity, although with 32GB on board, you probably will not find yourself running out of memory. The HM 550 uses JVC’s “seamless recording” system, which automatically switches memory formats when one is full. The camcorder is Eye-Fi ready, so it will automatically recognize when a wireless Eye-Fi memory card is in use.

You’ll frame your recordings on a large 3.5-inch Laser Touch LCD display. The Laser Touch display is something of hybrid – it’s not a touch screen but there are no tactile buttons either. Instead, you’ll find a serious of touch-sensitive controls on the edge of the display, including a swipe bar, for navigating around the HM1S’s menu items. In our experience, this Laser Touch display can be more responsive than small touch screens although it takes some getting used to.

Design

Design-wise, the HM1S cuts an angular (in our view attractive) appearance with nice ergonomics. Thanks to the use of flash memory you’ll still enjoy a light weight body though not as light as JVC’s less expensive HD models (.67 pounds with battery inside). The HM1S measures in at 2.1 x 2.4 x 4.8 inches, roughly the same form factor as the entry-level series of Everios, and features a zoom lever on the top of the camcorder and a record shutter located on the side, next to the camcorder’s battery. Open the display and you’ll find buttons video playback, scrolling and info, plus the camcorder’s ports: component, HDMI, USB and AV. There is a manual focus wheel adjacent to the lens.

Aesthetically, the HM1S is available in one color – silver, with black accents.

Shooting Features

The Everio GZ-HM1S is outfitted with face detection and a a face flow playback, which highlights faces in a frame in the playback menu so you can search your footage by the people you’ve recorded..

Among the other features you’ll find on the GZ-HM1S is a time-lapse recording function that lets you record one frame at a time for a selectable time interval (between one and 80 seconds). There are several fast frame rate options for recording in slow motion. The effect is very cool but the video files are lower quality, so they won’t look as good on the big screen as they will on your computer.

Finally, you can add basic animated effects to video in the camcorder as well as to still images. JVC’s Everio Media Browser software is built-in the camcorder as well for disc-free loading when you attach the camcorder to a computer via USB. The software supports basic video editing (color changing, clipping, etc.) as well as sharing via YouTube and Facebook.

Connectivity

The Everio GZ-HM1S offers a built-in HDMI output for connecting the camera although the cable is not included. You can also connect to a PC via USB cable, which is included.

Impression

At $1,100, the HM1S is geared for video enthusiasts who want to exercise a high level of control over the look of their video. The HM1S has an attractive design and a solid feature set for the price but is getting old, in camcorder years, so you may want to wait to see what JVC replaces it with before purchasing (or wait until its replacement is named and the HM1S gets discounted further).

JVC Everio GZ-HD500 Overview

JVC Everio GZ-HD500 Overview

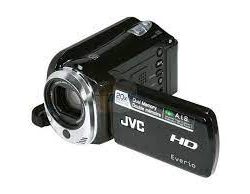
The JVC Everio GZ-HD500 is a high definition camcorder that records 1920 x 1080 video in the AVCHD format with a built-in hard disc drive.

The GZ-HD500 carries a suggested retail price of $549. Full technical specifications for the GZ-HD500 can be found here.

JVC Everio GZ-HD500 Video Features

The Everio GZ-HD500 uses the full AVCHD format for 1920 x 1080 high definition recording. It supports 24Mbps recording, the highest bit-rate available in the AVCHD video format. The HD500 features a 1/5.8-inch, 1.3-megapixel CMOS image sensor. Unlike JVC’s mid-range models, the HD500 cannot record in standard definition (not that you’d really miss it, would you?).

You can snap still photos with the HD500, however there’s no built-in flash so unless you’re operating in plenty of sunlight and keep steady, you’re likely to get blurry pics from it.

Optical Features

You’ll find a 20x optical zoom lens on the Everio GZ-HD500. This optical zoom is joined by a digital zoom which increases magnification to 200x. The lens uses JVC’s “Enhanced Advanced Image Stabilizer” for keeping your footage relatively shake-free. According to the company, the image stabilization technology can compensate for camera shake at wide-angles and is four times as effective in combating shake than the Advanced Stabilization found on less expensive models in the Everio line. In our experience, JVC has some of the best image stabilization technology in the camcorder market.

The HD500’s lens is conveniently protected by an automatic lens cap.

Memory and Display

The GZ-HD500 offers an 80GB built-in hard drive plus a single microSD/SDHC memory card slot. Unfortunately, it doesn’t accept higher-capacity SDXC cards for additional storage capacity, although with 80GB on board, you probably will not find yourself running out of memory. There is no seamless recording on the HD500, so you will need to manually switch between hard drive and memory card recording.

You’ll frame your recordings on a large 2.7-inch Laser Touch LCD display. The Laser Touch display is something of hybrid – it’s not a touch screen but there are no tactile buttons either. Instead, you’ll find a serious of touch-sensitive controls on the edge of the display, including a swipe bar, for navigating around the HD500’s menu items. In our experience, this Laser Touch display can be more responsive than small touch screens although it takes some getting used to.

Design

Design-wise, the HD500 is bulkier than JVC’s flash memory camcorders and much heavier at 1.82lbs (by contrast, JVC’s flash camcorders usually weigh about half as much). The HD500 measures in at 2.1 x 2.4 x 4.8 inches, roughly the same form factor as the entry-level series of Everios, and features a zoom lever on the top of the camcorder and a record shutter located on the side, next to the camcorder’s battery. Open the display and you’ll find buttons video playback, scrolling and info, plus the camcorder’s ports: component, HDMI, USB and AV.

The camcorder uses JVC’s two-way grip, which is a dual-purpose strap lets you hold it aloft or dangle the camcorder securely from your wrist.

Aesthetically, the HD500 is available in black.

Shooting Features

The Everio GZ-HD500 is outfitted with face detection and a face flow playback, which highlights faces in a frame in the playback menu so you can search your footage by the people you’ve recorded. There’s also an Auto Record function which starts recording automatically whenever an object moves into the frame. The camcorder will automatically end recording if motion stops after five seconds, so the camcorder can double as a motion-activated video camera (the battery won’t last long enough for it to truly replace a security camera though).

Among the other features you’ll find on the GZ-HD500 is a time-lapse recording function that lets you record one frame at a time for a selectable time interval (between one and 80 seconds).

Finally, you can add basic animated effects to video in the camcorder as well as to still images. JVC’s Everio Media Browser software is built-in the camcorder as well for disc-free loading when you attach the camcorder to a computer via USB. The software supports basic video editing (color changing, clipping, etc.) as well as sharing via YouTube and Facebook.

Connectivity

The Everio GZ-HD500 offers a built-in HDMI output for connecting the camera although the cable is not included. You can also connect to a PC via USB cable. There is a built-in button for YouTube uploading as well so you can send videos to the online sharing service when you camcorder is connected to your PC.

Impression

Hard disc camcorders are not nearly as popular as they used to be but still serve a niche for those who value large amounts of on-board camcorder storage. In our view, flash camcorders are more attractive options because they’re lighter, more energy efficient and tend to be more responsive. Still, if you want hours upon hours of recording capacity without breaking the bank, a hard drive camcorder is the way to go.