How The Google Nest Outdoor Camera 2 Pack Can Help You Stay Safe

How The Google Nest Outdoor Camera 2 Pack Can Help You Stay Safe

The holidays are a time for family, friends, and fun. But they’re also a time when home burglaries spike. In fact, according to the FBI, home burglaries increase by about 14% during the winter months.

One way to help protect your home during the holidays (and all year round) is to invest in a good home security system. And if you’re looking for a top-of-the-line security system, you can’t go wrong with the Google Nest Outdoor Camera 2 Pack.

Here’s what you need to know about the Google Nest Outdoor Camera 2 Pack and how it can help you stay safe this holiday season:

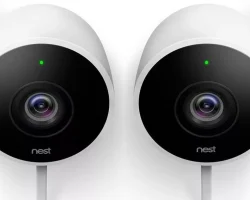
What is the Google Nest Outdoor Camera 2 Pack?

The Google Nest Outdoor Camera 2 Pack is a two-camera home security system that can be used to monitor the outside of your home. The cameras are weatherproof and have night vision, so you can keep an eye on your property even in the darkest of night.

The cameras connect to your home’s Wi-Fi network and can be accessed via the Nest app on your smartphone. The app also allows you to view live footage from the cameras, so you can see what’s going on outside your home at any time.

If the cameras detect motion, they will start recording and send an alert to your smartphone. You can then view the footage to see what triggered the alert.

The Google Nest Outdoor Camera 2 Pack is a great way to deter burglars and keep your home safe this holiday season. But that’s not all the Nest app can do.

How Else Can the Nest App Help You Stay Safe This Holiday Season?

In addition to letting you view live footage from the Google Nest Outdoor Cameras, the Nest app can also be used to control other Nest products, like the Nest Thermostat and the Nest Protect smoke and carbon monoxide detector.

You can use the app to turn the Nest Thermostat down when you’re away from home, so you’re not wasting energy heating an empty house. And if the Nest Protect detects smoke or carbon monoxide, it will sound an alarm and send an alert to your smartphone.

The Nest app can also be used to create custom rules for your home. For example, you can create a rule that turns on the lights and starts recording video from the Google Nest Outdoor Cameras when the Nest Protect detects smoke.

You can also create a rule that turns on the Nest Thermostat and starts playing music from the Nest app when you arrive home. The possibilities are endless.

The Google Nest Outdoor Camera 2 Pack and the Nest app can help you stay safe this holiday season. But they’re also great for year-round peace of mind. So if you’re looking for a top-of-the-line home security system, the Nest is the way to go.

How The Blink Outdoor 2 Camera System Can Improve Your Home Security

How The Blink Outdoor 2 Camera System Can Improve Your Home Security

If you’re looking for a home security system that’s easy to install and provides great coverage, the Blink Outdoor 2 Camera System is a great option. This system comes with two wireless cameras that can be installed anywhere around your home, and they’re simple to set up. The Blink cameras are also very affordable, making them a great choice for budget-conscious consumers.

One of the best things about the Blink Outdoor 2 Camera System is that it doesn’t require a monthly fee. That’s right, there are no monthly fees associated with this system. You’ll just need to pay for the cameras up front, and then you can enjoy peace of mind knowing that your home is being protected.

Another great thing about the Blink system is that it offers free cloud storage. That means you can review your footage at any time, from anywhere. And if you ever need to download footage for law enforcement or insurance purposes, you can do so easily.

Finally, the Blink Outdoor 2 Camera System comes with a two-year warranty. That means if anything goes wrong with your cameras, you’re covered.

If you’re looking for an affordable and easy-to-use home security system, the Blink Outdoor 2 Camera System is a great option.

When it comes to home security, many people think that they need to spend a lot of money to get a top of the line security system. However, this is not always the case. The Blink Outdoor 2 Camera System is a great option for those who are looking for an affordable and reliable security system.

The Blink Outdoor 2 Camera System is a great way to improve your home security for a number of reasons. First, the system is very affordable. You can get the system for just $129.99. This is a great price for a security system that includes two cameras.

Second, the Blink Outdoor 2 Camera System is very easy to install. The system comes with everything you need to get started. All you need to do is mount the cameras and connect them to the Blink Sync Module. The Blink Sync Module will then connect the cameras to your home Wi-Fi network.

Third, the Blink Outdoor 2 Camera System is very easy to use. The system comes with a free Blink app that you can download on your smartphone. The app is very user-friendly and it makes it easy to view your cameras, arm and disarm the system, and set up alerts.

Fourth, the Blink Outdoor 2 Camera System is very reliable. The system uses Blink’s proprietary technology to provide you with a clear and reliable video feed. The system also includes a motion detector that will send you an alert if it detects any movement.

Fifth, the Blink Outdoor 2 Camera System comes with free cloud storage. This means that you can access your video footage at any time, from anywhere.

The Blink Outdoor 2 Camera System is a great way to improve your home security. The system is affordable, easy to install, easy to use, and it is very reliable.

The Benefits Of The Blink Outdoor 2 Camera System

The Benefits Of The Blink Outdoor 2 Camera System

First and foremost, it is a Blink system, which means that it is compatible with all other Blink products. This gives you the peace of mind of knowing that your home security system is compatible with the products you already own.

Another great benefit of the Blink Outdoor 2 Camera System is that it is very easy to install. The instructions are clear and concise, and the entire process takes less than five minutes.

The Blink Outdoor 2 Camera System also comes with a free Blink Sync Module, which allows you to sync your Blink cameras with your other Blink products. This is a great feature, as it allows you to have a complete home security system that is easy to use and manage.

Finally, the Blink Outdoor 2 Camera System is very affordable. It is one of the most affordable home security systems on the market, and it offers a great value for the money.

If you are looking for a home security system that is easy to install, compatible with other Blink products, and very affordable, then the Blink Outdoor 2 Camera System is the perfect choice for you.

First and foremost, it is an affordable and easy to install security solution for your home or business. With its two wireless cameras, you can keep an eye on what’s going on both inside and outside your property. The Blink Outdoor 2 also offers motion detection, night vision, and two-way audio, so you can stay aware of any potential threats, and respond quickly if necessary.

In addition to its security benefits, the Blink Outdoor 2 is also a great way to keep an eye on your pets or kids when you’re not at home. The cameras’ live streaming capabilities mean you can check in on them at any time, from anywhere. And if you need to leave them home alone for a while, the two-way audio feature lets you check in on them and make sure they’re okay, even if you’re not there in person.

So whether you’re looking for a security solution or just a way to stay connected to your loved ones when you’re not at home, the Blink Outdoor 2 Camera System is a great choice. Affordable, easy to install, and packed with features, it’s the perfect solution for any home or business.

The Features Of The Blink Outdoor 2 Camera System

The Features Of The Blink Outdoor 2 Camera System

For one, the Blink Outdoor 2 Camera System is an easy to install, wireless security system. It’s also weatherproof, so you don’t have to worry about it rusting or being damaged by rain or snow. The Blink Outdoor 2 Camera System also has a two-year battery life, so you don’t have to worry about recharging it frequently.

The Blink Outdoor 2 Camera System also has motion detection, so you can be alerted when someone enters your yard or home. The Blink Outdoor 2 Camera System also has night vision, so you can see what’s going on even when it’s dark outside. Finally, the Blink Outdoor 2 Camera System also has a siren, so you can scare off intruders or alert your neighbors if there’s an emergency.

The Blink Outdoor 2 Camera System is a great security system for your home or business. It’s easy to install, has a long battery life, and has many features that will keep you and your property safe.

This system is designed to be installed outdoors, and it includes two Blink XT2 cameras, a Blink Sync Module 2, a Blink Outdoor Mount, and a Blink Solar Charger. The Blink Outdoor 2 Camera System is a great choice for homeowners who want a top-of-the-line security system that is easy to install and use.

The Blink Outdoor 2 Camera System is a great choice for homeowners who want a top-of-the-line security system that is easy to install and use. This system is designed to be installed outdoors, and it includes two Blink XT2 cameras, a Blink Sync Module 2, a Blink Outdoor Mount, and a Blink Solar Charger. The Blink Outdoor 2 Camera System is a great choice for homeowners who want a top-of-the-line security system that is easy to install and use.

The Blink Outdoor 2 Camera System is a great choice for homeowners who want a top-of-the-line security system that is easy to install and use. This system is designed to be installed outdoors, and it includes two Blink XT2 cameras, a Blink Sync Module 2, a Blink Outdoor Mount, and a Blink Solar Charger.

How To Use The Blink Outdoor 2 Camera System

How To Use The Blink Outdoor 2 Camera System

The Blink Outdoor 2 Camera System is a great way to keep an eye on your home or business. The system includes two cameras, a base station, and a Blink Sync Module. The Blink cameras are battery-powered and can be placed anywhere. The base station is plugged in to an AC outlet and connects to your home network. The Blink Sync Module connects wirelessly to the base station and allows you to sync your Blink cameras to your smartphone or tablet.

Here are some tips on how to use the Blink Outdoor 2 Camera System:

1. Choose the right location for your Blink cameras. The cameras should be placed in an area where they can get a good view of the area you want to monitor.

2. Install the Blink base station. The base station should be placed in a central location, such as a living room or office.

3. Place the Blink Sync Module. The Blink Sync Module should be placed in a location where it can get a good signal from the base station.

4. Install the Blink cameras. Follow the instructions that come with the cameras.

5. Sync the Blink cameras to your smartphone or tablet. Open the Blink app and follow the instructions.

6. Place the Blink cameras in the locations you want to monitor.

7. View the Blink cameras from your smartphone or tablet. Open the Blink app and you will see the live video feed from each camera.

8. Use the Blink app to set up motion alerts. You can choose to receive alerts via push notification, email, or both.

9. Access the Blink cameras from anywhere. The Blink cameras can be accessed from any internet-connected device.

10. Use the Blink cameras to record video. The Blink cameras can be set to record video when motion is detected. Video is stored in the cloud and can be downloaded to your smartphone or tablet.

The Blink Outdoor 2 Camera System is a great way to keep an eye on your home or business. With the tips above, you can make the most out of your Blink cameras.

How To Install The Blink Outdoor 2 Camera System

How To Install The Blink Outdoor 2 Camera System

If you’re looking for a Blink Outdoor 2 Camera System from Amazon, you’ve come to the right place. Here’s a quick guide on how to install it.

First, remove the Blink Sync Module from the box and plug it in to an outlet. Then, download the Blink app and create an account. Once you’re logged in, go to the Blink app’s main menu and tap “Add Device.” Select “Outdoor Camera” and follow the instructions to connect your Blink Outdoor 2 Camera to the Sync Module.

Now that your camera is connected, you can start using it to monitor your home. To do so, simply tap on the “Live View” button in the Blink app. This will bring up a live feed of what your Blink Outdoor 2 Camera is seeing. You can also use the Blink app to view recorded footage, set up motion alerts, and more.

Thanks for reading! We hope this quick guide was helpful. If you have any other questions about the Blink Outdoor 2 Camera System, feel free to leave them in the comments below.

Installing the Blink Outdoor 2 Camera System is a quick and easy process that can be completed in just a few minutes. The first step is to find a suitable location for the camera. It is important to choose a location that has a clear view of the area you wish to monitor. Once you have found a suitable location, simply screw the baseplate into the chosen location using the provided screws.

Next, you will need to connect the power adapter to the camera. Once the power adapter is connected, plug it into a power outlet. The camera will now begin to power on. Once the camera has powered on, you will need to pair it with the Blink Sync Module. To do this, simply press and hold the sync button on the back of the Blink Sync Module for 3 seconds. The pairing process will now begin. Once the pairing process is complete, the LED on the Blink Sync Module will turn green, indicating that the connection is successful.

The final step is to download the Blink app and create an account. Once you have created an account, you will be able to add your Blink Outdoor 2 Camera to your system and begin monitoring your home.

The Reception: Fun Ideas For Making It A Night To Remember

The Reception: Fun Ideas For Making It A Night To Remember

Your wedding reception is the time to let your hair down, enjoy some delicious food and drink, and dance the night away with your friends and family. But how can you make sure it’s a night to remember?

Here are a few fun ideas to get the party started…

1. Serve up some fun

Your guests will love tucking in to a fun and unique wedding reception menu. So why not get creative with your catering? Serve up mini burgers or hot dogs for a fun take on the traditional sit-down meal, or go for a street food style with a selection of different dishes from around the world.

2. Get the party started

Get your guests in the party mood from the moment they arrive with a fun and funky wedding reception playlist. Think upbeat tunes that will get everyone on the dance floor – from classics like ‘I Will Survive’ to current chart-toppers.

3. Create a photo booth

What’s a wedding reception without some fun photos to remember it by? Create a DIY photo booth with props and backdrops, or hire a professional photographer to capture all the action.

4. Set the scene

Transform your wedding reception venue into a magical setting with some simple decorations. Think fairy lights, lanterns, candles and flowers.

5. Give your guests some entertainment

Keep your guests entertained during the speeches with some fun and interactive entertainment. Why not hire a caricaturist or a photo booth? Or, if you’re having a summer wedding, set up a giant outdoor games area with giant Jenga and Connect 4.

By following these simple tips, you can be sure that your wedding reception will be a night to remember!

GE DV1 Camcorder Review

GE DV1 Camcorder Review

GE DV1 at a Glance

The Good: Low cost, durable, easy to use.

The Bad: So-so video quality.

Video Quality

The GE DV1 records 1080p HD video in the H.264 format via a 5-megapixel CMOS image sensor. Indoors, footage off the DV1 can get noisy but nothing out of the ordinary for a low cost pocket camcorder. There is some noticeable over-exposure, particularly in sunlight, but the colors reproduced crisply. All in all, the video is serviceable, but you shouldn’t expect it to compare with the more expensive Full HD camcorders on the market.

The DV1 offers several quality settings, from 1080p/30 frames per second (fps) to a useful 720p option at 60fps for filming faster action. You can also drop recording quality to 1440 x 1080 and 640 x 480, but there’s no practical reason to do so.

The DV1 also snaps 5-megapixel still photos. If you’re dealing with plenty of ambient light and a still subject, the photos are decent. Otherwise, it’s best to stick to video, as the images will blur. Fairly uniquely among pocket camcorders, the DV1 can also snap 2-megapixel photos while recording. These images are hit-and-miss and you can only take up to six, but the feature itself is nice to have.

Optics

The DV1 packs a 4x digital zoom lens with digital image stabilization. As with all digital zooms on pocket models, this one just ramps up the digital noise so it doesn’t add much.

Design

The big selling point with the DV1 is obviously the rugged and waterproof body design. As mentioned above, the DV1 can be submerged in up to 15 feet of water (that’s deeper than Kodak’s Playsport Zx3) but more than that, it can be dropped from a height of 5 feet and it’s sealed against dust.

This makes it one of the more rugged camcorders on the market. If you’re big into outdoor activities, it’s a good choice.

Obviously, a rugged camcorder will impose some trade-offs on the design. To wit: the DV1 is a bit bulkier and heavier than other pocket cams on the market – but not obtrusively so. It can still be slipped into a pocket or purse quite easily. The memory card port, flip-out USB plug and other connectors are housed securely behind latched doors to keep the elements out. But they open easily. While many pocket camcorders have jumped on the touch-screen bandwagon, the DV1 has nice, large tactile buttons for recording, playback, snapping stills, entering the menu and deleting photos. They can all be pressed easily while wearing gloves. The only exception is the power button, which sits rather flush with the side of the camcorder and might present a problem for a gloved hand.

Feature Set

The GE DV1 offers a pretty bare bones feature set, which isn’t surprising given its low cost. You’ll find settings for adjusting white balance (including an underwater mode), a high dynamic range mode for stills and video recording, exposure metering (stills and video), and a continuous shooting mode for photographs at 7fps.

Menu & Display

You’ll access what features the DV1 has through a bright 2-inch display (you can also adjust the brightness manually in the settings). The menu layout is straightforward and easy to navigate, though when you enter it, you’ll start with the still photo features, not the video, which is a bit odd.

While filming, the DV1 uses just the top portion of the display. The bottom is filled with a menu displaying your current settings – such as whether you’re in HDR mode and your resolution. It can also display a histogram while recording, which is pretty rare to see at this price.

Memory

The DV1 records to SDHC cards and comes with no built-in memory. So you’ll need to factor in the cost of a card to the DV1’s bottom line (unless you already have one).

Bottom Line

When it comes to camcorders that can be tossed into the water or survive a fall onto the concrete without shattering, your choices are pretty limited so the DV1 doesn’t have many direct competitors to compare it to. That said, it’s more rugged and can be dunked deeper than Kodak’s PlaySport Zx3 (cheaper too), but doesn’t offer Kodak’s video quality or feature set. So if you need a bare-bones camcorder for a trip to the beach or an outdoor adventure, the DV1 is a good option. At $129, it’s attractively priced to be a good companion video camera to those who don’t want to risk a higher-end model during their death-defying white water rafting trips.

How To Create A Secret Fairy Garden And Attract Real Fairies This Summer

How To Create A Secret Fairy Garden And Attract Real Fairies This Summer

Fairies Do Exist

I couldn’t believe my eyes. For weeks, At first I thought it was a nest of fire flies. I never knew where they lived and I like taking pictures of bugs so I got out my camera and waited. For what seemed an eternity I hid behind the tree and was as quiet as I could be. Eventually the tree lit up and I snapped a picture quickly.

I nearly fell over when I saw what was on the screen. It was a real life Fairy and she was living in my tree. How lucky could I be.

If You Want To Attract A Secret Fairy You Must Give her A Place To Live – Fairy Cottages

Fairies love a nice place to live and if you want to attract a Fairy to come live in your garden you must provide a safe place to live. They love cute cottages and beautiful flowers. They are very shy so make sure it is in a spot that is quiet and private.

The Fairy Spoke For The First Time

The day after I gave her the blanket I peeked into the hole and she walked right up to the door. She smiled at me and I smiled at her. That’s when she spoke for the first time. She said “Thank you” and backed up into the tree. She didn’t know I had bought her a new house to live in.

I told her to come out and see what else I had for her. She was very shy, but came back to the opening.

I place a very cute cottage by the tree and told her it was for her. She lit up very brightly. She flew down to the house and walked inside. I could tell she was very excited. The next thing I knew she was flying back and forth between the hole in the tree and the new house. She didn’t own very much so it didn’t take long for her to move in. She told me her name was Madeline.

Next I Bought Her Furniture

Madeline loved all the new things I bought for her. She told me that Fairies live all over and she wasn’t the only one. She said that they are very shy and usually live in tree holes. She was the only Fairy she knew that had her own house. The other Fairies were very jealous so I bought a few more houses and hoped to attract more.

Fairy Furniture

Once you buy your Fairy a house you must get her lots of furniture. The cuter the furniture the faster a Fairy will choose your garden to live in

My Indoor Fairy Garden


Fairy Babies Love Driftwood


Fairies love drift wood so it’s no surprise that they would leave their babies sleeping peacefully on top of it or next to it. They love things that sparkle so if you really want to attract Mama Fairies with their little ones then you will love this.

I like to make the drift wood I put in my yard comfortable and keep it from drying out in the sun. I also don’t like bugs eating it so I get new piece I will sand it down, remove much of the loose bark, stain the wood with a soft cloth and some wood stain and then spray seal it. This will keep the wood from absorbing water from rain.

Once I am finished I add a drop of Rub N Buff to bring out the color. I love dark wood with a brass finish as in this photo.

New Cottages

These charming cottages are perfect for indoor or outdoor Fairy gardens. They are realistic and work well with any of the Primrose Fairy figures.

Fairy Number 3, Glenda

A month later Glenda moved in. She grew up with Tina and were friends since they were babies. Of course she had a house right next to Tina. Glenda is very out going. She loves to tease my dog and when he gets barking at her she giggles and throws cheese at him. I think my dog secretly likes the teasing because he gets very excited when he sees her.

Fairies Love To Garden

If you attract Fairies into your yard you can expect it to have a beautiful garden because it what Fairies do best. The love to make the garden grow. With Valentine’s Day on the way why not attract a bunch of Fairies for that someone special in your life.

This Little Fairy Looks Sad

This Fairy Is Only 1 Inch And Has All The Details Of Her Bigger Sisters

Do you believe in Fairies. Are they living in your garden. Let me know what you have done to attract them.

Painting Easels For Teens and Adults

Painting Easels For Teens and Adults

Art Easels Can Make Oil and Acrylic Painting Much Easier for Teenage Artists

When shopping for the Painting Easels For Teens you will want to explore the size, materials, features, and portability of each easel you are considering. The smaller size, perhaps a table top (box type), or a folding compact style each have their own benefits.

Consider the lifestyle of the artist. Are they landscape artists needing to take their supplies on the go? If they prefer to be in the studio and stationary the set up can be less portable, but, consider the size of the teen. Find a size that fits the artist. Is the material suitable for outdoor use? As you browse these painting easels for teens you will find the best of each style is represented so you can quickly choose the best for your needs.

What to look for when buying an easel for outdoor use

Obviously, if you intend to use your easel out of doors it needs to be portable. That means buying one that a) fold flat to carry and b) is in a weight you can easily pick up and carry. One other thing you might consider though is how stable it is. Many outdoor easels these days are made of aluminium and fold down much like a photographer’s tripod into a carrying case. These are lightweight and can usually be carried on a shoulder strap. They will easily hold a small canvas and they have the added bonus of being weather proof. Many of them also come with attachments for you equipment like a holder for a water container or brushes.

As an alternative to these are the outdoor easels that are contained within a carrybox that also holds your paints and so on. The box usually has fold down legs and boards that you can easily assemble when you get there. They are generally wood and much heavier than the aluminium ones but you can generally get a harness or straps to carry them as backpacks. Some of these even come with a seat attached but remember anything like this is going to be heavy to carry.

A few other thinks you might consider: how easy it is to assemble or take down, how easy it is to adjust the angle of your drawing board, can you adjust the legs, after all you may not always be on level ground.

What to look for when buying an indoor easel

There are two types of indoor use easels a teenager might need, a free-standing studio easel or a table easel depending on a number of things like the type of art, space and of course budget. You can of course spend thousands on easels but for teens an A frame easel is probably all that he needs to start with. The A frames have the advantage of being able to fold flat quickly for storing away and they have all the stability he needs to be able to hold his work securely. The advantage of studio easels is that he can stand away from his work easily and see it from different angles.

If he is working with watercolors or just prefers to sit and bend over his work a table easel might be the best choice. If you are buying for a teen make sure you know what he is working with before you buy, for example, if his preference is for watercolor painting or amine drawing he will probably want an easel that has a solid board that paper can be attached to rather than one where you have to clamp a canvas to. Make sure it is sturdy enough to stay still while he is working on it, even then there might be small movements so you might want one with protective feet to protect your furniture. To ensure perfect stability of course you can always invest in one that clamps to the table or desk. The best easels can be adjusted to many levels from flat to vertical.

Best Painting Easels Videos

Demonstrations and Tutorials How to use Painting Easels

https://www.youtube.com/watch?v=DxSdep1QLLQ