The Best Type Of Sandpaper To Use For Prepping A Paint Job

The Best Type Of Sandpaper To Use For Prepping A Paint Job

Whether you’re a beginner or a seasoned woodworker, sanding can be a bit of a chore. But with a few tips and tricks, you can make the process go more smoothly and get better results.

Choose the right sandpaper

There are a variety of sandpaper types available, and each has its own strengths and weaknesses. For most projects, you’ll want to use either aluminum oxide or silicon carbide sandpaper.

Aluminum oxide is the most common type of sandpaper and will work for most projects. It’s durable and long-lasting, and it can be used on a variety of materials.

Silicon carbide is a good choice for sanding hardwoods, as it’s very sharp and will remove material quickly. However, it can also clog up quickly, so you’ll need to clean it frequently.

Start with a coarse grit

When you start sanding, it’s important to use a coarse grit sandpaper. This will remove the majority of the material quickly and help to level out the surface.

Once you’ve removed the majority of the material, you can switch to a finer grit sandpaper to smooth out the surface.

Use even pressure

When sanding, it’s important to use even pressure. This will help to avoid creating gouges or uneven surfaces.

Use a sanding block

A sanding block can help to evenly distribute the pressure you’re putting on the sandpaper and will also help to avoid creating gouges.

Clean the surface regularly

As you sand, the surface will start to clog up with debris. This can dull the sandpaper and make it less effective.

To avoid this, it’s important to clean the surface regularly. A simple way to do this is to use a vacuum cleaner with the hose attachment.

Finish with a fine grit

Once you’ve removed the majority of the material, you can switch to a finer grit sandpaper to smooth out the surface.

For most projects, you’ll want to finish with a grit between 220 and 320.

Apply a finish

Once you’ve finished sanding, it’s important to apply a finish to the surface. This will help to protect it from damage and keep it looking its best.

There are a variety of finishes available, and the best one for your project will depend on the type of wood and the desired look.

A few common finishes include lacquer, polyurethane, and Danish oil.

Sand with the grain

When sanding, it’s important to sand with the grain of the wood. This will help to avoid damage and create a smoother surface.

Use a dust mask

When sanding, it’s important to wear a dust mask to avoid inhaling the fine particles.

Take your time

Sanding can be a bit of a tedious task, but it’s important to take your time and do it right.

If you rush the process, you’ll likely end up with an inferior finish and a surface that’s more likely to be damaged.

What Are Artists Trading Cards, An Introduction

What Are Artists Trading Cards, An Introduction

My Personal Introduction to Artist Trading Cards

I was introduced to Artist trading cards or their equivalent ACEO’s by Ebay. Not knowing about artist trading cards, I was browsing around in the art categories on Ebay and kept seeing reference to ACEO.

I had to find out what it was. It is actually an art format, sized the same as the ubiquitous Trading Cards so beloved by kids of all ages. That is 2.5 X 3.5 inches exactly. The acronym stands for Art Cards Editions and Originals. It could be in any media at all and had been started on Ebay around 1996.

Anyway, I had always prepared for my painting by doing several small sketches to get right the composition / colour / etc and found that this size format was a natural for me. I tentatively put the first listing of an ACEO painting on Ebay and WOW it sold!!! Fantastic!!! I had soon sold around 50 of these little miniatures and felt great.

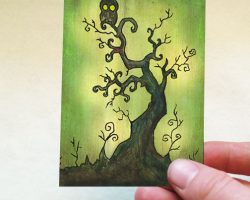
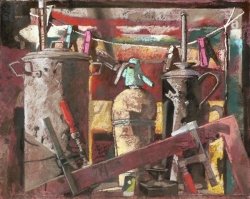
That first aceo painting was a scene from Portmeirion in Wales where the exterior scenes for the TV programme The Prisoner was filmed. Remember Patrick McGoohan, Prisoner Number 6. This was the rear of his circular house in the village. (see picture above).You can see more of my art on my blogs Painting With John and Artyfax, the trials and tribulations of a leisure artist.

I hope to give an account of the history and potential of these wonderful little works of art, they are a great way for anybody to start their very own art collection. They are fun, affordable and a real insight into the work of any artist that you like. Further to this I will talk about the making, collecting and selling of ACEO’s.My own personal collection of works by other artists is several hundred, but I think that this will grow substantially in the future. Why not try it out?

I originally wrote this lens specifically to cover art cards which were made for selling and so the term ACEO is used throughout the lens. However, I now recognise the similarity between these and art cards traded and indeed the only difference is that one is sold ( ACEO) and one is only ever traded (ATC). Therefore it should be taken as read, that whenever the term ACEO is mentioned in this page, it refers to either form of artist trading cards. I will gradually rewrite this anomaly out of the lens as it is modified.

please note the copyright of all images is the property of the original artist, unless otherwise stated all art and photographs are by Artyfax

What is an ACEO?

The ACEO format

abstract building the cityACEO (artist trading cards) are a particular art format which is defined by its size. The acronym stands for Art Cards, Editions and Originals. This reflects the idea that they are sometimes made as part of a series or may be made as numbered editions, usually limited editions. These miniature works are only 2.5 X 3.5 inches. This incidentally, and not by accident, is the size of the ubiquitous Trading Cards beloved by kids of all ages and sizes. This means that there are many products available for storing and displaying the art work, from simple plastic wallets to A4 loose leaf pages with multiple pockets, and whole display books. The miniature aceo art works can of course be framed for display either singly or as multiples.

Collectors often come up with their own devices or simply use a favourite box ( of the right size of course) and I have even heard of them being used as dolls’ house art.

It is a format that started back in 1996, and soon grew into a very popular collectible area. A search on Ebay.com for ACEO can bring up 3-4000 items (rather less in the UK as you might imagine being a much smaller market, but we are getting there) with aceo’s available in so many different media it soon becomes confusing. Watercolor, oil, acrylic, pencil, collage, photographic images, computer generated images….. the list goes on.

ACEO’s are a really inexpensive and fun way of starting your own original art collection.

Alternatively, for those with an artistic bent, art cards can be traded with other artists, almost always as originals or “one-of-a-kind” (OOAK). This was thte original means of dispersal when the format was introduced, see a short history below. When traded they are called ATC’s , short for artist trading card.

My ACEO’s on You Tube

A Portfolio of ACEO paintings by myself on YouTube

This video to be found on YouTube was an experiment for me. A selection of some of my ACEO paintings, backed by my own soundtrack, hope you like it.

Some of my favourite artists’ sites on Ebay

I have at least one work by most of these guys in my own collection of ACEO’s

There are many, many really great artists selling ACEO’s on Ebay. Some are selling simply to attract attention to their larger works, others sell ACEO’s as their main line. If you are interested, then give them a quick once over. I did not intend this lens to be a commercial, but hey! we all need to make bread, so please forgive the intrusion.

I am not selling on Ebay at the moment, and have given up my Ebay shop, please watch this space for news of developments on Etsy.

ARENA-CREATIONS
Immortalising Dreams, Moments and Memories……….. Artist, Gaynor Lewis shows her endless inspiration and expression through her artwork. Bringing extra to your life through art – Original artwork, prints, greeting cards, gift tags and commissions.
Aartless ACEO Gallery
ACEO Originals, Limited Edition ACEO Prints, Postcard and other Small Format Art by JAN VALLANCE. Direct from the artist. Cats, Portraits, Landscapes, all in Jan’s instantly recognisable and individual style.
Naj – My Depictions
Internationally selling UK based artist. Sells promotional samples of small format art, undertakes commissions for art work such as portraits, pet portraits and other custom art commissions, including canal art.
Round the Cauldron
I was raised in California but I now call Scotland my home. My two biggest inspirations are my children and my love of nature. I have been an artist for as long as I’ve been able to hold a pencil, working mainly in Graphite and Watercolour.
Mareens Art Gallery
*Contemporary Art* This Gallery is all about the art created by Mareen Haschke. Purchase ACEOs (Art Trading Cards), Fine Art Prints, and Originals such as pastel drawings and acrylic paintings directly from the artist.

ACEO Links On The Web

just a small selection to wet your apetite…

Here I have tried to provide links to sites with articles about the subject rather than artist sites, I will be adding more regularly.

A painting a day
From Shanti’s world of watercolour, A painting a day seems like a wonderful target. A great way of building up a real expertise. Why don’t I do it?
all you need to know
Probably the first and last link about ACEO’s you should need.
Entry in Wiki
A highly debated offshoot of artist trading cards are the “art card, editions and originals” (ACEO). ACEOs originated when some artists began to create cards to sell on eBay, in addition to trading among themselves. The selling of these cards is a sore point with some ATC purists; however the practice is not unprecedented: trading cards in other areas such as sports have also been traded and sold.
Art in your pocket
Basics of ATC’s ( Art Trading Cards)which are the equivalent of ACEO’s but are traded rather than sold. And importantly, many different ways of making them. Materials and techniques.

More ACEO Artists on the web

another list of links to fantastic artists

It never ceases to amaze me how how much can be contained in one little 2.5 X 3.5 inch painting. Here are some more of my favourite artists aceo’s:-

Affordable art – Ken Gillam
Ken Gillam is a Marine and Landscape Artist based in the South of England working in Watercolour and Acrylic. This site features some of his Miniature Paintings.
Original ACEO art for sale
About the artist, Jim Read

As a scholar I was taken to The British Museum and there saw my first nude, a sculpture.

I was entranced by the perfection of the form and the ever changing lines as I moved around it. I never lost the sense of awe I felt then and it is only now in later life that I feel able to commit my fascination to paper.

ACEO’s from the ACEO UK, Ebay group

a small selection from some fine artists

The Ebay user group ACEO UK has recently started to take notice of ths exciting development and list art videos (aka showreels) on You Tube. This is a group endeavour.

Artist Trading Cards In The News

Artists are creative people and like to keep up with new ideas.

Who is writing about these new ideas and what do they have to say? Find out here:-
Loading

History of ACEO’s

What and Why

jester aceo atcWe have seen above two variations of the artist trading card, ATC and ACEO. And how they only differ in that one is sold and the other is only ever traded. How did this come about?

Artists have always painted miniatures for patrons but in September 1996, Swiss artist M Vanci Stirnemann formally identified the concept and format of artist trading cards now known as ATC’s. I have also shown above that ATC’s are not limited to any particular media but can be created in almost any way that can be envisaged. I have listed and given examples in my lens Making Artist Trading Cards. The original idea was that ATC’s should be exchanged between artists and never sold or indeed should not involve the art establishments selling art. However the internet was taking off at this time and this helped to create a popular demand for this format. It very soon became established around the world particularly in the USA thanks to the involvement via the internet.

For more information see:-

Time line for ATC’s
ATC Quarterly

Collecting ACEO’s

As Opposed To Trading ATC’s

flower garden abstract atc aceoSome time after the introduction of the concept of the ATC an artist selling her work on Ebay (ID Bone-Diva, real name Lisa Luree) put some artwork in this format up for auction. This caused consternation amongst many supporters of the format and Lisa formed a breakaway group which came up with the name ACEO ( Art Cards Editions and Originals) as an acronym for art cards which were sold. This represents the fact that art cards are produced as originals, in series or as editions (open or limited edition prints). Ebay and other sites sell quite large numbers of ACEO’s to artists and collectors looking to start their own art collection at reasonable prices. Many are sold very cheaply by amateurs by auction but established artists with a strong following can command premium prices as you would imagine. Prices in the latter case can be relatively inexpensive but still command prices of $4-500.

For more information on the controversy see, ATC’s vs ACEO’s The Real Story

Selling Your ACEO’s On Ebay

A Quick Introduction

Collecting, selling and trading ACEO art (Art Cards Editions and Originals) is as easy as buying and selling anything on eBay — and it has the advantage of a specialized market. Here’s how to turn drawing miniature artworks the size of trading cards (2 1/2″ x 3 1/2″) into some added income to help you add to your collection!

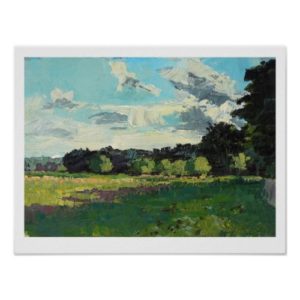
This image is of one of my early watercolour ACEO’s sold on Ebay. A good price is difficult but they are fairly quick to complete and if it sells short it is no great loss. take it on the chin and try again with another. There are other on-line sites and I will add some of these very soon to the lens on Selling ACEO’s; the next in this series. For now check out the recommended links on the side bar.

read this lens for more detailed informationHow to sell ACEOs on Ebay

Some Featured Items From Google News

Sometimes the items discovered by the Google News module are the sort that you don’t want to lose. For example the first in the list below is about hhow a school is using trading cards to overcome the lack of an art tteacher and structured art lessons. How great that this hobby (or passion even) can be used to help school kids in this way. I decided to keep track of some of the more relevant and interesting items for reference.

Art Cards In School
How the use of art trading cards is helping school pupils
trading with a difference
A different take on the trading of artist trading cards

Reader Feedback
I look forward to hearing any feedback!

An artist always craves attention, we prefer to be told how great or original we are BUT I am a realist, let me know what you think and if you don’t like it … well I will just use the input to improve on my next piece – thanks

Not Another Watercolour Painting Tutorial

Not Another Watercolour Painting Tutorial

Do We Need Another Watercolour Tutorial?

Need help with watercolour? In this short page, I hope to reveal how I use the process of sketching to develop an eye for a subject and a process for capturing what seems a limitless scene. Constant sketching and varying an approach just to see what something looks like will help all artists who are trying to capture landscapes in watercolour.

Do we need another watercolour tutorial? The easy answer is no! But of course there is always room for an experienced artist ( with a modest outlook) to pass on some of that experience to fellow artists who may just be starting out on a journey of discovery.

I intend to create a series of lenses about sketching subjects ( such as trees, skies, sunsets, sunrise and the use of colours) whilst these are taking shape this lens should be considered a work in progress – thanks.

The accompanying sketch shows a still life painted at a meeting of my art group. This and all other images below are sketched and photographed/scanned by myself.

Why Sketch?

shouldn’t you just go for a finished picture?

Even the great artists sketch…. and the more they do this the better they are likely to be. Turner left many sketches to the nation after his death. Even his skimpiest works show how he was approaching issues like skies and landscapes. The constant sketching will more than repay the investment in time for any artist.

A painting simply called watercolour beginning shows a simple Turner sketch which probably would have been completed in the fullness of time. There are many of these in books and galleries but I have not yet located a web link. ( In fact, a brochure from an exhibition of Turner’s works held at the Tate does have a few things to say about the watercolour beginnings). One other example of a sketch by Turner is shown in this Tate Gallery Blog post which also discusses the faded appearance of the watercolour sketch.

I often simply use up the remains of my palette to create sketches from my imagination – a little like doodling really but it does help to keep my pictorial vocabulary in use and growing. These sketches I call my “Turnerisms”, they show this simplistic doodling approach to landscape subjects. Not something I would frame and hang on the wall but “hey” they were done for fun and practice, and what is life without a little fun now and then. Just for reference they are all from a sketchbook which is about six inches wide, ( the longest dimesion in these sketches).


They were actually done on cartridge paper and so the effect of wet-into-wet washes is not very relevant but having fun and making marks is never a waste of time. In this series of lenses I hope to be showing you many more of my sketches, some in this vein, some looking more like finished works but all have the main objective of teaching me something.

As for the second question above, it is always worth sketching out one or two small thumbnail sketches to decide on compositional features prior to starting any major project/painting. Professionals do it, what makes any amateur think that they don’t need to? read about any major artist and the chances are that he will know what he is going to paint and how he is going to achieve any particular result before he starts. Why take a chance? Of course there are many instances of paintings being changed part way through but by and large even the masters will have made sketches of potential problem areas before the main work is started.

Some examples of what I am saying would be an obvious update to this lens, at the earliest opportunity. watch this space!

Norman Rockwell Paintings| Norman Rockwell Posters

Norman Rockwell Paintings| Norman Rockwell Posters

Norman Rockwell: painter of American Life

When you think of a painter who paints the idealized “American” Lifestyle only one name can come to mind: Norman Rockwell.

Norman Rockwell was a very popular American artist and the reason why is very clear. He painted gorgeous and clear paintings, but that is not the important point. His paintings symbolized everything that was good about the about America.

He painted innocent boys, family life, sports, abiding love and the American way of life. Basically his painting have always represented everything that is best about America and Americana. Sometimes it may be an idealized view of an America that no longer exists, but that is even more a reason to hold it up as an example of what would and could be.

Rockwell’s portraits can give us spirit and encouragement. They show us what is and what can be. So get inspired and check out a few of the Norman Rockwell Posters below.

All of these pictures are linked to a site where you can buy where Norman Rockwell posters, if you desire. SO check them out, find a good one you like and get a slice of American for your own home. Enjoy!

Norman Rockwell Posters:

Norman Rockwell Paintings of young kids
One of the reasons that Norman Rockwell Pictures are so beloved is that they show a picture of a bucolic and happy life. One of his most famous themes, that he goes back to again and again, are young boys getting into innocent trouble.

With scenes reminiscent of Tom Sawyer, these are often gangly kids who get into just a little bit of mischief.

You can see a sampling of these great Norman Rockwell boys posters below:


Norman Rockwell Navy Wallpaper

Being a “Navy” guy myself this has always been one of my favorites

Rockwells Paintings: Romance and Love

Romance and emotion is not really Norman Rockwells strong suit. AT least not passionate romance. Rockwell’s romance pictures are more of an abiding and happy scenes. They are pictures of caring and love, and a romance that will last the test of time. Filled with real caring and emotion, not a quick and fleeting passion.

See some of Norman Rockwell’s Romance pictures below:


Norman Rockwell Paints the American woman

Great Norman Rockwell Paintings of Women
While Rockwell painted a lot of pictures of boys and boyhood, often seemingly pictures of his own idyllic boyhood, he also had many strong women, both as children and adults that would take center stage.

Take a look at some of Norman Rockwell’s pictures of women:


Norman Rockwell and Sports Pictures

Norman Rockwell obviously cherished sports and sporting events because he also painted many of the iconic pictures of many sports. These are not hard bitten sports pictures showing how “tough” these sports are but showing the innocence , joy and fun of these great sports he enjoyed.

Check out some Norman Rockwell Sports Pictures:

Magic the Gathering Altered Art Cards

Magic the Gathering Altered Art Cards

An Introduction to Altered MTG Cards

What are altered art cards for Magic The Gathering, & where do they come from?? First let me say these should never be counterfeits! They are legitimate copies, simply painted over to change the picture. Many are changed to extend the artwork, removing those boring black or white borders. Others can end up very different from original image. Artists have added things like flames, cartoon characters peeking out from the corners, or other wacky additions.

Add Flare to Your Deck!

altered-mtg-cards-demon-vampire-art A well made acrylic painted card is a mini work of art! Nobody will have the same one painted the same way. Maybe you’re looking to spice up your deck with something different and original. Or perhaps you want to impress your gaming friends. Then you may consider adding a few alters to your deck. They can also make a neat gift idea for that special magic geek in your life!

What Shops Carry Altered Cards?

Look online for the best prices and availabiliy
altered-MTG-shop You probably won’t see these pieces for sale at your local hobby shop. If you want to buy one you’ll most likely need to turn to
the internet. You can find them easily on eBay, but sites like Etsy also have custom MTG sellers. Some sellers have even created small businesses by painting and selling their creations for profit, as well as taking commissions for collectors with special requests. It’s also becoming more common to see people painting away at the large MTG tournaments and comic conventions, where you may be able to find someone selling their wares to the hungry competitive players.

(Altered “duel lands” (c) Marta Molina)

Cheapest Custom MTG Work Online

FAQ: Are Painted Cards Against Copyright Law?

altered art mtg angel card These cards are perfectly legal to create and own!

Painted Magic cards are 100% legal to create, own or play with as long as they are actually painted on top of the original copies. As you may have already seen examples of, some people get very creative, adding a lot to the original work. The paint changes the look and feel, which in copyright terms is considered a “derivative work” meaning it becomes a new copyright work owned by the painter.

Restoration Angel by “Slatts Alters”

Are Painted MTG Cards Tournament Legal?

altered mtg cards DCI More players are starting to bring these cards in to sanctioned tournaments, and DCI judges have taken notice. There are now
some guidelines to follow if you intend to play in tournaments. One thing is certain, you must ask the head judge to
rule for permission before each tournament or else you risk being disqualified!

The main thing to qualify for DCI tournament play is the issue of the gameplay text. The text must still clearly be visible, showing the name, mana casting cost, expansion set symbol, and rules text cannot be obscured. Which means sadly most full art alters probably won’t be allowed in tournaments, unless you have a lenient judge.

Fear not, as most judges do allow these in to tournaments. While there are a handful who frown upon it, they seem to be in the minority. As long as the gameplay bits remain intact you should have nothing to worry about when playing in tournaments.

What About Additional Card Weight?

altered art mtg force of will Some people worry that these will make it easy to cheat or be cheated against, since surely the painting must make them more heavy. Factors that contribute to added weight are how much paint was used, and what type of gloss it was coated with. When put into sleeves and shuffled into a deck it’s impossible to tell the difference. Nobody can cheat by adding these to the deck, so don’t get any funny ideas!

How To Use The Color Wheel To Create Outstanding Art

How To Use The Color Wheel To Create Outstanding Art

What Is The Color Wheel And Why Is It Important

How to use the colour wheel in art, in simple terms whilst still being of practical use. There are literally millions of colors as any computer user will tell you but we only need to understand a few of them, and how the colour wheel can help with this, to realise how they can be used together for real benefit to the artist, adding a creative dimension to paintings and other artworks.

The colour wheel only considers three primary colors, three secondary colors and six tertiary colors and we look at how the color wheel is arrived at and how it is used.

The accompanying image is for explanation only and does not represent the actual colours. I put this together in Photoplus and could not obtain the exact colours, the images throughout are taken from this diagram. This should not affect the explanation here.

This will give us a practical ability to select color schemes for our art. For an artist / designer, knowing how to make use of the color wheel makes choosing color schemes and why they work, easy.

This is a concept that beginners sometimes find difficult to grasp at first. However it is very easy and will pay dividends if you understand how to use it to select color schemes for your artwork.

The Color Wheel 101

A Primer

The first thing to understand is that there are three colours from which all others can be mixed. These are called the PRIMARY COLOURS and there are specific names for them but all you really need to know is that they are red, yellow and blue. Please note: I have created the colour wheel images on this page for the purposes of this explanation of the concept, they do not accurately reflect the true primaries or mixes of these.

Photobucket

Mixing these in more or less equal proportion gives another three colours called SECONDARY COLOURS. They are green (blue and yellow), violet (red and blue) and orange (red and yellow).

Photobucket

TERTIARY COLOURS are obtained by mixing a secondary colour with an adjacent primary. E.g. red and orange gives red-orange, blue and violet gives blue-violet.

Photobucket

The real beauty of the colour wheel is not that it provides a colourful diagram, but that it helps to select colour schemes for your artwork and here’s how it fits together

Photobucket

Now we shall consider how we might use this knowledge. But first of all, the colours on the screen do not seem to work too well especially in the red to blue sector. Why not use the paints / colours from your own palette to make a colour wheel? Use it for reference when needed, it will repay the effort many times over. Just start with the primaries and add the other sectors by mixing the colours in the respective proportions. In fact, if you use different primaries ( for example: alizarin crimson in one wheel and cadmium red in another) you will be able to see which colours when mixed give you vibrant greens or dazzling oranges, etc. Knowing how to use your colours is one sign of a good artist.

You can find out more about the primaries I use in my watercolour palette, and how I use them to mix secondaries, etc in my page on Painting The Seasons.

The Monochromatic Colour Scheme

Use Of The Colour Wheel (1)

We can identify five main colour schemes based on their relative positions in the colour wheel. The first and easiest of these is: –

THE MONOCHROMATIC COLOUR SCHEME; contrasts are achieved simply with shades and tints of any one colour.

Now we seem to have introduced the concept of shades and tints. Do not fret! A tint is a lighter version of the colour. It is made by a process which depends on the media being used. In oils or acrylics for instance, it would be a mixture of the pure colour pigment and white. In watercolour, it would be a more dilute mixture of the colour. A shade is a darker version of the colour, often made by mixing with black but could be achieved by mixing in a small amount of the complementary colour. More about this below.

The Complementary Colour Scheme

Use Of The Colour Wheel (2)

The next we shall consider is the complementary colour scheme. Here we make use of one main colour and its close neighbours on the colour wheel or their tints and shades, and add a little zing by also using its complementary colour. This is the colour found opposite on the colour wheel. So :-
for blue the complementary is orange
for red the complementary is green
for yellow the complementary is purple

The photo of the indian lady shows a collage which makes use of a complementary scheme to make the red sash stand out.

Another collage, I have recently completed shows the effect of using a blue colour scheme and adding a little orange in the form of images in a film strip. I think this shows how effective the complementary colour scheme can be.

The Harmonious Colour Scheme

Use Of The Colour Wheel (3)

Next we shall consider the Harmonious colour schem, also called the analogous colour scheme.

This utilises closely co-ordinating colours, i.e. close together on the colour wheel. This is often described as using either warm or cool colours. Warm colours are the reds, yellows, oranges and their mixtures. Cool colours are the blues and greens.

The “sixties” themed ATC shown here uses mainly reds, purples and oranges to give it a warm feel.

Another example is given which uses cool blues in various tints.

The Triadic Colour Scheme

Use Of The Colour Wheel (4)

The triadic colour scheme utilises colours equidistant from each other on the colour wheel. E.g. red-orange, blue-green and blue violet. An example of this is seen in this “african themed” ATC.

This second photo shows also shows a triadic colour scheme in use. The red background with the blue of the repeated advertisements and the yellow text and gold (yellow) colouring dragged across the background.

The Split Complementary Colour Scheme

Use Of The Colour Wheel (5)

painting over collageThe split complementary colour scheme uses one dominant colour balanced by two colours from either side of its complementary. This can be said to be very similar to the triadic scheme and only subtly different.

The example here shows a painting, as I have not been able to find one of my ATC’s that have been created using this colour scheme.

The dominant blue has been off-set with a reddish orange and touches of a yellowish orange.

How to paint shadows – basic methods explained

How to paint shadows – basic methods explained

Painting shadows – resources for realistic painted shadows

This site tries to give some help on painting shadows in realistic, representational painting.
To establish the right form of a shadow is one thing, but to get the colour of a shadow “right” is at the centre of mastership in painting, I think.
Imagine a meadow in sunlight and a tree that casts a shadow on it. There will be different shades of green, some in light and some in shadow.

Especially the capability of the human eye to adapt quickly to low light levels adds to the difficulty to draw and paint true shadows. As you look into a shadow it seems to get lighter. When you look back into the sunlit areas the shadows suddenly seems so much darker again.

In the end painting shadows is painting light, a particular form of light: shadows are reflections of indirect light whereas the sunlit parts of a subject are exposed to direct sunlight.

Some basic steps to paint shadows are discussed here from dark to light and vice versa. Depending on the medium used there are limitations and different potentials to depict shadows. Two example paintings in oil colour (Plein Air) and dry pastels (studio still life) are discussed in detail. The tips can be used in studio work as well as in works on site, Plein Air.

Basics of the colour theory are explained together with links for more extensive studies. Finally some comprehensive “how to books” on painting light and shadow can be purchased from this website.

Image credits: All images on this webpage ,if not otherwise stated, are creations by the author.Images and illustrations of products (in affiliate links) are used according to Squidoo TOS.

The theory of light and shadow explained with a pastel still life painting as example

This is a great explanation of the theory of light and shade in drawings.

Understanding the categories of direct light, highlights, form shadow, reflected light and cast shadows can help a lot to see and depict the effects of lights in nature much better.

I lit the still life set above with a strong side light from the left and a weaker top light. With a bright piece of cardboard I reflected light back into the composition from the right side because otherwise those shadows would turn into a massive dark and partly almost black area. This is a method that photographers use a lot in portrait work to reduce the contrast between light and shadow areas.

What categories of light an shadow can be seen in this pastel painting?

1.) In area one there is the brightest part, the area of high light on this particular vessel

2.) In area two you see the darkest form shadow (core shadow) that contrasts the most with the area in direct light. This is partly an optical effect rather than a “true” observation. On curved surfaces you will see a more or less wide zone of transition from the brightest direct light into the form shadow. The core shadow will fade more and more
as you move away from the light source and will finally get brighter again when you get in to area 3

3.) Area three is a form shadow that receives some reflected light, often the reflected light has a different color and it will change the color of the form shadow. In this particular case I added some more red that was reflected from the background panel onto the vessel.

4.) Area four is interesting as a cast shadow falls directly into the zone of bright direct light. That dark shadows cast from the soda bottle is lit up on the lower edge of the other vessel by some reflected light from the lower body of the soda bottle.

5.) The shadow in area 5fice is a special case. There is a soft, somewhat blurry cast shadow with a darker core. That effect occured because I used two sources of light. The darker core is in fact a more precisely cast shadow from the strong side light, whereas the soft broader outer part of the shadow originates from the further away light bulb under the room ceiling.

Light, shade and shadown in drawing and painting a beginners guide

Is there a formula to mix the colour of shadows?

An example in oil colors -Some problems and questions that occur in painting shadows

Artprint plein air landscape painting by editionha
Large format printing by Zazzle

In this plein air oil painting light and shadow are the main features. I did this study because I wanted to find out what is the colour of grass and foliage in sun and in shadow and whether there is a way or maybe a kind of formula how I could get the best or convincing results.

But from which colour or shade should I start from? Should the colour of the grass in sun be the starting point and I would mix from bright to the darker shadow, or should I come from the dark side and establish the colour of the grass in shade first and brighten that colour somehow up to paint the areas in direct sunlight?

The most irritating thing is that the human eye adapts always to the light conditions. When I looked at the grass in sun the shadows seemed to be very dark. But when I studied the areas in shadow it seemed that the shadow was not that dark anymore the longer I looked at it. It seemed to get brighter and many different shades of grass emerged, which disappeared again when I studied the sunlit parts of the landscape. Particularly the border between light and shadow presented a difficulty. The contrast seemed so very strong there, but my logic told me that the amount of light and as a consequence the colour of the grass directly at this border line and a few meters away from it had to be the same. In other words the shadow would not get darker close to the sunlit area and also the sunlit area would not be brighter close to the shadow area. This effect again has to do with the way our eyes handle strong contrasts. There are limits for what our eyes can discern and for that reason leaves of trees observed against a bright sky always seem very dark, almost black even though we know that they are green.

Finally I had to realise that I never would be able to reproduce the very same sensation and experience of seeing light and shadow in my painting. Instead I could try to imitate the “effect” of light. For that reason I painted the grass near the border to the sunlit area in a darker and cooler green than the grass close to the edge of the forest. Also I tried to put in some variations within the sunlit and shadow areas.

Also my idea of a kind of a mixing formula vanished; instead I understood that I needed to establish the right tonal values between light and shadow and that I had to find the true colours of grass or leaves etc in shadow and light. Plein air painters often have a small card board frame with a small hole in it with them. By looking through this hole they can isolate certain spots of colour to determine the true colour of objects. I used the palm of my hand to form a kind of monocular and thus isolated certain spots of the landscape for my eyes to get an idea what the true value and colour. This helped me to establish the basic tonality of the shadow and the sunlit meadow. Then I started from these middle values and expanded the range by mixing slightly lighter and darker colours of dark greens and greens in sun.

Some people mix their shadow colours by adding blue, violet to the colour of the sunlit areas or objects in a rather schematic way. These shadows often look artificial. The same applies for the other method that starts with the object colours in shadow which then is brightened up with white and yellow to imitate the sunlit appearance. Both methods are based on the assumption that shadow or sunlight can be understood as some sort of colour filter. Sunlit areas contain more white and yellow, whereas shadows contain more blue and violet components. of course these basic assumptions are correct and helpful on the way, but for more sophisticated painting one has to drop “recipes” I think.

So how do you mix dark shadow colours with oil colors ?

There are many ways to mix dark colors, in fact the possibilities are endless. However there are only a few starting points.

1. Add black color to your base color
Let’s say you need a dark red. By adding black to red color you can mix a darker red, but the red will get more and more muddy the more black you add. You can tell by the greyish look of a paintings that a lot of black has been used in mixing. If you want that look it is fine, but if you prefer bright colors this method most probably will not be the preferred one

2. Start with a dark version of your base color and add dark blue
If you want to keep your colors bright and virbrant adding dark blue to the base color will give you a dark, but blueish version of the base color

3. Mix a dark color with the three primary colors : magenta,blue and yellow
This is the most demanding version to mix the color as seen from the primary colors. You might want to experiment with dark versions of the primary colors or similar colors for example you could subtitue magenta by burnt siena and use prussian blue instead of a primary blue etc..

4. Use Schmincke van Dyke brown to darken colors
I have used Schmincke van Dyke brown with great success to darken colors, especially for painting shadows on green foliage or very dark foliage.
In fact I consider van dyke bewon the best black you can get. It does not kill the clarity of your base color as black does. In combination with variation of no.2. and 3. one can get great results.

I commend to experiment with all four starting points. The shadows and dark greens in the landscape above were painted by using variations of the no.2–no4.

What is the colour of shadows ?

A bit of colour theory

The colour of an object is determined by the light, or more exactly by the wave length of the light that is reflected by the object.
An object in direct sunlight reflects stronger and different light in comparison to an object that receives no direct light or only a fraction of the available light because some other object is casting a shadow on it by stopping the light from the primary light source. Nevertheless the object receives indirect light from the surrounding, which is reflected light, when in shadow. The colour of this indirect light can vary of course depending where it is coming from especially from where it is reflected or maybe even filtered.

Example1:
Very well known is the effect of blue and grey shadows on snow. Snow in shadow receives mainly indirect light from the sky. As snow is white i.e. without colour or more correctly reflects all colours, the shadows in snow look blue under a blue sky without clouds or greyish on an overcast day with a closed layer of grey clouds.

Example 2:
The shadows under a red sun umbrella are influenced by the colour of the umbrella for example. A blue drinking cup under a red umbrella might change to a violet colour due to additive colour mixing theory : blue + red=violet.

Also it is interesting to observe that the colour of the primary light produces shadows in the complementary colour. If you chose a red bulb as your primary light source in a still life painting the shadows cast by that bulb will have a greenish colour.

How to paint shadows – basic approaches

From light to dark and vice versa

1. From light to dark
In water colour and in acrylics it is a very common method to lay down the colours of an object in “normal light”. Then the artists waits until the colours are dry. In a second step those areas in shadow will be covered with a transparent layer of colour that will darken the original colours in order to get a shadow effect. A similar approach is also used in oil colours by adding blue and darker colours to tone down from light to dark shadows. That way the colour hue of the sunlit area is always present in the colour mix for the shadows.

Usually the primary source of light as the sun contains warm yellow light and the colour of shadows are mixed with blue colours as cool complementary hue.

2. From dark to light
Of course it is also possible to start from the dark side and to establish the colours in shade first. The colours of the sunlit parts are then mixed by adding white and yellow to the shadow colours to brighten up or tone up the shadow colours.

3. Mixing the colours as seen
The other way is to paint the colours as they appear in front of the painter. In principle there is no difference in mixing the colour of the sky and the colours of a wall in sun and in then in shadow. In any case the painter has to observe the colours and to translate his observation into a colour mix.
Very bright hues can be mixed by adding white and if the source of light is “warm” i.e. yellowish, as direct sunlight mostly is, with a little bit of yellow in addition. In general it is wise not to overdo the mixing with white because the result will be washed out or almost bleached colours. Overdone highlights can really ruin an otherwise well done painting.

A major difficulty is to mix dark or very dark colour hues. To know the extreme dark and bright colours that are possible with your medium is very important. The gamut of oil colours and other painting media is just not sufficient to represent the wide range of tonalities which are there in nature. Therefore a very bright light can only be represented by emphasising the contrast with dark colours around.

Painting or drawing shadows with dry pastels

A studio still life study with controlled light

This is a still life in dry pastels on medium rough watercolour paper from life in my basement studio. During a week I studied light and shadow colours in artificial light. I tried to find the right colours as seen on the objects to get the realistic look of light and shadows.

It was very helpful to have different colour shades in the Schmincke set of pastels colors. For example the ochre tonalities in light and shadow on the lamp on the right are only very slightly mixed. For the most part I applied the pastel without mixing in that case.

The green glass bottle in the middle however required quite a lot of careful mixing as the set of pastels colour did not contain greens in a suitable gradation of tonalities. I also used bits of grey or charcoal to darken certain areas. With purpose I avoided to use a lot of white in the brightest areas. I would commend to establish small areas with the brightest colours and the darkest colours very early in the painting process to keep control over the contrast or tonality range. It might be very difficult to establish highlights later if the medium tonalities are to high already. If you set your middle values too dark the deepest darks in shadows can become a problem. I found that it is more difficult to create the darkest darks in pastel than the lightest lights.

As you may observe the tonality varies in shadows, by darkening the shadows close to the contact with the bright areas I tried to imitate the sensation for the eyes when it looks at strong contrasts as described in the previous paragraph. There was a rather complicated mixture of shadows cast by the objects onto themselves and on others as well as effects of reflected coloured light, particularly in the green glass vessel at the centre of the composition.

Great Easy Acrylic Painting Projects

Great Easy Acrylic Painting Projects

Find Great Easy Acrylic Painting Projects

Find easy acrylic painting projects. It has great ideas and acrylic painting projects and access to other painting projects too. Discover the joy of painting in acrylic and explore this great medium with these projects.

Finding an Easy Acrylic Painting Project

Finding things to paint can be a trial sometimes. But it need not be. There are things to paint all around. For instance did you know that Vincent van Gogh spent months and months painting nothing but flowers. It doesn’t matter that he used oils it was the dedication to finding a subject no matter how difficult the task.

Often us painters cannot see what to paint, we are too busy looking for that amazing landscape or capturing rare lighting which is all great. But in doing so we miss the little things. We forget that it is the beauty in what we see and paint that makes it amazing.

Below are projects for you to try. Depending on where you are in the world will depend on when and if you have winter, summer or seasons or monsoons. But there is no reason why you cannot adapt each project for your own needs. OK here goes.
Find Great Acrylic Painting Projects on Amazon
Finding great acrylic painting projects is a great idea as it expands your learning and techniques and gives you plenty of ideas. Below are some project ideas for your acrylic painting

Easy Acrylic Painting Project 1

Project 1

For this project we are going back to basics. For those of you who haven’t done any color mixing start here.

Watch this video on basic color mixing as you will need to be able to mix colors for future projects.
Then practice until you can confidently get most of the basic colors.
Orange
Green
Purple etc

Easy Acrylic painting project 2

painting project Two

Van Gogh may not be to everyone’s taste, however his work was based on feeling and color. If you are a beginner without much experience it is important for you to get the feel of the paint, how it works, how quickly it dries and what it looks like. The best way to do this is to play.

To do this project we are stepping into Van Gogh shoes. We are aiming not for an artistically correct piece, but one with color and feeling. Using your new found color mixing skills from project one we are going to create a simple painting.

1. Pick a subject that you love. Make sure it is fairly simple to do. Try to keep it natural. Flowers in a bottle or vase would be great, your favorite part of a garden, a cliff a tree etc. If you think a vase is too much keep it to one flower. Painting outside can be a challenge so only do this if you feel comfortable. Remember this isn’t about making a perfect picture but playing with color. do not paint from a picture or photo from other artists.
2. Gather together all your art colors and canvases and brushes.
3. Spend time looking at your image. Break your image down into both color and light.
4. Just paint the very basic shapes and basic colors. Don’t worry about detail just the overall image.
5. Make sure your colors are over vibrant and your paint thick. Keep your brushes larger to prevent fussiness.

Project 3 – Simple Acrylic Winter Landscape Project Challenge

Project 3

This is a lovely painting to do, it reminds me much of the Bob Ross style which is well known for bringing art to everyone. So challenge yourself to get out those brushes and explore the colors of winter!

Easy Painting Project 4 – A Simple Landscape

Project 4

This is a beautiful little painting to do. Not only is it a project but it also teaches you techniques all done by a 3 hour video tuition after which you should have some useful knowledge to apply to any local landscape painting you might fancy doing.

Project 5 – Fun Cave Horse Painting

This Comes With a Popularity Warning

One of my favorite projects was one I didn’t think I would enjoy but it was really fun. This is the cave horse painting. This is a beginners project however lots of people af all skill levels love to do this one. You recreate the stone walls by building up the paint much as you would for any other painting though it is designed to look really messy! The cave horse is painted much as the cave men would have done and he looks fats and dumpy.

Cave horse and other cave animal pictures are on the open domain if you want to get one.

WARNING: Very Popular. I didn’t think anyone would like a picture of a cave horse, but have found that it is very popular. My sister napped mine when my tiny house got crowded with art. Then my other sister wanted one too and I have to repaint one for me! So be warned you might have to do more than one! It isn’t a problem it is fun to do and can be done quite quickly.

Lots of Painting Projects for the Beginner to Advanced Painter

This is absolutely amazing! I came across this site while searching for inspiration and wow did they give it. This site has to be the best and most comprehensive site for art courses on the net. If you don’t agree and have found another one feel free to pop it on the comments as I am always in search of the best information and ideas out there. But I think this will be very hard to beat!

This is definitely the site by artists for artists of all levels and skills. These guys cover everything from easy acrylic painting projects like the one above right through to the more complicated projects and courses. If in doubt they do a free course and a free magazine just to get you started – these should keep you occupied for a while. However if you want to plunge right in there are some great courses and they start at low prices or you can buy modules.

Big Eyes Keane Paintings

Big Eyes Keane Paintings

The Story of Margret Keane

Sad Eyed Children, Big Eyed Art, Doe Eyed Orphans or Sorrowful, wide-eyed waifs, whatever name you used to describe them, there’s one thing for sure, with no grey areas, you either loved them or you hated them.

Artist Margaret Keane was born in 1927, by the 60’s she was a pop art sensation. Margaret was married to Walter Keane for ten years, from 1955 to 1965. A film about her life is being made called “BIG EYES”. Tim Burton, a fan of Margaret’s work, will co-produce the film. Early rumours had Ryan Reynolds and Reese Witherspoon in the staring rolls. The latest to be put up for the lead roles are Christoph Waltz and Amy Adams.

The script was penned by Larry Karaszewski and Scott Alexander and Tim Burton will direct the movie said to be released in August 2014.

The film will start just before Margaret and Walter meet up, and ends in a spectacular court scene where Margaret gets her day in court.

Margaret now lives in Napa County, California.

Personally I can’t wait until the film comes out. Now I have to go and find all those paintings my sister had hanging up on her anaglypta-wallpapered bedroom walls in the seventies, as they should skyrocket in price after the film.

The script

BIG EYES by Scott Alexander and Larry Karaszewski

At the beginning of the script the year is 1955 and Margaret with her eight-year old daughter Jane, leaves her first husband, and lands in the wild and cool beatnik epicenter of San Francisco. The place is foreign and strange, yet she gets a sense that this would be a great place to settle as an artist.

Margaret runs into Walter Keane whilst sketching tourists for a few dollars at Fisherman’s Wharf. Walter made an impression on her dressed like a Parisian Artist in a turtle neck and black beret flogging his Paris street scenes with the gusto of a fairground sideshow boss. As soon as Walter meets Margaret he foreshadows his future actions by criticizing her for selling herself and her artwork too short.

It’s not long before they pitch their easels next to each other in the park and start a courtship. Jane, Margaret’s daughter notices that Walter’s canvas is always blank. We learn that Walter is really a commercial realtor. They soon get married and honeymoon in Hawaii. in this script version, they decide not to delve in length into the reason why they get married so hastily, just a letter from Margaret’s ex-husband accusing her of being an unfit mother.

Walter’s artwork is shunned by a Gallery owner which motivates him to rent wall-space in the hungry I, a hugely popular and hip jazz club, and he exhibits his and wife Margaret’s work. At this time they both sign their works as Keane and Walter is soon credited with the sad-eyed-girls, hungry for sales he takes credit for the works. The Jazz club is further instrumental in their success when the club owner and Walter come to blows and are caught on camera; this catapults both the club and the paintings to overnight popularity and Walter deeper and deeper into his lie, a lie that eventually becomes real to him.

The paintings start shifting even though art critics snubbed them, one critic suggested they were “the very definition of tasteless hack work”. The layman loved them, and Walter found they had to start printing off posters and framed prints to keep up with demand.

There’s not doubt Walter had a flair for marketing, he opens up a gallery across from the first gallery that shunned him and started giving paintings away to famous and influential people including, Natalie wood, Jerry Lewis and Kim Novak also sending one of John Jr. and Caroline Kennedy to the White House.

Walter Keane churned out work, sausage factory style, well before Warhol and his helpers. Walter’s sweat shop consisted of Margaret only, whilst she grafted he wallowed in his self-promotion, and the secret was kept even from Margaret’s daughter.

Margaret becomes more and more depressed, which reflects in her artwork, almost self-portraits, which makes it more difficult for Walter to explain his inspiration.

The script heads towards the climax, where Margaret gets her day in court after remaining silent for years. A radio interview in 1970 prompted Margaret to admit she and she alone painted the wide-eyed waifs, and at this time challenged Walter to a public painting contest, Walter was a no show.

A couple of years go by and Walter surfaces suggesting to USA Today that Margaret thought that he was dead and that’s why she was making her claims. This led to a slander suit from Margaret.

When they both walked into the Honolulu federal court, 20 years had passed since either one had seen each other. Walter was 70 and Margaret 58, the whole trial lasted for 3½-week with plenty of sparks. According to Margaret the only reason she was obsequies and gave into Walter’s wishes was because she feared for her and her daughter’s lives.

Margaret brought into court paintings from her childhood, and clinched it when she painted a boy’s face in fifty three minutes, showing obviously that she is in fact the creator of Big Eyes. Walter was challenged to pick up a paint brush but declined clutching his should, saying he was taking medication and declined the challenge. The court awarded Margaret $4 million for damaged reputation and emotional distress at the hand of Walter’s false statements.

At the end of the Script a reporter asks Margaret if she feels vindicated by the high award, she replies that it was never about the money and anyway she doesn’t think that Walter would pay up. Margaret adds that she just wanted rightful credit for her work and to get her art back, my prayers are answered.

Art Glossary

Art Glossary

Explaining terminology from Art Forums

This art vocabulary glossary was made as an addition to /ic/’s Beginner’s Guide. It lists explanations of terms that are commonly used on art forums. We focus on visual art, namely paintings and drawings, in both the digital and traditional medium.

Note: work in progress. 🙂

Overview

A

Anatomy: the study of human and animal body structures. Artists study skeleton, muscles and fat distribution, as well as these functions in movement, in order to draw realistic looking figures or creatures.

B

Basic Shapes: the basic shapes are the sphere, the cube, the cone and the cilinder. Everything in life can be simplified to these basic shapes or variations of them.
When learning a new subject (proportions, perspective, lighting, …), it is useful to start with basic shapes.
Blending: mixing paint on canvas, mainly used in the context of painting digitally or with oils. This is an important part of rendering.
How to blend digitally

C

Chicken Scratch: the same as “hairy line”. Drawing a line consisting of multiple small scratches or going over a line multiple times to mask mistakes. Not to be confused with loose, sketchy lines. *example picture to be added
Canvas: the surface you paint on. For a traditional painter this is the fabric he works on. For digital artists, the canvas is the total image dimension he is working on. (better explanation for “digital canvas”?)
Color/Colour: considering painting techniques, colour refers to the whole of hue, value and saturation (also called chroma). This is an in depth guide to colour: The Dimensions of Colour.
Comfort Zone: keeping to the skills you already have and not trying new things due to fear of failure. For example, artist might restrain themselves to a single colour palette, or drawing the same subject over and over again.
Composition: arrangement of the elements in a pleasant manner. Or unpleasant, if you suck at composition. *explanatory video link to be added
Concept Art: mainly designing. Usually part of a larger process (creating a movie, game, …).
Construction: building the subject of the painting or drawing from a basic structure. This could be basic shapes which are later on refined, or the key elements of the subjects. For example, a very basic construction for the human figure might be composed of the head, torso and pelvis, with sticks for the joints.

E

Eyeballing: judging by eye, as opposed to measuring with rulers, drawing grids, colour picking, …

F

Fair Use: use of copyrighted works within legal limits.
Flatness (or flat drawing): the works lacks a sense of depth. In many cases, this is due to a poor value range or using strictly contour lines.
Flow: relaxed, zen-like work state of full concentration. For the photoshop tool “flow”, see this post.
Freelancer: self-employed professional.
Fundamentals: things you have to know before you can move on. The crawling before walking and running.
Figure Drawing: drawing humans.

G

Gesture: you probably heard before that non-verbal expressions are the most important element of conversation. That’s what gesture is about. The gesture of a figure, animal or even object can express a wild variety in emotions and actions. Gesture studies are a necessary complement to anatomy studies, to prevent your figures from becoming lifeless.
Graphic Design: the visual art that focuses on convey information. Fields like web design, logo design and typography are important to graphic design.
Grayscale/Greyscale: black-and-white. Consisting only of grey shades (from white to black). Sometimes short for “an image in grayscale”. Value painting/drawing.

H

Hairy Line: the same as “chicken scratch”. Drawing a line consisting of multiple small scratches or going over a line multiple times to mask mistakes. Not to be confused with loose, sketchy lines. *example picture to be added
colour hue Hue: this term is difficult to explain, as it corresponds to “colour” for those unfamiliar with colour theory. This is the third aspect of colour besides value and saturation. For example: red, green or blue are hues. Adding white or black will not change the hue.

I

Illustration: art accompanying another product. For example, illustrations in a book, on game cards, … Nonetheless, an illustration often has stand-alone artistic value.
Illustrator: artist making illustrations, either as a freelancer or employee.

L

Layer: in tradtional painting, this is literally a layer of paint. In digital painting, this is the layer in the painting program, on which one or more elements are kept. Painting on a single layer is also possible. Digital layers can be swapped, moved around and edited individually.
Life Drawing: also “drawing from life”. Drawing a real life object or person, as opposed to drawing from photo reference and drawing from imagination. The three most common life drawing practices are still lifes, model drawing and sketching people from life. The most beneficial aspect of life drawing is the increasing sense of value and 3D perception.
Loomis: usually heard in a phrase like “needs more Loomis”. This refers to the figure construction method as taught by the famous art teacher Andrew Loomis.

M

Master: an artist of great skill. An “old master” would be a great artist from the past, such as Rubens or Van Eyck. A “master work” is an artwork of high artistic and technical quality.
In the broadest sense, a master is any artist whose skill and accomplishments you admire. Doing a “master study” refers to studying the work of a master in order to learn from it.
Muddy drawing Muddiness (or a muddy drawing): the colours or values aren’t cleanly rendered. The most common causes are:
1. painting with a lot of short, small brush strokes instead of fluid large strokes.
2. Poor colour choice, for example shading by adding black.
3. Smudging.

N

Negative Space: the space surrounding the object of figure. Drawing negative space means focusing on the outer edge. This is most helpful to fix proportion errors.
Notan: balancing areas of light and dark in a harmonious whole. This concept is great importance in traditional ink paintings.

O

Opacity
Overlay

P

Pen Pressure: when using a tablet for digital art, you can turn pen pressure on. This responds to how firmly the stylus’ tip is pressed against the tablet surface.
It’s similar to how a pencil gives darker lines when pressed harder into the paper, but you can link pen pressure to a variety of settings. It is most commonly linked to line thickness and opacity.
Perspective
Photo Study: doing a study using a photograph as a reference. The goal of the study can be anything from lighting to anatomy.
Professional: an artist earning full-time income from his craft. Also refered to as “pro”, though “pro” is sometimes used for any artist of great skill.
Proportions

Q

Quick Pose: figure sketching done whilst setting a timer for each pose. Most common are quick gesture sketches, using 30 to 60 seconds for each figure. The purpose of quick poses varies.

R

Reference:

S

Saturation:

Self Portrait: drawing oneself in front of a mirror. Drawing yourself using a photo reference is usually regarded as a photo study.
Sketch: this is either an unfinished, rough drawing, or a drawing done as preparations for a bigger art work.
Sketchbook: there are physical sketchbooks with bound blank pages used to draw in, often done outside. “Sketchbook” could also reference to a regularly updated forum thread devoted to the art and progress of a single artist.
Skill: acquired technique and knowledge. The ability to do something.
Smudge: smudging is a blending process by rubbing with your finger or some material on the canvas. It is very common practice in pencil drawing, but often with poor results.
Speedpainting: a quick painting, usually between 30 minutes to 2 hours. Currently also used in the context of time lapse videos of the painting process.
Still Life: drawing or painting objects from life.
Studio:
Study: drawing or painting a reference in order to learn from it. The goal is to acquire knowledge and skill to use in one’s own artworks. Methods vary wildly depending on the aspect focused on.
Symbol drawing: drawing one’s representation of something instead of a realistic depiction. For example, drawing an almond shape and a circle for an eye.

T

Talent: the notion that one’s skills aren’t acquired by practice or studying. By some used to indicate great skill, but keep in mind that this could be an affront to hard working artists.
Thumbnail: a small version of an image.
Tutorial: short instructive guide. A tutorial could be in any format, from video to plain text. Usually tutorials are a combination of step drawings and explanatory text.
Tracing: putting a transparent sheet or a new layer on top of a picture and directly drawing over the lines. On the ethics of tracing, check out this link.

V

Value: when putting the colour on greyscale, value is the range it falls in, with pure white being 0 and pure black being 100. As some programs use different numbers, the value can also be expressed as a percentage, for example 10% grey.
Value is regarded as the most basic and important quality of colour, and beginners are encouraged to start practicing in greyscale before moving on to full colour. The two other aspects of colour besides value are hue and saturation.