Chinese, Korean, and Japanese Tiger Art

Chinese, Korean, and Japanese Tiger Art

Welcome to this lens dedicated to the tiger art of China, Korea, and Japan! Tiger art from these three countries has become famous all around the world and many tiger paintings, sculptures, statues, and other forms of art have been made in these countries over the centuries. Many have been purchased by art collectors the world over.

In this lens we’ll study the tiger art from each country, the characteristics of tiger art in these countries, and the meaning of the tiger in the traditions and folklore of China, Japan, and Korea.

Thank you for your visit and I hope you find this lens informative!

Lens intro image: Edo-period Japanese artist Utagawa Kuniyoshi’s (1797-1861) tiger print. Image used courtesy of Visipix.com

Table of Contents

Korean Tiger Art
Chinese and Japanese Tiger Posters on Amazon
Chinese Tiger Art
Japanese Tiger Art
Kishi Ganku Tiger Painting
Tiger Statues and Sculptures
Tiger Tattoos
In Conclusion
Tiger Art Link List
From the Same Author
New Guestbook

Korean Tiger Art

Traditional Korean Minhwa (folk) painting of a tiger and a magpie. In Korea, tiger art has been very popular over the millinea, especially in traditional Joseon-era Korean folk art (known as “Minhwa”).

Tigers made some of their earliest appearances in Koguryo paintings where they were being chased down by archers on horseback. Many of these mural paintings can still be found today on Koguryo-era temple walls in modern-day North Korea.

Tigers are an important character in traditional Korean beliefs and folklore and the mythical white tiger is traditionally the guardian of the East. Until the 1920s, the Siberian white tiger called Korea home and the tiger is mentioned in the creation myth of Ko-choson, which is one of Korea’s first dynasties. Tigers are one of the most common and prominent subjects of folk paintings, and are often portrayed as being friendly, approachable, and even silly or stupid. This stands in contrast to the artwork of most other countries where the tiger is portrayed as being an intelligent, proud, and fierce animal! In many folk paintings, the tiger is a companion to the mountain spirits. Many Korean folk paintings feature a magpie (a bird that’s considered to be an auspicious omen and a bearer of good news) cackling at a tiger, or the tiger with a lion or rooster. Tiger skins were also painted by minhwa artists and were much more affordable to the common person than real tiger skins. These paintings were supposed to invoke the tiger’s guardian powers.

However, the tiger also has more serious portrayals in Korea. Many Koreans believe the tiger is a mountain god that can determine the fate of a person. Also to many Koreans, the tiger is the guardian spirit of Korea. Tiger decorations can be found in many Buddhist temples and shamanistic ritual sites across Korea and tigers are also found on mural walls of many of Korea’s ancient kingdoms such as Koguryo and Paekche. And of course the tiger has also been the silly, clumsy animal in many a Korean folk painting and folktale.

In 1988, the tiger took on a new significance for Koreans when a tiger was chosen to be the mascot for the 1988 Seoul Summer Olympics. The tiger was named Hodori (derived from “horang-i dori,” or “boy tiger,” in Korean) and he was featured on many an Olympic souvenir item that year! There was also a female tiger named Hosuni, but she was rarely used.

Chinese and Japanese Tiger Posters on Amazon

Here are some nice reproductions of the famous Chinese and Japanese tiger paintings of centuries ago (as well as some modern-day artwork) available in poster format from Amazon:

Chinese Tiger Art

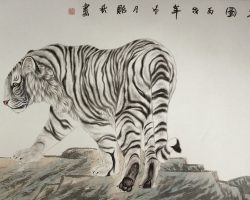
A Song Dynasty, Shaoxing Period-era (1159 AD) illustration of a tiger from a medical book. In Chinese culture, the tiger is revered as a creature of great courage, prowess, and beauty. It is the king of the wild and is a creature of masculine principles. The Chinese tiger has the power to drive away demons and ghosts and brings good fortune and luck to all those who keep its image close at hand. Furthermore, the tiger represents the basic drive to progress, achieve, and succeed. Also according to traditional Chinese beliefs, a tiger lives to be 1,000 years old and when it reaches the age of 500, it turns white. Therefore any tigers in Chinese white tiger artwork are said to have passed the age of 500 years.

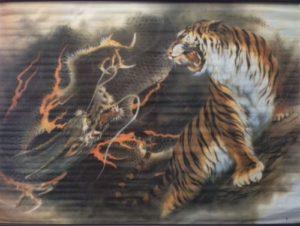
Tiger statues dating back some 7,000 years have been found in China and tigers are carved on many a tomb or monument. Many of the Chinese deities and legendary figures such as the Taoist “First Master of Heaven” Zhang Daoling, the God of Wealth Chao Gongming, and (occasionally) the mythological exorciser/ghost vanquisher Zhong Kui are often depicted riding a tiger in Chinese art.

For all these reasons, Chinese tiger art is displayed prominently in many Chinese businesses, offices, and homes. In addition, tigers appear on children’s clothing and many women in southern China place paper tiger images in their homes on the birthday of the tiger (March 6th, or the second moon of the lunar calendar) to prevent quarrels and to keep vermin such as snakes and rats away.

In Guizhou province, many of China’s ethnic minorities such as the Miao incorporate tiger motifs into batik artwork. Many of these pieces are very stunning and intricate.

Tiger paintings in China can range from folk art paintings to simple watercolors to modern paintings most people nowadays associate with the Chinese tiger. All of these paintings have one thing in common: they capture the ferocity and gracefulness of the tiger for all to see!

Japanese Tiger Art

Tiger art is also prominent in Japanese culture. The white tiger in particular is a common motif in Japanese paintings and artwork due to its status as a deity in the Shinto religion. Ironically enough, tigers aren’t native to Japan, which is why many Japanese artists from centuries past copied their works from the Chinese paintings.

Three Japanese artists who became particularly famous for tiger paintings during the Edo period were Kishi Ganku (1749 or 56-1839), Maruyama Okyo (1733-1795), and Katayama Yokoku. Ganku had the head of a tiger which became the basis of many of his paintings while Okyo had a tiger pelt which made drawing a tiger’s skin very easy. Yokoku’s paintings often depicted tigers as a traditional symbol of strength, and the tigers in his paintings are often shown emerging from bamboo.

In addition, other prominent Edo-era Japanese artists such as Okyo’s student Kameoka Kirei (1770-1835), Ganku’s son-in-law Kishi Renzan (1805-59), Kano Tsunenobu (1636-1713), and Katsushika Hokusai (1760-1849) painted some very famous tiger paintings. Hokusai’s “Old Tiger in the Snow” and “Running Tiger” as well as Kirei’s “Tiger Looking to the Moon” are staple Japanese tiger paintings from this period.

The popularity of tiger art continued during the Meiji era (1868-1912) in Japan. Artists such as woodblock (Ukiyo-e) artist Koson Ohara (1877-1945) made some amazing tiger paintings and woodblock prints during this period.

Since tigers are not native to Japan, it was not very easy to find a live tiger to get all the facial and body features down exactly as it was in China. However, there was an abundance of tiger skins and the Japanese artists of the time often based their paintings on these skins. This is why in many of the paintings the tiger’s skin is beautifully accurate, but in other paintings the tiger has a flat nose, abnormally large eyes, large paws, and small ears!

Tigers were also frequently used on the banners and wall paintings of samurai, to whom the tiger represented ferocity, strength, courage, and stubbornness, as it still does to the Japanese people to this very day.

Today tigers are still painted by many Japanese artists both on canvas and brush and in modern-day computer vector drawings. These artists have picked up where artists of centuries past such as Ganku and Okyo have left off!

Kishi Ganku Tiger Painting

This is one of Kishi Ganku’s paintings of a tiger. Notice the flat head and small ears on this tiger. This is very typical for Japanese tiger paintings from that period of time.

Tiger Statues and Sculptures

In addition to paintings, tiger statues and sculptures are commonplace in China, Japan, and Korea. Generally speaking, the statues and sculptures have all the same meaning as the paintings, but some have had and still have traditional uses.

In Japan during the Edo Period (1600-1848 AD), small tiger dolls made of papier mache known as Harikonotora were carried by travelers on the Tokaido highway. These were especially popular among samurai lords who believed the tiger could travel a thousand miles with ease and the dolls would inspire his entourage to do the same. Also many years ago in Japan, small tiger sculptures were given to boys on Boy’s Day (now known as Children’s Day) as a token to protect them from evil spirits and to foster growth and maturity.

Tiger Tattoos

Chinese and Japanese tiger art designs are very popular tattoo designs. Generally speaking, tiger tattoos can be found in virtually every country in Asia and have been for many centuries. However, Japanese tiger tattoos (i.e. tattoos with Japanese tiger designs) are the most popular and prevalent of all the tiger tattoos.

Tattooing in Japan has a very complex history that would take a very long time to explain on this lens. The popularity of Japanese tiger tattoos in particular stem from the tiger paintings described above. The tattoos drew inspiration from the Chinese and Japanese tiger paintings described above. However, it wasn’t until toward the end of the Edo period that tattooing became popular in Japan. The tattoo designs that have become famous over the years were widely influenced by the Ukiyo-e (traditional Japanese woodblock art) prints of the time. Another source of inspiration were the Chinese tiger paintings of the time. After seeing these elaborate paintings, many people – Japanese and non-Japanese alike – were inspired to have tattoos of these drawings drawn on their bodies.

During the 17th century or so, tattooing in Japan became both taboo and forbidden by law due to the popularity of Chinese culture in Japan and the popularity of tattoos among the underclass and the Yakuza mafia syndicates. Laws prohibiting tattoos in Japan were lifted after 1945, but this taboo still exists up to the present day. Despite this traditional taboo, a growing number of young people in Japan are becoming more and more open-minded about tattoos and getting some of their own.

The tiger in the tattoos often represent power and dominance. A resting tiger may represent dominance whereas an attacking tiger may represent power and aggression. This symbolism has made the tiger tattoos very popular in Asia over the centuries.

In Conclusion

Tiger have been a part of Chinese, Japanese, and Korean cultures for almost as long as they’ve been in existence. They’ve been in the artwork of these countries for many thousands of years and hopefully will remain in their artwork for many more centuries to come!

Thank you for stopping by and please come back! I will update this lens when time permits. Please remember to check in again for any new updates!

All images copyright: Wikimedia Commons.

Tiger Art Link List

You can read more about Asian tiger art and art from Asia in general at the sites below:

Japanese Tiger Art
Interested in tiger paintings from Japan? Be informed about the various mediums in which the Japanese have produced Japanese tiger art.

Tiger in Chinese culture – Wikipedia, the free encyclopedia
Wikipedia entry about the tiger in Chinese culture.

Chinese Tiger Art
The tiger has been a potent symbol in Chinese art throughout the history of the nation. The animal is one of the twelve characters of the zodiac calendar. As such the tiger is considered to have an authoritative personality that is considered to be t

About Korean Paintings
Another resource for Korean art that’s very in-depth and reliable.

Japanese Tiger Statue – The Old Tokaido
Blog entry about Japanese tiger statues.

Korean Focus eBulletin: White Tiger to Roar Loud and Proud in 2010
Very fascinating and in-depth article about the tiger in Korea and its place in Korean beliefs, culture, and society.

Japanese tattoos – what do they mean? Japanese Tattoos Designs & Symbols – Japanese tattoo meanings
Japanese tattoos – what do they mean? Tattoo Designs & Symbols – Japanese tattoo meanings

Japanese Tiger Tattoos
Interested in a tiger tattoo from Japan? Discover the age old traditions associated with Japanese tiger tattoos.

Tigers in Japanese Art at the Saint Louis Art Museum
Article about Japanese tiger art and the artists who painted them.

The Beautiful Oriental Art of Koson Ohara
Very comprehensive site about Koson Ohara. Featured on this site are a biography and many of his paintings.

The Asian History Blog
A new blog from yours truly pertaining to the history of Asia.

From the Same Author
While you’re at it, I would appreciate it very much if you would check out some of my other lenses related to Asian culture! All feedback on these is greatly appreciated.

Tips For Furnishing And Decorating Your Art Studio Apartment

Tips For Furnishing And Decorating Your Art Studio Apartment

Your art studio apartment is your creative haven. It’s a place where you can let your imagination run wild and create something beautiful. But, if your studio is feeling a little cold and uninviting, it can be tough to get inspired.

If you’re an artist, chances are you’re also on a tight budget. But that doesn’t mean your art studio apartment has to look like a college dorm room. With a little creativity and some thrifty shopping, you can turn your studio into a stylish and functional space that reflects your personality and creativity.

Tips for furnishing and decorating art studio

Here are some tips for furnishing and decorating your art studio apartment on a budget:

Get creative with your furniture

Just because you’re on a budget doesn’t mean you have to settle for boring, mass-produced furniture. Get creative with your furniture choices and look for pieces that double as both art and functional items. For example, a vintage dresser can be used as a buffet table for hosting parties, or an old door can be repurposed into a unique coffee table.

Shop at thrift stores and flea markets

If you’re looking for unique, one-of-a-kind pieces, thrift stores and flea markets are great places to find them. You can often find furniture and home decor items for a fraction of the cost of what you would pay at a traditional store.

DIY it

If you’re handy, why not DIY some of your own furniture and decor? There are plenty of easy and inexpensive DIY projects that even the most novice do-it-yourselfer can handle. Check out Pinterest or your favorite DIY blog for some inspiration.

Get creative with your wall decor

Your walls are a blank canvas for you to get creative with. Hang up some of your own artwork, or frame interesting found objects like old maps or antique postcards.

Use lighting to your advantage

Proper lighting can make a big difference in the feel of a room. If your studio doesn’t have a lot of natural light, make sure to invest in some good quality artificial lighting. String lights are a cheap and easy way to add some ambiance to your space.

How to make your art studio apartment cozy and inviting

Here are a few simple tips to make your art studio apartment feel cozy and inviting:

Bring in some plants

Adding some greenery to your studio will not only make it feel more inviting, but it will also help purify the air. Choose plants that are easy to care for, so you can focus on your art, not on your plants.

Add some cozy blankets and pillows

Making your studio cozy doesn’t have to be expensive. Simply adding a few blankets and pillows can make a big difference. Choose cozy fabrics in colors that complement your artwork and make you feel happy.

light some candles

Candles add both warmth and ambiance to any space. Choose candles with scents that make you feel relaxed and inspired, like lavender or citrus.

Play some relaxing music

Having some soft, relaxing music playing in the background can help you get into a creative mindset. Make a playlist of your favorite calm songs to help you focus on your art.

Hang some artwork

Of course, no art studio is complete without some artwork on the walls. Choose pieces that inspire you and make you feel happy. Seeing your own artwork on the walls will also help you feel proud of your accomplishments.

With a little creativity and some thrifty shopping, you can turn your art studio apartment into a stylish and functional space that reflects your personality and creativity.

Top Gifts for the Artist

Top Gifts for the Artist

Need a Gift for an Artist? Find One Here.

Photos of artwork by Gayle Dowell

What gift does someone get the artist friend or relative? I’ve listed a few ideas here. As an artist, I’ve always enjoyed getting gifts on holidays that I can use in my creative work. I’ve been a watercolor artist for 15 years. I’ve painted in oil, acrylic, and have created collage work. I’m now working with metal and creating jewelry. I find that a new book or new art medium can give me inspiration in work that I’m currently working on. On this page, I’ve listed the top gifts for artists of all mediums. You can vote or add your ideas as well. Leave your gift ideas in the comments section at the end of this page.

Sketchbooks

The Gift that Bridges All Mediums
No matter what medium your gift recipient works in, they can use a sketchbook to draw out their ideas, whether it be for planning a painting, a jewelry piece, or a sculpture, or to journal. My most cherished sketchbooks are those with quality paper that will hold up to both pencil and paint. They also have spiral binding so that I can bend back the cover when I’m outside which makes it easier to sketch without a table or drawing surface. It must also have a hard cover to withstand abuse. Here is my favorite sketchbook.

A Gift that Gives Year Round

A subscription to a great inspirational magazine that came to the recipients mailbox throughout the year, would be a great gift for an artist. I know of no other inspirational magazine that could top, “Cloth, Paper, Scissors”. I keep my back copies to look at whenever I need an art idea or to get me motivated to create.

A Camera?

A good camera may not come to mind as a great gift for an artist. But I use mine all the time. I’m constantly taking pictures of possible scenes to paint, textures to use in my designs or color combinations I want to remember. I love a good digital camera so that I can download pictures of my work to my blog or my online shopping site.

A Collection of Decorative Paper

I collect decorative paper. I use paper all the time in my design work. I do collage, scrap booking, greeting cards, experiments in watercolor painting…all requiring different types of decorative paper. When inspiration strikes, an artist needs different papers on hand.

A Book on Creative Living

This book by author Julia Cameron is the one I turn to first whenever I need to be reminded of how to live creatively. It is easy for an artist to live day to day and miss opportunities to keep their minds thinking creatively. This is a must have for those wanting to live a creative life.

Wacom Bamboo Create Tablet Review

https://www.youtube.com/watch?v=z8CfxqIj4iQ

Wacom Bamboo Create Tablet review by Melonie Mac

Adobe Photoshop Elements 12

With Photoshop Elements I can do more than just enhance my photos, I can manipulate them to make digital artwork. Photoshop Elements also gives me tools to edit and combine my videos clips to produce a finished movie. My daughter recently used this software to create a how-to video using digital video clips she took and combined them with music. I edit my artwork and handmade jewelry photos before I upload the photos online. Great tools for the price.

Packing And Shipping Art

Packing And Shipping Art

How To Pack & Ship Art

As an artist you will have to embrace shipping as a necessary part of your business in order to increase sales potential Many artists with whom I’ve spoken are afraid of shipping. Having a wonderful one of a kind piece of artwork destroyed in transit is a is something every artist loses sleep over. I know I do and I have been shipping my artwork all over the US and occasionally out of it form many years..

As a gallery owner I do a lot of shipping. They key to get your artwork from you to it’s future home is all in the packing. A well packaged item should arrive in mint condition provided something truly unpredictable doesn’t happen with the carrier. I have never had something arrive damaged and need to be replaced. However I’ve had plenty of things arrive at my gallery in a shambles because the original owner just stuck it in a box and handed it over, trusting the carrier to not toss it around like a sack of potatoes.

What You’ll Find On This Page
* Packing & shipping informations regarding using tubes, envelopes and boxes.
* Shipping Supply Companies
* How To Make Your Own Shipping Boxes
* Where To Find Free Recycled Supplies

Common Carriers In The US For Shipping Artwork

Shipping Companies For Your Artwork
Packing and Shipping Supplies I have an order or preference for shipping which is basically relevant to how much they charge to move my package. So my favorite carrier company which is Speedee, just also happens to be the cheapest. But they also make requesting a package pickup, the easiest and they offer services like 24 hour delivery at no extra fee. The downside to them is they only cover part of the country. They deliver to only 6 six states in the Midwest.

So here’s a list of all the carrier companies I do business with regularly, complete with links and what I like about each.

USPS United States Postal Service
usps.com
I actually use the post office for most of my smaller shipping needs. Priority costs are reasonable enough as long as the overall dimension (circumference completely around the width of the package) does not exceed 108″. Once you get past that size the cost go up exponentially and it is in your best interest and pocket book to to find another carrier. And if you want to track a package shipped with USPS click here.

FedEx Federal Express
fedex.com
This has become my second national carrier of choice. I used to do everything with UPS but they had a serious rate increase a year or so back and most days FedEx is about 30% cheaper than UPS when shipping the same package. I almost always check both carriers to see who’ll do the job for the least amount of money. And If you want to track a package via FedEx click here

UPS United Parcel Service
ups.com
This is usually my last choice in carriers these days though I have shipped literally hundreds of packages with UPS and other than them being the most expensive most days, I was very happy with their service. And if you want to track a package with UPS

Speedee Delivery Shipping Carrier

Companies For Shipping Your Artwork

And here’s a little known but excellent carrier for the Midwest
Speedee
speedee.com
I love these guys and ship everything I can with them. They are cheap and they are good. Exactly the combination I like The only downside is they only cover a few states. Iowa, Wisconsin, Minnesota, North Dakota, South Dakota, Parts of Nebraska and Illinois. And if you want to Track a package via Speedee click here

But if you live in this little circle of heaven these are just the guys to move your art and do it well.

Specific Benefits To Using Speedee
* They don’t have any extra fees for home delivery
* I’ve yet to ship a package so large as to incur oversize fees (both FedEx and UPS will charge me extra for the same size that Speedee handles.)
* They will pick up at any location for just $10. And trust me you save far more than that by using with them.)
* The almost invariably deliver within 24 hours again at no extra cost.,

A Story About Carrier Rates To Illustrate My Point
I had three large boxes that needed to go to Rapid City SD from my home town in Iowa. I first took them to UPS. The cost was $94 for all three. I checked out FedEx and it was around $70. I then called Speedee as I hadn’t shipped with them before this. All 3 packages to Rapid City by the next day for $32 and that included the $10 pick up charge from my gallery. Yup been a loyal fan ever since.

Shipping With Mailing Envelopes

Using Mailing Envelopes For Small Shrinkwrapped Artwork or Prints

Shipping artwork using mailing envelopes Shipping small prints either with or without matting is a fairly simple affair. In the above photo I’m using a USPS Priority mailing envelope which is made of a durable yet flexible material. I like these because of the size, which is 11×14. I mat many of my small collectible prints to fit this standard framing size so the envelope is the perfect fit. These come with the price set of usually around $5, so if you have a smaller print (say something that fits in a 9×12 envelope) that doesn’t need to go priority mail you can use your own envelope and save a little money. I tend to do that with ebay sales or sales of that nature. Generally just regular first class is about $2 to give you a comparison.

Shipping With Mailing Envelopes

Using Mailer Envelopes:
* Have print mounted to stiff backer board and shrinkwrapped or put in a protective sleeve. This is not only to prevent moisture damage but also protect the print while being handled.

* Apply a piece of cardboard or backer board over the face of the artwork,* Slip into envelope with invoice.

* Be sure to either write “Do Not Bend!” or apply labels to that effect. You might think that a postmaster would never attempt to bend a stiff envelope but I have had them do so despite the extra cardboard and labels.

Protecting Your Artwork With Sleeves or Shrinkwrapping

Packing Materials And Supplies

Having your artwork covered with either shrinkwrap or a protective sleeve is always a good idea whether your shipping them or not. Once protected your art is now easily handled without fear of damage dents, creases, scratches and dirty hands. Also when in transit a shrinkwrap or sleeve may keep moisture from doing any damage.

These clear envelopes are a great idea for do-it-yourself kind of shrinkwrapping. They come in a variety off sizes and are pretty cost effective, especially if you’re buying in bulk quantities.

My Favorite Supplier Of Protective Sleeves & Envelopes
One of my favorite supplier s for the is www.clearbags.com They have a staggering array of sizes as well as all sorts of packaging and marketing solutions for artists and craftsman. If you have a large variety of sizes to your product line these guys are a great company. I’ve been getting my supplies from them for many years and have always been happy with both the products and the service.

Padded Envelopes and Bubble Envelopes

Packing and Shipping Supplies & Materials
I don’t use these a whole lot because I tend to ship most of my items priority postal so I just use their envelopes. However these have that add little extra cushioning which is always great for mailing your artwork. Despite this you must still be sure to have some sort of cardboard covering on both from and back of your artwork to protect it during transit.

Rugged Mailers

Packing and Shipping Supplies & Materials
Rugged Mailers are also a really good alternative and they come in a nice assortment of sizes. Be aware that they can still get bent but it’s a rarity. Never hurts to add a little extra support of cardboard if there’s room, to these as well.

Packing Larger Shrinkwrapped Artwork or Prints Flat

Once again how much effort you put into packing your larger prints will depend mostly on how badly you want it to arrive at it’s destination in mint condition. If your mailing a one of a kind item that can’t be replaced or even an item that is costly to you to replace go, do the extra effort necessary to ensure it’s chances of arriving safely.

For a print in most cases it is sufficient to just have several layers of cardboard on both top and bottom. Cut these pieces at least 2″ larger than the size of the object being shipped. This is minimally what you’ll want to do to ship a larger shrinkwrapped print flat. This amount of packing will allow for minor denting of the cardboard both on the corners and on the face of the cardboard. It also makes bending pretty much impossible.

The Steps For Mailing Artwork Flat Are:
* Make sure the artwork is sealed in shrinkwrap or a protective sleeve.
* I then slip this in an additional bag with the invoice (on the back side of the backer-board, not on the face of the artwork) tucked in with it.
* Cut a piece of foam or thin bubble wrap to size of the object being shipped. I prefer the foam but bubble wrap will work as well.
* Cut at least 4 pieces of cardboard 2″ larger than object being shipped. Tap lightly to hold everything in place.
* Slip into an additional box frame for extra support.

Now if it’s an important piece of work I may slip a sheet of two of mat board in with the cardboard. Mat board is incredibly dense (unlike cardboard) so it is better at deflecting dents and stabs.

Using Mailing Tubes For Packing Artwork

How To Pack Artwork Using Tubes.
packing and shipping art using mailing tubes *Note: The art print featured in this photo is by Marion Gunderson Arts and was used with permission.

Whenever possible using tubes is my preferred method of shipping prints.
Most of the time I send my medium sized prints (say paper size) flat and in shrinkwrap as this not only makes for a nicer presentation when the customers opens the box, it also helps keep the art in mint condition until either being gifted or framed. But for prints ranging in larger sizes I send in a tube. It’s fast and nearly effortless. 5 minutes time is about all it usually takes.

What You’ll Need To Mail In A Tube
* The Mailing Tube (obviously)
* Plastic bag. (for packing option listed at the bottom)
* Sheet of paper slightly larger than the artwork being shipped. Usually a 1″ allowance all the way around is adequate and cut to fit the tube.

Using Heavy Duty Mailing Tube

The First thing to do is to roll up the print.
Lay your print in the center of you sheet of paper and roll them up together simultaneously. Slip this into the tube. DO NOT tape the paper roll. Just slip into the tube and allow it to expand to fit tightly inside the tube.

The paper serves a couple of functions
* First he keeps the print from sliding back and forth in the tube and potentially denting the print.
* Second most folks really don’t think about how clean their hands are when opening up a package. By having a bit of the paper surround it helps keep the print clear when being removed from the tube.

Be Sure To Include An Invoice Or Address On the Inside Of The Tube
It’s always recommended to have the destination included on the inside of any package you are shipping just in case it gets torn open and become separated from the original shipping contained.

Apply Label And Tape Shut
I always tape my tube ends securely no matter how snugly I think they are sealed.

Using A Reinforced Carriers Light Weight Tube
I have used USPS Priority Mail tubes (as is) for hundreds transit jobs and never had a problem. But then there was this one time that it arrived to the purchaser completely trashed and flattened. It’s rare but it does happen. So if you’re shipping something that’s not easily replaced either use your own heavy duty tube or modify the carrier’s tube.

Since Wild Faces Gallery is also a giclee publishing house we have plenty of extra heavy duty tubes from our rolls of paper. They are of course no end-caps so they are kinda useless as shipping tubes on their own. However they are exactly the extra durability I need when using one of the carriers triangular tubes. So the steps are pretty much the same as above.

The First thing to do is to roll up the print.
Lay your print in the center of you sheet of paper and roll them up together simultaneously. Slip this into the tube. DO NOT tape the paper roll. Just slip into the tube and allow it to expand to fit tightly inside the tube.

Affix Mailing address or label to the outside of the inner stabilizing tube

Slip tube into plastic bag
This has to do with common carrier cardboard triangular tube are made of a light weight cardboard. Occasionally a postal delivery person may leave the tube outside of someone’s home. The bag is just that little bit of extra insurance that if it rains, the print will arrive in perfect condition. And yes this has happened to me.

Slip tube into carrier triangular shipping tube And tape the ends shut.

Packing Framed Artwork

Packing and Shipping Framed Artwork

A Few Things To Consider
I have shipped large framed items from one end of the country to the other and have yet had anything arrive broken. That being said the amount of work involved in shipping a large framed piece of work is substantial and as an artist you must figure out whether the cost of packing materials coupled with the amount of time involved is the worth the “net” value on what you’re earning with framing charge. You may find it is much easier to simply sell only unframed items.

Since we have a full service frame shop in out gallery our net on framing is pretty good so we do ship framed prints and on rare occasion framed originals.

Note: Whenever shipping framed originals I replace the Conservation Clear glass that all my artwork is framed in, with a conservation grade picture framing acrylic. This won’t shatter (unless the shipper runs over it or something, and then you’ve got bigger worries) in transit. Broken glass inside a packing parcel will slice and shred as the box is handled.

Since Conservation grade framing acrylic is expensive you can also use just regular acrylic or plexiglass. Another less desirable option would be to put some sort of masking tape of film over the glazing so if it does happen to break the broken glass won’t be slipping around the box.

Steps For Packing Framed Artwork

Apply Cardboard Corners to the Frame This is sort of an optional step because if you’ve done your job correctly you won’t need them at all.

Wrap The Frame Artwork in copious amounts of bubble wrap How much depends on the kind of bubble wrap your using. If using large pocket bubble wrap you can use less, and the tiny bubble pocket bubble wrap you should use more of. I generally like a good 3″ inches of bubble wrap surround.

Wrap This In An Additional Layer of Either Flexible Foam Wrap Or Corrugated Cardboard Role I use the cardboard role primarily because it’s what I have on hand. The purpose is to add a firmer shell to the bubble wrap and create a tight package.

Write Address or Include it On The Package Once again it’s always wise to include the mailing address inside the package in case the contents ever get separated from the packing box. (Heaven forbid)

The Box Needs To Be Sufficiently Larger than The framed item Most shipping companies like to have a stabbing depth of a couple of inches so bear this in mind when packing. You should have a durable product that will hold your framed item in the center of the box. I often use styrofoam for this as it’s lightweight, stab resistant and cuts easily to fit my needs.

* Cut two sheets foam the size of your box
* Lay Foam Sheet In Bottom of Box
* Set wrapped framed artwork in center of box.
* Cut Strips to tightly fit between package and box wall. If you think it necessary tape in place so package won’t slip.
* Apply Other styrofoam sheet over top
* Put Lid On Box

Tape Shut and Add Mailing Label Packing is very easy to do but rather time consuming. Judge for yourself if it’s worth the effort.

Note: Many art exhibit require you to ship your artwork not only to them but then they need to use the containers and wrapping to return it back to you. And if it’s a traveling exhibition the packing materials need to be sturdy enough to be reused time and again. This often means you need to build a special wood crate. I won’t go into how to do this specifically since different galleries and shows have different requirements for this. Just be aware that simplicity and durability are what is required above all else for this kind of packaging.

Earth Friendly Ideas For Packing Your Art

Recycling Products For Shipping Your Art
Packing & Shipping materials In this economy it forces people to rethink how they can better save money in areas where they won’t feel the pinch. Packaging your artwork is one of those areas. I pack and ship a fair amount of stuff, (about 100 good sized boxes a year) which could potentially be a huge expense in packing materials. Not to mention we’re all getting more Earth conscious and knowing that so much packing materials just wind up in the landfill after just one use. This strikes me a kind of appalling.

Anyone who has ever bought a role of bubble-wrap at your favorite business supply store knows that boxes, and bubble-wrap can add big costs to your bottom line if you do ship often. So I’m going to share a little free packing supply secret …well it’s not really a secret, it’s just no one ever asked me) Yup I get much of my packing and shipping stuffs free.

So I’m going to share a little free packing supply secret … (well it’s not really a secret, it’s just no one ever asked me.)I reuse much of the packing materials that I get in my gallery most of which comes in from my framing orders. But the bulk of my packing supplies comes from other sources. The absolute best place for excellent packing materials that are free? A furniture store.

At one time I had an artist friend who worked at a furniture store and when he was doing a delivery in my home town, he’d pull the truck around and drop off a truckload (literally) of huge sheets of bubble-wrap and flexible foam sheeting. Most furniture stores throw tons of it away and it just sits in our landfills. The furniture store he worked for was thrilled because that was a little less that they had to pay to get hauled to the landfill. And of course I was thrilled because it saved me fortunes (the savings of which I passed on to my customer.) And frankly, I have no way of buying huge sheets of wrap like that. (Picture blanket sized for wrapping up beds and couches. Lovely, glorious packing stuffs.)

Also, our local vet clinic is very green oriented. They get in heavy duty air packing pillows and sheets that from their delicate bottles of medicine they receive. Our small local vet clinic can usually supply me a 30 gallon garbage bag full of the stuff in a week. These tend to be smaller bits which work well for shipping smaller works or dimensional items.

So I guess the point of this is if you are looking to save a little money and are willing to be creative with who you approach, you may well save a substantial amount in your packing materials costs. Plus a little less goes in the landfill because it was recycled at least once. This way the landfills, the furniture store, my customers and I, all win.

Free Shipping Supplies Sent To Your Door

Free Materials & Supplies Available From The Common Carrier Companies
The big name shipping companies like UPS and USPS provide free boxes and envelops that will be delivered to your door … yes for free.

Ravenna Table Easel with Drawer

Ravenna Table Easel with Drawer

Table Top Easel

If you are a part time artist or even a full time artist with limited painting space, I can’t think of a better idea than buying one of these compact, portable table top easels.

This compact artists easel is a great choice for any artist that is looking for a convenient and easy to way to store their art supplies!

If you are like many artists, your work space is also part of your living area. This easel is an easy way to help keep your artistic hobby from over running your living area.

If you have a family and like to work at home, keeping your artwork stored away safe, especially if you have children around, may be the best way to protect your work in progress.

I also like the idea that it’s portable and this makes it so easy to take your art materials wherever you fancy. A portable easel makes it easy to take on trips and work on your artwork outdoors. This portable unit is also humbly priced making it easy to afford even for struggling artists.

When I was in high school, my plan was to go to art school after graduation. My sister’s girlfriend had some family issues and she came to live with us for a few months. She also was forced to drop out of her art classes. She was trying to raise some money and she sold her portable wooden drawing board to my parents for me.

I loved that drawing board. It folded up like these portable easels. I had a place to keep my pictures, erasers and pencils. I’d set it up in the living room or bedroom and it was so handy. Gotta leave the house – fold it up and you’re done. Like most teens, I was lazy so that was important.

If you are forced to store away your artist’s materials when not in use, a portable table top easel such as the Ravenna is an excellent choice!

Tabletop Easel

Storage for Paining Supplies This artist’s easel has a roomy drawer for storing paint brushes, paints, and other drawing materials. The one drawer has multiple dividers to keep everything separated.

This easel is not lacking in craftsmanship. The Ravenna table easel is sturdy and strong and built with quality wood but yet is light and easy to carry.

Another feature that customers liked was the ability to choose an angle for the board. Use it in a flat position or with a steep incline.

This particular portable model is also a great way to introduce an artistically talented child to new supplies and art forms. It’s not a large investment but a young artist will be thrilled with an adult like tool to experiment with.

Which graphics tablet?

Which graphics tablet?

What’s the difference anyway?

One question I get asked again and again is, ‘What is the best graphics tablet?’ as I’m a digital artist, it seems only natural to ask me.

It’s easy to understand why this is perhaps the most frequently asked question to not just me, but every digital artist. The reason for this is because graphic tablets are a unique and confusing technology!

So, the first step to finding the right graphics tablet for you is to understand the technology that’s being offered!

Thank you to Nekoni for her thoughts as an artist on graphics tablets.

First I’ll explain the words that are used

Then look further down, to find out about sizes.

At the end, I’ve recommended the best tablets, in my opinion, depending on various types of artwork.

Important!

What is a graphics tablet?

The graphics tablet (or ‘digital design tablet’) is an input device (like a mouse, or keyboard) which acts like a giant and highly accurate touchpad, controlled by a stylus (digital pen). It allows artists to draw directly into their graphics programs on PCs, Macs and Laptops.

What can one do?

TRON – speedpainting by SaZo

Pen-specific technobabble:

The language that is used by graphics tablets sellers is very confusing.

Here is a list of the most popular phrases used in relation to the graphics tablet pens and what they actually mean!

“stylus”
The term specific for digital input pens used with graphics-tablets and other hardware. It’s not always used, but is the actual term. (imagine if you were told your new ipad came with a free ‘pen’? Why would you want a pen? Now imagine you were told it came with a free ‘stylus’? Awesome!)
“ergonomic pen” “grip pen” “easy to hold pen”
Almost all graphic tablets today come with a comfortable, easy to use variety of stylus (the exact shape and features vary). These don’t affect the quality of your digital artwork, but they do affect how comfortable you are while using them, and there’s no ‘right’ choice.
“cord/cable/wired stylus”
Refers to a stylus that is attached to its tablet by a cable. The stylus is therefore slim and light. It’s pretty rare today, as wireless is the standard for most models.
“battery operated stylus”
Sends a signal from the pen to your tablet. The stylus needs to be large enough to contain a AAA battery, but is shaped in a way so that it’s narrower at the point at which you hold it.
“battery-less stylus”
The tablet powers the stylus via electro-magnetic resonation, which means these styluses are slimmer and lighter than the battery powered alternatives.
“tilt sensitivity”, “tiltability” “rotation””tilt recognition”
What most artists are looking for when they chose a stylus with one of these descriptions is a stylus which has a sense of ‘right way up’ and ‘upside-down’ so that it can make more complex digital brush strokes (this is a great feature, especially for painters!). But these terms also may simply mean that the stylus still works when you’re holding it at an angle, (and I’ve never found a stylus that doesn’t). For this stylus it’s best to rely on reviews, as less scrupulous retailers and second-hand sellers who don’t understand the terms can easily use the wrong term, and lead you to disappointment if you don’t know what you’re buying.
“levels of pressure sensitivity”
The range of pressure sensitivity starts at 256 levels of pressure, and reaches 3000. 1024 levels of pressure can be registered by most graphics programs, and only the newest and more advanced programs can register anything higher. Levels of pressure sensitivity literally explains how sensitive your pen is, the more sensitive pens will be able to tell the difference between different pressures, but this will only be shown to have an effect if you’re using extremely large brush sizes (upwards of 1000 pixels, in the latest software), or, in some cases, very light pressure (the quality of the pen’s nib and the drawing surface can effect the pressure you need to apply just as much). I suggest 256 and 512 for the beginner or sketcher, 1024 for the student or professional artist, and 2048 or above for the super-professional or any artist who uses a tablet for poster-sized art-work.
“Interchangeable right and left-handed pen”
This is one of those marketing oddities, I assume the companies must say this in order to assure left-handed individuals that they too can use graphics tablets… though I’ve yet to find any evidence of a left-handed pen having ever existed.

Tablet-specific technobabble:

So now you know what they’re saying about the pens… how about the tablet themselves.

The tablets are all important and have their own range of specialist phrases.

Here’s a list of the phrases and their meanings.

“programmable hotlinks/ buttons/ scrollers / wheels?”
Most artists find the wheels/scrollers to be useful for controlling the zoom in graphics programs, and for rotating canvas in those that allow it. But neither they nor programmable hotlinks are a actually a required function on any tablet, they’re more of an extra feature that you can use, if you like, to save time.
“lines per inch” or “accuracy”
Much like dpi or dots per inch, this is the sensitivity of your graphics tablet and how accurately it recognizes the location of your pen. Unfortunately, not only is this rarely mentioned, but the effect this number has also changes depending on your computer’s settings, and the size of the tablet itself. The end result is that the pen does not follow the path you draw exactly, or makes your lines jagged. The way to avoid this is to read customer reviews, even if a number is given, and bear in mind that the cheapest of these tablets usually come with this disadvantage. For the beginner, or casual artist, or someone who does not intend to use their tablet for fine art, this isn’t much of a problem. It can usually be compensated by working zoomed in, but that has the disadvantage of letting you see less of your artwork at once, and takes longer to draw the same lines.
“work area/ live area”
Pay attention to this, a graphics tablet will be described as 10 by 15 inches, but the actual numbers you need to actually pay attention to those of the ‘work’ or ‘live’ areas, the space on which you can draw, which measure much less- say 5 by 8 inches. These numbers are possibly the most important thing when it comes to buying a tablet! What you need to look for is a graphics tablet that matches the size and ratio of your screen as much as possible.

What happens when you buy a tablet that is much smaller than your screen?

It’s very simple, when you draw in real life, say, on a piece of paper, you draw to a scale of 1:1. The motions you make with your hand equal the size of lines you end up with on paper exactly. When you draw on a graphic tablet, these sizes never match completely, but it’s best to get as close to reality as you can.

An example of a size mismatch:
Here is a small tablet and a large screen. You can see the actual line which is input into a tablet, then the line that comes up on screen.
imput: what is drawn in real life. result A mismatched size also has the disadvantage of being less sensitive.

If your tablet is half the size of another tablet, but only has the same level of sensitivity, your small tablet is only half as sensitive. Then add to that the fact your hand is only so accurate, and you are in effect trying to draw, really, really tiny.

If you’ve ever tried to draw a nice picture, but really, really tiny, then you can see the obvious flaw with that. There’s a limit to just how accurately you can control your hands.
There are ways to compensate for a small tablet, as you can simply zoom in until the size matches, or you can set your tablet to only represent a smaller part of your screen.

However, drawing on a smaller part of your screen has obvious flaws…andjust like with a tablet with low accuracy, drawing while zoomed in isn’t a flawless solutution either.

As well as being unable to see what you’re doing in relation to the rest of your artwork, or being unable to edit it quickly, you will end up taking slightly longer and each and every line. Proffesional artists should try to avoid this.
My own screen is actually 18 by 12 inches, and the tablet is smaller (around 12 by 7.5 inches of work area) but it is a much closer match and easier to draw with than my other tablet, which only has 5 x 3.5 inches of work area.

Another thing to take into account is screen ratio. I have a widescreen monitor. And so, I have a widescreen tablet.

Some tablets allow you to set a ratio for you to use, but remember, they can not ‘expand’ the work area outwards if you need a wider area to match your screen; they can only narrow it, vertically. If you anticipate keeping your screen for a long time, and it’s an unusual shape, try and buy accordingly.

What Are Artists Trading Cards, An Introduction

What Are Artists Trading Cards, An Introduction

My Personal Introduction to Artist Trading Cards

I was introduced to Artist trading cards or their equivalent ACEO’s by Ebay. Not knowing about artist trading cards, I was browsing around in the art categories on Ebay and kept seeing reference to ACEO.

I had to find out what it was. It is actually an art format, sized the same as the ubiquitous Trading Cards so beloved by kids of all ages. That is 2.5 X 3.5 inches exactly. The acronym stands for Art Cards Editions and Originals. It could be in any media at all and had been started on Ebay around 1996.

Anyway, I had always prepared for my painting by doing several small sketches to get right the composition / colour / etc and found that this size format was a natural for me. I tentatively put the first listing of an ACEO painting on Ebay and WOW it sold!!! Fantastic!!! I had soon sold around 50 of these little miniatures and felt great.

That first aceo painting was a scene from Portmeirion in Wales where the exterior scenes for the TV programme The Prisoner was filmed. Remember Patrick McGoohan, Prisoner Number 6. This was the rear of his circular house in the village. (see picture above).You can see more of my art on my blogs Painting With John and Artyfax, the trials and tribulations of a leisure artist.

I hope to give an account of the history and potential of these wonderful little works of art, they are a great way for anybody to start their very own art collection. They are fun, affordable and a real insight into the work of any artist that you like. Further to this I will talk about the making, collecting and selling of ACEO’s.My own personal collection of works by other artists is several hundred, but I think that this will grow substantially in the future. Why not try it out?

I originally wrote this lens specifically to cover art cards which were made for selling and so the term ACEO is used throughout the lens. However, I now recognise the similarity between these and art cards traded and indeed the only difference is that one is sold ( ACEO) and one is only ever traded (ATC). Therefore it should be taken as read, that whenever the term ACEO is mentioned in this page, it refers to either form of artist trading cards. I will gradually rewrite this anomaly out of the lens as it is modified.

please note the copyright of all images is the property of the original artist, unless otherwise stated all art and photographs are by Artyfax

What is an ACEO?

The ACEO format

abstract building the cityACEO (artist trading cards) are a particular art format which is defined by its size. The acronym stands for Art Cards, Editions and Originals. This reflects the idea that they are sometimes made as part of a series or may be made as numbered editions, usually limited editions. These miniature works are only 2.5 X 3.5 inches. This incidentally, and not by accident, is the size of the ubiquitous Trading Cards beloved by kids of all ages and sizes. This means that there are many products available for storing and displaying the art work, from simple plastic wallets to A4 loose leaf pages with multiple pockets, and whole display books. The miniature aceo art works can of course be framed for display either singly or as multiples.

Collectors often come up with their own devices or simply use a favourite box ( of the right size of course) and I have even heard of them being used as dolls’ house art.

It is a format that started back in 1996, and soon grew into a very popular collectible area. A search on Ebay.com for ACEO can bring up 3-4000 items (rather less in the UK as you might imagine being a much smaller market, but we are getting there) with aceo’s available in so many different media it soon becomes confusing. Watercolor, oil, acrylic, pencil, collage, photographic images, computer generated images….. the list goes on.

ACEO’s are a really inexpensive and fun way of starting your own original art collection.

Alternatively, for those with an artistic bent, art cards can be traded with other artists, almost always as originals or “one-of-a-kind” (OOAK). This was thte original means of dispersal when the format was introduced, see a short history below. When traded they are called ATC’s , short for artist trading card.

My ACEO’s on You Tube

A Portfolio of ACEO paintings by myself on YouTube

This video to be found on YouTube was an experiment for me. A selection of some of my ACEO paintings, backed by my own soundtrack, hope you like it.

Some of my favourite artists’ sites on Ebay

I have at least one work by most of these guys in my own collection of ACEO’s

There are many, many really great artists selling ACEO’s on Ebay. Some are selling simply to attract attention to their larger works, others sell ACEO’s as their main line. If you are interested, then give them a quick once over. I did not intend this lens to be a commercial, but hey! we all need to make bread, so please forgive the intrusion.

I am not selling on Ebay at the moment, and have given up my Ebay shop, please watch this space for news of developments on Etsy.

ARENA-CREATIONS
Immortalising Dreams, Moments and Memories……….. Artist, Gaynor Lewis shows her endless inspiration and expression through her artwork. Bringing extra to your life through art – Original artwork, prints, greeting cards, gift tags and commissions.
Aartless ACEO Gallery
ACEO Originals, Limited Edition ACEO Prints, Postcard and other Small Format Art by JAN VALLANCE. Direct from the artist. Cats, Portraits, Landscapes, all in Jan’s instantly recognisable and individual style.
Naj – My Depictions
Internationally selling UK based artist. Sells promotional samples of small format art, undertakes commissions for art work such as portraits, pet portraits and other custom art commissions, including canal art.
Round the Cauldron
I was raised in California but I now call Scotland my home. My two biggest inspirations are my children and my love of nature. I have been an artist for as long as I’ve been able to hold a pencil, working mainly in Graphite and Watercolour.
Mareens Art Gallery
*Contemporary Art* This Gallery is all about the art created by Mareen Haschke. Purchase ACEOs (Art Trading Cards), Fine Art Prints, and Originals such as pastel drawings and acrylic paintings directly from the artist.

ACEO Links On The Web

just a small selection to wet your apetite…

Here I have tried to provide links to sites with articles about the subject rather than artist sites, I will be adding more regularly.

A painting a day
From Shanti’s world of watercolour, A painting a day seems like a wonderful target. A great way of building up a real expertise. Why don’t I do it?
all you need to know
Probably the first and last link about ACEO’s you should need.
Entry in Wiki
A highly debated offshoot of artist trading cards are the “art card, editions and originals” (ACEO). ACEOs originated when some artists began to create cards to sell on eBay, in addition to trading among themselves. The selling of these cards is a sore point with some ATC purists; however the practice is not unprecedented: trading cards in other areas such as sports have also been traded and sold.
Art in your pocket
Basics of ATC’s ( Art Trading Cards)which are the equivalent of ACEO’s but are traded rather than sold. And importantly, many different ways of making them. Materials and techniques.

More ACEO Artists on the web

another list of links to fantastic artists

It never ceases to amaze me how how much can be contained in one little 2.5 X 3.5 inch painting. Here are some more of my favourite artists aceo’s:-

Affordable art – Ken Gillam
Ken Gillam is a Marine and Landscape Artist based in the South of England working in Watercolour and Acrylic. This site features some of his Miniature Paintings.
Original ACEO art for sale
About the artist, Jim Read

As a scholar I was taken to The British Museum and there saw my first nude, a sculpture.

I was entranced by the perfection of the form and the ever changing lines as I moved around it. I never lost the sense of awe I felt then and it is only now in later life that I feel able to commit my fascination to paper.

ACEO’s from the ACEO UK, Ebay group

a small selection from some fine artists

The Ebay user group ACEO UK has recently started to take notice of ths exciting development and list art videos (aka showreels) on You Tube. This is a group endeavour.

Artist Trading Cards In The News

Artists are creative people and like to keep up with new ideas.

Who is writing about these new ideas and what do they have to say? Find out here:-
Loading

History of ACEO’s

What and Why

jester aceo atcWe have seen above two variations of the artist trading card, ATC and ACEO. And how they only differ in that one is sold and the other is only ever traded. How did this come about?

Artists have always painted miniatures for patrons but in September 1996, Swiss artist M Vanci Stirnemann formally identified the concept and format of artist trading cards now known as ATC’s. I have also shown above that ATC’s are not limited to any particular media but can be created in almost any way that can be envisaged. I have listed and given examples in my lens Making Artist Trading Cards. The original idea was that ATC’s should be exchanged between artists and never sold or indeed should not involve the art establishments selling art. However the internet was taking off at this time and this helped to create a popular demand for this format. It very soon became established around the world particularly in the USA thanks to the involvement via the internet.

For more information see:-

Time line for ATC’s
ATC Quarterly

Collecting ACEO’s

As Opposed To Trading ATC’s

flower garden abstract atc aceoSome time after the introduction of the concept of the ATC an artist selling her work on Ebay (ID Bone-Diva, real name Lisa Luree) put some artwork in this format up for auction. This caused consternation amongst many supporters of the format and Lisa formed a breakaway group which came up with the name ACEO ( Art Cards Editions and Originals) as an acronym for art cards which were sold. This represents the fact that art cards are produced as originals, in series or as editions (open or limited edition prints). Ebay and other sites sell quite large numbers of ACEO’s to artists and collectors looking to start their own art collection at reasonable prices. Many are sold very cheaply by amateurs by auction but established artists with a strong following can command premium prices as you would imagine. Prices in the latter case can be relatively inexpensive but still command prices of $4-500.

For more information on the controversy see, ATC’s vs ACEO’s The Real Story

Selling Your ACEO’s On Ebay

A Quick Introduction

Collecting, selling and trading ACEO art (Art Cards Editions and Originals) is as easy as buying and selling anything on eBay — and it has the advantage of a specialized market. Here’s how to turn drawing miniature artworks the size of trading cards (2 1/2″ x 3 1/2″) into some added income to help you add to your collection!

This image is of one of my early watercolour ACEO’s sold on Ebay. A good price is difficult but they are fairly quick to complete and if it sells short it is no great loss. take it on the chin and try again with another. There are other on-line sites and I will add some of these very soon to the lens on Selling ACEO’s; the next in this series. For now check out the recommended links on the side bar.

read this lens for more detailed informationHow to sell ACEOs on Ebay

Some Featured Items From Google News

Sometimes the items discovered by the Google News module are the sort that you don’t want to lose. For example the first in the list below is about hhow a school is using trading cards to overcome the lack of an art tteacher and structured art lessons. How great that this hobby (or passion even) can be used to help school kids in this way. I decided to keep track of some of the more relevant and interesting items for reference.

Art Cards In School
How the use of art trading cards is helping school pupils
trading with a difference
A different take on the trading of artist trading cards

Reader Feedback
I look forward to hearing any feedback!

An artist always craves attention, we prefer to be told how great or original we are BUT I am a realist, let me know what you think and if you don’t like it … well I will just use the input to improve on my next piece – thanks

Big Eyes Keane Paintings

Big Eyes Keane Paintings

The Story of Margret Keane

Sad Eyed Children, Big Eyed Art, Doe Eyed Orphans or Sorrowful, wide-eyed waifs, whatever name you used to describe them, there’s one thing for sure, with no grey areas, you either loved them or you hated them.

Artist Margaret Keane was born in 1927, by the 60’s she was a pop art sensation. Margaret was married to Walter Keane for ten years, from 1955 to 1965. A film about her life is being made called “BIG EYES”. Tim Burton, a fan of Margaret’s work, will co-produce the film. Early rumours had Ryan Reynolds and Reese Witherspoon in the staring rolls. The latest to be put up for the lead roles are Christoph Waltz and Amy Adams.

The script was penned by Larry Karaszewski and Scott Alexander and Tim Burton will direct the movie said to be released in August 2014.

The film will start just before Margaret and Walter meet up, and ends in a spectacular court scene where Margaret gets her day in court.

Margaret now lives in Napa County, California.

Personally I can’t wait until the film comes out. Now I have to go and find all those paintings my sister had hanging up on her anaglypta-wallpapered bedroom walls in the seventies, as they should skyrocket in price after the film.

The script

BIG EYES by Scott Alexander and Larry Karaszewski

At the beginning of the script the year is 1955 and Margaret with her eight-year old daughter Jane, leaves her first husband, and lands in the wild and cool beatnik epicenter of San Francisco. The place is foreign and strange, yet she gets a sense that this would be a great place to settle as an artist.

Margaret runs into Walter Keane whilst sketching tourists for a few dollars at Fisherman’s Wharf. Walter made an impression on her dressed like a Parisian Artist in a turtle neck and black beret flogging his Paris street scenes with the gusto of a fairground sideshow boss. As soon as Walter meets Margaret he foreshadows his future actions by criticizing her for selling herself and her artwork too short.

It’s not long before they pitch their easels next to each other in the park and start a courtship. Jane, Margaret’s daughter notices that Walter’s canvas is always blank. We learn that Walter is really a commercial realtor. They soon get married and honeymoon in Hawaii. in this script version, they decide not to delve in length into the reason why they get married so hastily, just a letter from Margaret’s ex-husband accusing her of being an unfit mother.

Walter’s artwork is shunned by a Gallery owner which motivates him to rent wall-space in the hungry I, a hugely popular and hip jazz club, and he exhibits his and wife Margaret’s work. At this time they both sign their works as Keane and Walter is soon credited with the sad-eyed-girls, hungry for sales he takes credit for the works. The Jazz club is further instrumental in their success when the club owner and Walter come to blows and are caught on camera; this catapults both the club and the paintings to overnight popularity and Walter deeper and deeper into his lie, a lie that eventually becomes real to him.

The paintings start shifting even though art critics snubbed them, one critic suggested they were “the very definition of tasteless hack work”. The layman loved them, and Walter found they had to start printing off posters and framed prints to keep up with demand.

There’s not doubt Walter had a flair for marketing, he opens up a gallery across from the first gallery that shunned him and started giving paintings away to famous and influential people including, Natalie wood, Jerry Lewis and Kim Novak also sending one of John Jr. and Caroline Kennedy to the White House.

Walter Keane churned out work, sausage factory style, well before Warhol and his helpers. Walter’s sweat shop consisted of Margaret only, whilst she grafted he wallowed in his self-promotion, and the secret was kept even from Margaret’s daughter.

Margaret becomes more and more depressed, which reflects in her artwork, almost self-portraits, which makes it more difficult for Walter to explain his inspiration.

The script heads towards the climax, where Margaret gets her day in court after remaining silent for years. A radio interview in 1970 prompted Margaret to admit she and she alone painted the wide-eyed waifs, and at this time challenged Walter to a public painting contest, Walter was a no show.

A couple of years go by and Walter surfaces suggesting to USA Today that Margaret thought that he was dead and that’s why she was making her claims. This led to a slander suit from Margaret.

When they both walked into the Honolulu federal court, 20 years had passed since either one had seen each other. Walter was 70 and Margaret 58, the whole trial lasted for 3½-week with plenty of sparks. According to Margaret the only reason she was obsequies and gave into Walter’s wishes was because she feared for her and her daughter’s lives.

Margaret brought into court paintings from her childhood, and clinched it when she painted a boy’s face in fifty three minutes, showing obviously that she is in fact the creator of Big Eyes. Walter was challenged to pick up a paint brush but declined clutching his should, saying he was taking medication and declined the challenge. The court awarded Margaret $4 million for damaged reputation and emotional distress at the hand of Walter’s false statements.

At the end of the Script a reporter asks Margaret if she feels vindicated by the high award, she replies that it was never about the money and anyway she doesn’t think that Walter would pay up. Margaret adds that she just wanted rightful credit for her work and to get her art back, my prayers are answered.

Must have resources for the figure drawing artist

Must have resources for the figure drawing artist

The Artwork of Lacy Chenault – from Heart people to Belly Dancers

I Believe I have always been an artist – from a very young age I remember having a huge interest in drawing things – but it’s always been one thing – Women – which started as heart people and evolved to women.

Through High School I got bad grades in everything but art class, even if I skipped a week of school I would always finish my art projects on time, and sometimes do other people’s projects as well. But I feel like my art is at its peak right now – though I secretly hope it isn’t – I would like this to just be the beginning of a mountain rather than it being all downhill from here.

A few years ago – right around the time I moved in with Mark I started to really pick it up again, and since then I have gotten much better. I started my very own website and found the people who really like my art. At least I think they do?

I think the biggest thing for me is when I just recently signed a contract – I will be receiving 12% royalties from a company selling my artwork on cross-stitch patterns, and sales at my cafepress shop seem to have taken off. I am not one to usually have an ego about things, but at the very least at this point I can say I am proud of myself.

I can look at my art now and really see that I have gotten better – sure it has taken years and many drawings have been thrown in the trash, but after all that it has actually gotten better…wow.

Earlier this year I had my first “Art Show” at a local coffee house – my art was up for one entire month. MY ART was the sole décor for this coffee house for all of the month of February – sure when it happened, I didn’t think I deserved it, but looking back – I did. I loved that people could see my art up close and personal – not only on the web – my scanner never does them justice anyway. It was really nice to see that people really did like my art – lets be truthful here – a lot of people lie on the internet, I can’t read their expressions when seeing my art, so I never really know what they think of it – that is of course, unless they buy it.

It started as just Fairies here and there, some Goddesses – then it grew to include the Zodiac collection, and just recently I started Drawing Belly Dancers, as I myself am now one – it has inspired me in so many ways with my art.

I draw dancers from my class whether they know it is them or now – they are at the very least my inspiration – I have drawn my teacher twice and I think she likes them. I take tons of pictures at every show – just to take them home at get ideas for my next drawing.

It is really ever evolving – you put the effort it and you will see results – it may take years – but it is always about patients – with anything you want to get good at.

Giovanni Civardi – Drawing the Female Nude

Lots of different poses, real looking women
For many years I have been drawing women, and only women. The female figure I think is just nicer to look at.

The problem I would always run into when starting a drawing is thinking of a pose, and actually pulling it off. That is why I purchased “Drawing the Female Nude” at my local Barnes and Noble. The only other option I could think of was to hire an actual model, and that’s just too expensive and awkward.

Drawing the Female Nude is written (and illustrated) by Giovanni Civardi, an Italian artist and instructor who also wrote and illustrated “Drawing Human Anatomy” and “Drawing the Male Nude”. His drawings are as realistic as they come, which is how I like it.

In this book he uses two models, one that is tall and has more boyish figure and one who is a bit womanlier in the hips and butt. Both of them are definitely European, you can tell by the furry armpits, which you can “edit out” in your own drawings easily, but it really doesn’t detract from the book at all unless you are tremendously shallow. That is also part of the reason I really like this book.

The women in this book look like real women. Their breasts are not super-round and perfect, their brows are not perfectly plucked, and they do not have washboard abs. I am not saying they are fat (I am probably bigger than them), they are real.

These two women are drawn in many different poses including standing, sitting, stretching, twisting, turning, lying, and even some yoga positions from just about every different angle. Each pose includes his own tips on pulling it off, and information on different techniques and materials. He uses charcoal and pencil to sketch out the women. There are also a few actual photographs of the models in this book.

I really like his tips on shading and shaping the muscles. He really teaches you a lot about the female muscular structure in this book too, which is something every artist should study a bit about to reach his or her full potential. He encourages every artist to find his or her own unique style, not just to copy.

This book was definitely worth the $14.95 I paid over three years ago. I still use this book as a reference, and I do feel that it has made me an improved artist. This book I think would be an excellent gift for all artists who like to draw real looking women, whether amature or professional

The Nude Figure – a visual reference for the artist

I know you will find what you want in this book. It is full of good poses, which are lit very well.
I browsed through this book at a Barnes & Nobles a few weeks ago, and almost immediately fell in love with it. But I did have to wait to go online as it was nearly 30.00 at B&N and I knew I could get it cheaper at amazon.com, which I did for a mere 22.00 with shipping.

Before “The Nude Figure” my best reference book was “Drawing the Female Nude” by Giovanni Civardi, which featured his drawings of two models in various poses. It is a great book for the beginner, but after five years of using it I needed something new – and Playboy just wasn’t working.

The Nude Figure by Mark Smith featured only photographs of various models and all kinds of different poses. All of the photographs are in black and white which is a definite plus in my mind, helping you to see the defining lines and edges. The poses are divided into chapters as follows:

Standing Poses – This chapter is full of your basic standing poses. Arms up, arms down, from the side, from the back.

Reclining Poses – All kinds of laying down positions, all from different perspectives. Some look quite easy to draw and others are quite hard.
The Figure on a stool – These I find quite difficult simply because of the stools – I am not good at any kind of still life, even if it has a woman sitting on it.

Bending Poses – Most of these look like stretching before a workout poses. I don’t se how they could be useful in a work, but for practice everything is good.

The Figure in motion – I am very happy with this section as I do a lot of fairies and it is full of people jumping up in the air – something you could never get a live model to hold.
The Pregnant Figure – There are only a few pages of this, and I’m glad they put in here. It’s not too often that you get to see a nude pregnant woman to draw from. I think this will come in handy someday.
Unusual Poses – Just like it sounds, many of these aren’t very practical, but very useful in learning how different muscles shift in different positions.

The bulk of the photo’s are in Standing, Seated, and reclining poses. Those fill up most of this book.

Also the people in this book are all pretty fit. There aren’t any fat people in here, not a big scope of different shapes. Again, I am happy with this as I don’t want to draw fat people, but other artist might be disappointed by this lack of diversity. Some of the women have hairy armpits though, and some don’t – that’s diverse enough for me.

Take More Risks – Dynamic Figure Drawing

I highly recommend this book for any artist who just wants to tweak what they already know.
The moment I browsed through this book I knew it could help me tremendously. Dynamic Figure Drawing is a book for the already knowledgeable artist, wanting to better understand the human anatomy – something very important in drawing the figure.

I would start out with a book such as “Drawing the Female (or male) nude” by Giovanni Civardi, which only has poses of women or men, and Giovanni is much easier to read, easier to understand as a beginner.

What I found most helpful is the artist examples drawings; he shows different ways of looking at the figure to get a good realistic drawing of it. I have found that breaking the body down into simple shapes makes it so much easier to put it all together, adding muscle structures and curves after. He also breaks down the perspective drawings quite nicely,

There aren’t many full poses in this book as he beaks most down to the parts. He has sections on feet, legs, arms, chests, etc. My hands have gotten so much better since practicing them with this book. But I definitely recommend using another book or source for getting you poses, then using this book for the parts you have a hard time with. I recommend “The Figure Nude”, which is full of photographs of both men and women nude in all sorts of poses. If not, a magazine is always a good alternative.

This book is in no way easy reading, in fact it seems like it should be in college art classes all over the place. It is very technical, and I usually have to read over the same section a few times to really get what he is trying to say. So, again, I don’t recommend this book for beginners at all.

For the figure drawing artist who’s been at it for a while, and just has a hard time with certain parts, or has a hard time putting more action into their poses, I can’t say enough good about this book. It has helped me out in so many ways in just the short time I have had it. You can see it in my most recent works (some are featured on my profile) such as Gaia – I would have never tried such a difficult pose before reading this book. I also am not afraid to show hands anymore, because he has made them so much simpler.

I have truly been inspired by this book, since getting it I have been much more creative with my art, and I take more risks. I am very pleased with what this book has done for me.

Jobs in the art field

get serious about your passion

Artist
BSM – Phoenix, AZ
Designer About our company: Our company is one of the leading export companies in China. Our products range from giftware, toys, houseware, hardware, party… …

Graphic Artist
Sodexo – Altamonte Springs, FL
is seeking Graphic Artists for layout, design and… design artwork for proposal and presentation production for new sales and retention. The graphic artist… …

Graphic Artist
L-3 Communications – Atlanta, GA
Graphic Artist – Requisition ID 050503 USA… Solutions – STRATIS The Graphic Artist creates graphic designs, artwork, and documentation layout, for… …

Deals on not so new books
Soometimes it’s a good idea to go the cheap route
I know there are many starving artists out there as well (myself included) but art lesson/reference books aren’t the kind you want to just borrow from the library, it is a good idea to have them in your collection. Sometimes I open up my old books I haven’t looked at in years and it’s like I’ve never looked through them before – turn old inspiration into new – eBay is a good place to get good – and cheap art reference books.

The Artists of the Old West

The Artists of the Old West

Capturing the Wildlife (and Scenery) of the Old West (Recent West, Too!)

When explorers started their journey from the Eastern United States to discover the Western United States, they encountered Native American cultures and communities and wildlife they may have never imagined.

They encountered various Native American groups such as the Lakota Sioux and Blackfoot, the Comanches of the Western plains and mountains, and the Apaches, Navajo, Pueblo tribes of the American desert Southwest, to the groups of Pacific Northwest tribes such as the Bella Coola, the Haida, and the Kwakiuts. Most of the time, their encounters were friendly… although many times misunderstandings caused later conflict.

The explorers also encountered the numerous critters of the Wild West–grizzley bears, wolverines, timber wolves, antelope, moose, elk, deer, skunks, porcupines, great horned owls, flying squirrels, bald eagles, turkey vultures, and other critters.

In those days, photography wasn’t yet well developed (sorry… bad pun)… so those in their exploratory groups who had any art skills wound up drawing a lot of what they saw in their journals. Some of these artsts came to more fame because their art was so realistic and dramatic. And many more modern artists came into the field to further this capture of images from the wild west.

This Squidoo lens explores some of these artists and provides links and resources to more information on these amazing folks.

Charles M. Russell by the Bay…. eBay, That Is

I was born in Montana — and my adopted Grandpa, who normally worked as a logger in the deep forests of the Montana Northwest (near Kalispell and Flathead Lake), was also a wilderness guide for hunters. My Grandpa had some wild stories about his adventures in the Montana boonies–many of his stories were unbelievable.

One of his wilderness guide “clients” when Grandpa was younger was an artist named Charles M. Russell. And he had an original painting by Charles M. Russell in his living room that illustrated aspects of some of these adventures (the painting he had depicted some Native Americans going after a grizzley bear). (Grandpa Lloyd also had a huge bear rug on the floor of his living room–I used to play on it when I was a toddler and still remember it.) He also had some paintings by other western artists decorating his walls in other rooms of the house. His house was a veritable museum of animal trophies (most of the animal had been used for meat) and western art and other decorations. Maybe it helped that Grandma was a member of the Flathead Indian Tribe–Grandpa had an “in” with the backwoods of Montana.

You may find your own Charlie Russell artwork here for your own western-themed office, den, home, or cubicle!

The early wilderness and explorer artists created their work in a rough way…

Sometimes they had to make their own tools, inks, and surfaces…
The Mountains of the American West – Aspens and PinesCarrying art materials on the long journeys in the early days wasn’t easy… and having the right tools for drawing sometimes meant having to make them on the spot. Some charcoal from a campfire or the carbon from a lamp was used to create a drawing tool or ink. A tanned hide of a deer, elk, or antelope may have been used to make a flexible, foldable surface for the artwork. Pigments from the wildflowers, tree barks, and different mineral-content clays may have been used to create the various inks and paints. But most of the travelers most likely also carried their journals…. handing books of blank pages on which they could capture their notes as well as their impressions of the striking scenery, events, animals, and people they were seeing.

Athough some of the first wilderness old-west artists were Charles M. Russell and Frederic Remington, later artists carried on their tradition of capturing the adventure of the American Wild West.

Elmer Sprunger by the Bay… eBay, That Is…

After World War II, Elmer Sprunger came to Bigfork, Montana to live and work. His experiences with the wildlife of Montana became the theme of his drawings and paintings. And since my folks and I also lived in Bigfork, Montana for a while, we got to know Mr. Sprunger and his family. My Mom and Dad were teachers in Bigfork–and probably got to know Mr. Sprunger through his kids at the Bigfork school.

No matter how they met Mr. Sprunger, my folks developed a friendship with him such that they were able to acquire some of his paintings. Mr. Sprunger passed away in 2007– but he has left his legacy of beautiful wildlife paintings and drawings for others to enjoy.