How To Draw A Cat Step By Step Realistic

How To Draw A Cat Step By Step Realistic

Cats are one of the most popular subjects for drawing, and with good reason! They’re cute, they’re cuddly, and they’re just plain fun to draw. But if you’ve never drawn a cat before, they can also be pretty tricky. That’s why we’ve put together this step-by-step guide on how to draw a cat.

With just a few simple shapes and some careful shading, you’ll be drawing cats like a pro in no time! So grab a pencil and a piece of paper, and let’s get started.

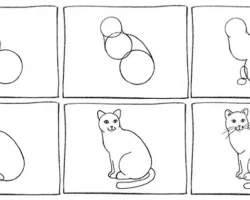
Step 1: Draw a Circle for the Head

To start off your cat drawing, use a pencil to lightly draw a circle. This will be the basic shape for the cat’s head.

Step 2: Draw Two Triangles for the Ears

Next, add two small triangles on top of the circle for the cat’s ears. Make sure they’re symmetrical, and that the point of each triangle lines up with the edge of the circle.

Step 3: Draw a Rectangle for the Body

Now draw a rectangle under the circle. This will be the cat’s body.

Step 4: Draw Four Legs

On each side of the rectangle, draw two small rectangles for the cat’s legs. Again, make sure they’re symmetrical.

Step 5: Draw a Tail

Finally, add a small triangle at the end of the rectangle for the cat’s tail.

Step 6: Erase the Lines You Don’t Need

Now that you have all the basic shapes in place, you can start erasing the lines you don’t need. Start with the circle and the rectangles, and then move on to the triangles.

Step 7: Draw the Eyes

Next, add the eyes. For each eye, draw a small circle within a larger circle. Then add a tiny circle in the middle of each eye for the pupil.

Step 8: Draw the Nose and Mouth

Add a small triangle for the nose, and a curved line for the mouth. Then add some whiskers with a few short, straight lines.

Step 9: Draw the Ears

Give your cat’s ears some detail by drawing a curved line along the edge of each triangle.

Step 10: Draw the Fur

To make your cat look extra fluffy, add some curved lines to indicate the fur. Start with the head and work your way down the body.

Step 11: Add the Final Details

For the final touches, add some small circles for the cat’s toes, and some stripes to the tail. Then erase any remaining pencil lines, and your cat drawing is complete!

The Top 10 Infinite Art Sand Painting Artists

The Top 10 Infinite Art Sand Painting Artists

Today we’ll be discussing the top 10 infinite art sand painting artists. These are artists who create beautiful, intricate sand paintings that are meant to be viewed from all sides. These paintings are often large and detailed, and can take weeks or even months to complete.

Kseniya Simonova is a Ukrainian sand artist who rose to fame after winning the television show Ukraine’s Got Talent in 2009. Her sand paintings tell stories, and she often uses music to help set the mood.

Chris Sainte-Claire is a French-Canadian sand artist who has been creating sand paintings for over 20 years. He often uses bright colors and geometric shapes in his work.

Dmitry Grinev is a Russian sand artist who specializes in creating 3D sand paintings. He has won numerous awards for his work, and has even been featured in the Guinness Book of World Records.

Karen Bonaker is an American sand artist who is known for her large, detailed sand paintings. She has been painting for over 30 years, and has exhibited her work all over the world.

Mario Mariotti is an Italian sand artist who is known for his realistic sand paintings. He often paints scenes from nature, and his work has been featured in many magazines and newspapers.

Gaudi is a Spanish sand artist who is known for his unique, abstract style. He often uses bright colors and organic shapes in his work.

Simon Hennessey is a British sand artist who is known for his detailed and realistic sand paintings. He has been featured in many magazines and newspapers, and has even been commissioned to create a sand painting for the Queen of England.

Michaelangelo was a famous Italian artist who is best known for his paintings and sculptures. He also created a few sand paintings, which are now on display in the Vatican Museum.

Picasso was a famous Spanish artist who is best known for his paintings and sculptures. He also created a few sand paintings, which are now on display in the Picasso Museum in Paris.

Dali was a famous Spanish artist who is best known for his paintings and sculptures. He also created a few sand paintings, which are now on display in the Dali Museum in Spain.

3D Paper Art Around The World

3D Paper Art Around The World

The intricate and beautiful designs that can be created using just paper are amazing. 3D paper artists are using this medium to create some of the most incredible art pieces we have ever seen.

Whether it is a 3D paper sculpture or a 2D illustration, the results are always impressive. 3D paper artists are able to create such detailed and realistic art because of the many different techniques they use. Some of these techniques include paper cutting, folding, and layering.

Paper cutting is probably the most essential skill for a 3D paper artist. This technique is used to create the basic shape of the sculpture or illustration. Once the basic shape is created, the artist can then begin to add details and layers.

Folding is another important technique for 3D paper artists. This is how they are able to create more complex shapes and add depth to their sculptures. By folding the paper, the artist can create all kinds of different shapes that would be impossible to create with just a piece of flat paper.

Layering is the final technique that is often used by 3D paper artists. This is how they are able to create dimension and add details to their sculptures. By layering different colors of paper, the artist can create a realistic effect.

3D paper art is truly incredible. The artists who create these pieces are extremely talented and skilled. If you have ever wanted to try your hand at 3D paper art, now is the time!

This is because it is a very versatile medium that can be used to create a wide variety of different pieces. It can be used to create 3D sculptures, paintings, and even jewelry.

There are a few things that you need to know in order to create your own 3D paper art. First, you will need to choose the right kind of paper. You can use regular printer paper, but it is not as sturdy as cardstock. You will also need to get some double-sided tape or glue dots.

The next step is to start cutting out your paper. You can use a template or freehand your design. Once you have your design cut out, you will need to score the paper. This will help the paper fold evenly.

After you have scored the paper, you will need to start folding it. You will want to start with the large pieces first and then work your way down to the smaller pieces. Once you have all of the pieces folded, you will need to glue or tape them together.

The final step is to add any embellishments that you want. You can use sequins, beads, or anything else that you can think of.

3D paper art is a great way to add a unique touch to any room in your home. It is also a great gift idea for any occasion.

Tips And Tricks For Creating 3D Paper Art

Tips And Tricks For Creating 3D Paper Art

3D paper art is a type of art that is created by folding and cutting paper. This type of art is also known as origami. 3D paper art can be used to create a variety of objects, including animals, flowers, and other objects.

There are a few things that you need to know in order to create 3D paper art. First, you need to choose the right type of paper. You can use any type of paper, but you need to make sure that it is thin and strong. Second, you need to fold the paper in half. You can use a ruler to help you fold the paper correctly.

Once you have folded the paper, you need to cut it into the desired shape. You can use a variety of scissors to do this. Once you have cut the paper, you need to glue it together. You can use a variety of glues, but you need to make sure that the glue is strong enough to hold the paper together.

Once you have glued the paper together, you need to let it dry. Once it is dry, you can add details to the paper. You can use a variety of markers and pens to add details to the paper.

Once you have added all of the details to the paper, you need to cut it out. You can use a variety of scissors to do this. Once you have cut the paper out, you can glue it to a piece of cardboard.

You can also use a variety of other materials to create 3D paper art. You can use paper clips, ribbon, and other materials to create 3D paper art.

If you want to learn more about 3D paper art, you can check out a variety of books and websites. You can also attend a class or workshop.

3D paper art is a type of sculpture that is made by folding, cutting, and gluing paper. The finished product can be very intricate and detailed, and it can be used to create both two-dimensional and three-dimensional sculptures.

Here are some tips and tricks for creating 3D paper art:

-Start with a simple design. If you are new to 3D paper art, it is best to start with a simple design. Once you have mastered the basics, you can move on to more complex designs.

-Use a variety of paper types. You can use different types of paper to create different effects. For example, you can use construction paper for a more sturdy sculpture, or tissue paper for a softer look.

-Be creative with your folds. There are no set rules for how you must fold your paper. Get creative and see what kinds of interesting shapes you can create.

-Use a glue stick for a stronger bond. If you are using construction paper or another type of paper that is not self-adhesive, you will need to use a glue stick to hold your paper together.

-Let your imagination run wild. The possibilities are endless when it comes to 3D paper art. So let your imagination run wild and see what you can create!

How To Create 3d Paper Art

How To Create 3d Paper Art

Paper is a versatile medium that can be used to create art in a variety of different forms. One of the most popular ways to use paper is to create three-dimensional art.

Three-dimensional paper art can be created using a variety of different techniques. One popular technique is to cut paper into shapes and then assemble the shapes into a three-dimensional object. This can be done by hand, or with the help of a cutting machine such as a Cricut or Silhouette.

Another popular technique for creating three-dimensional paper art is to fold paper into shapes. This can be done by hand or with the help of a paper-folding machine.

Once the paper has been cut or folded into the desired shapes, it can then be assembled into a three-dimensional object. This can be done by gluing the pieces together, or by using other methods such as stitching or wire-wrapping.

Three-dimensional paper art can be used to create a variety of different objects, including sculptures, jewelry, ornaments, and more. It is a versatile medium that can be used to create a wide variety of different art forms.

Adding some dimension to your paper crafts is a great way to add interest and depth to your projects. One way to do this is to create three-dimensional paper art. This type of art can be made using a variety of materials, but the most common is paper.

Paper is a great medium to work with when creating three-dimensional art because it is relatively easy to cut and shape. It is also inexpensive, so you can experiment with different techniques without breaking the bank.

There are a few different ways to create three-dimensional paper art. One popular method is to use paper folding techniques, such as origami or kirigami. This type of art is often made by folding paper into intricate shapes and then stacking the pieces to create a three-dimensional effect.

Another way to create three-dimensional paper art is to use paper cutting techniques. This involves cutting paper into shapes and then gluing or taping the pieces together to create a three-dimensional effect.

You can also create three-dimensional paper art by using a variety of different types of paper. For example, you can use construction paper, cardstock, or even recycled paper. By using different colors and textures of paper, you can create a unique and interesting three-dimensional effect.

If you are looking for a creative way to add dimension to your paper crafts, try creating three-dimensional paper art. This type of art is relatively easy to make and can add a lot of interest and depth to your projects.

How To Create 3D Nail Art

How To Create 3D Nail Art

Three-dimensional (3D) nail art is a type of nail decoration that adds depth and dimension to your nails. It can be achieved by using a variety of techniques, including layering, sculpting, and embossing. 3D nail art is a great way to add interest and drama to your nails, and it’s perfect for special occasions or simply when you want to stand out from the crowd.

If you’re new to 3D nail art, don’t worry – it’s not as difficult as it looks. With a little practice, you’ll be creating stunning 3D designs in no time. In this article, we’ll show you everything you need to know about 3D nail art, including how to choose the right products, how to create different 3D effects, and some top tips for perfect results.

What You Need

Before you start, you’ll need to gather together a few supplies. You’ll need a base coat and top coat of nail polish, as well as a color polish for your design. For the best results, choose a polish that is not too thick or too thin. You’ll also need some clear acrylic powder, a small brush, a dotting tool, and a toothpick.

If you’re planning on creating a lot of 3D designs, it’s worth investing in a few specialized tools, such as a 3D mold or a silicone mat. These can make it easier to create certain shapes and effects, but they’re not essential.

Creating a 3D Effect

There are lots of different ways to create a 3D effect on your nails. One of the simplest is to create a layered design using your chosen polishes. Start with a base color, then add a second color in a contrasting shade. Use a dotting tool or a toothpick to create dots or lines of the second color. Finally, use a dotting tool or your brush to slightly swirl the colors together.

If you want to add more dimension to your design, you can try sculpting with acrylic powder. Start by painting your nails with a base color and letting it dry completely. Next, use your dotting tool to apply a small amount of acrylic powder to your nails. Use a small brush to shape the powder into the desired design. You can create all sorts of shapes and effects, from flowers to geometric patterns.

Another way to add dimension to your nails is to emboss them. You’ll need a special embossing plate for this technique. Start by painting your nails with a base color and letting it dry completely. Place your embossing plate over your nail and use a dotting tool to apply polish to the plate. The polish will transfer onto your nail, and you can then use a brush to shape it into the desired design.

Top Tips

Here are a few top tips to help you get the best results from your 3D nail art:

-Start with clean, dry nails. Make sure your nails are free from any oils or residue, as this can interfere with the polish and cause it to chip.

-Take your time. Don’t try to rush your designs – the key to perfect 3D nail art is to take your time and be patient.

-Use a top coat. A top coat will help to protect your design and make it last longer.

-Be creative. There are no rules when it comes to 3D nail art, so let your imagination run wild!

With these simple tips, you’ll be creating beautiful 3D designs in no time.

Tips And Tricks For 3D Pen Art

Tips And Tricks For 3D Pen Art

3D pen art is a relatively new and exciting art form that allows you to create three-dimensional objects with a pen-like device. While it may sound complicated, it’s actually quite easy to get started with 3D pen art. In this article, we’ll give you some tips and tricks for creating beautiful 3D pen art.

One of the most important things to keep in mind when creating 3D pen art is to start with simple shapes. You can gradually increase the complexity of your shapes as you become more comfortable with the 3D pen. It’s also important to use a light hand when you’re first starting out. The pressure you apply to the pen will determine the thickness of the line you create.

Another important tip is to use a variety of colors when you’re creating 3D pen art. This will give your art more dimension and make it more interesting to look at. You can also experiment with different line thicknesses to add more interest to your art.

When you’re first starting out, it’s a good idea to practice on paper before you start working on three-dimensional objects. This will help you get a feel for how the 3D pen works and how to control it. Once you feel comfortable with the pen, you can start experimenting with different materials.

There are a few different types of 3D pens available on the market. Some of the more popular brands include the 3Doodler and the Lix 3D pen.

No matter what type of 3D pen you choose, the most important thing is to have fun and be creative. With a little practice, you’ll be able to create amazing works of art with a 3D pen.

3D pen art is a relatively new and exciting form of art that allows you to create three-dimensional objects with a special pen. This type of art is becoming increasingly popular, as it allows you to create unique and intricate designs that can be displayed in your home or office.

If you’re interested in trying your hand at 3D pen art, there are a few tips and tricks that you should keep in mind. First, it’s important to choose the right pen for your needs. There are a variety of 3D pens on the market, and each one has its own set of features and benefits. Do some research to find the pen that’s right for you and your artistic goals.

Once you have the right pen, it’s time to start practicing. Draw some simple shapes and objects to get a feel for how the pen works. Then, you can start working on more complex designs. When you’re first starting out, it’s a good idea to use a template or stencil to help you create your design. This will make it easier to get the hang of using the pen and create a consistent look for your art.

As you become more comfortable with using a 3D pen, you can start experimenting with different techniques. You can create different textures by varying the speed at which you move the pen, or by using different types of plastic. You can also create different colors by mixing different colors of plastic together. The possibilities are endless, so have fun and be creative!

3D Wall Art: The Perfect Way To Personalize Your Space

3D Wall Art: The Perfect Way To Personalize Your Space

3D wall art is the perfect way to add a personal touch to your home or office. Whether you’re looking for something unique to hang above your fireplace or want to create a statement piece in your living room, 3D wall art is a great way to achieve this.

There are a variety of 3D wall art pieces available on the market, from abstract sculptures to realistic images. No matter what your style or budget, you’re sure to find something to suit your taste.

3D wall art is a great way to add interest to a plain wall. It can also be used to create a focal point in a room. Whether you hang it above your bed or in your living room, it’s sure to be a conversation starter.

If you’re looking for a way to make a big impact in a small space, 3D wall art is the perfect solution. It’s also a great way to add a personal touch to your office or workspace.

Whether you’re an art lover or simply looking for a unique way to personalize your space, 3D wall art is a great option. With so many pieces to choose from, you’re sure to find something that fits your style and budget.

3D wall art is the perfect way to personalize your space. You can find 3D wall art in a variety of styles and colors to match your home’s décor. 3D wall art is also a great way to add a personal touch to your office or workspace.

3D wall art is made from a variety of materials, including metal, glass, wood, and even paper. You can find 3D wall art in a variety of shapes and sizes. You can also find 3D wall art that is illuminated, which is perfect for adding a dramatic touch to your space.

3D wall art is relatively easy to install, and you can find a variety of 3D wall art kits online or at your local home improvement store. You can also find a variety of 3D wall art templates online that you can print out and use to create your own 3D wall art.

If you are looking for a unique way to personalize your space, 3D wall art is the perfect solution. You can find a variety of 3D wall art online or at your local home improvement store.

Deco Mirror: Art Deco Mirrors for Interior Design

Deco Mirror: Art Deco Mirrors for Interior Design

Interior Design with Art Deco Mirrors

Art Deco mirrors are eminently suited to modern living. In general these designs emphasize strong lines and offer an elegance from a by-gone age. Art Deco, also called “Deco,” refers to a style of art, architecture and design consisting of of sleek, stylized forms and bold geometric designs. The Art Deco Era began in Paris in the 1920s and spread internationally. Mirrors were widely used and became an important component in architecture and interior design. Currently this style is enjoying a huge revival. This page showcases some fine examples of Deco mirrors. There is something here to suit every taste and budget.

Art Deco Style

The Deco Mirror Originally called the “modernistic style” or “Style Moderne,” the Art Deco Era lasted well into the 1930s. The style was decorative, functional and cutting edge. Mass production of mirrors led to a great popularity in their use, both for function and decoration. Along with handheld mirrors and Cheval freestanding full-length dressing mirrors, mirrors were incorporated into furniture and sideboards. They also were used in decorative interiors for public buildings. These Deco mirrors featured geometric shapes and were often beveled and etched. This modern and decorative style experienced a huge resurgence in the late 1960s. Because of its international influence which began with the 1925 Paris Exposition Internationale des Arts Décoratifs et Industriels Modernes, the name “Art Deco” was coined as an abbreviation of this famous exhibition.

Why Use Mirrors for Your Decor?

Mirrors are functional, and they create a feeling of light and space Mirrors are functional in that their intended purpose is to check you and your appearance. However, they should also be considered vital in interior design. In general, mirrors enlarge a room. Well placed, a mirror will make your room look bigger and more spacious. For example, a mirror placed in the hall will enhance the space. In addition, mirrors can be used to direct light into a room or space. Utilize natural or artificial light to create the effect you want. Art Deco mirrors are usually pieces of art in their own right and deserve to be displayed prominently. One is sure to add a touch of glamour to your living space or indeed any room in your home.

Art Deco Design: Deco Rugs and Carpets

Art Deco Design: Deco Rugs and Carpets

Art Deco Rugs

Art deco rugs were introduced to the world at the Paris Exposition of Modern and Decorative Art (Paris Exposition des Arts Decoratifs et Industriels Modernes) in 1925. For that historic world’s fair, the buildings were decorated in art deco rugs and the style took hold.

Art deco designs featured bold geometric shapes, stylized floral patterns and other natural forms, often with juxtapositions of dark and light. Artists from around the world started to design rugs and textiles. Some of the most creative rug designs were created by Jean Michel Frank and Emile Jacques Ruhlmann of France.

These rugs continue to be popular with interior designers today, and you can create your own Art Deco look with these stylish Art Deco rugs. This page showcases some of the best deco rugs available to buy online and at reasonable prices. So if you are looking to create a new style for your home, think about using rugs as decor highlights. Although antique rugs from this era can be quite expensive, you can buy new Art Deco style rugs from $80 to $600. Scroll down to enjoy some easy online shopping.

Art Deco Style

Deco Design Characteristics

The Art Deco Style was influenced by the formalized lines of ancient Egyptian and ancient Aztec art, and it borrowed from neoclassical, modernism, art nouveau, cubism and constructivism.

This time period, just after the First World War, was also known as the Machine Age. For the first time, rugs began to be made my machine, and because they were not expensive like the traditional hand-knotted oriental rugs, they were seen as rugs of the people i.e. stylish designs that the common man could afford. A new market was started and art deco rugs gained increasing popularity in Europe and America.

Not all art deco rugs were machine made, but this was an option, and the world was ready for it.

Art Deco Rug

Deco Rug Design


Art Deco Rugs & Deco Carpets

Designs of the 1920s and 1930s

When it comes to rugs and floor coverings, Art Deco rugs encompass an infinite range of design possibilities. Other applied art movements defined one over-arching theme, while Art Deco embraced influences for all ages and from all over the world. These modernists designs were highly sought after and are still relevant and in demand today.

Rugs and carpets designed in the Art Deco era of the 1920s and 30s represent the best and most beautiful side of industrial design and globalization. By the late 1920s, the rugs and carpets that were produced were colorful and derived their influence from many areas, highly decorative Persian rugs being only one. Designers in rugs, as much as anywhere else where the style was being copied, rated the latest innovations in construction, design and color theory.

The people who designed and wove Art Deco rugs were innovators who paved the way for mid-century and modern designers, abstract artists and many contemporary design movements. At a time when commercial air travel was new and novel, designers, importers and carpet traders provided a vital link between east and west. The cultural diffusion that occurred in the early 20th century is ever-present in Art Deco rugs, even today. The creative atmosphere and historic design conditions of the era resulted in a colorful melting pot that combined influences from all parts of the globe.

Deco Rugs

In Summary

Art Deco rugs and carpets run the breadth of the spectrum in design from stoic masculine rugs with sharp geometric shapes to feminine floral weaves with contrasting colors and pastels. In China, the vibrant jewel-tone carpets manufactured for the explorer and entrepreneur Walter Nichols, are in a league of their own while rugs produced in the same era in England, Europe and Scandinavia were all pieces that led to the designation of the Art Deco or Art Decoratif term in the mid 1960s. British colonial influence in India led to the creation of many phenomenal Art Deco rugs there and they continue to present a combination of modernity and glamour.

In recent years, Art Deco rugs, along with other modernist design, have seen a resurgence. In many places, people are falling back on the reliable, often simplistic, forms to decorate their homes and with good reason: Modernist design fuses form and function into a single beautiful piece that is a work of art in its own right.