How To Download And Install The Neilvard Three Font For Free

How To Download And Install The Neilvard Three Font For Free

The Neilvard Three font is a free font that is designed to help youcreate beautiful, professional looking documents. To download and install the font, you will need to first install the font software. Once the software is installed, you can then open the font file and click on the “Download” button. Once the download is complete, you can then open the font file and click on the “Install” button. Once the installation is complete, you can then open the font file and click on the “Font”button.

If you’re looking for a new font that you can download and install for free, then you should check out Neilvard Three. This font is designed by Neilvard Hjorth and is available for free download on many web platforms.

Neilvard Three is a Sans-serif font designed by Neilvard Jacobsen. It is free to download and install on your computer.

The font has a modern and stylish look, perfect for any type of writing. It is available in both TrueType and OpenType formats and can be used in any text document.

If you’re looking for a new and exciting font, then Neilvard Three is definitely worth checking out.

If you’re looking for a font that will help you look more stylish, then you should check out Neilvard Three. This font is designed to make writing more stylish, and it’s available for free. Just install it on your computer and start using it!

How To Install Battery In Arlo Pro 2 Camera

How To Install Battery In Arlo Pro 2 Camera

Installing a battery in your Arlo Pro 2 camera is a simple process that only requires a few steps. First, locate the battery door on the back of the camera. Next, use a Phillips head screwdriver to remove the two screws that are holding the door in place. Once the screws are removed, the door will come off and you will be able to access the battery compartment.

Inside the battery compartment, you will see a battery slot and a contact point. The battery slot is where the battery will go, and the contact point is where the battery will make contact with the camera in order to power it on. To install the battery, simply insert it into the battery slot and then push it down until it makes contact with the contact point.

Once the battery is installed, you can then put the battery door back on and screw it into place. That’s it! Your Arlo Pro 2 camera is now battery-powered and ready to use.

If you’ve just purchased an Arlo Pro 2 camera, you’re probably eager to get it set up and start using it. In this blog post, we’ll show you how to install the battery in your Arlo Pro 2 camera.

The first thing you’ll need to do is remove the battery cover from the camera. To do this, simply twist the cover counter-clockwise and it will come off.

Once the cover is off, you’ll see the battery compartment. Inside, there is a small metal tab that you’ll need to slide in order to release the battery.

Once the tab is slid, the battery will pop up slightly. Grab the battery and pull it out of the compartment.

Now take your new battery and insert it into the compartment, making sure that the metal tab lines up with the hole in the battery.

Once the battery is inserted, push down on it until you hear it click into place.

Now replace the battery cover by twisting it clockwise until it’s snug.

And that’s it! You’ve now successfully installed the battery in your Arlo Pro 2 camera.

How The Blink Outdoor 2 Camera System Can Improve Your Home Security

How The Blink Outdoor 2 Camera System Can Improve Your Home Security

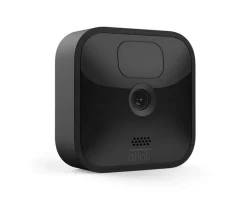
If you’re looking for a home security system that’s easy to install and provides great coverage, the Blink Outdoor 2 Camera System is a great option. This system comes with two wireless cameras that can be installed anywhere around your home, and they’re simple to set up. The Blink cameras are also very affordable, making them a great choice for budget-conscious consumers.

One of the best things about the Blink Outdoor 2 Camera System is that it doesn’t require a monthly fee. That’s right, there are no monthly fees associated with this system. You’ll just need to pay for the cameras up front, and then you can enjoy peace of mind knowing that your home is being protected.

Another great thing about the Blink system is that it offers free cloud storage. That means you can review your footage at any time, from anywhere. And if you ever need to download footage for law enforcement or insurance purposes, you can do so easily.

Finally, the Blink Outdoor 2 Camera System comes with a two-year warranty. That means if anything goes wrong with your cameras, you’re covered.

If you’re looking for an affordable and easy-to-use home security system, the Blink Outdoor 2 Camera System is a great option.

When it comes to home security, many people think that they need to spend a lot of money to get a top of the line security system. However, this is not always the case. The Blink Outdoor 2 Camera System is a great option for those who are looking for an affordable and reliable security system.

The Blink Outdoor 2 Camera System is a great way to improve your home security for a number of reasons. First, the system is very affordable. You can get the system for just $129.99. This is a great price for a security system that includes two cameras.

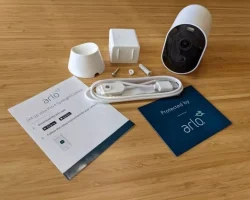
Second, the Blink Outdoor 2 Camera System is very easy to install. The system comes with everything you need to get started. All you need to do is mount the cameras and connect them to the Blink Sync Module. The Blink Sync Module will then connect the cameras to your home Wi-Fi network.

Third, the Blink Outdoor 2 Camera System is very easy to use. The system comes with a free Blink app that you can download on your smartphone. The app is very user-friendly and it makes it easy to view your cameras, arm and disarm the system, and set up alerts.

Fourth, the Blink Outdoor 2 Camera System is very reliable. The system uses Blink’s proprietary technology to provide you with a clear and reliable video feed. The system also includes a motion detector that will send you an alert if it detects any movement.

Fifth, the Blink Outdoor 2 Camera System comes with free cloud storage. This means that you can access your video footage at any time, from anywhere.

The Blink Outdoor 2 Camera System is a great way to improve your home security. The system is affordable, easy to install, easy to use, and it is very reliable.

The Benefits Of The Blink Outdoor 2 Camera System

The Benefits Of The Blink Outdoor 2 Camera System

First and foremost, it is a Blink system, which means that it is compatible with all other Blink products. This gives you the peace of mind of knowing that your home security system is compatible with the products you already own.

Another great benefit of the Blink Outdoor 2 Camera System is that it is very easy to install. The instructions are clear and concise, and the entire process takes less than five minutes.

The Blink Outdoor 2 Camera System also comes with a free Blink Sync Module, which allows you to sync your Blink cameras with your other Blink products. This is a great feature, as it allows you to have a complete home security system that is easy to use and manage.

Finally, the Blink Outdoor 2 Camera System is very affordable. It is one of the most affordable home security systems on the market, and it offers a great value for the money.

If you are looking for a home security system that is easy to install, compatible with other Blink products, and very affordable, then the Blink Outdoor 2 Camera System is the perfect choice for you.

First and foremost, it is an affordable and easy to install security solution for your home or business. With its two wireless cameras, you can keep an eye on what’s going on both inside and outside your property. The Blink Outdoor 2 also offers motion detection, night vision, and two-way audio, so you can stay aware of any potential threats, and respond quickly if necessary.

In addition to its security benefits, the Blink Outdoor 2 is also a great way to keep an eye on your pets or kids when you’re not at home. The cameras’ live streaming capabilities mean you can check in on them at any time, from anywhere. And if you need to leave them home alone for a while, the two-way audio feature lets you check in on them and make sure they’re okay, even if you’re not there in person.

So whether you’re looking for a security solution or just a way to stay connected to your loved ones when you’re not at home, the Blink Outdoor 2 Camera System is a great choice. Affordable, easy to install, and packed with features, it’s the perfect solution for any home or business.

The Features Of The Blink Outdoor 2 Camera System

The Features Of The Blink Outdoor 2 Camera System

For one, the Blink Outdoor 2 Camera System is an easy to install, wireless security system. It’s also weatherproof, so you don’t have to worry about it rusting or being damaged by rain or snow. The Blink Outdoor 2 Camera System also has a two-year battery life, so you don’t have to worry about recharging it frequently.

The Blink Outdoor 2 Camera System also has motion detection, so you can be alerted when someone enters your yard or home. The Blink Outdoor 2 Camera System also has night vision, so you can see what’s going on even when it’s dark outside. Finally, the Blink Outdoor 2 Camera System also has a siren, so you can scare off intruders or alert your neighbors if there’s an emergency.

The Blink Outdoor 2 Camera System is a great security system for your home or business. It’s easy to install, has a long battery life, and has many features that will keep you and your property safe.

This system is designed to be installed outdoors, and it includes two Blink XT2 cameras, a Blink Sync Module 2, a Blink Outdoor Mount, and a Blink Solar Charger. The Blink Outdoor 2 Camera System is a great choice for homeowners who want a top-of-the-line security system that is easy to install and use.

The Blink Outdoor 2 Camera System is a great choice for homeowners who want a top-of-the-line security system that is easy to install and use. This system is designed to be installed outdoors, and it includes two Blink XT2 cameras, a Blink Sync Module 2, a Blink Outdoor Mount, and a Blink Solar Charger. The Blink Outdoor 2 Camera System is a great choice for homeowners who want a top-of-the-line security system that is easy to install and use.

The Blink Outdoor 2 Camera System is a great choice for homeowners who want a top-of-the-line security system that is easy to install and use. This system is designed to be installed outdoors, and it includes two Blink XT2 cameras, a Blink Sync Module 2, a Blink Outdoor Mount, and a Blink Solar Charger.

How To Use The Blink Outdoor 2 Camera System

How To Use The Blink Outdoor 2 Camera System

The Blink Outdoor 2 Camera System is a great way to keep an eye on your home or business. The system includes two cameras, a base station, and a Blink Sync Module. The Blink cameras are battery-powered and can be placed anywhere. The base station is plugged in to an AC outlet and connects to your home network. The Blink Sync Module connects wirelessly to the base station and allows you to sync your Blink cameras to your smartphone or tablet.

Here are some tips on how to use the Blink Outdoor 2 Camera System:

1. Choose the right location for your Blink cameras. The cameras should be placed in an area where they can get a good view of the area you want to monitor.

2. Install the Blink base station. The base station should be placed in a central location, such as a living room or office.

3. Place the Blink Sync Module. The Blink Sync Module should be placed in a location where it can get a good signal from the base station.

4. Install the Blink cameras. Follow the instructions that come with the cameras.

5. Sync the Blink cameras to your smartphone or tablet. Open the Blink app and follow the instructions.

6. Place the Blink cameras in the locations you want to monitor.

7. View the Blink cameras from your smartphone or tablet. Open the Blink app and you will see the live video feed from each camera.

8. Use the Blink app to set up motion alerts. You can choose to receive alerts via push notification, email, or both.

9. Access the Blink cameras from anywhere. The Blink cameras can be accessed from any internet-connected device.

10. Use the Blink cameras to record video. The Blink cameras can be set to record video when motion is detected. Video is stored in the cloud and can be downloaded to your smartphone or tablet.

The Blink Outdoor 2 Camera System is a great way to keep an eye on your home or business. With the tips above, you can make the most out of your Blink cameras.

How To Install Your Arlo Pro 2 Camera

How To Install Your Arlo Pro 2 Camera

Arlo Pro 2 is one of the most popular home security cameras on the market. If you’re thinking about getting one (or more) for your home, here’s a quick guide on how to install them.

1. Start by finding a suitable location for your camera. Arlo Pro 2 cameras are wire-free, so you can pretty much put them anywhere. Just keep in mind that they need to be within range of the Arlo base station (more on that later).

2. Once you’ve found a spot, use the included mounting plate to attach the camera to a wall or ceiling. If you’re mounting it outside, make sure to use the included weatherproof skin.

3. Now it’s time to sync the camera with the base station. This is done by pressing and holding the sync button on the back of the camera for a few seconds. The base station will emit a chime when the camera is successfully synced.

4. The last step is to connect the base station to your router (or directly to your modem, if you’re using a wired connection). Once that’s done, you’re all set! Your Arlo Pro 2 camera is now up and running.

In this blog, we’ll show you how to install your Arlo Pro 2 camera. This process is pretty simple and only takes a few minutes.

1. Find a good location for your camera.

You’ll want to find a spot for your camera that has a good view of the area you want to monitor. If you’re placing the camera outdoors, make sure it’s in a protected spot where it won’t be damaged by the elements.

2. Mount the camera.

Once you’ve found the perfect location for your camera, you’ll need to mount it. If you’re mounting the camera to a wall, you’ll need to use the included mounting hardware.

3. Connect the camera to power.

Now you’ll need to connect the camera to a power source. If you’re using the battery-powered option, simply insert the batteries. If you’re using the solar-powered option, make sure the solar panel is in a location where it will get plenty of sunlight.

4. Set up the camera in the Arlo app.

Now that your camera is all set up, you’ll need to add it to your Arlo account and configure it in the Arlo app. This process is pretty simple and only takes a few minutes.

We hope you found this blog helpful. If you have any further questions, please reach out to our support team.

3D Wall Art: The Perfect Way To Personalize Your Space

3D Wall Art: The Perfect Way To Personalize Your Space

3D wall art is the perfect way to add a personal touch to your home or office. Whether you’re looking for something unique to hang above your fireplace or want to create a statement piece in your living room, 3D wall art is a great way to achieve this.

There are a variety of 3D wall art pieces available on the market, from abstract sculptures to realistic images. No matter what your style or budget, you’re sure to find something to suit your taste.

3D wall art is a great way to add interest to a plain wall. It can also be used to create a focal point in a room. Whether you hang it above your bed or in your living room, it’s sure to be a conversation starter.

If you’re looking for a way to make a big impact in a small space, 3D wall art is the perfect solution. It’s also a great way to add a personal touch to your office or workspace.

Whether you’re an art lover or simply looking for a unique way to personalize your space, 3D wall art is a great option. With so many pieces to choose from, you’re sure to find something that fits your style and budget.

3D wall art is the perfect way to personalize your space. You can find 3D wall art in a variety of styles and colors to match your home’s décor. 3D wall art is also a great way to add a personal touch to your office or workspace.

3D wall art is made from a variety of materials, including metal, glass, wood, and even paper. You can find 3D wall art in a variety of shapes and sizes. You can also find 3D wall art that is illuminated, which is perfect for adding a dramatic touch to your space.

3D wall art is relatively easy to install, and you can find a variety of 3D wall art kits online or at your local home improvement store. You can also find a variety of 3D wall art templates online that you can print out and use to create your own 3D wall art.

If you are looking for a unique way to personalize your space, 3D wall art is the perfect solution. You can find a variety of 3D wall art online or at your local home improvement store.

Guide to Camcorder Software

Guide to Camcorder Software

These days, you’re just as likely to view your camcorder videos on a computer as on a TV (if not more so.) That’s why every camcorder is packaged with some basic video software that will let you perform some routine tasks with your camcorder video. Here’s what you can expect:

Basic editing: While you shouldn’t expect to edit your Hollywood blockbuster on the included software, the basic editing features are usually there – some color corrections, trimming, along with the ability to add titles and transition effects.

Sharing: Whether you want to post your videos to Facebook or YouTube or send them to friends and family via email, the software included in your camcorder usually contains tools for Web sharing.

Transcoding: If you want to watch your home movies on DVD, smartphone, portable media players or even a PlayStation Portable, you may need to transcode your video – i.e. turn it into a file format that can be recognized by these devices. Most bundled software will have an option to output your video file for viewing on various platforms.

Organize: The more videos and photos you record with your camcorder, the harder it is to keep track of all your digital files. Included software will offer a basic organizer that will let you keep track of your ever-growing digital library.

DVD Burning: One of the most routine tasks you’ll need to perform with your camcorder’s software is burning an archival disk of your footage. If it does nothing else, your software should allow you to burn DVDs of your home movies.

Perform Specialized Tasks: Some high-end camcorder features can only be accessed through specialized software applications not found on off-the-shelf software.

Sony’s GPS camcorders are a case in point: you can only access map views and “geo-tagging” if you use the company’s included software to organize your files.

Built-in Software

There’s a growing trend among camcorders to ditch the CD-Rom and load their software directly into the camcorder itself. The software will typically install itself on your computer the first time you connect the camcorder to the computer. The virtue with the built-in approach is that you can upgrade computer (of suffer a hard drive wipe out) without worrying about losing your software.

Setting Up Your Home-Based Arts and Crafts Office

If my clients are any indication of how arts and crafts businesses are managed, many arts and crafts businesses are home based. Even if you need to rent studio space to make your craft, you are probably managing the business aspect of your arts and crafts company out of your home.

If you are thinking about starting an arts or crafts business, operating it out of your home will save on overhead and reduce the amount of startup cash you’ll need. Here are some tips to running your craft business out of your home.

Converting a Spare Room

This is kind of the holy grail of home businesses – that much bally-hoo’d spare room! Many folks new to crafts start a craft business later in life preparing to segue into it full time when they retire. In that case, there just may be a child’s bedroom that is no longer in use that can be converted into a workroom.

I also once owned a house that had a weirdly-shaped two car garage that was very deep – giving an extra fifteen feet by the width of the garage at its front. The prior owners had installed ductwork to have it under heat/air making it a perfect workroom.

After I moved, I purchased a portable rolling floor air conditioner to convert the new garage space into a workroom. The unit was somewhat pricey but it’s paid for itself many times over for both the business and for home use when we’ve had repair issues. The one I purchased does triple duty as a dehumidifier and regular fan too. The only problem is that your garage must have a window to connect the exhaust tubing when using as an air conditioner .

Converting a Closet

Once again, most people just don’t have extra closet space. But if you do, taking the doors off a regular closet will allow you to fit a desk and other equipment inside (I know from experience!). A walk-in closet with a window is ideal.

I find working on my business paperwork without natural light somewhat depressing. I have a large Verilux light that I use at night.

Investigating Unused Space for the Home Office

Look around your home to see where you can setup operations in an unused corner. Here are some suggestions:

  • Basement – it’s been so long since I lived in a house with a basement I almost forgot about it. Still there is the lack of natural light problem. You could try using a Verilux or similar lighting solution.
  • Unused space on stair landing – install a drop-down shelf that leaps into action when you need it and folds flush to the wall when you don’t.
  • Laundry room – you could think about buying a full-sized stacking washer and dryer to free up enough space to install a workstation. Just about any washer/dryer that has a flat top can convert to stacking using the correct kit. Plus most kits have a pull-out shelf for folding the fresh laundry.
  • Stow and go desk – I was in the market for a stow and go work area last year. After hours of searching, I found this great one at Furniturexo.com. We had to put off moving for another year so I’m waiting to buy it until after the move. It seem ideal in many ways. Sturdy, lots of room for storage, somewhat attractive in appearance and folds to a minimal footprint.
  • Expand a windowsill – install a folding shelf to the sill itself or to the wall immediately beneath. This has the extra advantage of all that natural light. You can install sheers to block excess sunlight when the sun is directly at window height.
  • Weirdly walled space – if you have an area of your house that is between rooms anchored by two walls creating wasted space, considering putting your workspace in there and hanging a matchstick shade from the ceiling long enough to extend to the floor to hide the area when you are finished working.

For more ideas, check out your local bookstore magazine stand. Since living in small houses for the last ten years, I have noticed there is just a plethora of magazines devoted to organizing and living in small spaces.