How to paint shadows – basic methods explained

How to paint shadows – basic methods explained

Painting shadows – resources for realistic painted shadows

This site tries to give some help on painting shadows in realistic, representational painting.
To establish the right form of a shadow is one thing, but to get the colour of a shadow “right” is at the centre of mastership in painting, I think.
Imagine a meadow in sunlight and a tree that casts a shadow on it. There will be different shades of green, some in light and some in shadow.

Especially the capability of the human eye to adapt quickly to low light levels adds to the difficulty to draw and paint true shadows. As you look into a shadow it seems to get lighter. When you look back into the sunlit areas the shadows suddenly seems so much darker again.

In the end painting shadows is painting light, a particular form of light: shadows are reflections of indirect light whereas the sunlit parts of a subject are exposed to direct sunlight.

Some basic steps to paint shadows are discussed here from dark to light and vice versa. Depending on the medium used there are limitations and different potentials to depict shadows. Two example paintings in oil colour (Plein Air) and dry pastels (studio still life) are discussed in detail. The tips can be used in studio work as well as in works on site, Plein Air.

Basics of the colour theory are explained together with links for more extensive studies. Finally some comprehensive “how to books” on painting light and shadow can be purchased from this website.

Image credits: All images on this webpage ,if not otherwise stated, are creations by the author.Images and illustrations of products (in affiliate links) are used according to Squidoo TOS.

The theory of light and shadow explained with a pastel still life painting as example
This is a great explanation of the theory of light and shade in drawings.

Understanding the categories of direct light, highlights, form shadow, reflected light and cast shadows can help a lot to see and depict the effects of lights in nature much better.

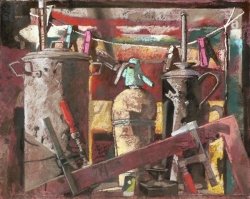
I lit the still life set above with a strong side light from the left and a weaker top light. With a bright piece of cardboard I reflected light back into the composition from the right side because otherwise those shadows would turn into a massive dark and partly almost black area. This is a method that photographers use a lot in portrait work to reduce the contrast between light and shadow areas.

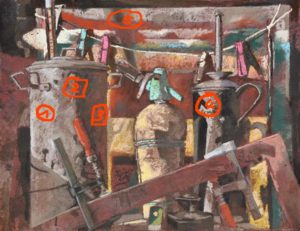
What categories of light an shadow can be seen in this pastel painting?

1.) In area one there is the brightest part, the area of high light on this particular vessel

2.) In area two you see the darkest form shadow (core shadow) that contrasts the most with the area in direct light. This is partly an optical effect rather than a “true” observation. On curved surfaces you will see a more or less wide zone of transition from the brightest direct light into the form shadow. The core shadow will fade more and more
as you move away from the light source and will finally get brighter again when you get in to area 3

3.) Area three is a form shadow that receives some reflected light, often the reflected light has a different color and it will change the color of the form shadow. In this particular case I added some more red that was reflected from the background panel onto the vessel.

4.) Area four is interesting as a cast shadow falls directly into the zone of bright direct light. That dark shadows cast from the soda bottle is lit up on the lower edge of the other vessel by some reflected light from the lower body of the soda bottle.

5.) The shadow in area 5fice is a special case. There is a soft, somewhat blurry cast shadow with a darker core. That effect occured because I used two sources of light. The darker core is in fact a more precisely cast shadow from the strong side light, whereas the soft broader outer part of the shadow originates from the further away light bulb under the room ceiling.

Light, shade and shadown in drawing and painting a beginners guide

Is there a formula to mix the colour of shadows?

An example in oil colors -Some problems and questions that occur in painting shadows
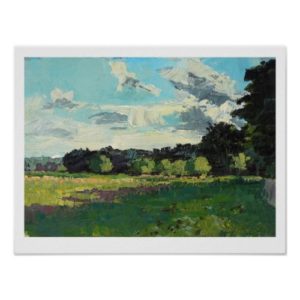
Artprint plein air landscape painting by editionha
Large format printing by Zazzle

In this plein air oil painting light and shadow are the main features. I did this study because I wanted to find out what is the colour of grass and foliage in sun and in shadow and whether there is a way or maybe a kind of formula how I could get the best or convincing results.

But from which colour or shade should I start from? Should the colour of the grass in sun be the starting point and I would mix from bright to the darker shadow, or should I come from the dark side and establish the colour of the grass in shade first and brighten that colour somehow up to paint the areas in direct sunlight?

The most irritating thing is that the human eye adapts always to the light conditions. When I looked at the grass in sun the shadows seemed to be very dark. But when I studied the areas in shadow it seemed that the shadow was not that dark anymore the longer I looked at it. It seemed to get brighter and many different shades of grass emerged, which disappeared again when I studied the sunlit parts of the landscape. Particularly the border between light and shadow presented a difficulty. The contrast seemed so very strong there, but my logic told me that the amount of light and as a consequence the colour of the grass directly at this border line and a few meters away from it had to be the same. In other words the shadow would not get darker close to the sunlit area and also the sunlit area would not be brighter close to the shadow area. This effect again has to do with the way our eyes handle strong contrasts. There are limits for what our eyes can discern and for that reason leaves of trees observed against a bright sky always seem very dark, almost black even though we know that they are green.

Finally I had to realise that I never would be able to reproduce the very same sensation and experience of seeing light and shadow in my painting. Instead I could try to imitate the “effect” of light. For that reason I painted the grass near the border to the sunlit area in a darker and cooler green than the grass close to the edge of the forest. Also I tried to put in some variations within the sunlit and shadow areas.

Also my idea of a kind of a mixing formula vanished; instead I understood that I needed to establish the right tonal values between light and shadow and that I had to find the true colours of grass or leaves etc in shadow and light. Plein air painters often have a small card board frame with a small hole in it with them. By looking through this hole they can isolate certain spots of colour to determine the true colour of objects. I used the palm of my hand to form a kind of monocular and thus isolated certain spots of the landscape for my eyes to get an idea what the true value and colour. This helped me to establish the basic tonality of the shadow and the sunlit meadow. Then I started from these middle values and expanded the range by mixing slightly lighter and darker colours of dark greens and greens in sun.

Some people mix their shadow colours by adding blue, violet to the colour of the sunlit areas or objects in a rather schematic way. These shadows often look artificial. The same applies for the other method that starts with the object colours in shadow which then is brightened up with white and yellow to imitate the sunlit appearance. Both methods are based on the assumption that shadow or sunlight can be understood as some sort of colour filter. Sunlit areas contain more white and yellow, whereas shadows contain more blue and violet components. of course these basic assumptions are correct and helpful on the way, but for more sophisticated painting one has to drop “recipes” I think.

So how do you mix dark shadow colours with oil colors ?

There are many ways to mix dark colors, in fact the possibilities are endless. However there are only a few starting points.

1. Add black color to your base color
Let’s say you need a dark red. By adding black to red color you can mix a darker red, but the red will get more and more muddy the more black you add. You can tell by the greyish look of a paintings that a lot of black has been used in mixing. If you want that look it is fine, but if you prefer bright colors this method most probably will not be the preferred one

2. Start with a dark version of your base color and add dark blue
If you want to keep your colors bright and virbrant adding dark blue to the base color will give you a dark, but blueish version of the base color

3. Mix a dark color with the three primary colors : magenta,blue and yellow
This is the most demanding version to mix the color as seen from the primary colors. You might want to experiment with dark versions of the primary colors or similar colors for example you could subtitue magenta by burnt siena and use prussian blue instead of a primary blue etc..

4. Use Schmincke van Dyke brown to darken colors
I have used Schmincke van Dyke brown with great success to darken colors, especially for painting shadows on green foliage or very dark foliage.
In fact I consider van dyke bewon the best black you can get. It does not kill the clarity of your base color as black does. In combination with variation of no.2. and 3. one can get great results.

I commend to experiment with all four starting points. The shadows and dark greens in the landscape above were painted by using variations of the no.2–no4.

What is the colour of shadows ?

A bit of colour theory

The colour of an object is determined by the light, or more exactly by the wave length of the light that is reflected by the object.
An object in direct sunlight reflects stronger and different light in comparison to an object that receives no direct light or only a fraction of the available light because some other object is casting a shadow on it by stopping the light from the primary light source. Nevertheless the object receives indirect light from the surrounding, which is reflected light, when in shadow. The colour of this indirect light can vary of course depending where it is coming from especially from where it is reflected or maybe even filtered.

Example1:
Very well known is the effect of blue and grey shadows on snow. Snow in shadow receives mainly indirect light from the sky. As snow is white i.e. without colour or more correctly reflects all colours, the shadows in snow look blue under a blue sky without clouds or greyish on an overcast day with a closed layer of grey clouds.

Example 2:
The shadows under a red sun umbrella are influenced by the colour of the umbrella for example. A blue drinking cup under a red umbrella might change to a violet colour due to additive colour mixing theory : blue + red=violet.

Also it is interesting to observe that the colour of the primary light produces shadows in the complementary colour. If you chose a red bulb as your primary light source in a still life painting the shadows cast by that bulb will have a greenish colour.

How to paint shadows – basic approaches

From light to dark and vice versa

1. From light to dark
In water colour and in acrylics it is a very common method to lay down the colours of an object in “normal light”. Then the artists waits until the colours are dry. In a second step those areas in shadow will be covered with a transparent layer of colour that will darken the original colours in order to get a shadow effect. A similar approach is also used in oil colours by adding blue and darker colours to tone down from light to dark shadows. That way the colour hue of the sunlit area is always present in the colour mix for the shadows.

Usually the primary source of light as the sun contains warm yellow light and the colour of shadows are mixed with blue colours as cool complementary hue.

2. From dark to light
Of course it is also possible to start from the dark side and to establish the colours in shade first. The colours of the sunlit parts are then mixed by adding white and yellow to the shadow colours to brighten up or tone up the shadow colours.

3. Mixing the colours as seen
The other way is to paint the colours as they appear in front of the painter. In principle there is no difference in mixing the colour of the sky and the colours of a wall in sun and in then in shadow. In any case the painter has to observe the colours and to translate his observation into a colour mix.
Very bright hues can be mixed by adding white and if the source of light is “warm” i.e. yellowish, as direct sunlight mostly is, with a little bit of yellow in addition. In general it is wise not to overdo the mixing with white because the result will be washed out or almost bleached colours. Overdone highlights can really ruin an otherwise well done painting.

A major difficulty is to mix dark or very dark colour hues. To know the extreme dark and bright colours that are possible with your medium is very important. The gamut of oil colours and other painting media is just not sufficient to represent the wide range of tonalities which are there in nature. Therefore a very bright light can only be represented by emphasising the contrast with dark colours around.

Painting or drawing shadows with dry pastels

A studio still life study with controlled light

This is a still life in dry pastels on medium rough watercolour paper from life in my basement studio. During a week I studied light and shadow colours in artificial light. I tried to find the right colours as seen on the objects to get the realistic look of light and shadows.

It was very helpful to have different colour shades in the Schmincke set of pastels colors. For example the ochre tonalities in light and shadow on the lamp on the right are only very slightly mixed. For the most part I applied the pastel without mixing in that case.

The green glass bottle in the middle however required quite a lot of careful mixing as the set of pastels colour did not contain greens in a suitable gradation of tonalities. I also used bits of grey or charcoal to darken certain areas. With purpose I avoided to use a lot of white in the brightest areas. I would commend to establish small areas with the brightest colours and the darkest colours very early in the painting process to keep control over the contrast or tonality range. It might be very difficult to establish highlights later if the medium tonalities are to high already. If you set your middle values too dark the deepest darks in shadows can become a problem. I found that it is more difficult to create the darkest darks in pastel than the lightest lights.

As you may observe the tonality varies in shadows, by darkening the shadows close to the contact with the bright areas I tried to imitate the sensation for the eyes when it looks at strong contrasts as described in the previous paragraph. There was a rather complicated mixture of shadows cast by the objects onto themselves and on others as well as effects of reflected coloured light, particularly in the green glass vessel at the centre of the composition.

Art Glossary

Art Glossary

Explaining terminology from Art Forums

This art vocabulary glossary was made as an addition to /ic/’s Beginner’s Guide. It lists explanations of terms that are commonly used on art forums. We focus on visual art, namely paintings and drawings, in both the digital and traditional medium.

Note: work in progress. 🙂

Overview

A

Anatomy: the study of human and animal body structures. Artists study skeleton, muscles and fat distribution, as well as these functions in movement, in order to draw realistic looking figures or creatures.

B

Basic Shapes: the basic shapes are the sphere, the cube, the cone and the cilinder. Everything in life can be simplified to these basic shapes or variations of them.
When learning a new subject (proportions, perspective, lighting, …), it is useful to start with basic shapes.
Blending: mixing paint on canvas, mainly used in the context of painting digitally or with oils. This is an important part of rendering.
How to blend digitally

C

Chicken Scratch: the same as “hairy line”. Drawing a line consisting of multiple small scratches or going over a line multiple times to mask mistakes. Not to be confused with loose, sketchy lines. *example picture to be added
Canvas: the surface you paint on. For a traditional painter this is the fabric he works on. For digital artists, the canvas is the total image dimension he is working on. (better explanation for “digital canvas”?)
Color/Colour: considering painting techniques, colour refers to the whole of hue, value and saturation (also called chroma). This is an in depth guide to colour: The Dimensions of Colour.
Comfort Zone: keeping to the skills you already have and not trying new things due to fear of failure. For example, artist might restrain themselves to a single colour palette, or drawing the same subject over and over again.
Composition: arrangement of the elements in a pleasant manner. Or unpleasant, if you suck at composition. *explanatory video link to be added
Concept Art: mainly designing. Usually part of a larger process (creating a movie, game, …).
Construction: building the subject of the painting or drawing from a basic structure. This could be basic shapes which are later on refined, or the key elements of the subjects. For example, a very basic construction for the human figure might be composed of the head, torso and pelvis, with sticks for the joints.

E

Eyeballing: judging by eye, as opposed to measuring with rulers, drawing grids, colour picking, …

F

Fair Use: use of copyrighted works within legal limits.
Flatness (or flat drawing): the works lacks a sense of depth. In many cases, this is due to a poor value range or using strictly contour lines.
Flow: relaxed, zen-like work state of full concentration. For the photoshop tool “flow”, see this post.
Freelancer: self-employed professional.
Fundamentals: things you have to know before you can move on. The crawling before walking and running.
Figure Drawing: drawing humans.

G

Gesture: you probably heard before that non-verbal expressions are the most important element of conversation. That’s what gesture is about. The gesture of a figure, animal or even object can express a wild variety in emotions and actions. Gesture studies are a necessary complement to anatomy studies, to prevent your figures from becoming lifeless.
Graphic Design: the visual art that focuses on convey information. Fields like web design, logo design and typography are important to graphic design.
Grayscale/Greyscale: black-and-white. Consisting only of grey shades (from white to black). Sometimes short for “an image in grayscale”. Value painting/drawing.

H

Hairy Line: the same as “chicken scratch”. Drawing a line consisting of multiple small scratches or going over a line multiple times to mask mistakes. Not to be confused with loose, sketchy lines. *example picture to be added
colour hue Hue: this term is difficult to explain, as it corresponds to “colour” for those unfamiliar with colour theory. This is the third aspect of colour besides value and saturation. For example: red, green or blue are hues. Adding white or black will not change the hue.

I

Illustration: art accompanying another product. For example, illustrations in a book, on game cards, … Nonetheless, an illustration often has stand-alone artistic value.
Illustrator: artist making illustrations, either as a freelancer or employee.

L

Layer: in tradtional painting, this is literally a layer of paint. In digital painting, this is the layer in the painting program, on which one or more elements are kept. Painting on a single layer is also possible. Digital layers can be swapped, moved around and edited individually.
Life Drawing: also “drawing from life”. Drawing a real life object or person, as opposed to drawing from photo reference and drawing from imagination. The three most common life drawing practices are still lifes, model drawing and sketching people from life. The most beneficial aspect of life drawing is the increasing sense of value and 3D perception.
Loomis: usually heard in a phrase like “needs more Loomis”. This refers to the figure construction method as taught by the famous art teacher Andrew Loomis.

M

Master: an artist of great skill. An “old master” would be a great artist from the past, such as Rubens or Van Eyck. A “master work” is an artwork of high artistic and technical quality.
In the broadest sense, a master is any artist whose skill and accomplishments you admire. Doing a “master study” refers to studying the work of a master in order to learn from it.
Muddy drawing Muddiness (or a muddy drawing): the colours or values aren’t cleanly rendered. The most common causes are:
1. painting with a lot of short, small brush strokes instead of fluid large strokes.
2. Poor colour choice, for example shading by adding black.
3. Smudging.

N

Negative Space: the space surrounding the object of figure. Drawing negative space means focusing on the outer edge. This is most helpful to fix proportion errors.
Notan: balancing areas of light and dark in a harmonious whole. This concept is great importance in traditional ink paintings.

O

Opacity
Overlay

P

Pen Pressure: when using a tablet for digital art, you can turn pen pressure on. This responds to how firmly the stylus’ tip is pressed against the tablet surface.
It’s similar to how a pencil gives darker lines when pressed harder into the paper, but you can link pen pressure to a variety of settings. It is most commonly linked to line thickness and opacity.
Perspective
Photo Study: doing a study using a photograph as a reference. The goal of the study can be anything from lighting to anatomy.
Professional: an artist earning full-time income from his craft. Also refered to as “pro”, though “pro” is sometimes used for any artist of great skill.
Proportions

Q

Quick Pose: figure sketching done whilst setting a timer for each pose. Most common are quick gesture sketches, using 30 to 60 seconds for each figure. The purpose of quick poses varies.

R

Reference:

S

Saturation:

Self Portrait: drawing oneself in front of a mirror. Drawing yourself using a photo reference is usually regarded as a photo study.
Sketch: this is either an unfinished, rough drawing, or a drawing done as preparations for a bigger art work.
Sketchbook: there are physical sketchbooks with bound blank pages used to draw in, often done outside. “Sketchbook” could also reference to a regularly updated forum thread devoted to the art and progress of a single artist.
Skill: acquired technique and knowledge. The ability to do something.
Smudge: smudging is a blending process by rubbing with your finger or some material on the canvas. It is very common practice in pencil drawing, but often with poor results.
Speedpainting: a quick painting, usually between 30 minutes to 2 hours. Currently also used in the context of time lapse videos of the painting process.
Still Life: drawing or painting objects from life.
Studio:
Study: drawing or painting a reference in order to learn from it. The goal is to acquire knowledge and skill to use in one’s own artworks. Methods vary wildly depending on the aspect focused on.
Symbol drawing: drawing one’s representation of something instead of a realistic depiction. For example, drawing an almond shape and a circle for an eye.

T

Talent: the notion that one’s skills aren’t acquired by practice or studying. By some used to indicate great skill, but keep in mind that this could be an affront to hard working artists.
Thumbnail: a small version of an image.
Tutorial: short instructive guide. A tutorial could be in any format, from video to plain text. Usually tutorials are a combination of step drawings and explanatory text.
Tracing: putting a transparent sheet or a new layer on top of a picture and directly drawing over the lines. On the ethics of tracing, check out this link.

V

Value: when putting the colour on greyscale, value is the range it falls in, with pure white being 0 and pure black being 100. As some programs use different numbers, the value can also be expressed as a percentage, for example 10% grey.
Value is regarded as the most basic and important quality of colour, and beginners are encouraged to start practicing in greyscale before moving on to full colour. The two other aspects of colour besides value are hue and saturation.

Theater For Children

Theater For Children

Kids Performing Art!

Theater is one of the most exciting and most educational projects you can to do with kids.

Developmentally, it’s hard to top theater. Drama can teach word skills like reading, writing, imaginative composition (fiction they call it, or drama), plus a feeling for the spoken music of words and poetry. Not to mention a smattering of history and literature.

Socially, drama teaches both cooperation AND independence, recognizing and dealing with emotions, empathy, plus the practical skill of speaking in front of an audience. Public speaking is a skill many adults wish we had developed. Music. Dance. Magic tricks. Almost any skill or interest can find a home onstage. There’s a whole branch of theater called improvisation: always useful to learn how to think on your feet. And as children get more involved in what’s called “technical theater” – all the props, costumes, sets, lights, sound etc. – math skills, visual and spacial skills, and handicrafts all come into play. Plus innovation. There’s a LOT of problem-solving in theater.

There’s also a great deal of comradery and joy.

Start small and easy: goof around with puppets, make masks, recite a poem, act out the Three Bears – – – Have fun onstage.

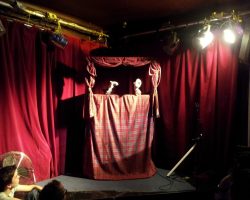
The picture? A set from a children’s production of “Charlie and the Chocolate Factory.” Since I happen to have an abundance of factory-themed children’s sets to decorate this Lens, let’s think of it as a big Drama-Fun Factory! I’ll point out some of the gears and levers that will help you make your own at-home theater. It’s also a factory-in-progress (as all my Lenses are), so please visit again to see what new gears have been added.

Puppet Theater

Always popular with kids
There is something fascinating about puppets. They combine the make-believe and miniature joy of dolls with the expression and story-telling of people – while, best of all, shy performers can hide behind them like a mask. (More on masks later.) Any child can say more, a lot more freely when using a puppet. (As psychologists know.) Puppets are freedom and wild improvisation.

It’s most fun to build your own puppets and puppet theaters, but store-boughten is fun too.

Do It Yourself Puppets

Punch. Where’s Judy? PAPER BAG PUPPETS – Maybe the simplest puppet is the paper bag puppet. Take a plain brown lunch bag and have your child draw the puppet’s eyes and nose on the bottom, so that the fold (where the bottom folds flat) becomes the inside of the puppet’s mouth. Colored markers or poster paint (not too wet!) will look bolder and more effective than crayons or pencils. Adding cut paper elements will make the puppet more exciting: a red construction paper tongue for a snake maybe or great big ol’ cow licks; the cow’s horns or moose antlers; arms and hands; or perhaps a silly mustache or paper wig. Scraps of fabric or fur can be fun. Anything, really. Go to the movies and watch the crazy puppets in the Fandango ads.

Now, how about adding a huge grocery store bag puppet to play the giant?

SOCK PUPPETS – Just as easy to make if you’re up for a little simple sewing: buttons for eyes, scraps of fabric for tongues, ears, hands; wool for hair.

GLOVE PUPPETS – One woolly glove becomes a quintet of actors. Or cut the fingers off (roll-hem the cut edges) and create five separate prima donnas. You could experiment with wool versus cotton versus rubber glove fingers (rubber for aliens maybe? add little teeny antenae) or roll your own finger tubes from any fabric or even stiff paper.

POPSICLE STICK PUPPETS – Almost any picture can be either printed onto stiff card-stock paper or mounted onto cardboard and glued to a popsicle stick. I suggest either adult-applied spray mount (flattest most permanent) or child-applied glue stick for the picture to cardboard gluing, then white glue like Elmers or hot glue (adult again or old enough child) for the picture to stick attachment. Try cutting out arms or heads separately and attaching these to the puppet’s body with old fashioned brass brads so you can change their poses. Suddenly they can emote!

OTHER “STICK” PUPPETS – As with popsicle sticks, almost any stick-like object can turn into a puppet. Try decorating wooden spoons or toilet paper tubes (which make finger puppets). Or how about – new! clean! – toilet plungers? Or spatulas or decorated pencils or pool noodles with drawn-on permanent marker faces?

SHADOW PUPPETS – These can be cut out cardboard shapes very similar to popsicle stick puppets. They needn’t be decorated with color unless you want to, but “decorations” made by cutting holes can be fun. Bring out the hole punch! I imagine you might be able to cut out small areas and then fill these with colored tissue paper or translucent plastic for a stained glass effect. Obviously you’ll need a shadow screen – stretched white fabric or paper – and a strong light to make these work.

MARIONETTES – These are more complicated puppets, but all you absolutely need are two flat sticks fixed together in an X with strings from the four ends that tie to the puppet’s arms, head, and legs or rear (whichever is funnier). The “puppet” could be any loose jointed doll – made of cloth or wood or cardboard tubes.

For older kids with advanced skills and a LOT of patience – and an interest in video – you could try making your own short film. Film puppets in action! (Watch a Muppet movie. Like that.)

Or if VERY patient and motivated, try making clay “puppets” to shot-by-shot act out a brief Claymation film. (Watch a Wallace and Grommet movie to see how masters do this!) But this stop motion filming technique is only for the extremely motivated and patient!

Puppet Videos

Scottish Falsetto Sock Puppet Theatre – Romeo and Juliet Part I
Rated PG – Extra Silly
Meant for older kids as it gets a bit, slightly, um, vulgar as the Bard and Scottish Sock Puppets are so apt to do. Make a nice antidote to classroom reading of this classic! The other vids are suitable for younger children.

Masks

Using and making masks for children

Poof! You’re someone (or something) else. Masks seem magical – a natural development of the baby’s game of peekaboo.

Masks can be made from almost any material: a paper grocery bag; a paper plate plus string; cut cardboard, felt, or craft foam plus elastic; paper mache (lots of goopy fun); or, if you’re ambitious, leather etc.; or there are lots of mask kits, where you start with a pre-formed face shape and decorate and add to it.

PAPER MACHE – Amazingly cheap and simple, though time consuming. Tear or cut newspaper into strips, the thinner, the more detailed you can get. Mix flour and water to make a thick paste, soak the paper in this till sticky but not soggy, then slowly build up your shape. It’s easier if you have a shape to lay the strips over. A kid’s-face-sized balloon can work or a plastic mask. You can add in cardboard to reinforce protruding pieces like ears or tusks – make sure these are well integrated into the face proper so they won’t rip off easily. Allow several days for the paper mache to dry before trying to paint or decorate it.

Things to Do With Pictures

Things to Do With Pictures

What Fun Stuff Can You Do with All of Those Pictures?

You’ve made the step and gone to digital photos. You can view them on your computer, e-mail them to friends, and take them to the store to get prints or maybe even print them at home. But after that you think, what can I do with these images that would be fun or interesting? How else can I enjoy them?

Well, let’s talk about that. There are a lot of great products, activities, services and more that will allow you to use those digital images in so many ways. Read on to learn more.

Photo Sharing Sites That Offer More

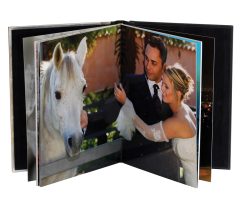
Photo sharing sites give you a place to keep your photos, a place to share them. However, some photo sharing sites offer more things to do with pictures. Shutterfly.com for instance also allows you to make a variety of things using your photos. Photo books, cards, calendars, coasters, tote bags, mouse pads, stickers, canvas prints, mugs, key rings, ornaments, puzzles, keepsake boxes, address labels, and notebooks are just some of the options.

Scrapbooking and collages are another creative way of dealing with your photos. Photomix, Google’s Picasa, Snapfish, and ScrapBlog are just a few that offer this ability.

Get Some Motion from Your Pictures

If you remember the little books you made as a kid by drawing a series of pictures in sequence, stapling them together, and then flipping through them to simulate motion, then you understand this concept.

This is another one of those fun things to do with pictures; make your own, more adult, version of these flip books. There are a number of sites that can produce some pretty nice flip books either from a series of digital photos or the still images grabbed from your camera’s video recordings. Flippies, Glitterfy, and FlipClips are just three of the options.

Of course there are also a number of tutorials out there to help you if you want to go it on your own. Two of the most useful that can be found are at a blog called The Curious and another called Short Courses.

If you’d like to make a 3-D movie from your images you can try Make3D but if you want to make a movie with some great music added you can try Animoto or even Google Picasa.

Wacky Things to Do With Pictures

Your pictures may be sentimental, they may be precious, but they should also be fun. At CaptionBubble you can make a joke of almost any picture by adding captions just like you see in cartoons.

There are a number of fun services at Flickr based BigHugeLabs. You can make a magazine cover, add captions, or make motivational posters among other things with your images.

If you want to really get silly, you can also use a number of sites to distort photos to create that “house of mirrors” effect. Sites like Gooifier allow you to do this without having to even download anything. Or perhaps you would rather insert your face, or the face of someone you know, into a well known picture, on the body of another person, or somewhere else where it doesn’t belong at FaceinHole. However, if you want a lifesized cutout of someone you’ll need to go to PhotoCutOuts or to get a caricature, visit osoq.

If you have kids, another kind of cool project can be found at FlattenMe where you can use your kids pictures to insert them into existing books. Suddenly your son or daughter can be the main character in the storyline.

Getting Artsy with Your Photos

There are a number of more artistic things to do with pictures. Various sites will allow you to change your favorite photos into works of art. PhotoWow can give you some great looking pop art of your favorites, while PhotoFiddle gives you even more options for the style of art you prefer; oil paintings, watercolor paintings, abstract collages, and so forth.

A site called ReColored allows you to colorize your black and white photos. On the other hand, if you just want a photo enlarged and placed on canvas to hang on the wall, you can try CanvasRUs.

For those who prefer a line drawing, there are a number of tools to help get the job done. Here is a Photoshop tutorial for doing just that.

Be Sure You Put Your Photos Best Face On

Digital photo frames have become more interesting and more affordable in the past few years. They offer larger screens with higher resolution in many instances, allowing you to enjoy your photos in their most vibrant splendor. These modern frames are capable of storing more images and can be set up to display slideshows so that you can enjoy more of your photos.

In addition, some frames offer filters for special effects, the ability to add music for a full presentation, and remote controls for convenience. Digital photo frames really are the best way to capitalize on the digital nature of your photos. Because fading won’t occur with the digital file and those images will always be at their best, this is one of the smart things to do with pictures.

Portable Digital Devices That Let You Enjoy Your Pictures Everywhere

A digital camera gives you that potential connection with the other modern devices you may own. Clearly, uploading those photos to a media player or other portable device allows you to take those images with you to share with others or to enjoy while you’re out and about.

On the other hand, some of the traditional ways of enjoying printed images aren’t lost just because you’ve gone digital. In fact many of these just got better because you can tote along more images with less bulk when your photos are in the digital format. For instance, an old picture wallet could hold a handful of 2×3 photos before it became an unwanted bulk. A digital photo wallet on the other hand allows you store many times more pictures and it’s size doesn’t change. Aside from true wallets, there are also wallet sized digital photo albums that are easy to take along; they’re definitely a much lighter load than a traditional photo album which is three or four times the size.

Another item to keep your pictures close at hand is a digital photo keychain. These are affordable little devices and they don’t require much technical knowledge to use. They do best in displaying up close, portrait type shots due to the small screen size but they’re definitely a fun little gadget.

Editing: Making Those Photos Look The Way You Want

Many of us don’t go out and buy the more sophisticated editing tools that are available but instead use whatever came with our camera. However, editing is among the best things to do with pictures if you want to enjoy them.

There are some sites out there than can help you do things with pictures that are a bit fun. Picnik is one of those sites. It allows you to do some editing, which includes adding interesting borders, effects, shapes, and fonts to spice up your images. Of course, one of the best things is that you don’t have to download anything to your computer or take a course to understand it.

Of course there are other online photo editing tools such as FotoFlexer and SplashUp.

Another possibility is to study up a bit and consider some photo editing software to really get the most from your pictures.