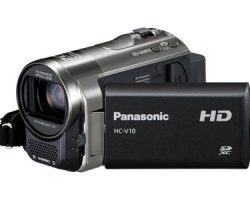
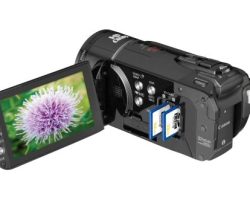
The Panasonic HC-V100 is a high definition camcorder that records 1920 x 1080 video in the AVCHD format.
The HC-V100carries a suggested retail price of $349. Full technical specifications for the HC-V100can be found here.
Panasonic HC-V100 Video Features
The HC-V100 uses the full AVCHD format for 1920 x 1080p high definition recording. It supports 17Mbps recording, not the highest bit-rate available in the AVCHD video format (24Mbps).
The HC-V100 features a 1.5-megapixel 1/5.8-inch CMOS image sensor. The HC-V100 can also record in standard definition if you want to save space on your memory card. The camcorder also supports iFrame recording (at 960 x 540) for movies that can be easily edited on most computers.
The camcorder uses Panasonic’s “Intelligent Auto” mode for automatically matching scene modes such as portrait, sunset, scenery, forest and macro mode, to shooting environments.
The mode employs various technologies – including image stabilization, face detection, an intelligent scene-selector and contrast control to optimize your exposure.
Optical Features
You’ll find a 34x optical zoom lens on the VC100. This optical zoom is joined by a 42x Intelligent zoom (iZoom), which can enhance the magnification of your footage by using a smaller portion of the sensor without losing image resolution. Finally, there’s a 2000xdigital zoom which will degrade resolution when in use.
The lens employs Panasonic’s Power Optical Image Stabilization (O.I.S.) for keeping your footage relatively shake-free. The image stabilization technology has an active mode which can be enabled when walking or when you’re otherwise in an unstable position to provide extra shake reduction.
The V100 lens is protected by a manual lens cover. It’s not as convenient as the automatic covers found on higher-end Panasonic models.
Memory and Display
The V100 records video to a single SDHX memory card slot. Using just internal memory, the HC-V100 can store approximately three hours and 45 minutes worth of the highest quality HD footage.
You can also record to SDXC cards, although there is no relay recording.
The HC-V100 offers a 2.7-inch LCD display. There is no optical or electronic viewfinder.
Design
Design-wise, the HC-V100 cuts a fairly conventional, if somewhat boxy, figure. Thanks to the use of flash memory you’ll still enjoy a light weight body at .4 pounds. The HC-V100 measures in at 2 x 2.3 x 4.4 inches, roughly the same form factor as the entry-level series of Panasonic camcorders, and features a zoom lever on the top of the camcorder and a record shutter located on the side, next to the camcorder’s battery. Open the display and you’ll find buttons video playback, scrolling and info, plus the camcorder’s ports: component, HDMI, USB and AV.
Aesthetically, the HC-V100 is available in a black.
Shooting Features
The HC-V100 is outfitted with a fairly minimalistic feature set. It offers face detection a pre-record function which records three seconds worth of video before you hit the shutter. The V100 also offers an auto ground-directional standby mode, which detects if the camcorder is being held in an unusual position (say, upside down) and automatically stops recording. A low light/color night recording mode preserves colors even in dim lighting.
As far as scene modes go, you’ll find sports, portrait, low light, spot light, snow, beach, sunset, fireworks, night scenery, night portrait and soft skin mode. You can snap 2-megapixel photos while recording video on the V100. Still photos can also be isolated from video footage played back on the camcorder and saved as a separate file. There is a two channel stereo microphone.
Connectivity
The HC-V100 offers a built-in HDMI output for connecting the camera although the cable is not included. You can also connect to a PC via USB cable.
Impression
At $349, the HC-V100 is Panasonic’s bid for the budget dollar, and the feature set reflects that. You’ll get a high-powered lens for an entry-level high definition camcorder, but you won’t get the full 24Mbps HD recording available on higher-end models and you’ll sacrifice features like a touch-screen display, relay-recording and manual modes, increasingly making their way down the camcorder food chain. That said, it packs a more potent video punch than a pocket camcorder (or smartphone) and the retail price will undoubtedly be discounted to make it an even more attractive buy for the budget-minded.The Panasonic HC-V100 is a high definition camcorder that records 1920 x 1080 video in the AVCHD format.
The HC-V100carries a suggested retail price of $349. It is a close cousin of the $449 GZ-HM320. Full technical specifications for the HC-V100can be found here.
Panasonic HC-V100 Video Features
The HC-V100 uses the full AVCHD format for 1920 x 1080p high definition recording. It supports 17Mbps recording, not the highest bit-rate available in the AVCHD video format (24Mbps). The HC-V100 features a 1.5-megapixel 1/5.8-inch CMOS image sensor. The HC-V100 can also record in standard definition if you want to save space on your memory card. The camcorder also supports iFrame recording (at 960 x 540) for movies that can be easily edited on most computers.
The camcorder uses Panasonic’s “Intelligent Auto” mode for automatically matching scene modes such as portrait, sunset, scenery, forest and macro mode, to shooting environments. The mode employs various technologies – including image stabilization, face detection, an intelligent scene-selector and contrast control to optimize your exposure.
Optical Features
You’ll find a 34x optical zoom lens on the VC100. This optical zoom is joined by a 42x Intelligent zoom (iZoom), which can enhance the magnification of your footage by using a smaller portion of the sensor without losing image resolution. Finally, there’s a 2000xdigital zoom which will degrade resolution when in use.
The lens employs Panasonic’s Power Optical Image Stabilization (O.I.S.) for keeping your footage relatively shake-free. The image stabilization technology has an active mode which can be enabled when walking or when you’re otherwise in an unstable position to provide extra shake reduction.
The V100 lens is protected by a manual lens cover. It’s not as convenient as the automatic covers found on higher-end Panasonic models.
Memory and Display
The V100 packs 16GB of internal memory and a single SDHX memory card slot. Using just internal memory, the HC-V100 can store approximately three hours and 45 minutes worth of the highest quality HD footage. You can also record to SDXC cards, although there is no relay recording.
The HC-V100 offers a 2.7-inch LCD display. There is no optical or electronic viewfinder.
Design
Design-wise, the HC-V100 cuts a fairly conventional, if somewhat boxy, figure. Thanks to the use of flash memory you’ll still enjoy a light weight body at .4 pounds. The HC-V100 measures in at 2 x 2.3 x 4.4 inches, roughly the same form factor as the entry-level series of Panasonic camcorders, and features a zoom lever on the top of the camcorder and a record shutter located on the side, next to the camcorder’s battery. Open the display and you’ll find buttons video playback, scrolling and info, plus the camcorder’s ports: component, HDMI, USB and AV.
Aesthetically, the HC-V100 is available in a black.
Shooting Features
The HC-V100 is outfitted with a fairly minimalistic feature set. It offers face detection a pre-record function which records three seconds worth of video before you hit the shutter. The V100 also offers an auto ground-directional standby mode, which detects if the camcorder is being held in an unusual position (say, upside down) and automatically stops recording. A low light/color night recording mode preserves colors even in dim lighting.
As far as scene modes go, you’ll find sports, portrait, low light, spot light, snow, beach, sunset, fireworks, night scenery, night portrait and soft skin mode. You can snap 2-megapixel photos while recording video on the V100. Still photos can also be isolated from video footage played back on the camcorder and saved as a separate file. There is a two channel stereo microphone.
Connectivity
The HC-V100 offers a built-in HDMI output for connecting the camera although the cable is not included. You can also connect to a PC via USB cable.
Impression
At $349, the HC-V100 is Panasonic’s bid for the budget dollar, and the feature set reflects that. You’ll get a high-powered lens for an entry-level high definition camcorder, but you won’t get the full 24Mbps HD recording available on higher-end models and you’ll sacrifice features like a touch-screen display, relay-recording and manual modes, increasingly making their way down the camcorder food chain. That said, it packs a more potent video punch than a pocket camcorder (or smartphone) and the retail price will undoubtedly be discounted to make it an even more attractive buy for the budget-minded.


. The helmet cam,…)