Tips For Furnishing And Decorating Your Art Studio Apartment

Tips For Furnishing And Decorating Your Art Studio Apartment

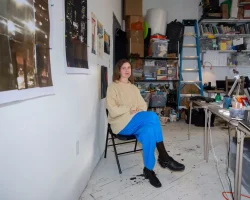
Your art studio apartment is your creative haven. It’s a place where you can let your imagination run wild and create something beautiful. But, if your studio is feeling a little cold and uninviting, it can be tough to get inspired.

If you’re an artist, chances are you’re also on a tight budget. But that doesn’t mean your art studio apartment has to look like a college dorm room. With a little creativity and some thrifty shopping, you can turn your studio into a stylish and functional space that reflects your personality and creativity.

Tips for furnishing and decorating art studio

Here are some tips for furnishing and decorating your art studio apartment on a budget:

Get creative with your furniture

Just because you’re on a budget doesn’t mean you have to settle for boring, mass-produced furniture. Get creative with your furniture choices and look for pieces that double as both art and functional items. For example, a vintage dresser can be used as a buffet table for hosting parties, or an old door can be repurposed into a unique coffee table.

Shop at thrift stores and flea markets

If you’re looking for unique, one-of-a-kind pieces, thrift stores and flea markets are great places to find them. You can often find furniture and home decor items for a fraction of the cost of what you would pay at a traditional store.

DIY it

If you’re handy, why not DIY some of your own furniture and decor? There are plenty of easy and inexpensive DIY projects that even the most novice do-it-yourselfer can handle. Check out Pinterest or your favorite DIY blog for some inspiration.

Get creative with your wall decor

Your walls are a blank canvas for you to get creative with. Hang up some of your own artwork, or frame interesting found objects like old maps or antique postcards.

Use lighting to your advantage

Proper lighting can make a big difference in the feel of a room. If your studio doesn’t have a lot of natural light, make sure to invest in some good quality artificial lighting. String lights are a cheap and easy way to add some ambiance to your space.

How to make your art studio apartment cozy and inviting

Here are a few simple tips to make your art studio apartment feel cozy and inviting:

Bring in some plants

Adding some greenery to your studio will not only make it feel more inviting, but it will also help purify the air. Choose plants that are easy to care for, so you can focus on your art, not on your plants.

Add some cozy blankets and pillows

Making your studio cozy doesn’t have to be expensive. Simply adding a few blankets and pillows can make a big difference. Choose cozy fabrics in colors that complement your artwork and make you feel happy.

light some candles

Candles add both warmth and ambiance to any space. Choose candles with scents that make you feel relaxed and inspired, like lavender or citrus.

Play some relaxing music

Having some soft, relaxing music playing in the background can help you get into a creative mindset. Make a playlist of your favorite calm songs to help you focus on your art.

Hang some artwork

Of course, no art studio is complete without some artwork on the walls. Choose pieces that inspire you and make you feel happy. Seeing your own artwork on the walls will also help you feel proud of your accomplishments.

With a little creativity and some thrifty shopping, you can turn your art studio apartment into a stylish and functional space that reflects your personality and creativity.

The Best Paper Art Tutorials

The Best Paper Art Tutorials

When it comes to working with paper, there are a lot of different options out there. But if you want to create something truly unique and eye-catching, then you need to think outside the box – or, in this case, outside the sheet. That’s why we’ve put together a list of the best papers for 3D paper art.

1. Cardstock

If you’re looking for a sturdy paper that will hold its shape, then cardstock is the way to go. It’s also relatively inexpensive, so it’s perfect for experimentation. Plus, there’s a wide range of colors and textures available, so you can really let your creativity shine.

2. Construction paper

This is another great option for those who want to experiment with 3D paper art. Construction paper is thicker than standard printer paper, so it’s perfect for creating 3D shapes. It’s also available in a wide range of colors, so you can find the perfect shade for your project.

3. Foam board

If you want to add a bit of dimension to your project, then foam board is a great option. You can use it to create raised areas, which can add depth and interest to your piece. Just be aware that foam board is a bit more expensive than other papers, so it may not be the best option if you’re working on a budget.

4. Kraft paper

This paper is perfect for those who want to add a rustic touch to their project. Kraft paper is a bit thinner than cardstock, so it’s easy to work with. And, because it’s not as smooth as other papers, it gives your project a bit of texture.

5. Patterned paper

If you want to add some visual interest to your project, then patterned paper is a great option. There are a wide variety of patterns available, so you can find the perfect one for your project. Just be aware that some patterned papers can be a bit pricey, so it’s important to shop around.

No matter what paper you choose, the most important thing is to have fun and let your creativity shine. With a little bit of effort, you can create something truly unique and eye-catching.

How To Get Started With 3D Pen Art

How To Get Started With 3D Pen Art

3D pen art is a new and upcoming art form that is becoming increasingly popular. It is a form of art where you use a 3D pen to create three-dimensional designs and sculptures.

3D pen art is a great way to express your creativity and is a lot of fun to do. It is also a great way to learn about three-dimensional art and how to create it.

If you are interested in learning how to do 3D pen art, there are a few things you need to know before you get started. First, you need to purchase a 3D pen. Second, you need to find some tutorials or books on how to use the pen.

Once you have your 3D pen and some tutorials, you are ready to start creating your own 3D art. Start by practicing on some simple designs and then move on to more complex ones.

3D pen art is a great way to express your creativity and is a lot of fun to do. With a little practice, you will be able to create some amazing 3D art.

3D pen art is a new and exciting way to create three-dimensional artwork. It’s perfect for those who love to draw and sculpt, but don’t have the time or patience for traditional methods. All you need is a 3D pen and some imagination!

If you’re new to 3D pen art, the first thing you need to do is choose the right pen. There are many different types of 3D pens on the market, so it’s important to find one that suits your needs. Do some research and read reviews before making your purchase.

Once you have your pen, it’s time to start creating! Begin by drawing a simple outline of your desired object. Then, start filling in the details with your 3D pen. Be sure to go slowly and carefully, as it takes some time to get used to the pen’s controls.

As you become more comfortable with your 3D pen, you can start experimenting with different techniques and styles. There are no limits to what you can create, so let your imagination run wild!

If you’re looking for some inspiration, there are many online resources that offer step-by-step tutorials and examples of 3D pen art. You can also find helpful tips and tricks from other 3D pen artists.

With a little practice, you’ll be creating amazing 3D art in no time!

10 Tips to Promoting Creativity

10 Tips to Promoting Creativity

Here are 10 steps to promote creativity in your life and lifestyle.

The truth is I believe everyone has some creative bent; a creative talent or way of expressing yourself. Some people arrange flowers; some sew clothes; some love to bake or cook; some are into interior decorating. Whether you are writing novels or just blogs; drawing portraits or architectural plans, carving wood or jewelry-making, taking creative photographs or taking pi to the next level, everyone is exercising their creativity some way. As creative people, we need to cultivate time, space, and a mindset to allow for that creativity to happen.

Photo credit: Photo of my friend, Merrily McCarthy, a fabulous artist living in the Yosemite Valley in California.

1. Time.

The first thing you must do is carve out the time to allow for creativity to happen. Whether you have toddlers under foot or a corporate job to run off too, you still have to find the time to energize your creative soul. You can carve out time at the beginning of the day or after everyone else has gone to bed, or dedicate a Saturday to your creativity; which ever way you do it, make sure you have a block of uninterrupted time just for you. The truth is we make time for what is a priority in our lives. So the question is, how important is your creativity to you?

2. Space.

With me, as a painter, I find I am energized to paint at the drop of a hat, if there is a space set up for me to close the door and keep the world at bay. For some, it only needs to be a small corner of a table or bench, for others you will need a garage or a separate studio. Whatever the need, make sure your space will accommodate you and your creative work and allow you to step into and out of it with relative ease.

Photo credit: Photo taken by myself of workspace at Sorenson Studio in Fresno CA.

3. Support.

This seems an obvious necessity but sometimes it has to be asked for. Your family needs to know that you NEED this, so ask for their support. It helps to have a spouse or children that will have your back when it is your creative time. You will be happier for the time and they will be happier to have you fulfilled.

Photo credit: Royalty free image from stockxchng.com

4. No Interruptions.

Turn off all electronic devices that may call you away and suck up your creativity time. Turn off your email alarms and twitter feeds. Turn off your phone. You can always get back to people later. That’s what God made messages and voice mail for.

There are times when interruptions are unavoidable, such as children needing you or emergencies. However most interruptions can be avoided by simply turning off ringing devices. Think about it.

Photo credit: Photo I took of my granddaughter playing with the phone.

5. No excuses.

As you build up the habit of taking time for your creativity, you may find you are not in “the mood” every day or every time you have it on your schedule. The funny thing is that if you let that be a good excuse, you will stop keeping your scheduled creative appointments. Make yourself, whether you feel it or not and the feelings will follow. It’s funny how the mood comes as soon as you start creating and not before. I like to read about artists
who overcame great odds and obstacles to create world famous works of art. In light of their sacrifice, I feel I have no room to complain that I’m not in the mood.

6. Make a list.

I don’t always know what to do during my creative time, so I have begun making lists. In the middle of the day or at night an inspiration may hit me. I have started the habit of writing these inspirations down and later when I have the time, I can explore them more fully. Some people tell me they get inspired in the shower or driving. It is as if creativity will hit you most often when you aren’t really thinking about anything. Write it down. You will be excited to see how the list grows.

9. Join a group.

Join a group of like-minded creatives in your area and actually attend meetings. There are writers groups, art groups, woodworkers, drama and theater groups; you name it, there is probably a group somewhere nearby. The benefit of being able to visit like-minded creatives is so varied that I could never list them all. One of the best benefits is the constant inspiration. Every time I come home from a meeting with my art group, I feel inspired to create something new.

Photo credit: Photo I took at my last art group meeting as we watched a demonstration.

10. Share your creativity.

Dean Dallin demonstration There is a certain fulfillment that comes with sharing your creative bent with others. Donate a work of art per year; create something for a family member’s birthday or holiday; share a photo of your work on social media; volunteer to do a demonstration. Wherever you share your work, make sure it is with someone who will appreciate what you have done. Nothing hurts worse than giving a gift of your creativity to someone who doesn’t like your work or doesn’t appreciate you. However those who do appreciate creativity will serve to energize your future work. Create on.

The Night Song – My Tips for Doing Budget Photo Shoot

The Night Song – My Tips for Doing Budget Photo Shoot

The Night Song

Have you ever wanted to create good, artistic photos but you only have limited amount of money? In this article, I would like to share my experience of doing a photo shoot with two models with very limited budget, in a very normal location with lighting from house lamps, and taken with cheapest entry level DSLR. This photo shoot was also my first experience working with models and DSLR camera. Could you imagine how limited was my knowledge about photography during this photo shoot?

I would like to emphasize that the most important thing in photography is not your gears. It’s your passion and creativity, and those two are the best weapon to create great photos. I am also looking forward to your comments and feedback so I could improve my works in the future.

The Concept

The story behind the scene
The Night Song

I bought my first DSLR camera in January 2012. My initial purpose for buying that kind of sophisticated camera was to make documentary of my final Bachelor of Arts research. Just a week after getting my DSLR, I accidentally found a very interesting video about photography on Youtube, from DigitalRevTV. The man in the video seems enjoying himself very much, taking photos of beautiful model with very cheap camera. Suddenly I felt that I wanted to create some photography works too.

The first thing came to my mind was about finding the models. As I was an amateur and didn’t have enough experience of handling DSLR camera, I decided to ask for help from my friends to be the model for my photography project. So, I contacted Nooreen and Varsha, two of my beautiful friends from Mauritius and offered this opportunity. Luckily, they agreed.

I wanted to talk a little bit about the model. Nooreen and Varsha are two students from Mauritius, a very beautiful small island in southern part of Africa. Mauritius used to be a colony of British and France. When the British ruled India, they sent some local Indian workers to work in Mauritius. At that time, there was no people on this island. Only jungles and animals. So, those Indian workers were the first colony in Mauritius, and they live, create a family, and until now inhibit this beautiful island.

After some years, British Empire decided to give Mauritius to France. Thus, under France regime, those Mauritian workers have to speak in France. The habit of speaking France has become a culture, even after their independence. Today, France is the national language of Mauritius.

I find that Mauritian people such as Nooreen and Varsha are the luckiest people in the world. They have beautiful, exotic face from their Indian ancestors. They speak Franch, the most beautiful, sexiest language in the world. They inherited the education and political system from British Empire, which is very systematic. Plus, they live in a small island with very beautiful nature; beaches, mountains, and jungle. What a very fortunate nation!

Back to the story of the model. Nooreen and Varsha are very good friends. They live together, study in the same college, and they understand each other very well. I wanted to use these facts to help a strong, artistic, and memorable photos. Thus, I decided to create a theme about intimate relationship between two women.

The Photo Shoot

The execution of the concept

As I told you before, I didn’t have any experience for doing photo shoot with any DSLR camera at that time. Thus, I wanted to focus more on the concept and messages of the photos rather than the technical aspects. I wanted to work as comfortable as possible, so I decided to do the photo shoot in Nooreen and Varsha’s house, in their small living room. I didn’t want to do it outside, because I thought that it was my first experience, and I didn’t want to embarass myself and the model.

The photo shoot took about three hours and it would be faster if I had more practical knowledge about DSLR camera. I spent a lot of unecessary times to adjust the ISO, control the focus, and set the exposure. I did all in manual mode, as I didn’t aware that the Aperture Priority mode would work more efficient. One of my most stupid mistake in this photo shoot was the fact that I forgot to turn on the Image Stabilizer, and at that time I didn’t even have a tripod. Luckily, I was able to take some good shots, and it took me about three hours to select, edit, and publish the photos.

Black Kimono for B&W Photoshoot

Here are some great kimono, a traditional Japanese dress for black and white photography. The wardrobe of the model is very important, especially if you later want to convert the images into monochrome. I strongly suggest that you find some dress with interesting pattern, especially for a photo shoot with plain background. Be sure to find a dress that looks cute and elegant.

Tips to do budget photo shoot

1. Find a strong, solid concept that can be executed in an empty room
Instead of focusing on the properties of the photo shoot, you should focus more on the model. Exploit your creativity and push it to its limit so that you can create good photos by only framing the model and a plain background. For this concept, you will need model who has strong, memorable expression. If the model also have beautiful and exotic face, it would be very helpful as well.

2. Try to find good references
Watch videos, read books, or go to photo exhibition. Read also about various article and tutorial about creating beautiful photos with cheap camera and limited budget. I strongly recommend that you watch “Pro Photographer Cheap Camera Series” from DigitalRevTV channel on Youtube.

3. Make it black and white
Black and white photos always appear to be more artistic, and by desaturating the color you can focus more on the subject. Simple photos with an empty background also look better in black and white rather than in color. For a better result, you can play with the contrast, brightness, exposure, and clarity of the photos during the post-processing.

4. Remember, your passion and creativity are more important than the physical aspects of the photos
It is you who can make the photos look great. Not the camera, not the place of the photo shoot, and not the dress worn by the models. Of course they will help you create something better and more beautiful, but remember that your passion and creativity are your main weapon.

The Black Dresses

Here are some alternative dresses that would be suitable for your model if you are planning to do a simple photo shoot with plain background. My advice: don’t choose a type of dress that has too much distracting patterns. Try to stick with a type of dress that look simple, elegant, and slightly hot.