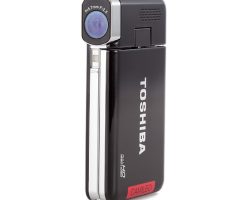
Toshiba Camileo S30 Review
Toshiba’s Camileo S30 camcorder records 1080p HD video in the H.264 format to SDHC/SDXC memory cards. The $179 camcorder features a 3-inch touch screen display and 8-megapixel still photo capture. Full specs for the Camileo S30 can be found here.
Toshiba Camileo S30 at a Glance
The Good: Slim design, good features for the price
The Bad: Touch screen can be unresponsive
Video Quality
The Toshiba Camileo S30 records 1920 x 1080p video in the H.264 format via an 8-megapixel CMOS sensor. It has additional options to record at 720p at 30 frames per second (fps) or at 60fps for capturing fast-moving subjects.
The video quality is definitely passable for a budget camcorder. You’ll notice a bit of over-exposure in bright sun and high contrast areas, but otherwise the S30 holds its own with other low-cost models on the market.
The S30 does offer a video light, which isn’t typically found on models at this price point. It’s useful for closeups but doesn’t have much power beyond that. Plus, it’s placed almost directly where your finger wraps around the camcorder, so you’ll have to be careful to nudge your finger down before activating the light.
In addition to movies, the Toshiba S30 can snap 8-megapixel still photos. However, most of the shots I snapped suffered from a good deal of blur, even when holding the camcorder steady.
Toshiba S30 Optics
The S30 does not offer an optical zoom but there is a 16x digital zoom. However, like all digital zooms, the quality degrades as you use it, so it’s better to avoid it all together. There’s also digital image stabilization, although it’s ineffective for the stills and only marginally useful on the video.
Design
The S30 is one of the few upright camcorders left in the market. At .75 inches, it’s slimmer than a pocket camcorder and has a larger, swing-out LCD display (3-inches) not found on pocket models.
However, it’s a bit larger than some of the smaller models on the market – at 2.3 x 4.3 x .75 -inches. Nevertheless, it’s quite portable.
The controls of the S30 are clustered on the slender body of the camcorder, although they are responsive. At the top is a large shutter button, followed by a lever for the zoom and controls for menu and the video light. Flip open the display and you’ll find large buttons for power (opening and closing the LCD also powers on and off the camcorder), switching between photo and video mode and web button for uploading videos from the camcorder to the Internet when it’s connected to a computer.
Feature Set
The Toshiba S30 has a nice set of features for a camcorder at the price. There’s a motion detect mode, which will begin recording when the camcorder sees motion. There’s also a slow motion option, which will record lower quality video at slower speeds (good for capturing baseball swings to view on the computer but not great for viewing on the big screen). A pre-record function will start recording a few seconds of video before you actually press the shutter, to help you catch all of the action. Finally, a time-lapse feature will capture short bursts of video over pre-set intervals so you can capture change over time.
Menu & Display
The nice thing about the Camileo S30 is its large, 3-inch display. It’s a touch-screen so most of the camera’s features are accessibly through there. Unfortunately, while the menu icons are large enough, the display isn’t all that responsive, nor well executed. Each icon needs a double tap to enter a specific function and sometimes it’s difficult to tell whether you’ve turned something on or off. There are enough features on the S30 that you’ll need to scroll down on the screen with a flick of your finger, but it often takes several flicks to get there.
On the plus side, once you press an icon once a text description of what it is will pop up on the display, but the process of navigating around the menu is more clumsy and time-consuming than it should be.
Memory
The S30 records to SDHC and SDXC memory cards (up to 64GB) which provides ample storage for your video-taking needs. It contains 128MB of internal memory, which is enough for about a minute of HD footage, so a card is a must.
Toshiba Camileo S30: Bottom Line
If you’re in the market for a good budget camcorder, the Toshiba Camileo S30 is a nice choice. Unlike some of its pocket camcorder competitors, it has a larger, swing-out display, which makes it easier to frame your videos. The menu interface needs improvement, and you shouldn’t be expecting ultra-high quality high def recording, but the S30 makes up for it with a nice feature set and a slender, portable design.


