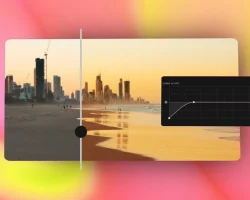
How To Use Teal And Orange Lut For Video Editing
If you’re looking for a versatile and stylish addition to your video editing toolkit, look no further than teal and orange lut. These two colors are perfect for adding a pop of color to any footage, and they can also be used to create a sleek and professional look. Here’s how to use teal and orange lut for video editing:
Start by adding some basic video editing tools to your toolkit. Once you’ve got everything you need, use the video editor’s tools to add basic luts to your footage. For instance, you can use the video editor’s crop tool to resize and adjust the footage, or the video editor’s focus tool to make the video look brighter or darker.
Next, use the lut creator to create custom luts. This tool allows you to create custom luts that are specific to your footage. For example, you can create a lut that alters the color temperature of the footage, or a lut that adjusts the amount of light that’s being used in the clip.
Next, use the lut editor to create and manage your luts. This tool allows you to create and edit luts, as well as manage and export your video footage. To create a new lut, simply click on the “New Lut” icon and enter the information you need.
Finally, use the video editor’s exporting tools to create and export your video luts. To export your footage to a video file, first select the “Export” tab and select the “LUTs” option. Then, enter the information you need for your luts. For example, you can choose a filename, or you can choose to save the footage in a format that can be played on a variety of devices.
Are you looking for a way to add a pop of color to your videos? Well, look no further than teal and orange lut for video editing! These colors are perfect for adding a bit of excitement and life to your videos, and they can be used in a variety of ways to create stunning results.
If you’re looking to add a pop of color to your videos without spending a fortune, teal and orange lut are a great option. They can be used in a variety of ways to create stunning results, and they’re relatively affordable too. So, if you’re looking for a way to add a pop of color to your videos, look no further than teal and orange lut!
When it comes to editing video, there are two main colors you can use: teal and orange. both colors can be very versatile in terms of how they can be used to add interest and brightness to a video. Here are a few tips on how to use both colors toedit your videos:
Use teal to add a Space Invaders-inspired feel to your videos. Use a light blue or green color to help contrast against the orange of the video.
Use orange to add a warm and inviting feel. Use a light yellow, green, or blue color to help contrast against the teal of the video.
Both colors can be used for different purposes, so experiment and see what works best for you. By using both colors in your videos, you can add a lot of personality and interactivity to your videos that you may not have been able to achieve with just one color.
When you want to add a bit of color to your video editing workflow, there are a few things you can do. One option is to use teal and orange lut to add a pop of brightness and color. However, there are a few things to keep in mind when using this type of lut.
When using teal and orange lut, you want to create a clean and crisp image. This is because the colors will be used in a specific order and will be blended together. You should also be aware that the colors will be dominant and will be used more in the center of the image than on the sides.
When using teal and orange lut, it is important to make sure that the colors are used in a way that is consistent with the rest of your video editing workflow. For example, if you are working on a video that is centered around a bright light, then you should use a more orange color to help balance the image.
When using teal and orange lut, it is also important to use a careful technique when editing. For example, if you want to make a video that is theatrically stylish, then you should not use teal and orange lut. Instead, you should use a more subdued color to help make the video look more professional.
