If you’re looking for a way to add some pizzazz to your home, 3D wall art is a great option. It’s easy to find, and there are tons of different styles to choose from. You can find 3D wall art in a variety of materials, including wood, metal, glass, and even fabric.
3D wall art is a great way to make a statement in your home. It’s also a great way to add some visual interest to a room. If you have a blank wall that you’re not sure what to do with, 3D wall art is a great way to fill it.
There are a few things to keep in mind when you’re shopping for 3D wall art. First, you’ll want to make sure that the piece is the right size for the wall you’re planning to put it on. You don’t want it to be too small or too large. Second, you’ll want to make sure that the piece is made of a material that you like. If you don’t like the look of metal, for example, you might want to look for a piece made of glass or wood. Finally, you’ll want to make sure that the piece is easy to hang. Some 3D wall art pieces come with hanging hardware, but not all of them do.
3D wall art is a great way to add style and character to your home. It’s easy to find, and there are tons of different styles to choose from. You can find 3D wall art in a variety of materials, including wood, metal, glass, and even fabric. With a little bit of planning, you can easily find a piece that will look great in your home.
If you’re looking for a quick and easy way to add some style to your home, 3D wall art is a great option. It’s a simple way to decorate your walls without having to worry about paint or wallpaper, and it can be a great way to add some personality to your space.
There are a few things to keep in mind when shopping for 3D wall art. First, you’ll want to make sure that the piece is the right size for the space. It’s also important to consider the style of the piece and how it will fit in with the rest of your decor.
If you’re not sure where to start, we’ve put together a few of our favorite 3D wall art pieces to get you started.
Turning hobbies into full time jobs is the dream of many casual crafters. It takes time, creativity and persistence. Another key element is experience. Rudimentary knowledge of your art / craft isn’t good enough if you’re selling goods to paying customers.
You need to have the knowledge to put out a quality product at a price that your customer will pay while still making enough money to cover both your business and personal expenses. Just starting out and not sure how to get that knowledge? Here are my suggestions for getting good, practical experience in running a craft business.
Working for Another Craft Business
Years ago when I first started giving seminars on starting a new business, getting good practical experience working for another similar type business was my number one suggestion. It still is. This is the best and most ideal of situations.
Working for another crafter not only teaches you the specific skill, it exposes you to the complete picture of the business aspects of selling crafts. Definitely, having prior experience working for a business in the same craft discipline to the one you want to start will be one of your major keys to success.
However, I know that for many, unless you are a student looking for an internship, this isn’t an option. You’re working 40 hours plus at your day job and the last thing you want to do is get a part-time job working for someone else in your craft field. Honestly, fast forwarding to today, it would be a difficult option for me to achieve too. So, what to do if putting in hours working for another arts / crafts designer just can’t be done?
Practice, Practice, Practice
It’s trite but practice is a very necessary part of gaining design and fabrication experience. Do you ever watch Project Runway? What always happens at the start of each show? These are trained designers with years of experience in the field, yet after they are given an assignment, they don’t just get out a pair of shears and start hacking up fabric.
They think about their particular design, sketch it out, carefully consider the right fabric and use muslin to make patterns prior to cutting the actual garment fabric. Sometimes they have to halt operations mid-stream when they see their design just isn’t going to pan out. As an inexperienced crafter, these are the basic steps you should follow – sometimes over and over and over again until a design or technique is totally worked out.
Until you’ve had a lot of practice, it’s really hard to have a 100% grasp on whether the materials you want to use are adaptable to your design. Also, it can take numerous prototypes to breakdown design elements into logical construction steps. Remember, developing well-honed techniques from hours of experimentation is necessary prior to announcing yourself to the world as a serious craft businessperson.
Yikes, all that material – it can be expensive – that’s why the clothing designers use muslin first. If possible, use the equivalent of muslin for your design prototypes.
Take Craft Business Courses or Seminars Tailored to Your Field
While this is a necessary part of running a business for experienced craft business owners, it’s exponentially important for the inexperienced. You should already have subscribed to and be reading trade publications. There are numerous craft seminars given convention style each year, hi-lighted in these publications, providing great information on many different craft related business topics.
Usually spanning two to three days, a variety of topics are normally covered and you’ll be able to pick and choose between the seminars you want to attend. If the seminars aren’t within driving distance, you’ll have the additional burden of airfare and lodging. However, lacking the time to get on-the-job practical experience, this is the next best thing.
Joining Craft Professional Trade Associations
What happens when you go out to lunch with people you work with? Don’t you invariable end up talking about your jobs – maybe getting the inside scoop on pending events? Well, that’s exactly the sort of interaction you’ll get when you join a local trade association. Attending these meetings is a great way to get experience vicariously as you find out about new tools, techniques, suppliers and legalities specific to your craft.
Getting experience working in the field is invaluable. You’ll have the priceless opportunity to see how an established business maneuvers around problems beyond their control and deals with supply, labor and customer issues. Lacking that opportunity, put aside time to practice your craft. Pair this with keeping on top of developing issues in your business by joining trade organizations and attending craft related seminars.
How to Build a Puppet Theater Out of a Cardboard Box
How do you make a puppet theater that is inexpensive and simple to make and use?
It’s quite easy to craft a simple stage in which your puppets can perform. All you need is a large cardboard box or appliance box, utility knife, paint, glue,and fabric.
Children will need the supervision of an adult for this project.
Transforming a box into a puppet stage
Table top puppet stage in processIt’s easy and inexpensive to build a puppet stage. This one was made out of a large cardboard computer box. It folds up and it’s light and easy to carry. This one was designed to sit on a table. If you want a taller, free-standing one, use an appliance box. Refrigerator boxes make wonderful puppet stages.
Just cut out the top, the bottom and the back of the box, leaving the front section and two sides. If you don’t need a stage that folds up, leave the bottom in as it will add stability. If you need to cut the bottom out so it will fold, you can glue wood strips or molding on for stability and weight so the stage won’t fall over easily.
Cut a square or rectangular opening in the front of the box, closer to the top of the stage than the bottom. Add a prop shelf if you like. Attach a fabric backdrop curtain about ten inches behind the front of the stage opening.
Make two small holes in the upper part of the stage and fit a dowel rod through the holes, like a curtain rod.
Make sure the curtain fabric is lightweight so you can see through it as you sit behind it. You will need to be able to see what the puppets are doing. If desired, you can put a clip-on reading light on the top of the stage. This makes your little actors more visible and makes it difficult for the audience to see the puppeteer.
Decorate your stage with paint or fabric.
Hint: Tacky glue, available at craft stores, is the best kind of glue for a project such as this. It adheres well to fabric and is very strong.
Have a great show!
Make a Cardboard Puppet Theater
Tom Knight gives excellent instructions for building a puppet theater out of a cardboard box.
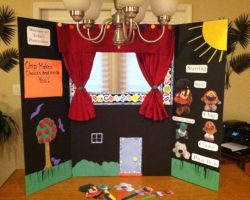
Cute Puppet Theater
If you go to Google Images, you can find hundreds of ideas for puppet stages. Just enter “puppet theaters” or “puppet stages”
Here is a lovely example of a beautifully decorated home made puppet theater.
Many of the images come from websites with directions for building the stage.
Photo from Google Images
Puppet StagesYou Can Buy
If you don’t have the time or inclination to build a stage, you can buy one!
Build a Puppet Theater
Books on making Puppet Theaters and other cardboard projects that may be adapted for stages or theaters. A castle, for example, makes a great stage for fairy tales.
Decorate Your Puppet Stage with Wall Decals
You can add some decorations to your puppet theater – not too many so that it distracts from the action, but just enough to make it interesting.
Theater is one of the most exciting and most educational projects you can to do with kids.
Developmentally, it’s hard to top theater. Drama can teach word skills like reading, writing, imaginative composition (fiction they call it, or drama), plus a feeling for the spoken music of words and poetry. Not to mention a smattering of history and literature.
Socially, drama teaches both cooperation AND independence, recognizing and dealing with emotions, empathy, plus the practical skill of speaking in front of an audience. Public speaking is a skill many adults wish we had developed. Music. Dance. Magic tricks. Almost any skill or interest can find a home onstage. There’s a whole branch of theater called improvisation: always useful to learn how to think on your feet. And as children get more involved in what’s called “technical theater” – all the props, costumes, sets, lights, sound etc. – math skills, visual and spacial skills, and handicrafts all come into play. Plus innovation. There’s a LOT of problem-solving in theater.
There’s also a great deal of comradery and joy.
Start small and easy: goof around with puppets, make masks, recite a poem, act out the Three Bears – – – Have fun onstage.
The picture? A set from a children’s production of “Charlie and the Chocolate Factory.” Since I happen to have an abundance of factory-themed children’s sets to decorate this Lens, let’s think of it as a big Drama-Fun Factory! I’ll point out some of the gears and levers that will help you make your own at-home theater. It’s also a factory-in-progress (as all my Lenses are), so please visit again to see what new gears have been added.
Puppet Theater
Always popular with kids
There is something fascinating about puppets. They combine the make-believe and miniature joy of dolls with the expression and story-telling of people – while, best of all, shy performers can hide behind them like a mask. (More on masks later.) Any child can say more, a lot more freely when using a puppet. (As psychologists know.) Puppets are freedom and wild improvisation.
It’s most fun to build your own puppets and puppet theaters, but store-boughten is fun too.
Do It Yourself Puppets
Punch. Where’s Judy? PAPER BAG PUPPETS – Maybe the simplest puppet is the paper bag puppet. Take a plain brown lunch bag and have your child draw the puppet’s eyes and nose on the bottom, so that the fold (where the bottom folds flat) becomes the inside of the puppet’s mouth. Colored markers or poster paint (not too wet!) will look bolder and more effective than crayons or pencils. Adding cut paper elements will make the puppet more exciting: a red construction paper tongue for a snake maybe or great big ol’ cow licks; the cow’s horns or moose antlers; arms and hands; or perhaps a silly mustache or paper wig. Scraps of fabric or fur can be fun. Anything, really. Go to the movies and watch the crazy puppets in the Fandango ads.
Now, how about adding a huge grocery store bag puppet to play the giant?
SOCK PUPPETS – Just as easy to make if you’re up for a little simple sewing: buttons for eyes, scraps of fabric for tongues, ears, hands; wool for hair.
GLOVE PUPPETS – One woolly glove becomes a quintet of actors. Or cut the fingers off (roll-hem the cut edges) and create five separate prima donnas. You could experiment with wool versus cotton versus rubber glove fingers (rubber for aliens maybe? add little teeny antenae) or roll your own finger tubes from any fabric or even stiff paper.
POPSICLE STICK PUPPETS – Almost any picture can be either printed onto stiff card-stock paper or mounted onto cardboard and glued to a popsicle stick. I suggest either adult-applied spray mount (flattest most permanent) or child-applied glue stick for the picture to cardboard gluing, then white glue like Elmers or hot glue (adult again or old enough child) for the picture to stick attachment. Try cutting out arms or heads separately and attaching these to the puppet’s body with old fashioned brass brads so you can change their poses. Suddenly they can emote!
OTHER “STICK” PUPPETS – As with popsicle sticks, almost any stick-like object can turn into a puppet. Try decorating wooden spoons or toilet paper tubes (which make finger puppets). Or how about – new! clean! – toilet plungers? Or spatulas or decorated pencils or pool noodles with drawn-on permanent marker faces?
SHADOW PUPPETS – These can be cut out cardboard shapes very similar to popsicle stick puppets. They needn’t be decorated with color unless you want to, but “decorations” made by cutting holes can be fun. Bring out the hole punch! I imagine you might be able to cut out small areas and then fill these with colored tissue paper or translucent plastic for a stained glass effect. Obviously you’ll need a shadow screen – stretched white fabric or paper – and a strong light to make these work.
MARIONETTES – These are more complicated puppets, but all you absolutely need are two flat sticks fixed together in an X with strings from the four ends that tie to the puppet’s arms, head, and legs or rear (whichever is funnier). The “puppet” could be any loose jointed doll – made of cloth or wood or cardboard tubes.
For older kids with advanced skills and a LOT of patience – and an interest in video – you could try making your own short film. Film puppets in action! (Watch a Muppet movie. Like that.)
Or if VERY patient and motivated, try making clay “puppets” to shot-by-shot act out a brief Claymation film. (Watch a Wallace and Grommet movie to see how masters do this!) But this stop motion filming technique is only for the extremely motivated and patient!
Puppet Videos
Scottish Falsetto Sock Puppet Theatre – Romeo and Juliet Part I
Rated PG – Extra Silly
Meant for older kids as it gets a bit, slightly, um, vulgar as the Bard and Scottish Sock Puppets are so apt to do. Make a nice antidote to classroom reading of this classic! The other vids are suitable for younger children.
Masks
Using and making masks for children
Poof! You’re someone (or something) else. Masks seem magical – a natural development of the baby’s game of peekaboo.
Masks can be made from almost any material: a paper grocery bag; a paper plate plus string; cut cardboard, felt, or craft foam plus elastic; paper mache (lots of goopy fun); or, if you’re ambitious, leather etc.; or there are lots of mask kits, where you start with a pre-formed face shape and decorate and add to it.
PAPER MACHE – Amazingly cheap and simple, though time consuming. Tear or cut newspaper into strips, the thinner, the more detailed you can get. Mix flour and water to make a thick paste, soak the paper in this till sticky but not soggy, then slowly build up your shape. It’s easier if you have a shape to lay the strips over. A kid’s-face-sized balloon can work or a plastic mask. You can add in cardboard to reinforce protruding pieces like ears or tusks – make sure these are well integrated into the face proper so they won’t rip off easily. Allow several days for the paper mache to dry before trying to paint or decorate it.
