How To Capture Amazing Action Shots With Your Camera

How To Capture Amazing Action Shots With Your Camera

Action shots are always impressive, whether it’s a photo of a friend skydiving or a video of a dance recital. But how do you get great action shots with your body camera? Here are a few tips:

Use a high frame rate.

The higher the frame rate, the more frames per second your camera will capture. This is important for action shots because it means you’ll be able to capture more detail and movement.

Use a fast shutter speed.

A fast shutter speed will help to freeze the action, so you don’t end up with a blurry mess.

Use burst mode.

Burst mode is a great way to make sure you don’t miss the perfect shot. When you enable burst mode, your camera will take a rapid succession of photos, giving you plenty of options to choose from.

Use a wide aperture.

A wide aperture will give you a shallow depth of field, which means that the background will be blurred and the focus will be on the subject of your photo.

Use a tripod.

A tripod will help to keep your camera steady, so you don’t end up with blurry photos.

Use manual mode.

Manual mode will give you the most control over your camera settings. This is important for action shots because you’ll want to be able to adjust the shutter speed and aperture to get the perfect photo.

Use a remote shutter release.

A remote shutter release will allow you to take photos without having to touch your camera. This is especially helpful if you’re using a tripod, as you won’t have to worry about jarring the camera and ruining your shot.

Use continuous autofocus.

Continuous autofocus will help to keep your subject in focus, even if they’re moving around.

Use high ISO.

A high ISO will help to brighten your photos, making it easier to capture detail in low-light situations.

Use post-processing.

Post-processing is a great way to fine-tune your photos and make them look their best.

With these tips, you’ll be able to take amazing action shots with your body camera. So go out and start shooting!

How to Choose a Camera: SLR vs DSLR

How to Choose a Camera: SLR vs DSLR

When choosing either a SLR or DSLR camera, it is important to know which one is better for the type of photographs you plan to take. This article will highlight which is best for certain endeavors. We’ll also show you some of the top rated cameras in each category.

Which is Better SLR or DSLR?

The SLR camera is called as such because it makes use of a mirror and prism, reflex pertaining to the reflection on the mirror (see some examples of an SLR camera here). The reflection allows the user to see the image about to be captured through the viewfinder before actually taking the photo. This is special and different compared to the viewfinder camera which shows a very different image in the frame as compared to what you can see through the viewfinder. When the user hits the shutter button, the mirror moves away and allows light to go past it and hit the film to capture the image.

The main difference between a traditional SLR camera and a DSLR or digital single lens reflex camera lies right in its name, the DSLR is digital and does not make use of film (see some examples of a DSLR camera here). And because it has no film, instead of the mirror moving away for the light to hit the film, the light would, instead, go to the CCD or CMOS imaging sensor. Each camera has its pros and cons and they cater to certain kinds of photographers.

When to buy a SLR Camera

SLR Camera Review Getting a traditional SLR is advised for the more advanced photographer just because your number of shots is limited to how much film you have. The SLR user does not have the luxury of having a nearly unlimited number of frames that the DSLR user enjoys. Some people really do prefer having an SLR over a DSLR because of the quality and texture of film prints.

SLR Camera Reviews

There are very subtle differences between a film and digital print that are visible to the trained eye. One print isn’t better than the other, so to speak. It’s really more a preference. It should be noted that while getting an SLR is cheaper than a DSLR, in the long run, you could save more money with a DSLR because you won’t have to keep buying film. And the ISO, or level of exposure, depends on what kind of film you can buy. You can’t change it until you change film rolls.

SLR Cameras Under $1000, $500 and $250 Dollars

When to buy a DSLR Camera

DSLR Camera Review DSLRs tend to be more expensive but it is highly advisable for beginners to try out an entry level DSLR for a multitude of reasons. First of all, since everything is digital, you don’t have to count how many frames you’ve used because everything goes into a memory card and they can hold and store a large number of photos. And you can just transfer your photos to your computer when you’ve filled up your card and you can start shooting again.

DSLR Camera Reviews

Another great advantage of the DSLR for beginners is the fact that you can see your photo right away. You don’t need to process it before you can check it out and judge it for yourself. There’s more flexibility with digital photographs too. For one, you can change the ISO on the camera itself.

Canon EOS Rebel 18MP T3i DSLR Camera

**Top Choice**

DSLR Cameras Under $1000, $500 and $250 Dollars

SLR vs DSLR Summary

It should be noted that film and film cameras are slowly being phased out. That shouldn’t discourage you from getting a film camera because there’s more to learn with SLRs. To capture a beautiful picture using a film camera, you need a certain level of understanding and knowledge of light, exposure, and film. Using an SLR will allow you to gain more experience, knowledge, and appreciation for photos. But it is more practical to get a DSLR. One isn’t really better than the other in this situation. Deciding which one to buy really depends on your personal preference.

The Most Affordable Way To Display Your Photos With Nixplay Digital Photo Frames

The Most Affordable Way To Display Your Photos With Nixplay Digital Photo Frames

If you’re a photographer and you love spending time in your studio, then you’ll love the idea of using digital photo frames to store your photos. Not only are they affordable, but they offer a great way to showcase your photos in a way that’s both stylish and affordable.

There are a few different types of digital photo frames that you can choose from, and the ones that are the most affordable are those that are designed to be used with Nixplay Digital Photo Frames. This is a great platform that allows you to easily store and display your photos, and it’s one of the most popular platforms for digital photo frames.

The next best option for a digital photo frame is one that is designed to be used with a Nixplay Camera. This is a great platform that allows you to easily store and display your photos, and it’s one of the most popular platforms for digital photo frames.

Finally, if you’re looking for a more custom-made digital photo frame, then you should consider looking into those that are designed to be used with Apple’s iOS. This is a great platform that allows you to easily store and display your photos, and it’s one of the most popular platforms for digital photo frames.

So, if you’re a photographer and you’re looking for a great way to showcase your photos, then you should consider using digital photo frames. They are affordable, stylish, and offer a great way to store and display your photos.

Nixplay Digital Photo Frames is the best way to display your photos! With this app, you can create digital photo frames that are easy to assemble and display. You can choose to have your photos framed in a variety of styles and colors, and you can also add your own text or graphics.

If you want to show off your photos in a way that is both affordable and stylish, then you should consider using digital photo frames. A digital photo frame is a great way to show off your photos and make them look more beautiful. There a number of different types of digital photo frames available, and you can find the best one for your needs by using a search engine.

One of the best ways to find a digital photo frame that is both affordable and stylish is to look for ones that come in a variety of colors. You can also find ones that are made to look like different pieces of art. There are a number of different types of digital photo frames available, and you can find the best one for your needs by using a search engine.

If you are looking for a digital photo frame that is both affordable and stylish, then you should consider using ones that come in a variety of colors. You can also find ones that are made to look like different pieces of art. There are a number of different types of digital photo frames available, and you can find the best one for your needs by using a search engine.

Nixplay Digital Photo Frames are a great way to display your photos! With these frames, you can easily and cheaply add copies of your photos to your home or office. Plus, they’re a great way to show off your photos to others. Here’s a detailed explanation of how they work:

To set up a Nixplay Digital Photo Frame, first you need to find a physical photo frame. Once you have found one, you will need to determine how large the frame should be. You can find these frames at most stores, or you can order them online. Once you have chosen the size, you will also need to find the type of frame. There are many different types of frames, but the most common type is the photo frame. You can find these frames at most stores, or you can order them online.

Once you have chosen the type of frame, you will need to find the photo that you want to display. Once you have found the photo, you will need to select the size of the photo. You can find the photo by looking at the size of the frame. You can also find the photo by looking at the type of frame. Once you have selected the size, you will need to select the type of photo that you want to display. You can find the type of photo by looking at the photo size. You can also find the type of photo by looking at the type of frame.

Once you have selected the type of photo, you will need to find the location of the photo. You can find the location of the photo by looking at the photo. You can also find the location of the photo by looking at the type of frame. Once you have found the location of the photo, you will need to find the location of the frame. You can find the location of the frame by looking at the type of frame.

Once you have found the location of the photo and the location of the frame, you will need to put the photo in the frame. You can put the photo in the frame by looking at the location of the photo and the location of the frame. You can also put the photo in the frame by looking at the type of frame.

Once you have put the photo in the frame, you will need to put the frame in the room. You can put the frame in the room by looking at the location of the frame and the location of the room. You can also put the frame in the room by looking at the type of frame.

Once you have put the frame in the room, you will need to put the photo in the frame. You can put the photo in the frame by looking at the location of the photo and the location of the frame. You can also put the photo in the frame by looking at the type of frame.

Once you have put the photo in the frame, you will need to put the frame in the wall. You can put the frame in the wall by looking at the location of the frame and the location of the wall. You can also put the frame in the wall by looking at the type of frame.

Once you have put the frame in the wall, you will need to put the photo in the frame. You can put the photo in the frame by looking at the location of the photo and the location of the frame. You can also put the photo in the frame by looking at the type of frame.

Once you have put the photo in the frame, you will need to put the frame in the photo album. You can put the frame in the photo album by looking at the location of the frame and the location of the photo. You can also put the frame in the photo album by looking at the type of frame.

5 Tips For Getting The Most Out Of Free Wedding Video LUTs

5 Tips For Getting The Most Out Of Free Wedding Video LUTs

Video compression algorithms have become more and more popular in recent years as they offer significant improvements in file size and video quality. However, they can also introduce undesirable artifacts into your video footage, which can make it difficult to create a high-quality wedding video. Here are five tips to help get the most out of free wedding video LUTs:

Choose the right compression algorithm

Before choosing a compression algorithm, it is important to understand the effects that different algorithms have on video footage. If you want to use a lossy algorithm, such as MPEG-4 Lossless, your footage will likely be smaller but with poorer video quality. Conversely, if you want to use a HEVC algorithm, your footage will likely be larger but with better video quality.

Use a good video editor

If you want to create wedding videos with your own video editor, you will need to be careful about the codecs and format that you use. MPEG-4 video is a popular codec and is commonly used in wedding videos. However, it can be difficult to create high-quality wedding videos with MPEG-4, so it is best to use a more robust codec such as H.265.

Use a LUT

Another important step in creating high-quality wedding videos is to use a LUT. A LUT is a lookup table that stores the brightness and color information for a set of video frames. This allows you to easily change the brightness and color of individual frames in your footage.

Use a good audio editor

If you have audio recordings of your wedding, you will need to use a good audio editor to dub them into wedding videos. This will help to improve the quality of the audio and make it easier to lip-sync the audio for each individual video frame.

Use a mastering service

If you want to ensure that your wedding videos are ready for release, you will need to use a mastering service. This will help to ensure that your videos are properly mastered and that any artifacts are removed from the footage.

Welcome to our blog post about 5 tips for getting the most out of free wedding video LUTs.

First and foremost, always consult with a professional video editing company to get the best results for your wedding. There are a variety of different LUTs to choose from, and each has its own unique strengths and weaknesses.

Next, be sure to choose the right video editing software for your needs. Some of the most popular options include Adobe Premiere, Sony Vegas, and Apple Final Cut Pro. Make sure to read the tutorials and reviews before making your decision, as each software has its own quirks and preferences.

Finally, be sure to get plenty of practice footage before your big day. This will help you to better prepare and edit your clips, and will also help you to get a feel for how your footage looks on-screen.

With all of these tips in mind, you’re on your way to a great wedding video experience!

– Make sure that you are properly trained in how to use free wedding video lUTs.

– Be sure that your wedding video lUTs are of high quality.

– Use a quality audio mixer to combine your audio and video components.

– Make sure that your wedding video lUTs are properly captioned.

– Use a quality software program to create and edit your wedding video lUTs.

The Best Video Cameras For Capturing Action In Low Light

The Best Video Cameras For Capturing Action In Low Light

It’s that time of year again. The weather is getting colder, the days are shorter, and the nights are longer. That can only mean one thing: it’s time to start thinking about the best video cameras for capturing action in low light.

There are a few things to consider when choosing a video camera for low light use. The first is sensor size. A larger sensor will be able to gather more light, resulting in better low light performance. The second is the lens. A faster lens (one with a lower f-stop number) will also gather more light and result in better low light performance.

Best cameras for low light

With those factors in mind, here are our picks for the best video cameras for low light:

Sony a7S II

The Sony a7S II is a full-frame mirrorless camera that features a 12.2-megapixel sensor. It’s capable of capturing 4K video, and it has excellent low light performance thanks to its large sensor and fast lens options.

Panasonic Lumix GH5

The Panasonic Lumix GH5 is a Micro Four Thirds camera that features a 20.3-megapixel sensor. It can capture 4K video at 60 frames per second, and it has excellent low light performance thanks to its large sensor and fast lens options.

Canon EOS 1D X Mark II

The Canon EOS 1D X Mark II is a full-frame DSLR that features a 20.2-megapixel sensor. It can capture 4K video at 60 frames per second, and it has excellent low light performance thanks to its large sensor and fast lens options.

Nikon D5

The Nikon D5 is a full-frame DSLR that features a 20.8-megapixel sensor. It can capture 4K video at 30 frames per second, and it has excellent low light performance thanks to its large sensor and fast lens options.

Sony Alpha a9

The Sony Alpha a9 is a full-frame mirrorless camera that features a 24.2-megapixel sensor. It can capture 4K video at 30 frames per second, and it has excellent low light performance thanks to its large sensor and fast lens options.

Tips to choose cameras for action sports photography

In fact, many professional photographers use mid-range or even entry-level cameras to capture amazing action shots. The key is to know how to use your camera and its features to get the most out of it.

Here are a few tips on how to choose the best video camera for action sports photography:

Look for a camera with a fast shutter speed. This will help you capture sharp images of fast-moving subjects.

Choose a camera with good low-light performance. Action sports often take place in low-light conditions, so a camera that can perform well in these conditions is essential.

Consider a camera with 4K video
capabilities
. 4K video is becoming more and more popular, and action sports photography is the perfect genre to take advantage of this high-resolution format.

Look for a camera with built-in GPS. This can be helpful for tracking your location and adding GPS data to your photos and videos.

Choose a camera that is rugged and weather-sealed. Action sports can be tough on equipment, so a camera that can withstand the elements is a must.

Keep these tips in mind when shopping for a video camera for action sports photography, and you’ll be sure to find the perfect camera for your needs.

In fact, many of the best action sports cameras are actually quite affordable. That being said, there are still a few things to consider when purchasing an action sports camera. Here are a few tips:

Action sports cameras are designed to be durable and withstand a lot of abuse. They should be able to withstand being dropped, being submerged in water, and being exposed to extreme temperatures.

The camera should be able to record high-quality video. This is especially important if you plan on using the footage for professional purposes.

The camera should be easy to use. It should have a user-friendly interface and be relatively easy to operate.

The camera should be affordable. As mentioned before, many of the best action sports cameras are actually quite affordable.

Keep these things in mind when shopping for an action sports camera and you should be able to find a great camera that fits your needs and budget.

Things to Do With Pictures

Things to Do With Pictures

What Fun Stuff Can You Do with All of Those Pictures?

You’ve made the step and gone to digital photos. You can view them on your computer, e-mail them to friends, and take them to the store to get prints or maybe even print them at home. But after that you think, what can I do with these images that would be fun or interesting? How else can I enjoy them?

Well, let’s talk about that. There are a lot of great products, activities, services and more that will allow you to use those digital images in so many ways. Read on to learn more.

Photo Sharing Sites That Offer More

Photo sharing sites give you a place to keep your photos, a place to share them. However, some photo sharing sites offer more things to do with pictures. Shutterfly.com for instance also allows you to make a variety of things using your photos. Photo books, cards, calendars, coasters, tote bags, mouse pads, stickers, canvas prints, mugs, key rings, ornaments, puzzles, keepsake boxes, address labels, and notebooks are just some of the options.

Scrapbooking and collages are another creative way of dealing with your photos. Photomix, Google’s Picasa, Snapfish, and ScrapBlog are just a few that offer this ability.

Get Some Motion from Your Pictures

If you remember the little books you made as a kid by drawing a series of pictures in sequence, stapling them together, and then flipping through them to simulate motion, then you understand this concept.

This is another one of those fun things to do with pictures; make your own, more adult, version of these flip books. There are a number of sites that can produce some pretty nice flip books either from a series of digital photos or the still images grabbed from your camera’s video recordings. Flippies, Glitterfy, and FlipClips are just three of the options.

Of course there are also a number of tutorials out there to help you if you want to go it on your own. Two of the most useful that can be found are at a blog called The Curious and another called Short Courses.

If you’d like to make a 3-D movie from your images you can try Make3D but if you want to make a movie with some great music added you can try Animoto or even Google Picasa.

Wacky Things to Do With Pictures

Your pictures may be sentimental, they may be precious, but they should also be fun. At CaptionBubble you can make a joke of almost any picture by adding captions just like you see in cartoons.

There are a number of fun services at Flickr based BigHugeLabs. You can make a magazine cover, add captions, or make motivational posters among other things with your images.

If you want to really get silly, you can also use a number of sites to distort photos to create that “house of mirrors” effect. Sites like Gooifier allow you to do this without having to even download anything. Or perhaps you would rather insert your face, or the face of someone you know, into a well known picture, on the body of another person, or somewhere else where it doesn’t belong at FaceinHole. However, if you want a lifesized cutout of someone you’ll need to go to PhotoCutOuts or to get a caricature, visit osoq.

If you have kids, another kind of cool project can be found at FlattenMe where you can use your kids pictures to insert them into existing books. Suddenly your son or daughter can be the main character in the storyline.

Getting Artsy with Your Photos

There are a number of more artistic things to do with pictures. Various sites will allow you to change your favorite photos into works of art. PhotoWow can give you some great looking pop art of your favorites, while PhotoFiddle gives you even more options for the style of art you prefer; oil paintings, watercolor paintings, abstract collages, and so forth.

A site called ReColored allows you to colorize your black and white photos. On the other hand, if you just want a photo enlarged and placed on canvas to hang on the wall, you can try CanvasRUs.

For those who prefer a line drawing, there are a number of tools to help get the job done. Here is a Photoshop tutorial for doing just that.

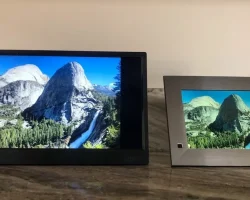
Be Sure You Put Your Photos Best Face On

Digital photo frames have become more interesting and more affordable in the past few years. They offer larger screens with higher resolution in many instances, allowing you to enjoy your photos in their most vibrant splendor. These modern frames are capable of storing more images and can be set up to display slideshows so that you can enjoy more of your photos.

In addition, some frames offer filters for special effects, the ability to add music for a full presentation, and remote controls for convenience. Digital photo frames really are the best way to capitalize on the digital nature of your photos. Because fading won’t occur with the digital file and those images will always be at their best, this is one of the smart things to do with pictures.

Portable Digital Devices That Let You Enjoy Your Pictures Everywhere

A digital camera gives you that potential connection with the other modern devices you may own. Clearly, uploading those photos to a media player or other portable device allows you to take those images with you to share with others or to enjoy while you’re out and about.

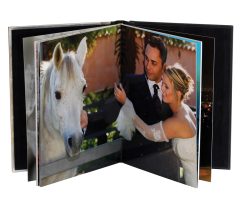
On the other hand, some of the traditional ways of enjoying printed images aren’t lost just because you’ve gone digital. In fact many of these just got better because you can tote along more images with less bulk when your photos are in the digital format. For instance, an old picture wallet could hold a handful of 2×3 photos before it became an unwanted bulk. A digital photo wallet on the other hand allows you store many times more pictures and it’s size doesn’t change. Aside from true wallets, there are also wallet sized digital photo albums that are easy to take along; they’re definitely a much lighter load than a traditional photo album which is three or four times the size.

Another item to keep your pictures close at hand is a digital photo keychain. These are affordable little devices and they don’t require much technical knowledge to use. They do best in displaying up close, portrait type shots due to the small screen size but they’re definitely a fun little gadget.

Editing: Making Those Photos Look The Way You Want

Many of us don’t go out and buy the more sophisticated editing tools that are available but instead use whatever came with our camera. However, editing is among the best things to do with pictures if you want to enjoy them.

There are some sites out there than can help you do things with pictures that are a bit fun. Picnik is one of those sites. It allows you to do some editing, which includes adding interesting borders, effects, shapes, and fonts to spice up your images. Of course, one of the best things is that you don’t have to download anything to your computer or take a course to understand it.

Of course there are other online photo editing tools such as FotoFlexer and SplashUp.

Another possibility is to study up a bit and consider some photo editing software to really get the most from your pictures.