The intricate and beautiful designs that can be created using just paper are amazing. 3D paper artists are using this medium to create some of the most incredible art pieces we have ever seen.
Whether it is a 3D paper sculpture or a 2D illustration, the results are always impressive. 3D paper artists are able to create such detailed and realistic art because of the many different techniques they use. Some of these techniques include paper cutting, folding, and layering.
Paper cutting is probably the most essential skill for a 3D paper artist. This technique is used to create the basic shape of the sculpture or illustration. Once the basic shape is created, the artist can then begin to add details and layers.
Folding is another important technique for 3D paper artists. This is how they are able to create more complex shapes and add depth to their sculptures. By folding the paper, the artist can create all kinds of different shapes that would be impossible to create with just a piece of flat paper.
Layering is the final technique that is often used by 3D paper artists. This is how they are able to create dimension and add details to their sculptures. By layering different colors of paper, the artist can create a realistic effect.
3D paper art is truly incredible. The artists who create these pieces are extremely talented and skilled. If you have ever wanted to try your hand at 3D paper art, now is the time!
This is because it is a very versatile medium that can be used to create a wide variety of different pieces. It can be used to create 3D sculptures, paintings, and even jewelry.
There are a few things that you need to know in order to create your own 3D paper art. First, you will need to choose the right kind of paper. You can use regular printer paper, but it is not as sturdy as cardstock. You will also need to get some double-sided tape or glue dots.
The next step is to start cutting out your paper. You can use a template or freehand your design. Once you have your design cut out, you will need to score the paper. This will help the paper fold evenly.
After you have scored the paper, you will need to start folding it. You will want to start with the large pieces first and then work your way down to the smaller pieces. Once you have all of the pieces folded, you will need to glue or tape them together.
The final step is to add any embellishments that you want. You can use sequins, beads, or anything else that you can think of.
3D paper art is a great way to add a unique touch to any room in your home. It is also a great gift idea for any occasion.
3D paper art is a type of art that is created by folding and cutting paper. This type of art is also known as origami. 3D paper art can be used to create a variety of objects, including animals, flowers, and other objects.
There are a few things that you need to know in order to create 3D paper art. First, you need to choose the right type of paper. You can use any type of paper, but you need to make sure that it is thin and strong. Second, you need to fold the paper in half. You can use a ruler to help you fold the paper correctly.
Once you have folded the paper, you need to cut it into the desired shape. You can use a variety of scissors to do this. Once you have cut the paper, you need to glue it together. You can use a variety of glues, but you need to make sure that the glue is strong enough to hold the paper together.
Once you have glued the paper together, you need to let it dry. Once it is dry, you can add details to the paper. You can use a variety of markers and pens to add details to the paper.
Once you have added all of the details to the paper, you need to cut it out. You can use a variety of scissors to do this. Once you have cut the paper out, you can glue it to a piece of cardboard.
You can also use a variety of other materials to create 3D paper art. You can use paper clips, ribbon, and other materials to create 3D paper art.
If you want to learn more about 3D paper art, you can check out a variety of books and websites. You can also attend a class or workshop.
3D paper art is a type of sculpture that is made by folding, cutting, and gluing paper. The finished product can be very intricate and detailed, and it can be used to create both two-dimensional and three-dimensional sculptures.
Here are some tips and tricks for creating 3D paper art:
-Start with a simple design. If you are new to 3D paper art, it is best to start with a simple design. Once you have mastered the basics, you can move on to more complex designs.
-Use a variety of paper types. You can use different types of paper to create different effects. For example, you can use construction paper for a more sturdy sculpture, or tissue paper for a softer look.
-Be creative with your folds. There are no set rules for how you must fold your paper. Get creative and see what kinds of interesting shapes you can create.
-Use a glue stick for a stronger bond. If you are using construction paper or another type of paper that is not self-adhesive, you will need to use a glue stick to hold your paper together.
-Let your imagination run wild. The possibilities are endless when it comes to 3D paper art. So let your imagination run wild and see what you can create!
3D nail art is a beautiful and unique way to decorate your nails, but it can also be tricky to get the hang of. If you’re having trouble creating beautiful 3D designs, don’t worry – we’ve got you covered with this handy troubleshooting guide.
1. My designs keep falling off!
If your 3D designs are constantly falling off, it’s likely that your adhesive is to blame. Make sure you’re using a good quality glue or gel, and that you’re applying it correctly. If you’re still having trouble, try using a thinner layer of adhesive or curing it under a UV lamp for a few seconds.
2. My designs look lumpy and uneven!
If your designs look lumpy or uneven, it’s probably because you’re not using enough glue or gel. Make sure you’re applying a generous amount of adhesive, and that it’s evenly distributed across the entire design.
3. My designs look dull and lifeless!
If your designs look dull, it could be because you’re using too much glue or gel. Try using a thinner layer of adhesive, and make sure you’re not curing it under a UV lamp for too long.
4. I can’t get my designs to stick!
If your designs just won’t stick, it might be because the surface of your nails isn’t clean enough. Make sure you wipe your nails with nail polish remover before applying the adhesive, and that you’re not using an old or dried-out glue.
5. Help! My design is stuck to my nail!
If you accidentally get your design stuck to your nail, don’t panic! Gently peel the design off, being careful not to damage your nail. If the design is still stuck, soak your nails in warm water for a few minutes, then try peeling it off again.
We hope this troubleshooting guide has helped you to create beautiful 3D designs that last. If you’re still having trouble, don’t hesitate to ask a professional nail artist for help.
A flower loop hair bow is a delightful way to dress up a little girl. This charming bow is made from a variety ribbon in different colors and patterns. You can make a flower loop hair bow any size with as many layers as you like. For each succeeding layer just decrease the length of the ribbon by one inch. After creating your loopy hair bow, embellish the top with an artificial flower, an ornamental button, a plastic heart, jingle bells, or any decoration you choose.
How to make the Bow
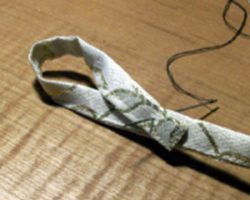
Practice the technique briefly to better understand the construction of a flower loop hair bow. Cut a 10″ length of ribbon. Find the middle of the ribbon and insert a needle through it. Curl one end of the ribbon over (the end is flat and not curled into a circle) and push the end down halfway on the needle. You should have a loop with a needle protruding through one end. Curl the other end of the ribbon over and push it down on the needle. Now you have a figure 8 with a needle protruding in the center. This is the process you will repeat to construct the loop bow.
4″ Bow with 4 layers
Cut 6 pieces of ribbon 9″ long for layer 1. Cut 5 pieces of ribbon 8″ long for layer 2. Cut 4 pieces of ribbon 7″ long for layer 3. Cut 4 pieces of ribbon 6″ long for layer 4. Stack up all 6 pieces of ribbon for layer 1, fold them in half and hold. Insert a threaded needle half way through the center of the loop and through each layer of ribbon. Fan the pieces of ribbon around the needle in the shape of a flower. Place a salon or hair clip in the center to hold the fanned ribbon in place. Fold the end of the first ribbon over and push the end onto the needle. Take the ribbon next to the one you just folded and do the same thing. Repeat until all the ribbons are folded all the way around. Adjust the folded ribbons so they are evenly distributed around the bow. Pull the needle completely through until it is stopped by the knot in the end of the thread. Run the needle back through making a stitch. Make several stitches to secure layer 1. Repeat the entire process for each layer of the bow. You can sew or hot glue all the layers together.
Attach to a Barrette
Sew a piece of ribbon 2 ½” long to the bottom of the bow (the side with visible ribbon ends). Use this piece of ribbon to hot glue or sew the bow to the barrette. Add a flower, or any decoration to the front of the bow.
I’m restoring a house from 1905, and as we worked on demolishing and removing what my husband calls “100 years of well-intentioned renovation,” I was excited to find some lovely hardwood floors underneath a few layers of old linoleum and glue. Luckily, the wood was largely in great shape — it just needed some sanding, and, in one room, some major scraping and sanding.
The kitchen had layers of old linoleum and glue on top of the original hardwood floors. I knew I needed some serious tools to expose those floors. I love that Home Depot has a Tool Rental department, and they had just the tools for the job. I found that there are different kinds of floor sanders — and choosing the right one is important. I’ll show you what sander I chose, why, and share some tips and tricks you’ll need to know — after the break!
As you can see in the preceding picture, the kitchen floor in the house was the worst. Once I scraped up the old linoleum layers, there was still some old backing paper and glue on top of the hardwood, and I knew that it was going to take more than a little effort to get it done. Before I even got started in the rental department, I stopped and picked up some of these:
I grabbed this kit because it had three essentials: a sanding mask, eye protection and ear protection. I’ve later found a style of mask I like even better — with a valved respirator (meaning it’s easier to breathe) — and that isn’t as hot (you can find it here).
You don’t want to breathe the sanding dust if you can help it. It’s just a bad idea to breathe a lot of sawdust to begin with, but it’s also possible that you might be allergic to something in the wood. Most frightening: some of the paints and adhesives used years ago may also contain asbestos, so it’s — again — better to be safe than sorry. Since I couldn’t identify exactly what it was on my wood floor — probably some old adhesive, possibly mastic, I felt it was best to be safe.
Once I had the safety supplies, I was off to the rental department.
The helpful gentlemen in my local Home Depot Tool Rental department asked me about the floors I was going to sand, and disabused me of the notion that I wanted to use a drum sander. I had thought I wanted to use one, but they pointed out my first important tip: unless I really knew how to use one, they are hard to control and likely to damage the floor. They suggested I was better off using a oscillating sander — so that’s exactly what I did.
Tip: Consider a oscillating sander to minimize damage to the floor, accidentally making lower and higher places in the floor, and to provide an overall more even finish.
They also had me pick up a variety of grits in the sanding pads. As you might imagine, it’s best to start with a coarser grit and work your way to a finer grit with each pass of the sander. I started with a very coarse grit — and went through a lot of pads — to remove the gunk from the floor; then moved to a finer grit for a semi-final pass.
Tip: Be sure to start with a coarser grit and move to a finer grit with each pass. This will give you a more even and smooth finish on the floor.
I picked up the full system, complete with a vacuum system I wore on a back harness. I had to empty the canister frequently to minimize the danger of fire. (The second time I rented the sander, the Home Depot folks recommended I just use my giant ShopVac, which I did.
As you can see from that day’s Instagram photo, I was ready to go and looked like a GhostBuster.
Rather than detail the “fun” I had getting all of the gunk off of this floor, I’ll simply say that it took most of a day to get that one room done with the thick coat of adhesive on top. The other two rooms I did went much faster and used up much fewer sanding pads because they didn’t have as many layers of gunk.
You can see that the random sander enabled me to go back over stubborn sections more than once without worrying about accidentally gouging or creating valleys in the floor.
Tip: You can use a mouse sander or other smaller hand sander to get particularly stubborn patches. Just don’t forget your mask!
Now, I’m not done yet. While we’ve done the major “gunk removal” process and gotten the floors nearly ready, we are still going to go over each of them with a handheld belt sander, with the grain and with a fine grit paper to help bring out the grain and make sure we’ve edged the room correctly.
Tip: Use a handheld belt sander with the grain, with a fine-grit sandpaper, as your final pass to help bring out the grain.
As a final pass, we’ll fill in any big gaps or gouges with stainable wood filler.
Finally, we’ll be putting down a nice dark stain — and we’ll probably have to custom-mix the stains for each room since the woods appear to be different in each.
We expect to use a nice stain and polyurethane, like the fine Minwax products sold at Home Depot. I’m going to put on multiple coats of the oil-based polyurethane to help give each floor a thick, protective, glossy finish.
And don’t forget — it might be worth considering just installing a new hardwood floor instead if your floor is overly damaged or irreparable.
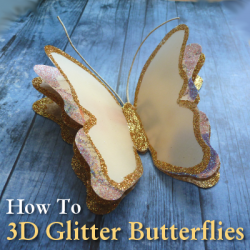
Make Your Own Luxury Layered 3D Butterfly Embellishments from Paper and Glitter
You can buy all kinds of pretty embellishments to adorn your handmade cards and craft projects but most of the time, I prefer to make my own. That’s because, embellishments like butterflies are fun to make and very inexpensive too once you already have a stock of paper and glitter powders to use. You can even opt to use newsprint, magazine pages or sheets torn from old books you no longer want in order to keep costs minimal.
Once you know how this technique works, each piece is easy to assemble. I do recommend making them up in bulk batches because it’s much quicker to make several at a time than just make a single piece each time you want a luxury 3D butterfly embellishment.
All Personal Images belong to the author of this article: Marie Williams Johnstone
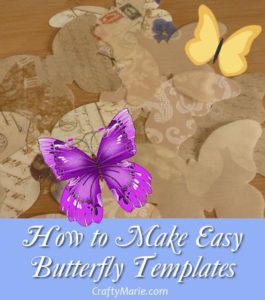
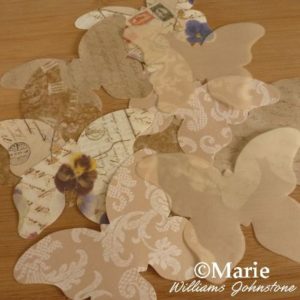
First You Need Paper Butterfly Shapes
Use a Cutting Machine or Make Your Own DIY Templates
I prefer to make my own templates because this way I get the exact style and size of butterfly that I want for the project at hand which means I can fit the finished pieces to fit perfectly on handmade cards, as gift toppers, as DIY napkin rings for special occasions, hanging decor and more.
If you want to create your own beautiful butterflies, I show you a variety of ways which are the exact methods I use:
How to Make Butterfly Shaped Templates for Crafts
You can use paper punches but be aware that even large punches will tend to give you quite small pieces and this 3D, layered version that I’m showing you really is best on a bigger scale. The ones I make are often palm sized and bigger. Cutting machines are capable of making larger versions so this may be a better option if you do not wish to or cannot cut by hand.
The last option is to buy pre-cut paper butterfly shapes from a venue such as eBay or you may even find a seller on etsy that will provide you with what you need. Again, I’d prefer to make my own since I get full control over the paper and design being used.
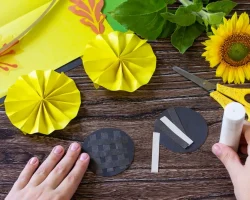
Some of the Materials You’ll Need
These pretty paper embellishments do not need an abundance of materials in order to make them and you may already have most of what you need. The main component is paper and I like to pick out rather antiqued looking and vintage style papers in creams, pale browns and grungy colors. Extra fine glitter powder is an essential and you can buy large sets of these to use. The tubs they come in tend to look tiny but a little really goes a long way providing you use a tidy tray or paper to collect the stray powder to pop back in the jar – don’t throw it away! Zig glue pens are the ONLY wet glue pen I’d ever recommend because I’ve used these for years.
How to Make Layered 3D Paper Butterflies
In Vintage Style With a Gorgeous Glitter Edging on the Wings
These are the layered 3D butterflies that I’ve been making for a long time now – the shape may vary and the colors of the paper but the styling stays the same. This style screams luxury and they are ideal for topping special gifts and cards for occasions such as weddings, anniversaries, milestone birthdays and heartfelt thank yous. I like them in a antiqued vintage look but you can change this up with papers of your own choice to match the theme. Need to know how to make butterfly shapes? See How to Make Butterfly Templates
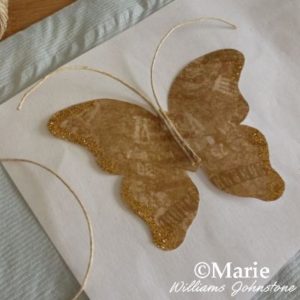
1.You need lots of butterfly shapes cut from the paper of your choice. I like to make my own templates for this and cut by hand but you can use a large paper punch to make smaller versions or a cutting machine. I like to use 4 cut pieces to make a single 3D butterfly but you can choose 3-6 pieces depending whether you want more or less layers. For the top layer of paper, I like to use Vellum which you can partially see through. It just gives a nice effect. With vintage style papers, I opt for a cream color vellum.
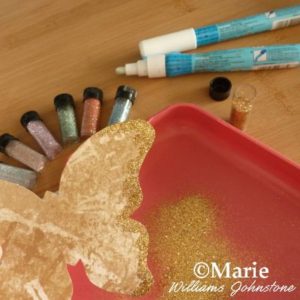
2.You can use another brand, but I absolutely recommend a Zig glue pen to draw around the edges of your wings so the glitter has something to stick to. I’ve been using these glue pens for many, many years so I know how good they are. Draw around the edges of one wing where you want with the glue and shake your choice of extra fine glitter over the top. Have a tidy tray or some paper underneath to catch the excess glitter. Turn the butterfly over and tap the back of the wing to remove excess powder.
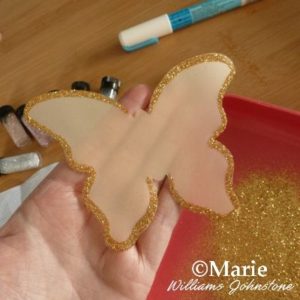
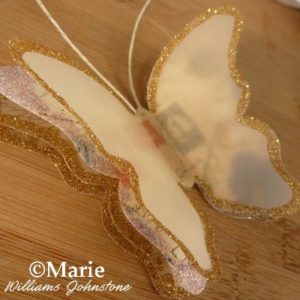
3.Add glittered edges to all the wings. Here’s a tip to save on using too much glitter. For the top layer which I like to choose vellum for, I will glitter all the way around the edges. For layers underneath, I just tend to add glitter right at the sides where it will be seen most. You can see the difference between images in step 2 and step 3.
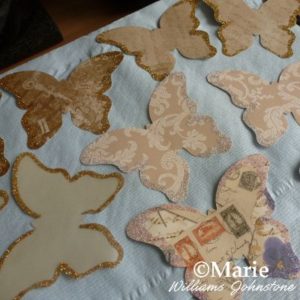
4.Leave all your pieces of paper to dry. This should not take very long with a Zig glue pen. I spread them out onto sheets of paper or a tray in case of stray glitter.
5.Choose a piece for your bottom layer as this needs the antennae stuck to it. For the antennae (or stalks as my daughter calls them) I use a hemp twine which works well with the vintage or antiqued styling. If you’re working with stronger colors, you can get colored cords instead. Cut off two same sized pieces, run some strong adhesive down the middle of the butterfly (I prefer a glue gun for this as it sticks pretty instantly) and stick in the ends of the cord or twine – be careful of hot glue if using a glue gun!
6.Now add on the rest of your layers for the piece. I use 4 altogether with vellum as the top layer. To add them, run a strip of glue or adhesive down the middle of the butterfly and stick the next piece down making sure it lines up with the previous layer.
7.When all layers are in place, go back to your glue pen or Zig pen and add this over the middle area between the wings. Now sprinkle over your choice of glitter. If you have a dark brown or black, this can look quite dramatic. Once dry, carefully push up each layer of wings using your fingers underneath to push them up and out. You can see how beautiful the finished versions can look with a large image further down this page. I hope you’ve enjoyed reading my lens or article today, thanks for your visit. Don’t be afraid to change up the color scheme and use colors and patterns to match with the occasion. And have fun.
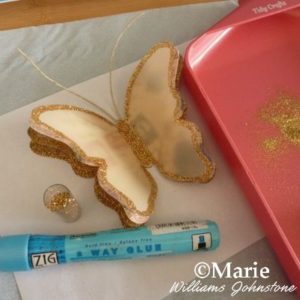
Tidy Tray Keeps Powder from Going Astray
Glitter powders are gorgeous on handmade crafts but you don’t want to get them anywhere else because they are a real pain to shift. When using these powders, I work over a tidy tray which catches all the excess powder as I work. When done, I use a brush to push the powder through the hole on one side of the tray and back into the glitter jar. If you pop a piece of paper under the jar and any powder misses the jar on its way back, you can pinch one end of the paper to a point and pour the rest in.
Extra Fine Glitters for Gorgeous Shimmer
But You’ll Really Need a Tidy Tray to Contain Them
Most of the time, I opt to use Stickles glitter glue because these little wet glue bottles are great at adding bits of sparkle to handmade projects. However, wet glitter glue when added in big and concentrated amounts, just like in this project all around the edges of the wings, can cause paper to wrinkle and buckle. Extra fine powder glitters are premium glitters and the absolute BEST I’ve ever come across for adding in a real shine and sparkle. They are worth using for special cards, gifts and projects like special celebration birthdays, weddings and where you need to make a real impact.
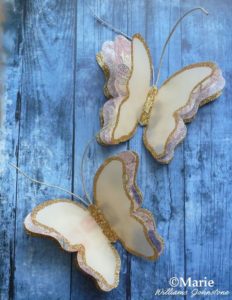
Some Finished Fluttering Embellishments
The Extra Fine Glitter Really Sparkles and Shines Beautifully
Layered vintage style paper and sheer vellum paper butterflies with gorgeous glitter edges.
Butterfly Punches and Dies
Great Option if You Don’t Want to Hand Cut
If you’re not keen on paper cutting or you’d prefer a machine to do the work for you, there are options to use paper punches or die cutters for popular machines like the Sizzix. Bear in mind that, even with large punches, your cut shapes are still going to be quite small – the biggest I have found are around 2 inches. Cutting machines can go larger than hand punches. If size is a real issue then cutting your own may be the best option.
How to Build a Puppet Theater Out of a Cardboard Box
How do you make a puppet theater that is inexpensive and simple to make and use?
It’s quite easy to craft a simple stage in which your puppets can perform. All you need is a large cardboard box or appliance box, utility knife, paint, glue,and fabric.
Children will need the supervision of an adult for this project.
Transforming a box into a puppet stage
Table top puppet stage in processIt’s easy and inexpensive to build a puppet stage. This one was made out of a large cardboard computer box. It folds up and it’s light and easy to carry. This one was designed to sit on a table. If you want a taller, free-standing one, use an appliance box. Refrigerator boxes make wonderful puppet stages.
Just cut out the top, the bottom and the back of the box, leaving the front section and two sides. If you don’t need a stage that folds up, leave the bottom in as it will add stability. If you need to cut the bottom out so it will fold, you can glue wood strips or molding on for stability and weight so the stage won’t fall over easily.
Cut a square or rectangular opening in the front of the box, closer to the top of the stage than the bottom. Add a prop shelf if you like. Attach a fabric backdrop curtain about ten inches behind the front of the stage opening.
Make two small holes in the upper part of the stage and fit a dowel rod through the holes, like a curtain rod.
Make sure the curtain fabric is lightweight so you can see through it as you sit behind it. You will need to be able to see what the puppets are doing. If desired, you can put a clip-on reading light on the top of the stage. This makes your little actors more visible and makes it difficult for the audience to see the puppeteer.
Decorate your stage with paint or fabric.
Hint: Tacky glue, available at craft stores, is the best kind of glue for a project such as this. It adheres well to fabric and is very strong.
Have a great show!
Make a Cardboard Puppet Theater
Tom Knight gives excellent instructions for building a puppet theater out of a cardboard box.
Cute Puppet Theater
If you go to Google Images, you can find hundreds of ideas for puppet stages. Just enter “puppet theaters” or “puppet stages”
Here is a lovely example of a beautifully decorated home made puppet theater.
Many of the images come from websites with directions for building the stage.
Photo from Google Images
Puppet StagesYou Can Buy
If you don’t have the time or inclination to build a stage, you can buy one!
Build a Puppet Theater
Books on making Puppet Theaters and other cardboard projects that may be adapted for stages or theaters. A castle, for example, makes a great stage for fairy tales.
Decorate Your Puppet Stage with Wall Decals
You can add some decorations to your puppet theater – not too many so that it distracts from the action, but just enough to make it interesting.
Theater is one of the most exciting and most educational projects you can to do with kids.
Developmentally, it’s hard to top theater. Drama can teach word skills like reading, writing, imaginative composition (fiction they call it, or drama), plus a feeling for the spoken music of words and poetry. Not to mention a smattering of history and literature.
Socially, drama teaches both cooperation AND independence, recognizing and dealing with emotions, empathy, plus the practical skill of speaking in front of an audience. Public speaking is a skill many adults wish we had developed. Music. Dance. Magic tricks. Almost any skill or interest can find a home onstage. There’s a whole branch of theater called improvisation: always useful to learn how to think on your feet. And as children get more involved in what’s called “technical theater” – all the props, costumes, sets, lights, sound etc. – math skills, visual and spacial skills, and handicrafts all come into play. Plus innovation. There’s a LOT of problem-solving in theater.
There’s also a great deal of comradery and joy.
Start small and easy: goof around with puppets, make masks, recite a poem, act out the Three Bears – – – Have fun onstage.
The picture? A set from a children’s production of “Charlie and the Chocolate Factory.” Since I happen to have an abundance of factory-themed children’s sets to decorate this Lens, let’s think of it as a big Drama-Fun Factory! I’ll point out some of the gears and levers that will help you make your own at-home theater. It’s also a factory-in-progress (as all my Lenses are), so please visit again to see what new gears have been added.
Puppet Theater
Always popular with kids
There is something fascinating about puppets. They combine the make-believe and miniature joy of dolls with the expression and story-telling of people – while, best of all, shy performers can hide behind them like a mask. (More on masks later.) Any child can say more, a lot more freely when using a puppet. (As psychologists know.) Puppets are freedom and wild improvisation.
It’s most fun to build your own puppets and puppet theaters, but store-boughten is fun too.
Do It Yourself Puppets
Punch. Where’s Judy? PAPER BAG PUPPETS – Maybe the simplest puppet is the paper bag puppet. Take a plain brown lunch bag and have your child draw the puppet’s eyes and nose on the bottom, so that the fold (where the bottom folds flat) becomes the inside of the puppet’s mouth. Colored markers or poster paint (not too wet!) will look bolder and more effective than crayons or pencils. Adding cut paper elements will make the puppet more exciting: a red construction paper tongue for a snake maybe or great big ol’ cow licks; the cow’s horns or moose antlers; arms and hands; or perhaps a silly mustache or paper wig. Scraps of fabric or fur can be fun. Anything, really. Go to the movies and watch the crazy puppets in the Fandango ads.
Now, how about adding a huge grocery store bag puppet to play the giant?
SOCK PUPPETS – Just as easy to make if you’re up for a little simple sewing: buttons for eyes, scraps of fabric for tongues, ears, hands; wool for hair.
GLOVE PUPPETS – One woolly glove becomes a quintet of actors. Or cut the fingers off (roll-hem the cut edges) and create five separate prima donnas. You could experiment with wool versus cotton versus rubber glove fingers (rubber for aliens maybe? add little teeny antenae) or roll your own finger tubes from any fabric or even stiff paper.
POPSICLE STICK PUPPETS – Almost any picture can be either printed onto stiff card-stock paper or mounted onto cardboard and glued to a popsicle stick. I suggest either adult-applied spray mount (flattest most permanent) or child-applied glue stick for the picture to cardboard gluing, then white glue like Elmers or hot glue (adult again or old enough child) for the picture to stick attachment. Try cutting out arms or heads separately and attaching these to the puppet’s body with old fashioned brass brads so you can change their poses. Suddenly they can emote!
OTHER “STICK” PUPPETS – As with popsicle sticks, almost any stick-like object can turn into a puppet. Try decorating wooden spoons or toilet paper tubes (which make finger puppets). Or how about – new! clean! – toilet plungers? Or spatulas or decorated pencils or pool noodles with drawn-on permanent marker faces?
SHADOW PUPPETS – These can be cut out cardboard shapes very similar to popsicle stick puppets. They needn’t be decorated with color unless you want to, but “decorations” made by cutting holes can be fun. Bring out the hole punch! I imagine you might be able to cut out small areas and then fill these with colored tissue paper or translucent plastic for a stained glass effect. Obviously you’ll need a shadow screen – stretched white fabric or paper – and a strong light to make these work.
MARIONETTES – These are more complicated puppets, but all you absolutely need are two flat sticks fixed together in an X with strings from the four ends that tie to the puppet’s arms, head, and legs or rear (whichever is funnier). The “puppet” could be any loose jointed doll – made of cloth or wood or cardboard tubes.
For older kids with advanced skills and a LOT of patience – and an interest in video – you could try making your own short film. Film puppets in action! (Watch a Muppet movie. Like that.)
Or if VERY patient and motivated, try making clay “puppets” to shot-by-shot act out a brief Claymation film. (Watch a Wallace and Grommet movie to see how masters do this!) But this stop motion filming technique is only for the extremely motivated and patient!
Puppet Videos
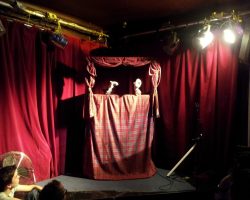
Scottish Falsetto Sock Puppet Theatre – Romeo and Juliet Part I
Rated PG – Extra Silly
Meant for older kids as it gets a bit, slightly, um, vulgar as the Bard and Scottish Sock Puppets are so apt to do. Make a nice antidote to classroom reading of this classic! The other vids are suitable for younger children.
Masks
Using and making masks for children
Poof! You’re someone (or something) else. Masks seem magical – a natural development of the baby’s game of peekaboo.
Masks can be made from almost any material: a paper grocery bag; a paper plate plus string; cut cardboard, felt, or craft foam plus elastic; paper mache (lots of goopy fun); or, if you’re ambitious, leather etc.; or there are lots of mask kits, where you start with a pre-formed face shape and decorate and add to it.
PAPER MACHE – Amazingly cheap and simple, though time consuming. Tear or cut newspaper into strips, the thinner, the more detailed you can get. Mix flour and water to make a thick paste, soak the paper in this till sticky but not soggy, then slowly build up your shape. It’s easier if you have a shape to lay the strips over. A kid’s-face-sized balloon can work or a plastic mask. You can add in cardboard to reinforce protruding pieces like ears or tusks – make sure these are well integrated into the face proper so they won’t rip off easily. Allow several days for the paper mache to dry before trying to paint or decorate it.


 Layered vintage style paper and sheer vellum paper
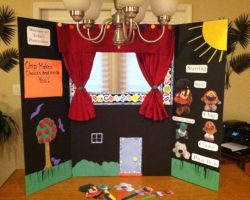