If you’re looking for a night out that’ll leave you feeling energized, excited and entertained, Night Nation Run is the event for you! With its variety of events, costumes and nightlife, this event is sure to keep you entertained all night long.
Night Nation Run is an annual running event that takes place on Saturday nights in downtown Minneapolis. The event features a variety of races, including the half marathon and 10K.
The event begins at 6 p.m. and runs all night. It’s a great opportunity to run in the city, see friends, and have some fun.
There are a variety of prizes available at Night Nation Run, including cash, prizes, and badges. There is also a food concession area where you can purchase food and drinks.
There is parking available in the event center, and there are ample transportation options available.
There isn’t one night that goes by without a party happening at Night Nation Run. Whether it’s a night of music, drinks, and fun, Nights at Night Nation Run always has something for everyone. Our events are always Something for Everyone!
If you’re looking for a way to get some great night nation run products for a fraction of the price, then you’ll want to check out night nation run promo codes. Whether you are looking for a percentage off your purchase, free shipping, or a free gift with purchase, they have a code that will help you save.
Perfect opportunity to make new friends
At Night Nation Run, we want you to feel like the only one in the room. So whether you’re looking for a night of fun, or a night to catch up with old friends, we’ve got you covered.
We believe that making new friends is one of the most important things you can do, so we offer a wide variety of events so you can meet people from all over the city. Whether you’re looking for a night to drinks and Dance the night away, or just to chat and have some fun, Night Nation Run has you covered.
Night Nation Run is a running event that takes place annually in the city of Detroit. The event is a fundraiser for the city’s social services department. The event features a variety of races and activities that allow runners of all levels to experience the city and its nightlife.
The event is a two-day event that starts on Saturday and ends on Sunday. The event features a variety of races and activities that allow runners of all levels to experience the city and its nightlife. The races include the 5K, 10K, and 15K races. The event also includes a variety of activities such as a night market, live music, and food.
The event is open to both men and women. The event is a great opportunity to run in the city and have some fun. The event is also a great opportunity to meet new people and make some new friends. The event is a great opportunity to raise money for the city’s social services department.
Night Nation Run is a running event that is sure to leave you feeling energized and inspired. This event is designed for people of all ages and abilities, and it is sure to leave you feeling like you can conquer any obstacle in your path.
At Night Nation Run, you will have the opportunity to run around the track and obstacle course, as well as to participate in a number of other activities. This event is sure to leave you feeling motivated and inspired, and you will be sure to leave feeling like you have accomplished something great.
Night Nation is a running event that pits runners against each other in a variety of races. This year’s event will have a variety of obstacles and challenges to keep runners on their toes.
One of the most popular races in the event is the men’s half marathon. The race starts and ends at the same spot, making it a great opportunity to test your stamina.
The women’s half marathon is also a popular race. It’s a shorter race, but it’s also a challenging one. The course is also wide, making it easy to navigate.
The final race of the night is the 5k race. This race is a great opportunity to test your endurance. The race is also a great workout, and it’s a great way to end the night.
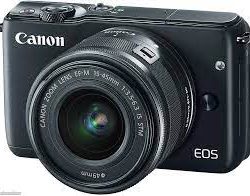
Canon has not chosen to make significant investments in the mirrorless interchangeable lens camera (ILC) market, sticking with focusing on its very popular DSLR camera models. But Canon isn’t completely abandoning the mirrorless market either, as shown by its recent release of the Canon M10. It’s very much a beginner-level mirrorless camera, as shown in this Canon EOS M10 review, and, as such, it has some drawbacks.
But the M10 fits in pretty well against other cameras that have a similar price point, as well as against other entry-level mirrorless ILCs. It’s one of the least expensive mirrorless cameras on the market, even after you purchase a lens or two. (Keep in mind that you cannot use the same lenses for Canon DSLR cameras as you can for Canon mirrorless models.)
With some of this camera’s drawbacks, I’d almost be tempted to go with an entry-level Canon Rebel DSLR model over this one, as the basic DSLRs are only slightly more expensive than the M10.
Rebel DSLRs have been around for decades, and provide strong performance levels and image quality. The M10’s biggest benefit versus those entry-level Rebels is its thin size of just 1.38 inches without the lens attached. Otherwise, Canon’s Rebels will provide a better experience for most photographers over the M10.
Specifications
Resolution: 18 megapixels
Optical zoom: NA, uses interchangeable lenses
LCD: 3.0-inch, 1,040,000 pixels (touch and tilt enabled)
Maximum image size: 5184 x 3456 pixels
Battery: Rechargeable Li-Ion
Dimensions: 4.25 x 2.62 x 1.38 inches
Weight: 10.6 ounces (including battery and memory card)
Image sensor: APS-C (22.3×14.9 mm)
Movie mode: HD 1080p
Pros
Low price for a mirrorless camera
Image quality is a bit above average versus other cameras in this price range
LCD screen is sharp and offers tilt and touch capabilities
Camera is easier to use than most interchangeable lens models
Movie recording is easy and full HD movies look great
Cons
Viewfinder is not included
No hot shoe for adding components
Camera’s image quality at high ISO settings is poor
Battery life isn’t as good as it should be, especially if you choose to use camera’s Wi-Fi
Shutter lag is a problem in some shooting situations
Image Quality
The Canon EOS M10 does a nice job with image quality versus other entry-level mirrorless cameras and versus other models in its price range. The M10’s images aren’t significantly better than its competitors, but they are above average. Personally, I like the image quality of Rebel DSLRs a little better than what’s found with the M10, but there isn’t a huge difference.
The Canon M10 does a nice job with indoor photography, nearly equal to its performance with outdoor photography in sunlight. This isn’t always the case with mirrorless cameras. The M10’s 18 megapixels of resolution and its APS-C sized image sensor allow for the good performance indoors.
However, the good indoor performance doesn’t continue if you’re shooting at a high ISO setting. Once you hit the midpoint of the M10’s ISO range — say around ISO 1600 — you’ll start to notice significant noise in the images, High ISO settings are not really usable with this camera. I’d suggest using the built-in flash unit wherever possible, rather than increasing the ISO past 800.
Performance
The Canon M10’s performance levels are impressive, as Canon gave this camera its DIGIC 6 image processor, which leads to some fast operational aspects. You can shoot between four and five frames per second in burst mode, which is a solid performance for a mirrorless camera.
But I was a bit disappointed in the M10’s shutter lag, which can approach half a second in some shooting conditions where you’re unable to prefocus by holding down the shutter button halfway. At some point, you will miss some spontaneous photos because of this shutter lag issue. It certainly isn’t the type of shutter lag problem you’d experience with a basic point and shoot camera, but it is more noticeable than what you’d find with a Rebel DSLR.
Battery performance with this model is a bit below average, which is a disappointment. However, this is a common problem with thin mirrorless ILCs, as they must have a thin battery to fit the overall design of the camera. Just understand that if you choose to use the M10’s built-in Wi-Fi capabilities, the poor battery lifespan problem will be magnified.
Design
The thin camera body found with the Canon M10 gives it an advantage over the Rebel DSLRs. No DSLR can match the EOS M10’s 1.38-inch thickness measurement.
Although you can use the M10 one-handed, it’s a little difficult to hold this camera with one hand because it has no right-hand grip area. The front of the camera body is smooth, so you have to try to hold it more like a point and shoot camera with a pinching grip, which can be difficult because of the way the lens protrudes from the camera body. It’s just easier to hold the camera with two hands.
Canon gave the EOS M10 tiltable and touch screen capabilities, which is great to find on a camera that’s aimed at inexperienced photographers. The camera also has very few buttons and dials, meaning you’ll be using the screen the majority of time to make changes to the settings, so having touch capabilities makes this model easy to use.
The build quality for the EOS M10 is very solid. There’s no loose parts or flimsy aspects to this Canon model.
One question I get asked again and again is, ‘What is the best graphics tablet?’ as I’m a digital artist, it seems only natural to ask me.
It’s easy to understand why this is perhaps the most frequently asked question to not just me, but every digital artist. The reason for this is because graphic tablets are a unique and confusing technology!
So, the first step to finding the right graphics tablet for you is to understand the technology that’s being offered!
Thank you to Nekoni for her thoughts as an artist on graphics tablets.
First I’ll explain the words that are used
Then look further down, to find out about sizes.
At the end, I’ve recommended the best tablets, in my opinion, depending on various types of artwork.
Important!
What is a graphics tablet?
The graphics tablet (or ‘digital design tablet’) is an input device (like a mouse, or keyboard) which acts like a giant and highly accurate touchpad, controlled by a stylus (digital pen). It allows artists to draw directly into their graphics programs on PCs, Macs and Laptops.
What can one do?
TRON – speedpainting by SaZo
Pen-specific technobabble:
The language that is used by graphics tablets sellers is very confusing.
Here is a list of the most popular phrases used in relation to the graphics tablet pens and what they actually mean!
“stylus”
The term specific for digital input pens used with graphics-tablets and other hardware. It’s not always used, but is the actual term. (imagine if you were told your new ipad came with a free ‘pen’? Why would you want a pen? Now imagine you were told it came with a free ‘stylus’? Awesome!) “ergonomic pen” “grip pen” “easy to hold pen”
Almost all graphic tablets today come with a comfortable, easy to use variety of stylus (the exact shape and features vary). These don’t affect the quality of your digital artwork, but they do affect how comfortable you are while using them, and there’s no ‘right’ choice. “cord/cable/wired stylus”
Refers to a stylus that is attached to its tablet by a cable. The stylus is therefore slim and light. It’s pretty rare today, as wireless is the standard for most models. “battery operated stylus”
Sends a signal from the pen to your tablet. The stylus needs to be large enough to contain a AAA battery, but is shaped in a way so that it’s narrower at the point at which you hold it. “battery-less stylus”
The tablet powers the stylus via electro-magnetic resonation, which means these styluses are slimmer and lighter than the battery powered alternatives. “tilt sensitivity”, “tiltability” “rotation””tilt recognition”
What most artists are looking for when they chose a stylus with one of these descriptions is a stylus which has a sense of ‘right way up’ and ‘upside-down’ so that it can make more complex digital brush strokes (this is a great feature, especially for painters!). But these terms also may simply mean that the stylus still works when you’re holding it at an angle, (and I’ve never found a stylus that doesn’t). For this stylus it’s best to rely on reviews, as less scrupulous retailers and second-hand sellers who don’t understand the terms can easily use the wrong term, and lead you to disappointment if you don’t know what you’re buying. “levels of pressure sensitivity”
The range of pressure sensitivity starts at 256 levels of pressure, and reaches 3000. 1024 levels of pressure can be registered by most graphics programs, and only the newest and more advanced programs can register anything higher. Levels of pressure sensitivity literally explains how sensitive your pen is, the more sensitive pens will be able to tell the difference between different pressures, but this will only be shown to have an effect if you’re using extremely large brush sizes (upwards of 1000 pixels, in the latest software), or, in some cases, very light pressure (the quality of the pen’s nib and the drawing surface can effect the pressure you need to apply just as much). I suggest 256 and 512 for the beginner or sketcher, 1024 for the student or professional artist, and 2048 or above for the super-professional or any artist who uses a tablet for poster-sized art-work. “Interchangeable right and left-handed pen”
This is one of those marketing oddities, I assume the companies must say this in order to assure left-handed individuals that they too can use graphics tablets… though I’ve yet to find any evidence of a left-handed pen having ever existed.
Tablet-specific technobabble:
So now you know what they’re saying about the pens… how about the tablet themselves.
The tablets are all important and have their own range of specialist phrases.
Here’s a list of the phrases and their meanings.
“programmable hotlinks/ buttons/ scrollers / wheels?”
Most artists find the wheels/scrollers to be useful for controlling the zoom in graphics programs, and for rotating canvas in those that allow it. But neither they nor programmable hotlinks are a actually a required function on any tablet, they’re more of an extra feature that you can use, if you like, to save time. “lines per inch” or “accuracy”
Much like dpi or dots per inch, this is the sensitivity of your graphics tablet and how accurately it recognizes the location of your pen. Unfortunately, not only is this rarely mentioned, but the effect this number has also changes depending on your computer’s settings, and the size of the tablet itself. The end result is that the pen does not follow the path you draw exactly, or makes your lines jagged. The way to avoid this is to read customer reviews, even if a number is given, and bear in mind that the cheapest of these tablets usually come with this disadvantage. For the beginner, or casual artist, or someone who does not intend to use their tablet for fine art, this isn’t much of a problem. It can usually be compensated by working zoomed in, but that has the disadvantage of letting you see less of your artwork at once, and takes longer to draw the same lines. “work area/ live area”
Pay attention to this, a graphics tablet will be described as 10 by 15 inches, but the actual numbers you need to actually pay attention to those of the ‘work’ or ‘live’ areas, the space on which you can draw, which measure much less- say 5 by 8 inches. These numbers are possibly the most important thing when it comes to buying a tablet! What you need to look for is a graphics tablet that matches the size and ratio of your screen as much as possible.
What happens when you buy a tablet that is much smaller than your screen?
It’s very simple, when you draw in real life, say, on a piece of paper, you draw to a scale of 1:1. The motions you make with your hand equal the size of lines you end up with on paper exactly. When you draw on a graphic tablet, these sizes never match completely, but it’s best to get as close to reality as you can.
An example of a size mismatch:
Here is a small tablet and a large screen. You can see the actual line which is input into a tablet, then the line that comes up on screen.
imput: what is drawn in real life. result A mismatched size also has the disadvantage of being less sensitive.
If your tablet is half the size of another tablet, but only has the same level of sensitivity, your small tablet is only half as sensitive. Then add to that the fact your hand is only so accurate, and you are in effect trying to draw, really, really tiny.
If you’ve ever tried to draw a nice picture, but really, really tiny, then you can see the obvious flaw with that. There’s a limit to just how accurately you can control your hands.
There are ways to compensate for a small tablet, as you can simply zoom in until the size matches, or you can set your tablet to only represent a smaller part of your screen.
However, drawing on a smaller part of your screen has obvious flaws…andjust like with a tablet with low accuracy, drawing while zoomed in isn’t a flawless solutution either.
As well as being unable to see what you’re doing in relation to the rest of your artwork, or being unable to edit it quickly, you will end up taking slightly longer and each and every line. Proffesional artists should try to avoid this.
My own screen is actually 18 by 12 inches, and the tablet is smaller (around 12 by 7.5 inches of work area) but it is a much closer match and easier to draw with than my other tablet, which only has 5 x 3.5 inches of work area.
Another thing to take into account is screen ratio. I have a widescreen monitor. And so, I have a widescreen tablet.
Some tablets allow you to set a ratio for you to use, but remember, they can not ‘expand’ the work area outwards if you need a wider area to match your screen; they can only narrow it, vertically. If you anticipate keeping your screen for a long time, and it’s an unusual shape, try and buy accordingly.
Find easy acrylic painting projects. It has great ideas and acrylic painting projects and access to other painting projects too. Discover the joy of painting in acrylic and explore this great medium with these projects.
Finding an Easy Acrylic Painting Project
Finding things to paint can be a trial sometimes. But it need not be. There are things to paint all around. For instance did you know that Vincent van Gogh spent months and months painting nothing but flowers. It doesn’t matter that he used oils it was the dedication to finding a subject no matter how difficult the task.
Often us painters cannot see what to paint, we are too busy looking for that amazing landscape or capturing rare lighting which is all great. But in doing so we miss the little things. We forget that it is the beauty in what we see and paint that makes it amazing.
Below are projects for you to try. Depending on where you are in the world will depend on when and if you have winter, summer or seasons or monsoons. But there is no reason why you cannot adapt each project for your own needs. OK here goes.
Find Great Acrylic Painting Projects on Amazon
Finding great acrylic painting projects is a great idea as it expands your learning and techniques and gives you plenty of ideas. Below are some project ideas for your acrylic painting
Easy Acrylic Painting Project 1
Project 1
For this project we are going back to basics. For those of you who haven’t done any color mixing start here.
Watch this video on basic color mixing as you will need to be able to mix colors for future projects.
Then practice until you can confidently get most of the basic colors.
Orange
Green
Purple etc
Easy Acrylic painting project 2
painting project Two
Van Gogh may not be to everyone’s taste, however his work was based on feeling and color. If you are a beginner without much experience it is important for you to get the feel of the paint, how it works, how quickly it dries and what it looks like. The best way to do this is to play.
To do this project we are stepping into Van Gogh shoes. We are aiming not for an artistically correct piece, but one with color and feeling. Using your new found color mixing skills from project one we are going to create a simple painting.
1. Pick a subject that you love. Make sure it is fairly simple to do. Try to keep it natural. Flowers in a bottle or vase would be great, your favorite part of a garden, a cliff a tree etc. If you think a vase is too much keep it to one flower. Painting outside can be a challenge so only do this if you feel comfortable. Remember this isn’t about making a perfect picture but playing with color. do not paint from a picture or photo from other artists.
2. Gather together all your art colors and canvases and brushes.
3. Spend time looking at your image. Break your image down into both color and light.
4. Just paint the very basic shapes and basic colors. Don’t worry about detail just the overall image.
5. Make sure your colors are over vibrant and your paint thick. Keep your brushes larger to prevent fussiness.
This is a lovely painting to do, it reminds me much of the Bob Ross style which is well known for bringing art to everyone. So challenge yourself to get out those brushes and explore the colors of winter!
Easy Painting Project 4 – A Simple Landscape
Project 4
This is a beautiful little painting to do. Not only is it a project but it also teaches you techniques all done by a 3 hour video tuition after which you should have some useful knowledge to apply to any local landscape painting you might fancy doing.
Project 5 – Fun Cave Horse Painting
This Comes With a Popularity Warning
One of my favorite projects was one I didn’t think I would enjoy but it was really fun. This is the cave horse painting. This is a beginners project however lots of people af all skill levels love to do this one. You recreate the stone walls by building up the paint much as you would for any other painting though it is designed to look really messy! The cave horse is painted much as the cave men would have done and he looks fats and dumpy.
Cave horse and other cave animal pictures are on the open domain if you want to get one.
WARNING: Very Popular. I didn’t think anyone would like a picture of a cave horse, but have found that it is very popular. My sister napped mine when my tiny house got crowded with art. Then my other sister wanted one too and I have to repaint one for me! So be warned you might have to do more than one! It isn’t a problem it is fun to do and can be done quite quickly.
Lots of Painting Projects for the Beginner to Advanced Painter
This is absolutely amazing! I came across this site while searching for inspiration and wow did they give it. This site has to be the best and most comprehensive site for art courses on the net. If you don’t agree and have found another one feel free to pop it on the comments as I am always in search of the best information and ideas out there. But I think this will be very hard to beat!
This is definitely the site by artists for artists of all levels and skills. These guys cover everything from easy acrylic painting projects like the one above right through to the more complicated projects and courses. If in doubt they do a free course and a free magazine just to get you started – these should keep you occupied for a while. However if you want to plunge right in there are some great courses and they start at low prices or you can buy modules.
 market, sticking with focusing on its very popular DSLR camera models. But…)