Which Microphones Should You Invest In?

Which Microphones Should You Invest In?

Almost everyone likes to capture the moment. Parents like to capture their children from newborn until they are adults because it is a precious moment that they will not return. Moments can be well preserved into a beautiful memory with today’s digital equipment such as smartphones or video cameras.

Video images can be exciting, dramatic, beautiful, or shocking, but the image is only a part of the picture, so to speak. Good, clean audio can make or break a production. Background noise, hiss, muffled vocals, distortion or other factors can all make a good video bad.

We all know that audio is captured through a microphone, but without going so far as to hire a sound engineer to join us on shoots, what can we add to our setup to ensure decent audio quality?

Let’s take a quick walk through some of the basic microphone types, and why we might want to use them.

Built-In Camera Microphone

This is probably the least desirable of the options, and video pros and enthusiasts alike will talk down about the relative merits or drawbacks of the built-in microphone, but listen to yourself on this one. While the audio quality is not going to be great with a built in microphone, it might be all you need. Filming your kid’s soccer game? Taking a camera along on an evening stroll? It’s important to assess the application of the final video to determine what’s worth bringing along. If you’re doing something where the final video doesn’t need great audio, and the time and hassle of attaching an external device will take away from the moment, just toss a camera in your bag and be done with it.

Of course, if a bit of nicer audio is going to make a difference, maybe you’d consider bringing along a simple…
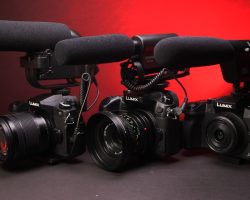
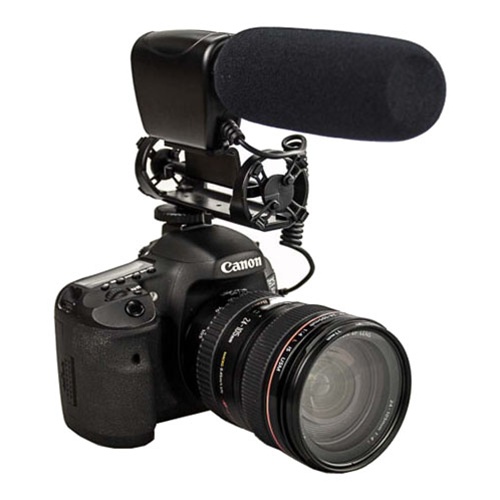
Shotgun Microphone

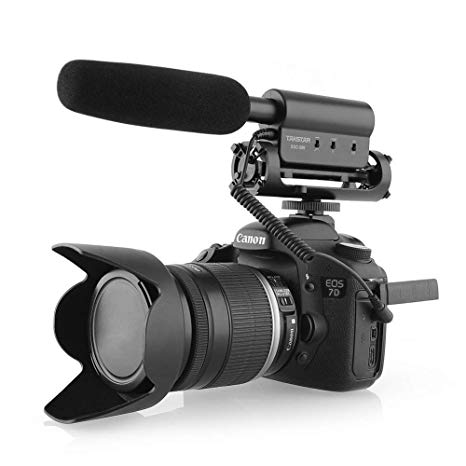
Sitting atop of the camera is the proud shotgun microphone.Highly directional, a sensitive shotgun microphone should make a substantial improvement over the camera’s built in mic. This said, a shotgun will generally be a fair distance from a subject, so be thoughtful of the mic’s capabilities as they relate to the project at hand. If you’re shooting an interview, you’ll want to get close enough to make the speaker’s voice the dominant sound by a large margin. If you’re filming the soccer game, you needn’t worry as such.

Shotgun mic’s come in a variety of shapes and sizes, with prices ranging from around the cost of a case of beer, all the way through the stratosphere. Most camera stores will let you test out a couple of them to see how they work on your camera, but YouTube will be your true friend in this case. Head there to hear the results others have captured using various shotgun microphones.

Boom Microphone

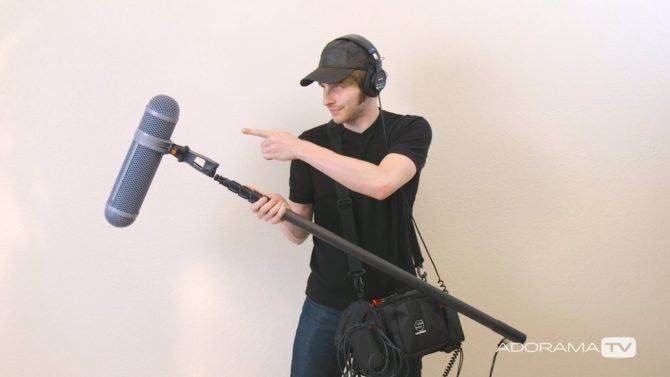
Like the shotgun mic, the boom microphone is a directional microphone designed to work better than your camera’s internal microphone. Mounted at the end of a long pole, the boom mic will either be placed on a stationary stand or moved to accommodate a scene by a special operator.

The real benefit of a boom mic is that it can be positioned to capture excellent audio from a close proximity to the subject. No wires or devices will be visible on camera. This is a bonus.

Of course, closer is better, and nothing gets closer than a…

Lavaliere Microphone

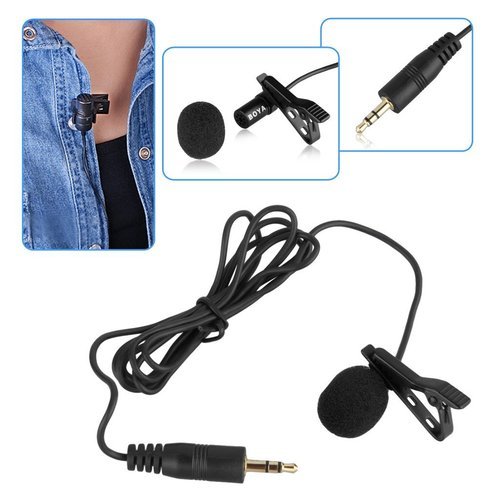
A lavaliere, lapel or lav microphone is a versatile microphone designed to clip to a subject’s lapel, shirt or other garment. The idea is that a lav mic can be hidden, and it will sit closely to a subject’s mouth, delivering clear, crisp vocal audio.

There are wired and wireless models on the market now, with options at nearly any price point. The value of owning a wireless lav mic is proven every time you want to put a subject in front of the lens. The difference in audio between this and other options is clear, and the ability to achieve clean audio without the assistance of a boom operator is a true plus.

An In expensive Display Board For A Leisure Painter’s Group

An In expensive Display Board For A Leisure Painter’s Group

Why Does An Art Group Need Display Boards.

Do you belong to an art group looking for inexpensive and usable exhibition venues?
Have you thought about making your own display boards to help ease your problems with hanging paintings or craft pieces?
Your own display board can really help to solve the problem of where, and how, a group can hold exhibitions. The greater the choice of venue, the more choice there is for dates and arranging things becomes so much easier. This in turn can lead to saving money, important but especially so for a small group of leisure painters.

The Knowle Art Group is just such a group, we had been running into difficulties deciding where to hold our exhibitions.
The usual local libraries, etc, were getting to be too expensive. The less expensive halls to hire usually meant that there was no where to hang our paintings. They did not cater for groups like ours, wanting to hold an art exhibition. It was possible to hire display boards but again the cost was prohibitive.

The solution was going to be do-it-yourself display boards which we could stand on available tables. The idea came to us after exhibiting in an old Manor House where of course we couldn’t knock anything into the walls and the combined cost renting the room and hiring display boards was too much for us. The original idea was to construct a framework out of rough wooden poles. It worked well in the ancient property but couldn’t be used in other locations. After some thought the idea behind the display boards was arrived at. here is how the boards were made.

The Basic Idea

For Our Display Boards

The display boards were to be used by standing them on tables, which are always available at any hall or room for hire. This meant that they did not have to be large ( heavy and expensive) and waste the bottom two thirds of the available area. the tables could be covered with paper banqueting roll to give a professional appearance. We have since made some white table cloths as one of our members is a seamstress and this gets over the problem of the paper ripping at the slightest provocation.

The idea was quite simple, a board with two hinged side panels would be used to increase the available area for hanging the paintings. In other words we got 50 % extra space compared to the length of the tables. This also had the benefit of giving us a stable configuration. The board was held in place by slotting into two wooden battens ( runners) which were provided with carefully placed slots. A final touch was to hold the rear of the board to the rear runner by using a single screw. This prevented the board from bowing out and again increased the stability.

The Display Boards Are Made From Three Simple Components

The Hinged Back And Two Battens
Here is a photo of the hinged back. The sides are half the width of the center portion so that when it is folded up they do not interfere with each other. Of course the board is stored and moved in the folded condition. The whole thing is painted white, which we felt was appropriate for an art exhibition.

This photo shows the two battens positioned roughly on the table, waiting for the board to be placed in the slots. The paintings around the wall are waiting to be hung. We always have a practice before the day we set up the exhibition so that we can arrange the paintings most efficiently and effectively. This photo was taken at one of these practice sessions which is why there is no tablecloth.

You can see the slots, in this detail photo. We did not have a jig for the ten boards that we made but simply placed the board on the battens and marked the position of the slots which was cut with a saw and widened with a file. The slots are cut about two thirds of the way into the batten to allow the small bolt at the rear to go through the board and through the batten.

The measurements of the boards were to suit , but I will be creating an outline sketch of the three components which will be added to the lens very shortly

A Few More Paintings Waiting Their Turn

This is the first step in arranging the paintings, we put out ten tables (one for each board) and roughly decide which paintings will go on which board. We tend to theme each board; water, mountains, figure, animals, boats,etc. Not really necessary but it gives a great show for the public.

Hanging The Paintings On The Boards

Another Little Secret, Sschhh!!
The way we hang paintnigs on the boards is quite simple. We use brass hooks over the top of the board which support brass chains. For larger paintings, a pair of hooks/chains makes a very stable combination.

Having roughly positioned the paintings on the tables, we can then carefully hang them on the display boards.

The paintings are of course numbered for the catalogue and this identification is used to position them easily on the morning of the actual exhibition opening. And voila, a very professional display at a very inexpensive rate. Once made the boards can be used year after year, with just a new coat of paint.

The Final Outcome

One of Our Exhibitions
Here you can see how the boards can be arranged, and how we also press into service our painting easels for the very large paintings or to get a few more paintings on show.

The Boards Used In A Different Configuration

We Found A New Venue This Year
A view of the hall from above…. showing the boards arranged to take advantage of the natural lighting in the new venue. They also ensure that the visitor has to walk back around the paintings to get a second to the exit which means they get a second look.