How To Clean Soap Scum Off Granite: What You Need To Know

How To Clean Soap Scum Off Granite: What You Need To Know

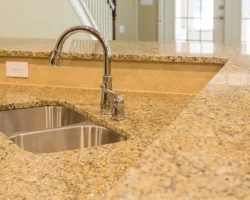
Granite is a popular material for bathroom countertops because it is durable and easy to care for. However, one downside of granite is that it is susceptible to soap scum. Soap scum is a film that forms on surfaces when soap and water mix together. This film can be difficult to remove, but it is important to clean it off of your granite countertop regularly to prevent it from buildup.

There are a few different ways that you can clean soap scum off of your granite countertop. One way is to use a commercial granite cleaner. These cleaners are designed to break down soap scum and make it easier to remove. You can also use a mixture of vinegar and water to clean your countertop. Simply mix equal parts vinegar and water in a spray bottle and spritz the solution onto the soap scum. Let it sit for a few minutes and then wipe it away with a damp cloth.

If you have stubborn soap scum, you may need to use a little elbow grease. Start by wetting a sponge with warm water and rubbing it over the soap scum. Then, use a soft cloth to buff the area dry. For tougher soap scum, you can try using a pumice stone. Wet the stone and rub it over the soap scum in a circular motion. Rinse the area well and dry it with a soft cloth.

No matter what method you use, it is important to be gentle when cleaning soap scum off of your granite countertop. Harsh scrubbing can damage the surface of the granite. If you are having trouble removing all of the soap scum, you may need to call a professional granite cleaner.

Granite is a popular choice for countertops, but it requires special care to keep it looking its best. Soap scum can build up on granite, making it look dull and dirty. But don’t worry, there’s an easy way to clean it off!

Here’s what you need to know about cleaning soap scum off granite:

1. Use a mild soap. Harsh cleaners can damage the granite.

2. Use a soft cloth or sponge. Abrasive scrubbers will scratch the surface.

3. Rinse well. Soap residue can leave a film on the granite.

4. Dry with a soft cloth.

5. Repeat as needed.

Now that you know how to clean soap scum off granite, you can keep your countertops looking beautiful for years to come!

How To Create 3D Nail Art

How To Create 3D Nail Art

Three-dimensional (3D) nail art is a type of nail decoration that adds depth and dimension to your nails. It can be achieved by using a variety of techniques, including layering, sculpting, and embossing. 3D nail art is a great way to add interest and drama to your nails, and it’s perfect for special occasions or simply when you want to stand out from the crowd.

If you’re new to 3D nail art, don’t worry – it’s not as difficult as it looks. With a little practice, you’ll be creating stunning 3D designs in no time. In this article, we’ll show you everything you need to know about 3D nail art, including how to choose the right products, how to create different 3D effects, and some top tips for perfect results.

What You Need

Before you start, you’ll need to gather together a few supplies. You’ll need a base coat and top coat of nail polish, as well as a color polish for your design. For the best results, choose a polish that is not too thick or too thin. You’ll also need some clear acrylic powder, a small brush, a dotting tool, and a toothpick.

If you’re planning on creating a lot of 3D designs, it’s worth investing in a few specialized tools, such as a 3D mold or a silicone mat. These can make it easier to create certain shapes and effects, but they’re not essential.

Creating a 3D Effect

There are lots of different ways to create a 3D effect on your nails. One of the simplest is to create a layered design using your chosen polishes. Start with a base color, then add a second color in a contrasting shade. Use a dotting tool or a toothpick to create dots or lines of the second color. Finally, use a dotting tool or your brush to slightly swirl the colors together.

If you want to add more dimension to your design, you can try sculpting with acrylic powder. Start by painting your nails with a base color and letting it dry completely. Next, use your dotting tool to apply a small amount of acrylic powder to your nails. Use a small brush to shape the powder into the desired design. You can create all sorts of shapes and effects, from flowers to geometric patterns.

Another way to add dimension to your nails is to emboss them. You’ll need a special embossing plate for this technique. Start by painting your nails with a base color and letting it dry completely. Place your embossing plate over your nail and use a dotting tool to apply polish to the plate. The polish will transfer onto your nail, and you can then use a brush to shape it into the desired design.

Top Tips

Here are a few top tips to help you get the best results from your 3D nail art:

-Start with clean, dry nails. Make sure your nails are free from any oils or residue, as this can interfere with the polish and cause it to chip.

-Take your time. Don’t try to rush your designs – the key to perfect 3D nail art is to take your time and be patient.

-Use a top coat. A top coat will help to protect your design and make it last longer.

-Be creative. There are no rules when it comes to 3D nail art, so let your imagination run wild!

With these simple tips, you’ll be creating beautiful 3D designs in no time.