How To Use An Ons Promo Code

How To Use An Ons Promo Code

There are a few things you need before you can start using your ons promo code. First, you need to create an account on our website. Second, you need to enter your promo code in the online form. Third, you need to click on the green “apply” button. Finally, you need to wait for your code to be sent to your inbox.

If you’re looking for a Ons.org coupon code, you’ve come to the right place! At Couponvario, they have a huge selection of coupons, promo codes and deals for Ons.org.

There are a few things you need to know in order to use an ons promo code.

  • Always enter the promo code into the “Promo Code” box on the ons website.
  • When you click on the “Apply” button, you will be taken to a page where you will need to enter your email address and other required information.
  • After you have submitted all of your information, you will be able to click on the “Apply” button and your code will be applied to your account.
  • If you have any questions or problems with using an ons promo code, please contact us at [email protected].

The best way to use an ons promo code is to use the code at the time of purchase. If you do not have a digital copy of your receipt, you can also look up the code on the ons website.

If you are using an ons promo code on a purchase made online, you will need to create a customer account and enter the promo code into the account settings. After your purchase is complete, go to the account settings and select the “My Orders” tab. under the “Order Details” tab, select “Receipts and Payments” and click on the “View My Order” link. Under the “Receipts and Payments” tab, click on the “Receipts” tab and copy the code that you used in the account settings.

If you are using an ons promo code on a purchase made in-store, you will need to present your proof of purchase to the cashier. After your purchase is complete, go to the “My Orders” tab and under the “Order Details” tab, select “Receipts and Payments” and click on the “View My Order” link. Under the “Receipts and Payments” tab, click on the “Receipts” tab and copy the code that you used in the account settings.

If you want to use an ons promo code, you first need to create an account on the site. Once you have an account, you can use the “Sign In” link to create a new account or sign in with an existing account.

After you sign in, you will see a new tab called  “Promo Codes.” This tab will have a list of all the ons promo codes that are currently active.

To use an ons promo code, you first need to find the code that you want to use. The code will be written in a small text box next to the code.

To use the code, you need to click on the code and then click on the “Use Code” button.

The code will then start to run. The code will expire in 10 minutes. If the code doesn’t work, you can always try again later.

An ons promo code is a code that can be used to purchase items from the ons online store. When using an ons promo code, you will be given a code that you can use at the time of purchase.

The code will be emailed to you and will need to be entered into the shopping cart during checkout. Once you have entered the code and clicked on the “buy” button, the store will start to process the purchase and you will be taken to a page where you can enter your shipping information.

Once the purchase has been processed, you will be redirected to the ons website and will see the “Your Order has been Shipped” message. If the order has not yet been shipped, you will see the “Your Order is Processing” message.

Once the order has been processed and the shipping information has been entered, you will be able to view the “Your Order Status” page. This page will show the status of the order as well as the amount of time it will take to process. The “Your Order Status” page will also show the ons promo code that you were given.

If the order has not yet been shipped, you will see the “Your Order is Processing” message. If the order has been processed and the shipping information has been entered, you will be able to view the “Your Order Status” page.

How To Use A Dietbet Promo Code To Lose Weight

How To Use A Dietbet Promo Code To Lose Weight

Dietbet is a website where you can find a variety of diet advice, foods to eat and how to lose weight. When you use a dietbet promo code, you can lose weight even faster.

To use a dietbet promo code, you must first create a dietbet account. After you create an account, you will be able to find a list of dietbet promo codes. You can use the promo code to discount your purchase of a food or product.

If you’re looking for a Dietbet coupon code, you’ve come to the right place! At Couponvario.com, they offer handpicked product deals, printable coupons, and promo codes from over 20,000 merchants, including Macy’s, Amazon.com, Best Buy, Travelocity, and thousands of other popular brands!

When you use a dietbet promo code, you are helping to help others lose weight. DIETbet is a website that provides a variety of diet advice, foods to eat and how to lose weight. With a dietbet promo code, you can help yourself lose weight quickly and easily.

So you’ve just migrated to Dietbet, and you’re feeling excited about the new opportunities that the platform has to offer. But you’re also confused about the basics of how to get the most out of your Dietbet promo code. Here are three tips to help get the most out of your Dietbet promo code:

Review the terms and conditions of Dietbet before signing up. This will help you understand the terms of the promotion and how it applies to your specific situation.

Use the promo code sparingly. Don’t use it more than once per day, or you’ll run out of time.

Be sure to use the correct Dietbet promo code. If you don’t have a code, you can create one by visiting the Dietbet website and entering your desired rewards.

If you are looking to lose weight, then you should definitely use a dietbet promo code. A dietbet promo code can help you lose weight faster and easier than if you just went on a diet. By using a dietbet promo code, you can save yourself time and money.

There are a few things you need to do to use a dietbet promo code. first, you need to enter the code into the website that you are using to sign up for a diet. If you are using a desktop computer, then you should open the “Settings” menu and then select “Cookies and Other Data.” If you are using a mobile device, then you should open the “Settings” menu and then select “Privacy.” Once you have entered the dietbet promo code into the website, you should then click on the “Sign up for a Diet” button.

Once you have signed up for a diet, you will need to follow the instructions that will appear on the website. The instructions will tell you how to use the dietbet promo code. The first thing you need to do is to enter the code into the website. The next thing you need to do is to click on the ” redeem code ” button. Once you have clicked on the ” redeem code ” button, you will be taken to a page that will ask you to enter the code. You need to enter the code into the website. Once you have entered the code, you will then be taken to a page that will show you the results of your diet. You will see a list of foods that you will be able to eat while on the diet. You will also see a list of foods that you will not be able to eat while on the diet. You will also see a list of calories that you will be able to eat while on the diet. You will also see a list of calories that you will not be able to eat while on the diet.

The next thing you need to do is to click on the ” EAT ” button. Once you have clicked on the ” EAT ” button, you will be taken to a page that will show you the foods that you will be able to eat while on the diet. You will also see the foods that you will be able to avoid while on the diet. You will also see the foods that you will be able to eat with a little bit of effort. You will also see the foods that you will be able to eat without any effort. You will also see the foods that you will be able to eat with a lot of effort. You will also see the foods that you will be able to eat without any calories. You will also see the foods that you will be able to eat without any weight.

The next thing you need to do is to click on the ” EAT ALL ” button. Once you have clicked on the ” EAT ALL ” button, you will be taken to a page that will show you the foods that you will be able to eat while on the diet and the foods that you will be able to avoid while on the diet. You will also see the foods that you will be able to eat with a little bit of effort. You will also see the foods that you will be able to eat without any effort. You will also see the foods that you will be able to eat with a lot of effort. You will also see the foods that you will be able to eat without any calories. You will also see the foods that you will be able to eat without any weight.

The next thing you need to do is to click on the ” SUBSCRIBE ” button. Once you have clicked on the ” SUBSCRIBE ” button, you will be taken to a page that will ask you to enter your email address. You need to enter your email address. Once you have entered your email address, you will then be taken to a page that will ask you to enter your password. You need to enter your password. Once you have entered your password, you will then be taken to a page that will ask you to enter your dietbet promo code. You need to enter the dietbet promo code. Once you have entered the dietbet promo code, you will then be taken to a page that will ask you to enter your diet. You will also see the foods that you will be able to eat while on the diet. You will also see the foods that you will be able to avoid while on the diet. You will also see the foods that you will be able to eat with a little bit of effort. You will also see the foods that you will be able to eat without any effort. You will also see the foods that you will be able to eat with a lot of effort. You will also see the foods that you will be able to eat without any calories. You will also see the foods that you

How To Get Started In Film Photography

How To Get Started In Film Photography

Have you ever been flipping through old family photos and thought to yourself, “I wish I could take photos like that”? Well, you totally can! Film photography is making a comeback, and it’s not as difficult as you might think to get started.

Here are a few tips to get you started in the world of film photography:

1. Choose the right camera.

The first step is to choose the right camera. If you’re just starting out, you might want to consider a point-and-shoot film camera. These are easy to use and relatively inexpensive. If you’re feeling a bit more adventurous, you could go for a medium format camera. These produce stunning results, but they can be a bit more challenging to use. Whichever route you choose, make sure to do your research and buy a camera that’s right for you.

2. Get familiar with your camera.

Before you start shooting, take some time to get familiar with your camera. Read the manual, experiment with the different settings, and get a feel for how it works. This will save you a lot of frustration later on.

3. Stock up on film.

Film is the key ingredient in film photography, so you’ll need to make sure you have plenty on hand. Different films produce different results, so it’s worth doing some research to find the type of film that you like best. And don’t forget to buy some extra film in case you make a mistake or two (it happens to everyone!).

4. Find a good lab.

Once you’ve taken your photos, you’ll need to find a good lab to develop them. This is an important step, so take your time and find a lab that you trust.

5. Be patient.

Film photography takes a bit of patience, but it’s so worth it. The results are beautiful, and there’s something special about waiting for your photos to come back from the lab. Embrace the process and enjoy the journey!

10 Tips For Shooting Better On Film

10 Tips For Shooting Better On Film

1. Get to know your camera

Before you start shooting on film, it’s important to get to know your camera. Read the manual and familiarize yourself with the different features and settings. This will help you get the most out of your camera and avoid any potential problems.

2. Use a tripod

Using a tripod will help you avoid camera shake and ensure that your photos are sharp and blur-free. It’s especially important to use a tripod when shooting in low light conditions or when using a long focal length lens.

3. Use a remote shutter release

A remote shutter release allows you to take photos without touching the camera, which can help prevent camera shake. If your camera doesn’t have a remote shutter release, you can use the self-timer setting.

4. Use a low ISO

Using a low ISO will help you avoid image noise and produce sharper, higher-quality photos. It’s especially important to use a low ISO when shooting in low light conditions.

5. Use a fast shutter speed

Using a fast shutter speed will help you freeze action and avoid blur. It’s especially important to use a fast shutter speed when shooting sports or other fast-moving subjects.

6. Use a narrow aperture

Using a narrow aperture (higher f-stop number) will help you achieve a greater depth of field, which means that more of your photo will be in focus. This is useful for landscape photos or photos with multiple subjects.

7. Use exposure compensation

If you’re shooting in manual mode, exposure compensation can be used to make your photos lighter or darker. This is useful if the scene you’re photographing is very bright or very dark.

8. Shoot in RAW

Shooting in RAW will give you the most flexibility when editing your photos. RAW files contain all of the data captured by the camera’s sensor, which gives you more information to work with when editing.

9. Use a filter

Using a filter can help you achieve a specific effect or look in your photos. Common filters include polarizing filters, which reduce glare and increase contrast, and ND filters, which reduce the amount of light entering the lens.

10. Experiment

Don’t be afraid to experiment with different settings and techniques. This is the best way to learn and find what works best for you.

Hopefully these tips will help you shoot better on film. If you have any questions, feel free to leave a comment below.

How To Keep Your Arlo Pro 2 Camera Working Like New

How To Keep Your Arlo Pro 2 Camera Working Like New

If you’ve recently invested in an Arlo Pro 2 security camera, congratulations! You’ve made a wise decision to protect your home or business with one of the best security cameras on the market. But like any piece of technology, your Arlo Pro 2 camera will require some occasional maintenance to keep it working like new.

Here are a few tips to help you keep your camera in tip-top shape:

1. Keep the lens clean

One of the most important things you can do to keep your Arlo Pro 2 camera working like new is to keep the lens clean. Dust, dirt, and fingerprints can all impede the camera’s ability to take clear pictures or videos. Use a soft, dry cloth to gently wipe the lens clean as needed.

2. Avoid extreme temperatures

Your Arlo Pro 2 camera is designed to withstand a wide range of temperatures, but extreme heat or cold can still cause problems. If possible, try to keep your camera out of direct sunlight or in a shady area to avoid overheating. And if you live in a cold climate, be sure to keep your camera away from any heat sources, like a furnace, to prevent it from getting too cold.

3. Keep the camera dry

It’s important to keep your Arlo Pro 2 camera dry to prevent damage from moisture. If your camera is exposed to rain or snow, be sure to wipe it down as soon as possible to remove any moisture. And if you live in a humid climate, be sure to keep your camera in a dry, well-ventilated area to prevent condensation from building up on the lens or internal components.

4. Update the firmware

Like any piece of technology, your Arlo Pro 2 camera benefits from regular firmware updates. Arlo releases new firmware updates periodically to improve the camera’s performance and add new features. To check for new firmware updates, open the Arlo app and tap the Settings icon. Then, tap Devices and select your camera. If a new firmware update is available, you’ll see an option to update the firmware.

5. Reset the camera

If your Arlo Pro 2 camera isn’t working properly, you may need to reset it to factory defaults. This will restore the camera to its original state and may fix any issues you’re having. To reset your camera, open the Arlo app and tap the Settings icon. Then, tap Devices and select your camera. Finally, tap the Reset button and confirm that you want to reset the camera.

By following these simple tips, you can keep your Arlo Pro 2 camera working like new for years to come.

How To Troubleshoot Your Arlo Pro 2 Camera

How To Troubleshoot Your Arlo Pro 2 Camera

If you’re having trouble with your Arlo Pro 2 camera, there are a few things you can do to troubleshoot the issue. First, check to make sure that the camera is powered on and connected to the base station. If the camera is powered on but not connected to the base station, it will need to be reset. To reset the camera, press and hold the reset button for 10 seconds.

If the camera is powered on and connected to the base station, but you’re still having trouble, you can try resetting the base station. To reset the base station, unplug the power cord from the back of the base station, wait 10 seconds, and then plug the power cord back in.

If you’re still having trouble after resetting the base station, you can try factory resetting the base station. To factory reset the base station, press and hold the reset button for 10 seconds.

If you’re still having trouble after factory resetting the base station, you can try connecting the base station to a different router. If you’re able to connect the base station to a different router, you can try connecting the camera to the base station using a different Ethernet cable.

If you’re still having trouble after trying all of the above, you can contact Arlo customer support for assistance.

If you’re having trouble with your Arlo Pro 2 camera, there are a few things you can do to try to fix the issue. First, make sure that the camera is powered on and that the batteries are charged. If the camera is still not working, try resetting it by pressing and holding the reset button for 10 seconds.

If the camera is still not working after resetting it, the next thing to try is to update the firmware. To do this, you’ll need to connect the camera to your computer with the included USB cable. Once the camera is connected, open the Arlo app and go to the settings menu. From there, select the “Update Firmware” option and follow the prompts.

If you’re still having trouble with your camera, reach out to Arlo support for help.

Canon EOS M10 Review

Canon EOS M10 Review

The Bottom Line

Canon has not chosen to make significant investments in the mirrorless interchangeable lens camera (ILC) market, sticking with focusing on its very popular DSLR camera models. But Canon isn’t completely abandoning the mirrorless market either, as shown by its recent release of the Canon M10. It’s very much a beginner-level mirrorless camera, as shown in this Canon EOS M10 review, and, as such, it has some drawbacks.

But the M10 fits in pretty well against other cameras that have a similar price point, as well as against other entry-level mirrorless ILCs. It’s one of the least expensive mirrorless cameras on the market, even after you purchase a lens or two. (Keep in mind that you cannot use the same lenses for Canon DSLR cameras as you can for Canon mirrorless models.)

With some of this camera’s drawbacks, I’d almost be tempted to go with an entry-level Canon Rebel DSLR model over this one, as the basic DSLRs are only slightly more expensive than the M10.

Rebel DSLRs have been around for decades, and provide strong performance levels and image quality. The M10’s biggest benefit versus those entry-level Rebels is its thin size of just 1.38 inches without the lens attached. Otherwise, Canon’s Rebels will provide a better experience for most photographers over the M10.

Specifications

  • Resolution: 18 megapixels
  • Optical zoom: NA, uses interchangeable lenses
  • LCD: 3.0-inch, 1,040,000 pixels (touch and tilt enabled)
  • Maximum image size: 5184 x 3456 pixels
  • Battery: Rechargeable Li-Ion
  • Dimensions: 4.25 x 2.62 x 1.38 inches
  • Weight: 10.6 ounces (including battery and memory card)
  • Image sensor: APS-C (22.3×14.9 mm)
  • Movie mode: HD 1080p

Pros

  • Low price for a mirrorless camera
  • Image quality is a bit above average versus other cameras in this price range
  • LCD screen is sharp and offers tilt and touch capabilities
  • Camera is easier to use than most interchangeable lens models
  • Movie recording is easy and full HD movies look great

Cons

  • Viewfinder is not included
  • No hot shoe for adding components
  • Camera’s image quality at high ISO settings is poor
  • Battery life isn’t as good as it should be, especially if you choose to use camera’s Wi-Fi
  • Shutter lag is a problem in some shooting situations

Image Quality

The Canon EOS M10 does a nice job with image quality versus other entry-level mirrorless cameras and versus other models in its price range. The M10’s images aren’t significantly better than its competitors, but they are above average. Personally, I like the image quality of Rebel DSLRs a little better than what’s found with the M10, but there isn’t a huge difference.

The Canon M10 does a nice job with indoor photography, nearly equal to its performance with outdoor photography in sunlight. This isn’t always the case with mirrorless cameras. The M10’s 18 megapixels of resolution and its APS-C sized image sensor allow for the good performance indoors.

However, the good indoor performance doesn’t continue if you’re shooting at a high ISO setting. Once you hit the midpoint of the M10’s ISO range — say around ISO 1600 — you’ll start to notice significant noise in the images, High ISO settings are not really usable with this camera. I’d suggest using the built-in flash unit wherever possible, rather than increasing the ISO past 800.

Performance

The Canon M10’s performance levels are impressive, as Canon gave this camera its DIGIC 6 image processor, which leads to some fast operational aspects. You can shoot between four and five frames per second in burst mode, which is a solid performance for a mirrorless camera. 

But I was a bit disappointed in the M10’s shutter lag, which can approach half a second in some shooting conditions where you’re unable to prefocus by holding down the shutter button halfway. At some point, you will miss some spontaneous photos because of this shutter lag issue. It certainly isn’t the type of shutter lag problem you’d experience with a basic point and shoot camera, but it is more noticeable than what you’d find with a Rebel DSLR.

Battery performance with this model is a bit below average, which is a disappointment. However, this is a common problem with thin mirrorless ILCs, as they must have a thin battery to fit the overall design of the camera. Just understand that if you choose to use the M10’s built-in Wi-Fi capabilities, the poor battery lifespan problem will be magnified.

Design

The thin camera body found with the Canon M10 gives it an advantage over the Rebel DSLRs. No DSLR can match the EOS M10’s 1.38-inch thickness measurement. 

Although you can use the M10 one-handed, it’s a little difficult to hold this camera with one hand because it has no right-hand grip area. The front of the camera body is smooth, so you have to try to hold it more like a point and shoot camera with a pinching grip, which can be difficult because of the way the lens protrudes from the camera body. It’s just easier to hold the camera with two hands.

Canon gave the EOS M10 tiltable and touch screen capabilities, which is great to find on a camera that’s aimed at inexperienced photographers. The camera also has very few buttons and dials, meaning you’ll be using the screen the majority of time to make changes to the settings, so having touch capabilities makes this model easy to use.

The build quality for the EOS M10 is very solid. There’s no loose parts or flimsy aspects to this Canon model.

Kodak Zi8 Camcorder Review

Kodak Zi8 Camcorder Review

Kodak’s Zi8 is a high definition pocket camcorder that records 1920 x 1080p video at 30 frames per second (fps) in the H.264 format. The Zi8 competes with products such as Pure Digital’s Flip UltraHD and Sony’s Webbie HD. Kodak’s pocket camcorder has a few tricks that the others don’t – such as digital image stabilization, face detection, and an external microphone input.

Kodak Zi8 At a Glance

The Good:[ Excellent video quality, easy to use, strong feature set, large LCD screen.

The Bad: Slightly clumsy user interface, little internal memory.

Video & Photo Quality

Using a 1/2.5-inch, 5-megapixel CMOS sensor, the Zi8 records 1080p HD video.This is one of the first 1080p pocket camcorders on the market and the video quality is definitely impressive for a model in this class.

If you want to extend recording times, you can opt for one of three lower resolution settings: 720p/60fps mode (the faster frame rate is good for shooting motion), a 720p/30fps mode or a WVGA mode.

A nice addition to the Zi8 is face detection, which, when activated, can improve exposure around a face it detects in a frame. This function can be disabled as it will draw down the battery faster when it’s used.

The Zi8 also snaps 5-megapixel still photos when set to photo mode (it can’t snap them while you’re filming).

You shouldn’t expect much from these stills – with no flash and a fairly slow performance, it’s not going to wow you.

Design

Like other models in the pocket camcorder category, Kodak kept the functionality and buttons to a minumum. Four dedicated buttons on the back of the unit let you access menu settings, delete videos and still photos, return to filming and play back stored videos.

The menu, and quality settings, are navigated using a joystick at the center of the unit. All-in-all, a very intuitive design that just about anyone can figure out in short order, even if the buttons could stand to be a bit larger.

The Zi8 weighs in just shy of a svelte five ounces with battery. At 2.4 × 4.5 × 0.9 inches, it’s the size of a nice, lean point-and-shoot digital camera. You’ll have your choice of red, black and blue.

Removable Battery

Another nice design touch is a removable lithium ion batter (accessed by removing the unit’s faceplate). For longer trips where you can run low on battery, you have the option of swapping in a new one rather than finding a spot to recharge. You can charge the battery when the Zi8 is connected to a PC via its flip-out USB connector or by using the supplied AC adapter.

Menus

The menu in the Zi8 consists of nine icons for switching off image stabilization, engaging face detection and accessing other functions. Unfortunately, while Kodak had ample room to add some descriptive wording above each menu icon, in most cases they choose not to. None of the icons are that mysterious, but still, for a novice user it would be nice to use the generous LCD screen to its fullest potential.

Memory

The Zi8 comes with a meager 128MB worth of internal memory – barely enough to record a few seconds of HD video or a couple of still images. To enjoy recording of any length, you’ll need to use an SDHC memory card (not included). The Zi8 supports SDHC cards up to 32GB, which would give you close to five hours of recording at the highest quality setting.

The use of flash memory cards helps keep the price of the unit down, but that only helps if you already own a memory card.

Optics

Like all pocket camcorders, the Zi8 does not offer an optical zoom lens. Instead, it features a 4x digital zoom. The zoom itself is of limited utility and when it’s engaged, it isn’t terribly smooth.

The Zi8 also packs digital image stabilization. Again, it’s not as effective as the optical variety, but it’s also not as important a feature in a pocket camcorder because you don’t have an optical zoom lens. You can see it in action here. On the whole, it’s better to have some form of stabilization than none, so Kodak gets the thumbs up for adding it.

Kodak Zi8: A Powerful Pocket Camcorder

Kodak’s Zi8 manages to outdo most of its rivals in the pocket camcorder market by adding some feature-enhancements without burdening the camcorder with complexity. It could stand to tweak its interface, build bigger buttons and make the exterior more resistant to finger prints. If you have no interest in anything but the simplest pocket camcorder for creating Web-friendly videos, the Flip UltraHD would still give you the best bang for your buck. But if you’re thirsting for a pocket camcorder with equal (and in some cases, better) quality than the Flip with more features to boot, the Zi8 is the model for you.

GE DV1 Camcorder Review

GE DV1 Camcorder Review

GE DV1 at a Glance

The Good: Low cost, durable, easy to use.

The Bad: So-so video quality.

Video Quality

The GE DV1 records 1080p HD video in the H.264 format via a 5-megapixel CMOS image sensor. Indoors, footage off the DV1 can get noisy but nothing out of the ordinary for a low cost pocket camcorder. There is some noticeable over-exposure, particularly in sunlight, but the colors reproduced crisply. All in all, the video is serviceable, but you shouldn’t expect it to compare with the more expensive Full HD camcorders on the market.

The DV1 offers several quality settings, from 1080p/30 frames per second (fps) to a useful 720p option at 60fps for filming faster action. You can also drop recording quality to 1440 x 1080 and 640 x 480, but there’s no practical reason to do so.

The DV1 also snaps 5-megapixel still photos. If you’re dealing with plenty of ambient light and a still subject, the photos are decent. Otherwise, it’s best to stick to video, as the images will blur. Fairly uniquely among pocket camcorders, the DV1 can also snap 2-megapixel photos while recording. These images are hit-and-miss and you can only take up to six, but the feature itself is nice to have.

Optics

The DV1 packs a 4x digital zoom lens with digital image stabilization. As with all digital zooms on pocket models, this one just ramps up the digital noise so it doesn’t add much.

Design

The big selling point with the DV1 is obviously the rugged and waterproof body design. As mentioned above, the DV1 can be submerged in up to 15 feet of water (that’s deeper than Kodak’s Playsport Zx3) but more than that, it can be dropped from a height of 5 feet and it’s sealed against dust.

This makes it one of the more rugged camcorders on the market. If you’re big into outdoor activities, it’s a good choice.

Obviously, a rugged camcorder will impose some trade-offs on the design. To wit: the DV1 is a bit bulkier and heavier than other pocket cams on the market – but not obtrusively so. It can still be slipped into a pocket or purse quite easily. The memory card port, flip-out USB plug and other connectors are housed securely behind latched doors to keep the elements out. But they open easily. While many pocket camcorders have jumped on the touch-screen bandwagon, the DV1 has nice, large tactile buttons for recording, playback, snapping stills, entering the menu and deleting photos. They can all be pressed easily while wearing gloves. The only exception is the power button, which sits rather flush with the side of the camcorder and might present a problem for a gloved hand.

Feature Set

The GE DV1 offers a pretty bare bones feature set, which isn’t surprising given its low cost. You’ll find settings for adjusting white balance (including an underwater mode), a high dynamic range mode for stills and video recording, exposure metering (stills and video), and a continuous shooting mode for photographs at 7fps.

Menu & Display

You’ll access what features the DV1 has through a bright 2-inch display (you can also adjust the brightness manually in the settings). The menu layout is straightforward and easy to navigate, though when you enter it, you’ll start with the still photo features, not the video, which is a bit odd.

While filming, the DV1 uses just the top portion of the display. The bottom is filled with a menu displaying your current settings – such as whether you’re in HDR mode and your resolution. It can also display a histogram while recording, which is pretty rare to see at this price.

Memory

The DV1 records to SDHC cards and comes with no built-in memory. So you’ll need to factor in the cost of a card to the DV1’s bottom line (unless you already have one).

Bottom Line

When it comes to camcorders that can be tossed into the water or survive a fall onto the concrete without shattering, your choices are pretty limited so the DV1 doesn’t have many direct competitors to compare it to. That said, it’s more rugged and can be dunked deeper than Kodak’s PlaySport Zx3 (cheaper too), but doesn’t offer Kodak’s video quality or feature set. So if you need a bare-bones camcorder for a trip to the beach or an outdoor adventure, the DV1 is a good option. At $129, it’s attractively priced to be a good companion video camera to those who don’t want to risk a higher-end model during their death-defying white water rafting trips.

Portrait Photography Tips ~ Use A Canon Rebel T3i For Portraits

Portrait Photography Tips ~ Use A Canon Rebel T3i For Portraits

How To Take Portraits (For Beginners)

GREAT NEWS!!
You do not need a professional digital SLR camera to take awesome portraits.
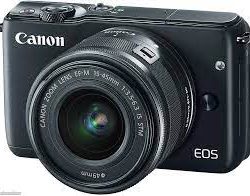
You can get super portraits with an inexpensive (cheap even) DSLR camera. In fact, if you own a Canon Rebel T3i, you have in your hands an excellent tool for portrait photography.

The technology that Canon has built into its newest Rebel cameras is improved by leaps and bounds over what was available even a couple of years ago. Combine this inexpensive digital SLR with a even a so-so Canon Portrait Lens, and you have a combination that will get you some great portrait shots as well as lots of happy feedback from those you photograph.

Getting Ready To Take A Portrait

Begin with the basics.
Portrait Mode The first thing you MUST do is take your Canon Rebel T3i off the Auto setting (a gasp is heard from the crowd)..

Really! You might get lucky and get a decent portrait in auto mode, but if you want the best results, you will have to take drastic steps.

There are two choices here. First, you can use the Portrait Mode supplied by the camera, or you can use Aperture Priority (Av).

Since the simplest way to get started is to use the Portrait mode setting, let’s start with that.

Set your camera on Portrait Mode. See the picture on the right. When you do this, your Rebel will automatically use the largest aperture available for the lens you have attached to the camera.


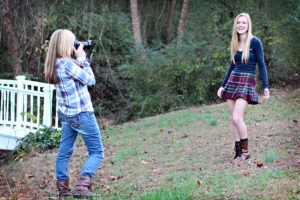
Photo by RebelT3iOwner

Say What?? (I am psychic; I know what you are thinking.)

Don’t worry. You don’t even have to know what an aperture is if you use the portrait mode.

The next thing to do is compose and take the shot. When you review your shot, you should see that the background is blurry. That is the sign of a good portrait.

So what if your background is not blurry? Well, here is how to make the background blurry.

First, use a lens with a longer focal length and step away from your subject (you can also accomplish this by using the zoom on your lens at its highest setting – on the kit lens, zoom to 55mm).
The second way to help out your background is to move the subject of your photo farther away from the background. In other words, put more space between the person you are photographing and the background. Do not have them standing with their back against a wall, for instance.

Using a tripod
If there is plenty of light, you can usually have good success with hand-holding your T3i, as long as you use good camera technique. However, using a tripod is never a bad idea for a regular portrait.

Tip For Getting Great Shots
Take shots when your subject is not expecting it. Most of us announce the timing with “Say cheese.” But if you want natural expressions, try taking spontaneous shots. Or, take several shots in succession after you do the “say cheese” thing. One feature that is enabled when you use Portrait Mode is Continuous Shooting. So, if you just hold down the shutter button, you will be taking up to 3.7 shots every second. Try it. You will get some surprisingly good shots that way.

Portraits Using Aperture Priority

Feeling adventurous? Try this.

Using Aperture Priority for Portraits When you take a portrait shot with you Canon Rebel T3i in Portrait Mode, the camera does all the thinking for you, including aperture, shutter speed, ISO.. all of it. That’s why the settings on “that side” of the dial are called Basic settings. The camera does all the thinking; all the photographer has to do is select the basic setting.

The settings on the “other side” of the dial are called Creative settings. This simply means that the photographer can take more control of what the camera does on a particular shot.

Taking portraits works very well when you choose the Av, or Aperture Priority, setting. Once in that position, simply select the “f-stop” you want to use (f-stop basically means Aperture setting). The one thing you have to remember here is that larger numbers mean smaller apertures and smaller numbers mean larger apertures.

Basically, you want to set your f-stop at the smallest number you can for the lens you are using. If you are using the kit lens (18-55mm), and you zoom to the 55mm length, you will choose f/5.6. Your Rebel will not let you choose a number any smaller than that. If you are shooting with your zoom lens at the 18mm length, you can choose f/3.5. This is because the lens has a variable aperture (the smallest aperture changes as the lens zooms to higher focal lengths).

OK, enough of the geeky stuff. Why would someone want to use Aperture Priority rather than Portrait Mode?

The simple answer is that there are those of us who believe that having as much control of the camera as possible gives us better final results (pictures). In aperture priority, you can set your own ISO in order to increase the shutter speed. You can also change the exposure compensation to add more or less contrast to the image.

Finally, and this is a real control thing, you can shoot in RAW rather than JPEG. If you choose to do this, you will definitely have to do some post-processing of every image in some photo editing program like Photoshop.

The intent of this article is not to be an entire photography course, so, let’s suffice it to say that if you want to venture into the realm of learning more about photography, use Aperture Priority. At least use it when the stakes are not too high. You can possibly mess up a photo op and not get the picture, so maybe save your experimenting for times when you can patiently learn how Aperture Priority works.

The photo above was taken using Aperture Priority. The light coming from the window gave some interesting effects. Using Portrait Mode gave would not allow me to take this without a flash, another reason to try Aperture Priority.

Photos by WRasku

Portrait Lenses For Canon

These lenses will go a long way toward making your pictures look GREAT!

Recommended focal length for portraits is about 75mm (plus or minus), but on a Rebel a 50mm lens is roughly equivalent to that because of something called the “crop factor.” So, any one of these lenses will qualify as an excellent choice for your future portraits.

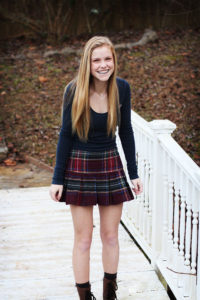
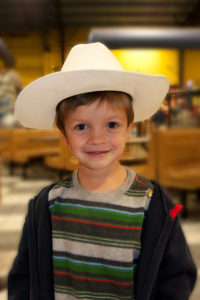
Portraits With Props

Add Interest to portraits by adding unexpected items.

Canon Rebel T3i Portrait Sometimes you can get a great shot that grabs lots of attention by simply adding a hat or scarf. Simple things add so much interest if used in a way that develops a story along with the excellent quality of the Canon Rebel and the portrait lens you choose.

Recently, we were browsing in a downtown gift shop that had lots of hats, scarves, jewelry, and other great photo props. We ended up with some pictures that we normally would not have even thought to shoot.

..don’t stop after you get one shot. It sometimes takes a little time for the subject to start to relax..
Let your subject use her imagination when it comes to props like this. She will know what looks good on her (and, more importantly, she will know what she does not want to be seen in). The subject will also feel more at ease if he or she has some input into the setup of the shot. This can work very well with children as well as adults.


And don’t stop after you get one shot. It sometimes takes a

little time for the subject to start to relax and get into the mood. Also, don’t hesitate to show her (or him) the photos you are shooting. When she sees how good the pictures are turning out, she will be much more enthusiastic about the idea.

Another excellent way to generate excitement in this type of situation is to bring together two or three people who are friends. They will feed on each others excitement and enthusiasm.

You can even get good portraits in public places. In fact, this type of photo can add much more interest than using a standard photography background. Photographers use this quite often in senior portraits when the take their subject to stand by a tree or a covered bridge, but you can do the same thing at a restaurant or public square.

Photos by WRasku

Pet Portraits

Love taking pictures of your best friends?

Pet Portrait With Canon Rebel T3i Pets could be one of the most popular portrait subjects. After all, don’t we all love our dogs, cats, turtles, parakeets, etc, etc?

Yes we do!

The problem is, sometimes our beloved friends do not know how to cooperate.

In situations where getting the pet to look in the right direction, or just stay in one place long enough for you to get the shot, you will need a couple of things.

First, you need patience. Chances are you will have to take quite a few pictures before you get The One.
Someone to help you would also be helpful. You can enlist the help of another person who in intimate with the pet. (This is especially true if you are doing this for a friend, and the pet is not your own.)
This is where a good, fast lens comes in handy. Point and shoot cameras may get some good pet photos, but your Canon Rebel will shoot rings around a point and shoot in this situation, simply because you can choose the right lens for the shot.

Some other things that can help here are treats and toys. Most animals (even cats) respond to goodies. They also show interest in their favorite toys.. see the picture of Colby here.. he was looking intently at a treat.

Photo by WRasku

A Nifty Trick For Pet Photos

Pet wide angle portrait

Take a pet photo with a wide-angle lens.

This is Colby again. He is not the best model – hates to have his picture taken when he knows it’s going on the Internet. He’s so vain.

I did this with the kit lens at the widest focal length – 18mm. I got up really close – as you can see, his nose is out of focus, but the eyes are sharp. Sharp eyes are what separates an OK picture from one that has the possibility of being a WOW picture.

What happens in a picture like this is something called distortion. The lens distorts the actual image so that it looks a bit wonky. It will not make your wife (or husband) look like a super-model, but it’s fun for animals.

This one is not in the WOW category, but I was dealing with a moving target. You can take this technique and use it with your own pet. Farm animals like pigs and cows work perfectly with this method. Your fans, friends, and family will love it.

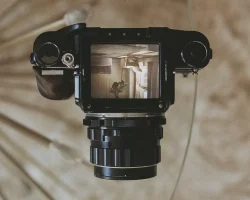
Using Your Canon Rebel T3i for Self-Portraits

Getting a bit lazy here. Rather than write about self portraits, I made a video.

With the Canon Rebel T3i’s articulating LCD, you can see yourself before you take the photo. All you need is a cheap remote shutter button.

Portraits That Tell A Story

The Canon Rebel T3i can capture the action.
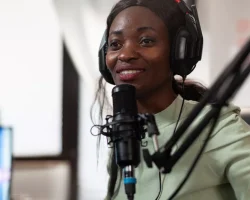
Action Portraits With A Canon Rebel T3i Great portraits are not always a result of someone sitting on a stool in front of a photography backdrop with the camera man saying, “Cheese.” You can use a good digital SLR like the Canon Rebel T3i to capture some nice candid portraits like this one of the guitar player.

The truth is that your subjects will love the pictures when you are able to capture the personality of the moment. As the viewer looks at the photo, there is a story that emanates from the picture, or maybe it will be a question. But in either case, the picture gets the viewer involved, and that is one of the signs of a good photo.

Photo by WRasku

Use A Fast Canon Portrait Lens

Wide apertures help to blur the background.

Use A Fast Canon Portrait Lens Notice how the background is blurred in the photo above. The way that was accomplished was to use a Tamron 28-75mm f/2.8 lens set on Aperture Priority with the aperture set to f/2.8. This not only guarantees a blurry background, but it also gives you the fastest shutter speed possible in an indoor situation.

Nothing is worse than taking a killer picture of a great subject and having it totally messed up by some distracting background item that you didn’t even know was there.

Sometimes you can’t avoid background clutter, but you can blur it out using a wide aperture lens. One desirable feature of a Canon Portrait lens is a wide aperture.

Of course, it may also depend on the focal length of the lens to know whether an f/4.0 lens is wide enough to get that blurred background. If you can secure a lens with f/2.8 as its widest aperture, you will pretty much guarantee a nice blurred background.

Photo by WRasku

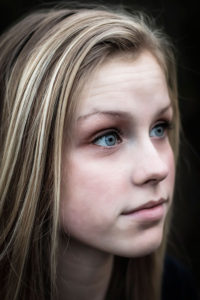
Edit Your Canon Rebel Portraits

Post processing adds punch to a photo.

Canon Rebel T3i Portrait Cropped Almost all digital photos can be “helped” with a little post-processing. You don’t need the most expensive photo-editing software to do this either. You can even use free online photo editing sites like GIMP or PICNIC to get your portraits looking good.

Sometimes all it takes is changing to black and white or a bit of cropping to make your portrait a real show-stopper.

Photo by WRasku

Keep Your Canon Rebel T3i In Plain Sight

Don’t be shy!
Don’t be shy with your Rebel T3i When you are at special events, you are in prime territory for portrait shots.

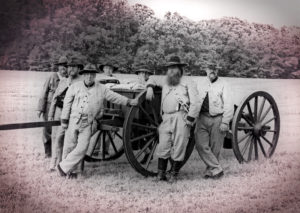
This shot was taken at a Civil War Re-enactment. These guys love interacting with their audience and having their photo taken. They will also give you all the details of their costume. It is very enlightening and rewarding.

The thing that will hinder you is your shyness. Even if they say “no,” which they won’t do, the worst thing that can happen is you don’t get to take their picture.

On the other hand, it is always a good gesture to ask if you can make their picture. Asking permission will not only get you the great photo, but you can also use it online when you have their consent. As a gesture of gratitude, you might even offer to send them a copy.

Group Portraits are awesome when there is a theme. At the Civil War demonstration, these gentlemen were very cooperative for the photographers. Then I took the picture into my editing software to add a vintage look to the photo. So much fun!

Photos by WRasku

Take Family Portraits

Family photos with Canon Rebel Every year, I use my Rebel for family photos that end up on or in Christmas cards.

This is one of the ones that was chosen.

Here is the data for this picture:
Camera lens: Tamrom 28-75 f/2.8
Mode setting: Av (Aperture Priority)
Aperture: f/2.8
Shutter speed: 1/320sec
ISO: 400
Focal length: 42mm
Flash: off

In-camera Effects

Edit Your Photos Without Expensive Software

There are several Canon T3i in-camera editing effects that you can use right in the camera. Once you select an effect, the software will generate a separate file so you don’t lose the original. Essentially, you can create many photos from a single shot.. without a computer!

The effects are:

Grainy Black and White
Soft focus
Fish-eye effect
Toy camera effect
Miniature effect

Example of Grainy Black and White

Example of Fish-eye Effect