Starting a Craft Business for the Inexperienced Crafter

Starting a Craft Business for the Inexperienced Crafter

Whatever the reason you choose craft as a bussines, you need to manage it wisely. I recommend starting with the preparation of a business plan. However, since your craft business idea is so unformed, I think it’s a better use of your time to approach this from another direction – ending with the business plan instead of starting with it.

To follow are five steps I recommend you follow to move your craft business idea from infancy to fruition:

1. Deciding on a Type of Craft

Courtesy : https://smitas-art-and-painting-classes.business.site/

Before you go any further, you have to figure out what general area of craft you want to become involved. There are five basic groups: textile, paper, decorative, functional and fashion. Consider if you have any existing knowledge or skill in any of these areas. If so, do you want to pursue that type of craft for your business or do you want to try out a completely different type.

Don’t have any experience in crafts at all? Well, check out the description of each of the five types of crafts so see which one interests you the most. Also – don’t start wandering all over the craft map. Right now, only pick one type of craft to concentrate on.

2. Getting Craft Making Experience

Now that you’ve tentatively decided on a type craft, honestly evaluate your skills in bringing that craft to life. Little to no practical experience or skill in your chosen type of craft? Don’t be discouraged – no arts or crafts business owner just wakes up one day with a complete skill set and knowledge base.

However, it’s impossible to start any type of business successfully unless you have sufficient practical experience in that type of business. This fact isn’t any truer for a dentist or plumber than it is for a craft business. Honing craft techniques is your next step. So, go to the library and check an instructional book out on the topic. Then, buy some cheap raw materials and practice, practice, practice.

3. Evaluate Your Passion for the Craft

Next, step back and honestly decide if you are happy doing this type of craft. Can you see yourself working in this craft medium day after day? There is no point in starting a craft business working in a type of craft that at best you are indifferent to and at worst flat-out hate.

If you’re not content doing this type of craft or have objectively decided that your skills will never advance to the level needed when selling to customers, go back to step one. Is there another type of craft you may be interested in?

4. Finding Supplies, Tools and Materials for Your Craft Business

Finding great, reliable vendors is one of your first steps in starting an arts and crafts business. You can’t decide to make a type of craft until you know you can easily buy the raw materials and supplies needed to make it. Also, you have to know how much your vendors are going to charge you for the art or crafts supplies before you can set a reasonable retail price for your products.

5. Prepare a First Draft of a Business Plan

Writing a business plan is both nerve-racking and exhilarating. It can be stressful to work through each section, dealing with problems and exploring alternative solutions. However, you’ll find that it’s positively thrilling to work through those problems and find out that yes, this is a doable proposition!

Most business plans have the following eight main sections; some also include an appendix. Keep in mind there is no right or wrong way to develop a business plan and your particular type of art or craft will shape its format.

Art Glossary

Art Glossary

Explaining terminology from Art Forums

This art vocabulary glossary was made as an addition to /ic/’s Beginner’s Guide. It lists explanations of terms that are commonly used on art forums. We focus on visual art, namely paintings and drawings, in both the digital and traditional medium.

Note: work in progress. 🙂

Overview

A

Anatomy: the study of human and animal body structures. Artists study skeleton, muscles and fat distribution, as well as these functions in movement, in order to draw realistic looking figures or creatures.

B

Basic Shapes: the basic shapes are the sphere, the cube, the cone and the cilinder. Everything in life can be simplified to these basic shapes or variations of them.
When learning a new subject (proportions, perspective, lighting, …), it is useful to start with basic shapes.
Blending: mixing paint on canvas, mainly used in the context of painting digitally or with oils. This is an important part of rendering.
How to blend digitally

C

Chicken Scratch: the same as “hairy line”. Drawing a line consisting of multiple small scratches or going over a line multiple times to mask mistakes. Not to be confused with loose, sketchy lines. *example picture to be added
Canvas: the surface you paint on. For a traditional painter this is the fabric he works on. For digital artists, the canvas is the total image dimension he is working on. (better explanation for “digital canvas”?)
Color/Colour: considering painting techniques, colour refers to the whole of hue, value and saturation (also called chroma). This is an in depth guide to colour: The Dimensions of Colour.
Comfort Zone: keeping to the skills you already have and not trying new things due to fear of failure. For example, artist might restrain themselves to a single colour palette, or drawing the same subject over and over again.
Composition: arrangement of the elements in a pleasant manner. Or unpleasant, if you suck at composition. *explanatory video link to be added
Concept Art: mainly designing. Usually part of a larger process (creating a movie, game, …).
Construction: building the subject of the painting or drawing from a basic structure. This could be basic shapes which are later on refined, or the key elements of the subjects. For example, a very basic construction for the human figure might be composed of the head, torso and pelvis, with sticks for the joints.

E

Eyeballing: judging by eye, as opposed to measuring with rulers, drawing grids, colour picking, …

F

Fair Use: use of copyrighted works within legal limits.
Flatness (or flat drawing): the works lacks a sense of depth. In many cases, this is due to a poor value range or using strictly contour lines.
Flow: relaxed, zen-like work state of full concentration. For the photoshop tool “flow”, see this post.
Freelancer: self-employed professional.
Fundamentals: things you have to know before you can move on. The crawling before walking and running.
Figure Drawing: drawing humans.

G

Gesture: you probably heard before that non-verbal expressions are the most important element of conversation. That’s what gesture is about. The gesture of a figure, animal or even object can express a wild variety in emotions and actions. Gesture studies are a necessary complement to anatomy studies, to prevent your figures from becoming lifeless.
Graphic Design: the visual art that focuses on convey information. Fields like web design, logo design and typography are important to graphic design.
Grayscale/Greyscale: black-and-white. Consisting only of grey shades (from white to black). Sometimes short for “an image in grayscale”. Value painting/drawing.

H

Hairy Line: the same as “chicken scratch”. Drawing a line consisting of multiple small scratches or going over a line multiple times to mask mistakes. Not to be confused with loose, sketchy lines. *example picture to be added
colour hue Hue: this term is difficult to explain, as it corresponds to “colour” for those unfamiliar with colour theory. This is the third aspect of colour besides value and saturation. For example: red, green or blue are hues. Adding white or black will not change the hue.

I

Illustration: art accompanying another product. For example, illustrations in a book, on game cards, … Nonetheless, an illustration often has stand-alone artistic value.
Illustrator: artist making illustrations, either as a freelancer or employee.

L

Layer: in tradtional painting, this is literally a layer of paint. In digital painting, this is the layer in the painting program, on which one or more elements are kept. Painting on a single layer is also possible. Digital layers can be swapped, moved around and edited individually.
Life Drawing: also “drawing from life”. Drawing a real life object or person, as opposed to drawing from photo reference and drawing from imagination. The three most common life drawing practices are still lifes, model drawing and sketching people from life. The most beneficial aspect of life drawing is the increasing sense of value and 3D perception.
Loomis: usually heard in a phrase like “needs more Loomis”. This refers to the figure construction method as taught by the famous art teacher Andrew Loomis.

M

Master: an artist of great skill. An “old master” would be a great artist from the past, such as Rubens or Van Eyck. A “master work” is an artwork of high artistic and technical quality.
In the broadest sense, a master is any artist whose skill and accomplishments you admire. Doing a “master study” refers to studying the work of a master in order to learn from it.
Muddy drawing Muddiness (or a muddy drawing): the colours or values aren’t cleanly rendered. The most common causes are:
1. painting with a lot of short, small brush strokes instead of fluid large strokes.
2. Poor colour choice, for example shading by adding black.
3. Smudging.

N

Negative Space: the space surrounding the object of figure. Drawing negative space means focusing on the outer edge. This is most helpful to fix proportion errors.
Notan: balancing areas of light and dark in a harmonious whole. This concept is great importance in traditional ink paintings.

O

Opacity
Overlay

P

Pen Pressure: when using a tablet for digital art, you can turn pen pressure on. This responds to how firmly the stylus’ tip is pressed against the tablet surface.
It’s similar to how a pencil gives darker lines when pressed harder into the paper, but you can link pen pressure to a variety of settings. It is most commonly linked to line thickness and opacity.
Perspective
Photo Study: doing a study using a photograph as a reference. The goal of the study can be anything from lighting to anatomy.
Professional: an artist earning full-time income from his craft. Also refered to as “pro”, though “pro” is sometimes used for any artist of great skill.
Proportions

Q

Quick Pose: figure sketching done whilst setting a timer for each pose. Most common are quick gesture sketches, using 30 to 60 seconds for each figure. The purpose of quick poses varies.

R

Reference:

S

Saturation:

Self Portrait: drawing oneself in front of a mirror. Drawing yourself using a photo reference is usually regarded as a photo study.
Sketch: this is either an unfinished, rough drawing, or a drawing done as preparations for a bigger art work.
Sketchbook: there are physical sketchbooks with bound blank pages used to draw in, often done outside. “Sketchbook” could also reference to a regularly updated forum thread devoted to the art and progress of a single artist.
Skill: acquired technique and knowledge. The ability to do something.
Smudge: smudging is a blending process by rubbing with your finger or some material on the canvas. It is very common practice in pencil drawing, but often with poor results.
Speedpainting: a quick painting, usually between 30 minutes to 2 hours. Currently also used in the context of time lapse videos of the painting process.
Still Life: drawing or painting objects from life.
Studio:
Study: drawing or painting a reference in order to learn from it. The goal is to acquire knowledge and skill to use in one’s own artworks. Methods vary wildly depending on the aspect focused on.
Symbol drawing: drawing one’s representation of something instead of a realistic depiction. For example, drawing an almond shape and a circle for an eye.

T

Talent: the notion that one’s skills aren’t acquired by practice or studying. By some used to indicate great skill, but keep in mind that this could be an affront to hard working artists.
Thumbnail: a small version of an image.
Tutorial: short instructive guide. A tutorial could be in any format, from video to plain text. Usually tutorials are a combination of step drawings and explanatory text.
Tracing: putting a transparent sheet or a new layer on top of a picture and directly drawing over the lines. On the ethics of tracing, check out this link.

V

Value: when putting the colour on greyscale, value is the range it falls in, with pure white being 0 and pure black being 100. As some programs use different numbers, the value can also be expressed as a percentage, for example 10% grey.
Value is regarded as the most basic and important quality of colour, and beginners are encouraged to start practicing in greyscale before moving on to full colour. The two other aspects of colour besides value are hue and saturation.

What is good drawing? How to make a difference

What is good drawing? How to make a difference

Good drawing – better drawing , how to make a difference

What is good drawing is a question that I was confronted with on my first day in school. The answer I got to that question changed a lot in my life for quite some time. The dimensions of this seemingly innocent question are much wider than one would assume on first sight.

But this question is not put up here to stage a controversy or to seek late revenge for an early injury by a stupid teacher. Rather I want to use it to arouse interest in the many facets of drawing. The question what is good drawing forces to analysis and development of criteria which allow to make a difference in quality between drawings. As a result this process will lead not only to better understanding, but also to enhanced enjoyment of drawings.

At this point it might be clear that this site is not about construction or instruction drawings, but about drawing in arts and in particular about the artistic value of drawings.

How to analyse a drawing

The analysis of a drawing often consists in separating certain aspects of a drawing. Usually it starts with the level of technical skill that the artist shows. As second aspect the content or the picture idea is examined further and finally the artistic value might be considered.
Such an approach is not without difficulty, because it is impossible to separate these three aspects from each other as their combination is what makes for the quality of a drawing. The use of simple lines might indicate a lack of technical skill, but in fact simple lines might be used with purpose as a means of artistic expression for example.

However this method is still a good way to explore drawings and therefore I want to discuss these three different layers of a drawing further.

Craft and dexterity – technical skills and quality of a drawing

What are drawing skills ?

Postcard Forest diary ink drawing postcard

I remember the tale of an artist and his king in China. The king commissioned a drawing of a cockerel to a famous artists and the artists agreed. After waiting one year as the works was still not finished the King got impatient and started to send out messengers to the artists cabin a long way in the woods.
They returned and reported that the drawing was not done yet. This happened a couple of times until the King got so angry in the 10th year of waiting that he made the journey himself ready to punish the artist on site, if he had not finished the work yet.

In the cabin the king urged the artist to do the drawing otherwise he would be killed. The artist replied that the king just came on time as he was ready no to do the drawing. He fetched a piece of beautiful rice paper, prepared the ink and laid down the drawing with his brush within a few minutes. The king was totally amazed and pleased with the quality of the work, which was a perfect piece of art and a beautiful representation of a cockerel.

The king asked the artist, why for heaven sake didn’t you do this quick drawing already ten years ago? The artist said nothing but turned to his big wall cupboard to open the doors. As the doors opened hundreds and hundreds of drawings fell to the floor, documenting that the artist had done nothing but drawing cockerels over the years until he thought that his skills were good enough. The King was ashamed and fell silent.

The most realistic or illusionistic representation in a drawing is often seen as the ultimate proof of quality in a drawing. The more a drawing conjures with a photographic image the better the quality it seems. Indeed it takes very long and talent is needed to achieve skills that enables the artist to depict a subject in aphoto realistic way.

Training of drawing skills was a major task of art academies during centuries. These academic skills were abandoned in modern art not because artist were too lazy to do the exercises, but the value of academic drawing was questioned by modern artists. Pure imitation no matter how skillful it is conducted seemed to be without artistic value.

These are two main position that have been discussed in art for a long time and it seems there is no end to this. I think that there cannot be an end or a final valid judgement on these issues. The interesting thing is the discussion itself, the different views on drawing which open new perspectives for the participants in this discussion.

Content , image idea, meaning of a drawing

Drawing as visual language

The formal content of a drawing is what we recognise first. Our perception is constantly and immediately interpreting what we see and offers meanings to us saying : This is a dog or a house what I see for example. This is a rather simple level of understanding and usually we perceive a lot more of impressions which go much further than that at the same time. Apart from rational thoughts drawings like any other picture evoke emotions.

The quality of a drawing can also literally be seen in the way and in the efficiency the artist manages to communicate with the viewers and in his capacity for original inventions and modes of execution. Drawings can be seen as a kind of visual language and some artists are better speakers than others.

At this point the connection to the previous paragraph has to be considered. What happens if the viewer is not capable to understand the visual language of the artist properly ? There are many misunderstandings regarding the quality of drawings simply for this reason. As the artist improves the skills of his visual voice with exercise the viewer improves his skills of listening i.e. understanding drawings by looking and examining drawings on a regular basis.

Artistic value in a drawing

academic versus artistic drawing

To determine the artistic value of a drawing is the most difficult task. People who might agree in considerations about technical skills and image idea still can come to totally different conclusions about the artistic value of a drawing.This disagreement is based on different ideas about what artistic value is.
It is very interesting to study many different opinions and to compare the points of view. The more one tries to define artistic value the more it seems to vanish into something vague and undefined. Words seem not to be able to grasp what is meant. “The there is a harmonic sense in lines and their relationships, a music of line that is found at the basis of all good art” This quote from the book: ThePractise and Science Of Drawing, by Harold Speed, might illustrate this difficulty.
I heard drawings praised because the artist was able to draw lines that were considered fast, suspenseful or dynamic and so on. All these attempts to address the quality of a drawing are very much based on personal standards which have beenacquired.
Over the years my own standards are changing constantly and I am eager to see drawings that are executed in a way I did not see before.

Almost every art lover has a kind of internal hit list of works or artists he likes or dislikes. The comparison and ranking of different artworks is a good method to learn about the quality of a work,especially when we want to know why we like something better than the other and start to ask questions in that direction. It can take some time to evaluate the quality , works that had been in a lower ranking might advance to a better position after some time when the work is better understood.

What is good drawing ?

The one that does not wear off !
I had the opportunity to attend workshops given by a great artists and watercolour landscape painter named Simon Fletcher. Simon Fletcher has a traditional point of view on landscape depiction and puts great emphasise on graphic skills in his work. The underlying drawing, the visual grid that constitutes a painting, establishes according to him the potential of a painting. If the drawing or graphic skeleton is not good the painting cannot be good. He also explained to his students that once the drawing has been established successfully the artist gains maximum of freedom to do with thecolours whatever he wants. His works illustrate these principles, that I tried to lay down here in short, very well.
This alone does not get us a step forward to an answer to the question what good drawing means. I found the answer Simon Fletcher gave for pictures in general applies also to drawings very well.

This is a very simple criterion, that covers all aspects and conditions of the picture itself and those of the viewer. There is indeed the phenomenon that we consume certain pictures with the blink of an eye and move over, others intrigue us, stay in our memory and attract our curiosity again and again. This is also a holistic approach that is valid without sophisticated intellectual analysis.

How to Draw by Joy: Baby’s Portrait

How to Draw by Joy: Baby’s Portrait

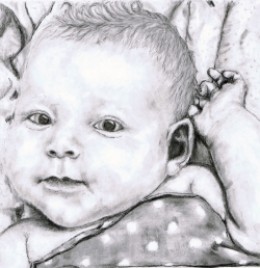
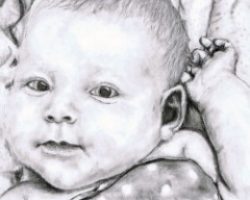
Step by step baby portrait pencil drawing

I am presently working on drawing this little one at two years old in a illustrations for a children’s book I am creating. Two of the illustrations are included on this drawing tutorial below.

This is a free drawing tutorial by Joy. Pencil drawing is a skill, that to a degree, can be learned. Of course it helps if you have an eye for it, and a creative streak within you. However, the skill of drawing can be learned by anyone with the determination and discipline to practice.

Through drawing, I have improved my photography by learning to see the world around me differently. I have also learned to think “out of the box” and pay attention to the story being told with the drawings and the photos. This seemed to come once I did not have to focus on technique so much. After a while I have become comfortable knowing what to expect out of the pencils and other supplies used in drawing, and I do not have to put effort into trying to get them to do what I want them to do. Now, I seem to be able to focus more on the composition and seeing what I am drawing differently.

I hope you enjoy this tutorial. I have many others with various drawing subjects for you to explore when you are ready.

More Portrait Drawing by Joy

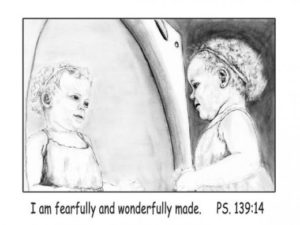
“I Am Fearfully and Wonderfully Made” portrait drawing (Aug. 13, 2012)

I am presently working on writing and illustrating a children’s book. Here is the progress on the first illustration. Just click on the photo to go to “I am my Father’s Child” Squidoo lens to see more illustrations the children’s book I am working on creating.

By the way, this little girl is the baby in the drawing. She is now 2 !/2 years old.

Finished….updated portrait of same child as in baby drawing. – August 14, 2012

Where to begin drawing your baby portrait…

Personally, I began by looking up portraits that I considered well drawn on the internet and took a look the artists who drew them, there styles, the materials they tend to use, and if they had a tutorial on their website, I read it. Some of these included: J D Hillberry, Lee Hammond, Remi Engles, and Diane Cardaci. After studying this for a few days, I gathered my supplies, and began.

Here is a list of supplies I used: graphite pencils (F, 2B, B, mechanical .7mm 2B, mechanical .5mm HB), charcoal pencil (soft, medium), a carbon pencil, tortillions (various sizes), a gummy eraser, a typewriter eraser, a scanner/printer, photopaper (to print the reference photos), strathmoore 300 Bristol (smooth) paper, a sheet of tracing paper to keep over the drawing in progress so that it does not smudge (I tend to need to protect my drawings as I travel and draw at the same time). Most of these products can be purchased at your local hobby store or amazon.com.

Essential Drawing and Sketching supplies:

Here are my favorite basic supplies for pen and ink, graphite, charcoal, and carbon pencil drawing and sketching.

Step 1:
Reference photos and grid

A good reference photo without any blurring is essential. Once obtained, scan it into your computer. Crop it to the portion of the photo that you will be drawing. Print it out in a size that you can easily see well. Next, determine the size of the portrait you will draw. A good size to start is 8″ by 8″ or 8″ by 10″. Once you have practiced a while, drawing larger portraits will not be such a challenge.

After the final portrait drawing size is determined, print out a black and white (grayscale) of the reference photo at the same size you will be drawing.

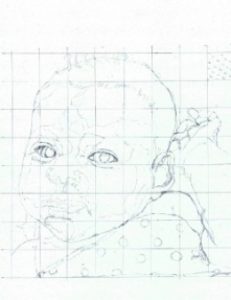
On the black and white reference photo, draw a 1″ by 1″ grid directly on the reference photo. And, then draw the same grid very lightly with the F graphite pencil on the bristol paper.

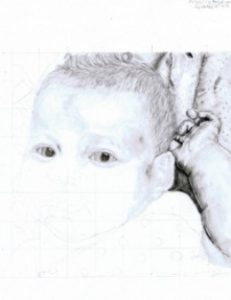
From here, begin drawing just the outline of the reference photo, square by square onto the grid. Occasional step back and look at the line drawing as a whole, but for the most part you will draw what you see one square at a time. Draw in only an outline of the reference photo, and do not include detail. If there are major areas of shading or highlights, then dot them in lightly. Here is an example of what I did.

Step 2:


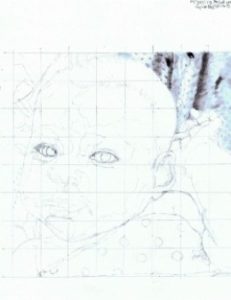
I am left-handed, so I usually begin in the upper right corner of the drawing. This is very important, because you do not want to smudge the drawing with your hands as your progress over the portrait. If you are right-hand, then choose the upper left side of the drawing to begin. I use the black and white reference photo under my hand to prevent smudging my line drawing.

I begin using my graphite pencils here and start shading using the tortillons of various sizes. To figure out where to shade, I pay close attention to the black and white reference photo. There are shading techniques that you can learn from tutorials of the above named artists on their websites or books they have written. If you pay very close attention to the details of the shading on the black and white reference photo, and play around with your totillions and pencils on a scratch paper as you go, you will develop your own technique of achieving the shading in the photo.

Step 3:
The hand and arm…

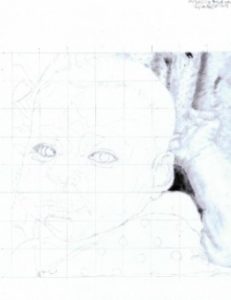
This proved to be the hardest part of the drawing for me. I had to learn not to draw lines to create the arm and hand. This one is not perfect, I still have work on developing my ability to draw this portion of the portrait. I did learn that I can kind of dot in the hand outline and use shading to bring it out. I closely followed the shading in the black and white reference photo (paying very close attention to each square of the grid, one square at a time). I drew mostly with the toritillions, not the pencil. I would just rub the end of the tortillion on the charcoal pencil and use it to shade according to the reference photo.
My Favorite Essential books for Drawing

In my opinion, anyone who loves drawing should have a copy of these books on their reference shelf. They are full of inspirational ideas and skills to enhance your own drawing performance.
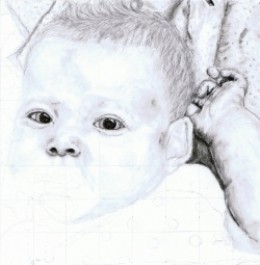
Step 4:
hair and forehead

While I moved on to the hair and forehead, I went back to the blanket and arm and hand regularly, adding darkened areas with my charcoal pencil and carbon pencil. Be sure to do this sparingly, a little dark goes a long way :-).

I learned from the above listed artists that the hair must be built up in layers. So I used the F pencil to lay the foundation, making strokes that followed the hair in the reference photo, but also following the shape of the head. I alternated drawing with pencils, blending with tortillions, and drawing with my kneaded easer in hair-like strokes, until it appeared as close to the reference photo as I could get it. I shaded the forehead the same way as I did the hand and the arm, paying close attention to shading under the hairline, and highlights.

I then began to darken in the eyes, keeping in mind that to create a real eye, the eye is round inside the eyelids, and that the eyelids contain several layers to the edges with dots rather than just a solid line.

Step 5:
The nose and ear…

As I draw, I tend to go back a little at a time, fine tuning what I have already done and adding darks and lights to the drawing.

I continued down the face to the nose, paying particular attention to the fact that a nose is primarily shaded onto the face with very few hard lines. These hard lines are created by the shadows under the nose and around the nose rather than drawn in with the pencil. I primarily used a tortillion that I rubbed on the charcoal pencil as I went along.

I also began shading in the ear, paying very close attention to the dark shaded areas to create the lines rather than my drawing them in. I also added the hair over the fingers here, and began adding more detail to the hair and building the layers in it.

Triumphant – August 18, 2012

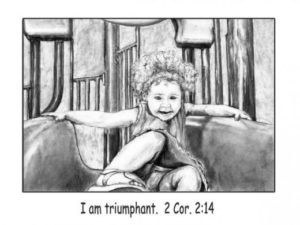
This one of her was so fun to draw. She has great facial expression. I also used a few new techniques to get the slide to come forward in the drawing.

Step 6:
Ear and Mouth

I am working my way down the face to the mouth now. I left out the bubbles from the reference photo on the mouth and began shading it in. Here I remembered from the artists listed above, that highlights are very important in creating a realistic mouth and also the deeper shading. I also paid close attention to the lines in the mouth begin careful to shade them in rather than draw them in.

The blanket was shaded in next in layers. The first layer was my 2B pencil, held like a wand and shaded in an up and down direction. Blended with a large tortillion, then shaded in with the same wand like method of holding the pencil, but this time in a side to side direction. Again, blended. Leaving the dots white and using a kneaded easer when the shading bled into it. I used the carbon pencil in spots to bring out the edges and shading in the edges. The charcoal pencils was used on the tortillion to shade in the darker folds of the blanket in the foreground.

Step 7:

In the final stage, I finished up the arm at the left bottom side, and went back to adjust the fingers a bit on the hand. I also went back with my carbon pencil and added a little dark here and there, and did the same thing with the typewriter eraser (very lightly) to add highlights here and there. The darks and the lights should be added sparingly. A little goes a long way. I will keep this drawing up on the easel with the reference photos for a while longer. This way as I see it from time to time, I can touch it up a bit here and there. When finished, I will spay with a fixative to keep it from smudging. Then have it framed and matted at a local store.

Don’t forget…

to have fun!!! Drawing a little bit everyday creates drastic improvements in your drawing. Draw what you enjoy. Post it on your own lens or FB and have fun with your drawing.

Joy Neasley — the Missionary and the Artist

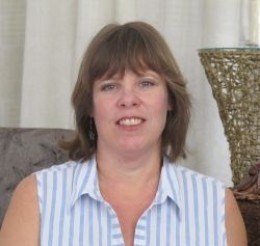
I am a missionary and an artist. I was born in East Texas, but left at age 19. Eventually, I settled in Tennessee. Over the years, I have raised two children who now live in Tennessee. Missionary training began at RBTC in Oklahoma in September 2005, with graduation from the missions group after two years in May 2007. Then, after returning to my hometown, Clarksville, TN, I began preparations to head out to Northern China, which took place in May 2008.

Drawing is a new skill which started in Spring 2009. During a time of recuperating from an illness for several months, I found ample time to spend in prayer. Out of that prayer time, I began to draw and write cards for various people, in which, I was led to spend time in prayer. Before I was finished with these cards there were a little over 60 of them. They were very rough sketches, but none-the-less, what I was led to do. Through this process, I realized what He was doing, and I continued to draw and develop this skill, and still continue to grow and develop. These drawings are the result. As I travel through China for my primary purpose of ministry, I draw, creating a visual journal of what I see.

I really enjoy the drawing and the purposes for which God has placed this gift in my life. A whole new door has opened, and I am walking through that door, eagerly awaiting to see where the road beyond it leads.

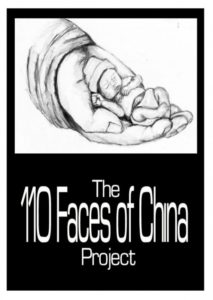
In mid-May of 2009 I moved into Southern China. I love the people and the ministry work here. I still travel around China and work where needed in association with another ministry here, also. This year, to help share the people I meet with my friends and supporters back home I am working on The 110 Faces of China Drawing Project. I have six of these finished, and working hard to get more finished as time permits. I also have started a blog with regular updates about the people, myself, and the drawings. You can check out this and my blog,” What is it like to be a Missionary Today”, in the links on this Squidoo lens. I also have a Fine Arts America website (linked to this lens) where prints and cards of my drawings and photos are made available to everyone.

Thank you for your prayers and support!

Blessings,

joy neasley

P.S. – if you want to support this ministry, the fastest way is to make an Online Donation via www.WorldOutreach.org. Go to “Donate” and select Joy Neasley – Asia. The system can process USA and International cards. Or simply mail your gift to World Outreach Ministries, PO Box B, Marietta, GA 30061, and designate for Joy Neasley Fund.

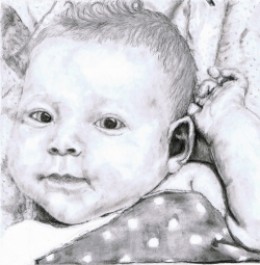
Gift of God – July 28, 2012

Steve Wannall’s Survival Guide to Being a Renaissance Festival Performer

Steve Wannall’s Survival Guide to Being a Renaissance Festival Performer

Why Perform at a Renaissance Festival?

Over the past couple of decades, the phenomenon that is the renaissance festival has been rapidly growing in popularity. From single weekend tent events, to giant villages filled with permanent structures, “renfaires” seem to be popping up all over. Still, this form of entertainment maintains a very unique quality…and it requires an equally unique type of entertainer. More and more actors, magicians, jugglers, mimes, and special entertainment performers of all kinds find themselves drawn to the nearest festival to find work. If you fit into this category (or even if you want to try to break into the business), then read on! You’ve come to the right place!

Stage vs. Street: What Kind of Performer to Be

The first thing to understand about performing for a renfaire, is that there are several ways to do it. The most common is to become a “strolling character.” Strolling characters are usually a collection of simple villagers or high class royalty who roam the festival at will and interact with the patrons in character. Sometimes these characters will represent actual historic figures like Henry VIII, or Queen Elizabeth, but often they are fictional period characters who are there to provide the appropriate atmosphere.

Strolling characters are typically hired through a normal audition process, and they become the workhorses of any given renfaire. They typically work the hardest of any of the performers, and usually get paid the least (depending on the character or amount of responsibility). Despite this fact, many performers find the job very rewarding. Aside from the physical demand, a strolling character is always “on.” In other words, they must remain in character for the entire time they are on the job. Because of this, they usually undergo a very specific rehearsal process, in which they must learn to speak with the appropriate accent and period language, as well as becoming versed in period mannerisms and greetings.

A strolling character must be prepared to know everything of historical significance pertaining to their character. A village worker must know what kinds of tools might be at their disposal, as well as period terms associated with their job. The village mayor, or sheriff must know a thing or two about renaissance politics. Of course, anyone portraying an actual historic figure must know everything about their character inside and out. Being so immersed in a role can be a fun challenge for an actor, but it can also prove hard to “turn off” at the end of the day. Just remember the phrase: “the beer is in the pickup truck” when trying to get rid of an accent you have been using all day long (although, by using this method you run the risk of simply replacing one accent with another).

Depending on the festival, strolling characters will often need to learn scripted material created to build specific interactions between characters. Sometimes, there is a plot line that is followed throughout the course of a day which may involve making appearances at certain locations, or even being in a staged play.

Some festivals will cast other plays and street performers out of their already existing cast of “strollers.” This may provide opportunities for additional income, but it also might mean more of a physical demand. Needless to say, there is a lot to take into consideration before becoming a strolling character.

The second type of renfaire performer is the stage act. These are the headline entertainers with already existing, pre-rehearsed, and pre-packaged shows which they perform on stage, or in the street at regular intervals. Performers in this group include jugglers and magicians, sword-swallowers and acrobats, singers and dancers, and a myriad of other entertainers with special skills. Being a stage act can be a very different experience from being a strolling character, but it has its own set of pros and cons.

On the plus side, stage acts typically make a lot more money for a lot less work. Instead of being in character for a whole day of walking around, stage acts usually perform intermittently in fixed locations for only short periods of time (typically anywhere from 20-45 minutes). While some stage acts find themselves performing a large number of shows, occasionally at different locations, there is usually plenty of down time for breaks. Depending on the success of the show, stage acts may even enjoy a slight feeling of celebrity from developing a fan base. While a stage act at a renfaire does have to make some concessions for the period (it doesn’t make much sense for a magician to be doing tricks with lasers and buzz saws), they usually have a bit more leniency as far as what they can get away with. It is not at all unusual for a special events entertainer used to performing in bars and clubs to perform a slightly “tweaked” version of their normal “non-renaissance” show.

On the negative side…getting a job as a stage act at a festival means building and rehearsing a whole show entirely on your own…and then convincing an entertainment director or festival owner to buy it. This means putting together a good pitch and some promotional material, or at least some decent video footage of your act. The bad news here, is that it is a highly competitive market, with many different acts all vying for the same venues. In order to land a job at the best faires, a stage act either needs to be singularly unique, or VERY high quality. Building a show that fits with the theme very often means having a special skill or talent (such as juggling), although a good performer will find that just a little bit of creativity can go a long way.

Stage acts will also find that certain festivals are what we call “hat faires.” These are festivals where an act’s base pay will be lower (or even non-existent) because they are allowed to “pass the hat” during their performances. Busking for your pay may be appropriate to a renaissance setting, but it also means not having as steady of an income. There will be days when there are huge crowds who love you and are willing to throw all kinds of cash your way…and then there will be days when the crowds are small and strapped for cash after paying for their admission to the festival, souvenirs for the kids, and food for the whole family.

Stage acts are also responsible for supplying their own props and period costumes…which can get kind of expensive. In some cases, a stage act might manage to get the festival’s resident costumer to outfit them, but having something already put together to sell to a renfaire is always preferable.

An important skill for a stage act to have, is that of contract negotiation. Before accepting any renfaire job, it is a good idea to know any up-front expenses, and exactly how much money you will need in order to make the job worth it.

Be Prepared for the 16th Century!

Health and hygiene for outdoor performing

As a veteran renfaire performer, I have accumulated a good deal of experience acting in an outdoor setting. I have also witnessed the culture shock of many an entertainer performing in the rain or blinding sunlight for the first time. Needless to say, it takes a very different skill-set than acting in a darkened theater or nightclub. A lot of the following advice may seem obvious…but for anyone preparing to don the garb in the near future…this bears repeating.

1. Wear comfortable footwear.

Okay, I know it seems like there isn’t much choice in the matter. Period shoes are period shoes, and most of them aren’t made with comfort in mind. Still, if your feet are getting punished, your whole body will suffer. Luckily, this isn’t too hard to fix. There are many brands of new boots and shoes that are made in a renaissance-passable style, and if you are willing to spend some money, every faire has their own cobbler shops that make very high quality boots, moccasins, etc. specifically for use at festivals (I also recommend shopping online for the best deals). In a pinch, get yourself a good insert with arch support. You won’t regret it.

2. Cover your noggin!

16th century hats, hoods, and snoods are not only stylish and period appropriate, they can save you a lot of grief. True, some of them don’t do much more than look pretty (or even pretty stupid), but they can keep you dry in the rain, and shield your eyes from the sun. For a nifty trick…you can even conceal a small watch inside of a hat. That way, if you get asked for the time (and you will), you need only lift off your hat, use it to shield your eyes as you pretend to gaze in the direction of the sun, and then boldly pronounce the time of day.

3. Wear sunscreen.

Duh.

4. Stay cool and hydrate.

Again, duh. This one is especially important however, because at a renfaire this might not be all that easy to do. If you happen to be portraying royalty (thank the Lord that I never do), you are particularly susceptible to heatstroke, as you will probably be wearing enough upholstery to build a couch. The best thing to do is budget your time to include breaks where you can strip off layers. And for pity’s sake, stay away from the ale and drink water!

5. Carry anti-bacterial hand sanitizer.

Some festivals have full, amusement park quality bathrooms with running water. At others, you will get little more than plastic port-o-johns. In either case, you’re going to want an easy way to keep your hands clean before you start gnawing on that turkey leg or hunk-o-meat-on-a-stick. Even if your village is the kind with the nice washrooms (personally, I think the existence of “nice” ones is a myth), you may find yourself avoiding going to them for several reasons. Ladies can attest to how difficult it is to hit the privy wearing a hoop skirt and corset. And guys…take it from me…it’s no fun having to stand at a urinal next to someone who’s “a big fan!” On the same note as clean hands, I highly suggest keeping your nails trimmed. Many faires are pretty dusty, and grime can build up quick (just ask a performer at a festival without paved pathways what it’s like to blow their nose at the end of a day).

6. Know where first aid is.

Any festival that hires you will give you some kind of orientation on this subject. Take it seriously. Festivals are fun, but there are a dozen ways for a performer to get sick or injured.

7. Remember, you are not REALLY in the renaissance!

There is historical accuracy, and then there is just plain stupid. Many of the customs, fashions, and practices from centuries ago are no longer in existence for a good reason…because people DIED from them. There is nothing wrong with wearing a stylish little fox tail on your belt, which was done in the renaissance to attract plague-carrying fleas away from the body, but it is no excuse to stop bathing! And ladies, a tight corset may be attractive (and historically accurate), but use your better judgment when lacing them. There has actually been a rise of ailments that have not been seen among women for 300 years…specifically because of the new popularity of renfaires and all the corsets that women are once again wearing! When in doubt, go with your modern education over obsessively staying in character.
Best Festival Poll!

To anyone who has ever worked at, attended, or even just looked into more than one renaissance festival…here’s your chance to sound off!

Theater For Children

Theater For Children

Kids Performing Art!

Theater is one of the most exciting and most educational projects you can to do with kids.

Developmentally, it’s hard to top theater. Drama can teach word skills like reading, writing, imaginative composition (fiction they call it, or drama), plus a feeling for the spoken music of words and poetry. Not to mention a smattering of history and literature.

Socially, drama teaches both cooperation AND independence, recognizing and dealing with emotions, empathy, plus the practical skill of speaking in front of an audience. Public speaking is a skill many adults wish we had developed. Music. Dance. Magic tricks. Almost any skill or interest can find a home onstage. There’s a whole branch of theater called improvisation: always useful to learn how to think on your feet. And as children get more involved in what’s called “technical theater” – all the props, costumes, sets, lights, sound etc. – math skills, visual and spacial skills, and handicrafts all come into play. Plus innovation. There’s a LOT of problem-solving in theater.

There’s also a great deal of comradery and joy.

Start small and easy: goof around with puppets, make masks, recite a poem, act out the Three Bears – – – Have fun onstage.

The picture? A set from a children’s production of “Charlie and the Chocolate Factory.” Since I happen to have an abundance of factory-themed children’s sets to decorate this Lens, let’s think of it as a big Drama-Fun Factory! I’ll point out some of the gears and levers that will help you make your own at-home theater. It’s also a factory-in-progress (as all my Lenses are), so please visit again to see what new gears have been added.

Puppet Theater

Always popular with kids
There is something fascinating about puppets. They combine the make-believe and miniature joy of dolls with the expression and story-telling of people – while, best of all, shy performers can hide behind them like a mask. (More on masks later.) Any child can say more, a lot more freely when using a puppet. (As psychologists know.) Puppets are freedom and wild improvisation.

It’s most fun to build your own puppets and puppet theaters, but store-boughten is fun too.

Do It Yourself Puppets

Punch. Where’s Judy? PAPER BAG PUPPETS – Maybe the simplest puppet is the paper bag puppet. Take a plain brown lunch bag and have your child draw the puppet’s eyes and nose on the bottom, so that the fold (where the bottom folds flat) becomes the inside of the puppet’s mouth. Colored markers or poster paint (not too wet!) will look bolder and more effective than crayons or pencils. Adding cut paper elements will make the puppet more exciting: a red construction paper tongue for a snake maybe or great big ol’ cow licks; the cow’s horns or moose antlers; arms and hands; or perhaps a silly mustache or paper wig. Scraps of fabric or fur can be fun. Anything, really. Go to the movies and watch the crazy puppets in the Fandango ads.

Now, how about adding a huge grocery store bag puppet to play the giant?

SOCK PUPPETS – Just as easy to make if you’re up for a little simple sewing: buttons for eyes, scraps of fabric for tongues, ears, hands; wool for hair.

GLOVE PUPPETS – One woolly glove becomes a quintet of actors. Or cut the fingers off (roll-hem the cut edges) and create five separate prima donnas. You could experiment with wool versus cotton versus rubber glove fingers (rubber for aliens maybe? add little teeny antenae) or roll your own finger tubes from any fabric or even stiff paper.

POPSICLE STICK PUPPETS – Almost any picture can be either printed onto stiff card-stock paper or mounted onto cardboard and glued to a popsicle stick. I suggest either adult-applied spray mount (flattest most permanent) or child-applied glue stick for the picture to cardboard gluing, then white glue like Elmers or hot glue (adult again or old enough child) for the picture to stick attachment. Try cutting out arms or heads separately and attaching these to the puppet’s body with old fashioned brass brads so you can change their poses. Suddenly they can emote!

OTHER “STICK” PUPPETS – As with popsicle sticks, almost any stick-like object can turn into a puppet. Try decorating wooden spoons or toilet paper tubes (which make finger puppets). Or how about – new! clean! – toilet plungers? Or spatulas or decorated pencils or pool noodles with drawn-on permanent marker faces?

SHADOW PUPPETS – These can be cut out cardboard shapes very similar to popsicle stick puppets. They needn’t be decorated with color unless you want to, but “decorations” made by cutting holes can be fun. Bring out the hole punch! I imagine you might be able to cut out small areas and then fill these with colored tissue paper or translucent plastic for a stained glass effect. Obviously you’ll need a shadow screen – stretched white fabric or paper – and a strong light to make these work.

MARIONETTES – These are more complicated puppets, but all you absolutely need are two flat sticks fixed together in an X with strings from the four ends that tie to the puppet’s arms, head, and legs or rear (whichever is funnier). The “puppet” could be any loose jointed doll – made of cloth or wood or cardboard tubes.

For older kids with advanced skills and a LOT of patience – and an interest in video – you could try making your own short film. Film puppets in action! (Watch a Muppet movie. Like that.)

Or if VERY patient and motivated, try making clay “puppets” to shot-by-shot act out a brief Claymation film. (Watch a Wallace and Grommet movie to see how masters do this!) But this stop motion filming technique is only for the extremely motivated and patient!

Puppet Videos

Scottish Falsetto Sock Puppet Theatre – Romeo and Juliet Part I
Rated PG – Extra Silly
Meant for older kids as it gets a bit, slightly, um, vulgar as the Bard and Scottish Sock Puppets are so apt to do. Make a nice antidote to classroom reading of this classic! The other vids are suitable for younger children.

Masks

Using and making masks for children

Poof! You’re someone (or something) else. Masks seem magical – a natural development of the baby’s game of peekaboo.

Masks can be made from almost any material: a paper grocery bag; a paper plate plus string; cut cardboard, felt, or craft foam plus elastic; paper mache (lots of goopy fun); or, if you’re ambitious, leather etc.; or there are lots of mask kits, where you start with a pre-formed face shape and decorate and add to it.

PAPER MACHE – Amazingly cheap and simple, though time consuming. Tear or cut newspaper into strips, the thinner, the more detailed you can get. Mix flour and water to make a thick paste, soak the paper in this till sticky but not soggy, then slowly build up your shape. It’s easier if you have a shape to lay the strips over. A kid’s-face-sized balloon can work or a plastic mask. You can add in cardboard to reinforce protruding pieces like ears or tusks – make sure these are well integrated into the face proper so they won’t rip off easily. Allow several days for the paper mache to dry before trying to paint or decorate it.

Varsha, My Photography Journal

Varsha, My Photography Journal

Backtracking my photography learning process through a model

I decided to seriously learn photography back in December 2011. I purchased my first digital camera, which was Sony NEX-3, and started to read some photography books. Until today, I have participated in three professional photo shoots and five photo exhibitions. One of the most remarkable person during my learning period of this art is Varsha.

Varsha was my first “unofficial” model. I practiced a lot of basic theory and concept of capturing image with her as the main subject. Sometimes I asked her to pose, but most of the times I took her pictures in candid. Indeed, the photos of Varsha show the progress of my photography learning skill, from a real newbie until now. In this article, I would like to share some of my photographs of Varsha. Please kindly share your comments and feedback about my work.

A story about Varsha

Varsha is a student who studied Bachelor of Arts in Telugu (one of national languages of India) in Hyderabad between 2009 to 2012. She pursued her degree under the scholarship of Indian government in Koti Women’s College Hyderabad. I met her for the first time in 2011 through one of my classmate who also originates from Mauritius.

Varsha is physically very attractive and perfect to be a model for my photos. She is also very friendly, thus it makes me more comfortable in taking her pictures. The first time I took her photo was during a trip to Medak, a remote district about three hours driving from Hyderabad. At that moment, I felt that her face was very camera friendly. Therefore, I decided to take her photos regularly as a part of my learning process.

Varsha originates from Mauritius, a very beautiful island, a paradise on earth. Mauritius is located on the south east of the main continent of Africa. This country is full of amazing beaches, beautiful jungles, and wonderful people. Most people in Mauritius have Indian blood, and they speak French as the first language. I worked with Varsha in two different photo shoot, both of them when my skill was at very newbie level.

Photoshoots with Varsha

I spent a lot of time with my Mauritian friends because they are very good people and student. They invited me a lot to have some lunch, and we went out together to watch movies, concerts, and other interesting spots in Hyderabad. The first time I seriously took photos of Varsha was in November 2011, when I and three of my Mauritian friends (including Varsha) watched Zeb and Haniya concert in Ravindra Bharati, Hyderabad. At that moment, I successfully captured some very great candid photos of her.

After being able to take a bunch of great photos, I successfully convinced her to be a model for my photo shoot titled “The Night Song”. It was my very first photo shoot that I did only two weeks after I purchased my first DSLR camera. She performed surprisingly above my expectation. Her photos that I took during “The Night Song” were really great, and some of them were even selected for my international exhibition in Hong Kong and Singapore.

Another moment when I successfully captured great images of her was during Ugadi, one of the traditional festival for South Indian community. She dressed in saree very nicely, and we went to the temple and visited a lot of friends and relatives who celebrated Ugadi. During our trip, I took a lot of beautiful candid photos of her.

About two months after Ugadi, we worked for our second photo shoot titled “The Mystique of Love”. It was done for my photography assignment in my course and located in landscape garden, Osmania University. The photo shoot was rather challenging for me, compared to the first one due to the technical aspects and my lack of experience as a photographer. But from this work, I really learned a lot of useful things in photography.

Varsha finished her course in summer 2012 and went to her country immediately. Unfortunately, I didn’t have the chance to say my last goodbye and to take more photos of her because I was abroad.

Some tips to improve your photography skill

Try to take photos every day
More photos you take, the better your skill in photography. If you really want to be a good photographer, try to allocate at least half an hour per day for hunting pictures. By taking a lot of good photos, your technical skills, experience, and sensitivity as a photographer would improve. One more thing, try to think this habit as something fun, not as a boring responsibility.

Spend some time to review and select your best photos
Among of those photos you take regularly, you have to carefully select which photo to keep and which to delete. Be selective, and don’t hesitate to delete not so good photos. If you want to publish them in social media or online album, then you have to be more selective. Only publish your best photos, or the one that has special meanings for you.

Use a prime lens
Instead of zoom lenses, it is better to start learning photography by using prime lenses. Prime lenses will make you use your legs more in order to make the subject closer or farther from your camera frame. They don’t have zoom feature so you are forced to move a lot when taking images. By using prime lenses, you will learn how to depend more on your body and eyes rather than the zoom.

Learn to use manual focus
Manual focus is the best way to get the perfect focus. Although in modern days some autofocus of an expensive camera also performs well, but nothing can beat the accuracy of manual focus. Thus, learn to take photos with widest aperture as possible (to enable you detecting the focus point more easily), choose a single subject, then try to get the best focus of a specific part of the subject.

Focus on the eyes of the subject
After learning the principle of focusing, it is advisable for a beginner to practice with a living subject such as human and animal. At your very first few weeks of learning, try to take a close-up photos of the face. When taking photos of living things, the most important thing is to make sure that your camera focus is on the eyes of the subject. When you do it right, your photo will look better.

Persian Band Concert

Persian Band Concert

My experience taking photographs in a live concert

Taking photograph of a live concert is not an easy work. You need good camera, good lenses, and good position near the stage to be able to take the best pictures. One of the assignment in my photography course was to take good photos of live music concert. Considering the fact that I didn’t have those great equipments, I decided to come to a music concert that was held in a small auditorium. Thus, the distance between me, the stage, and the musician won’t be too large, and I could take decent photos with my fifty millimetres lenses.

The concert was held in one of the university in Hyderabad. The performers named”Persian Band”, a group consists of Iranian and Indian musicians. In this article, I would like to share some of the best photos that I successfully took during the concert. Please kindly give me your feedback and comments.

About the concert of Persian Band

It was a small, but very memorable concert
The concert of Persian Band was held in April 2012, just a week before the deadline of my concert photography assignment for my diploma course. I found the concert as a perfect opportunity for a beginner photographer like me to sharpen my skill. It was impossible for me to take a photos of a band who performs in big venue, as I didn’t have appropriate zoom lens to take a good close-up photos. Thus, this concert was my only hope to complete my assignment.

Luckily, the organizer gave me a journalist seat, a place near the stage which allows me to take good photographs. They even said that I could approach the stage if I need better angles. As the size of the stage was not very large (approximately only ten by twenty meters), it wasn’t a big problem for me to take the photos of the concert.

The Persian band consists of three members: two female vocalists, three guitarists, a bassist, and a drummer. Three of the members are from Iran, and the rests of them are from India. The concert lasted about one and half hour, and during that much period I focused on taking close-up pictures of each band member. I wanted to take some photos from different angles and want to make the viewers of my photo feel the music within the photos. The images that I took should look dynamic and dramatic

Taking the photographs

It is not as easy as it seems
Believe me, taking photos of a musician performing on stage is not as easy as taking photos of a model. You need to always put your eyes on the viewfinder and be ready to click the shutter button on the right moment. When you miss the best moment, it is gone forever. I almost couldn’t enjoy their performance because I was too busy with my camera, struggled to capture the most memorable moments from the concert. However, judging from the audience’s big applause, I thought the band performed very well.

I also had to move a lot, from one side to another. Sometimes, I missed a good moment because I was on the move and was not ready to click my camera. Sometimes when I got the perfect angle and moment, I missed the focus point so the image was very blurry. Indeed, it takes a lot of hard work and efforts to be able to take good photographs of a live concert.

Fortunately, I managed to take around twenty good photos. I submitted those images as my assignment in my photography course. Some of them (which I couldn’t publish on this lens due to copyright issues) were selected to be featured in a local magazine and exhibited at a university exhibition. Based on my experience, I strongly suggest all beginner photographers who read this lens to go to a small concert and try to take as many good photos of the performers as possible. It is a very challenging task, but when you successfully accomplished the task, your skill and confidence as a photographer would significantly increase.