How To Pack & Ship Art
As an artist you will have to embrace shipping as a necessary part of your business in order to increase sales potential Many artists with whom I’ve spoken are afraid of shipping. Having a wonderful one of a kind piece of artwork destroyed in transit is a is something every artist loses sleep over. I know I do and I have been shipping my artwork all over the US and occasionally out of it form many years..
As a gallery owner I do a lot of shipping. They key to get your artwork from you to it’s future home is all in the packing. A well packaged item should arrive in mint condition provided something truly unpredictable doesn’t happen with the carrier. I have never had something arrive damaged and need to be replaced. However I’ve had plenty of things arrive at my gallery in a shambles because the original owner just stuck it in a box and handed it over, trusting the carrier to not toss it around like a sack of potatoes.
What You’ll Find On This Page
* Packing & shipping informations regarding using tubes, envelopes and boxes.
* Shipping Supply Companies
* How To Make Your Own Shipping Boxes
* Where To Find Free Recycled Supplies
Common Carriers In The US For Shipping Artwork
Shipping Companies For Your Artwork
Packing and Shipping Supplies I have an order or preference for shipping which is basically relevant to how much they charge to move my package. So my favorite carrier company which is Speedee, just also happens to be the cheapest. But they also make requesting a package pickup, the easiest and they offer services like 24 hour delivery at no extra fee. The downside to them is they only cover part of the country. They deliver to only 6 six states in the Midwest.
So here’s a list of all the carrier companies I do business with regularly, complete with links and what I like about each.
USPS United States Postal Service
usps.com
I actually use the post office for most of my smaller shipping needs. Priority costs are reasonable enough as long as the overall dimension (circumference completely around the width of the package) does not exceed 108″. Once you get past that size the cost go up exponentially and it is in your best interest and pocket book to to find another carrier. And if you want to track a package shipped with USPS click here.
FedEx Federal Express
fedex.com
This has become my second national carrier of choice. I used to do everything with UPS but they had a serious rate increase a year or so back and most days FedEx is about 30% cheaper than UPS when shipping the same package. I almost always check both carriers to see who’ll do the job for the least amount of money. And If you want to track a package via FedEx click here
UPS United Parcel Service
ups.com
This is usually my last choice in carriers these days though I have shipped literally hundreds of packages with UPS and other than them being the most expensive most days, I was very happy with their service. And if you want to track a package with UPS
Speedee Delivery Shipping Carrier
Companies For Shipping Your Artwork
And here’s a little known but excellent carrier for the Midwest
Speedee
speedee.com
I love these guys and ship everything I can with them. They are cheap and they are good. Exactly the combination I like The only downside is they only cover a few states. Iowa, Wisconsin, Minnesota, North Dakota, South Dakota, Parts of Nebraska and Illinois. And if you want to Track a package via Speedee click here
But if you live in this little circle of heaven these are just the guys to move your art and do it well.
Specific Benefits To Using Speedee
* They don’t have any extra fees for home delivery
* I’ve yet to ship a package so large as to incur oversize fees (both FedEx and UPS will charge me extra for the same size that Speedee handles.)
* They will pick up at any location for just $10. And trust me you save far more than that by using with them.)
* The almost invariably deliver within 24 hours again at no extra cost.,
A Story About Carrier Rates To Illustrate My Point
I had three large boxes that needed to go to Rapid City SD from my home town in Iowa. I first took them to UPS. The cost was $94 for all three. I checked out FedEx and it was around $70. I then called Speedee as I hadn’t shipped with them before this. All 3 packages to Rapid City by the next day for $32 and that included the $10 pick up charge from my gallery. Yup been a loyal fan ever since.
Shipping With Mailing Envelopes
Using Mailing Envelopes For Small Shrinkwrapped Artwork or Prints
Shipping artwork using mailing envelopes Shipping small prints either with or without matting is a fairly simple affair. In the above photo I’m using a USPS Priority mailing envelope which is made of a durable yet flexible material. I like these because of the size, which is 11×14. I mat many of my small collectible prints to fit this standard framing size so the envelope is the perfect fit. These come with the price set of usually around $5, so if you have a smaller print (say something that fits in a 9×12 envelope) that doesn’t need to go priority mail you can use your own envelope and save a little money. I tend to do that with ebay sales or sales of that nature. Generally just regular first class is about $2 to give you a comparison.
Shipping With Mailing Envelopes
Using Mailer Envelopes:
* Have print mounted to stiff backer board and shrinkwrapped or put in a protective sleeve. This is not only to prevent moisture damage but also protect the print while being handled.
* Apply a piece of cardboard or backer board over the face of the artwork,* Slip into envelope with invoice.
* Be sure to either write “Do Not Bend!” or apply labels to that effect. You might think that a postmaster would never attempt to bend a stiff envelope but I have had them do so despite the extra cardboard and labels.
Protecting Your Artwork With Sleeves or Shrinkwrapping
Packing Materials And Supplies
Having your artwork covered with either shrinkwrap or a protective sleeve is always a good idea whether your shipping them or not. Once protected your art is now easily handled without fear of damage dents, creases, scratches and dirty hands. Also when in transit a shrinkwrap or sleeve may keep moisture from doing any damage.
These clear envelopes are a great idea for do-it-yourself kind of shrinkwrapping. They come in a variety off sizes and are pretty cost effective, especially if you’re buying in bulk quantities.
My Favorite Supplier Of Protective Sleeves & Envelopes
One of my favorite supplier s for the is www.clearbags.com They have a staggering array of sizes as well as all sorts of packaging and marketing solutions for artists and craftsman. If you have a large variety of sizes to your product line these guys are a great company. I’ve been getting my supplies from them for many years and have always been happy with both the products and the service.
Padded Envelopes and Bubble Envelopes
Packing and Shipping Supplies & Materials
I don’t use these a whole lot because I tend to ship most of my items priority postal so I just use their envelopes. However these have that add little extra cushioning which is always great for mailing your artwork. Despite this you must still be sure to have some sort of cardboard covering on both from and back of your artwork to protect it during transit.
Rugged Mailers
Packing and Shipping Supplies & Materials
Rugged Mailers are also a really good alternative and they come in a nice assortment of sizes. Be aware that they can still get bent but it’s a rarity. Never hurts to add a little extra support of cardboard if there’s room, to these as well.
Packing Larger Shrinkwrapped Artwork or Prints Flat
Once again how much effort you put into packing your larger prints will depend mostly on how badly you want it to arrive at it’s destination in mint condition. If your mailing a one of a kind item that can’t be replaced or even an item that is costly to you to replace go, do the extra effort necessary to ensure it’s chances of arriving safely.
For a print in most cases it is sufficient to just have several layers of cardboard on both top and bottom. Cut these pieces at least 2″ larger than the size of the object being shipped. This is minimally what you’ll want to do to ship a larger shrinkwrapped print flat. This amount of packing will allow for minor denting of the cardboard both on the corners and on the face of the cardboard. It also makes bending pretty much impossible.
The Steps For Mailing Artwork Flat Are:
* Make sure the artwork is sealed in shrinkwrap or a protective sleeve.
* I then slip this in an additional bag with the invoice (on the back side of the backer-board, not on the face of the artwork) tucked in with it.
* Cut a piece of foam or thin bubble wrap to size of the object being shipped. I prefer the foam but bubble wrap will work as well.
* Cut at least 4 pieces of cardboard 2″ larger than object being shipped. Tap lightly to hold everything in place.
* Slip into an additional box frame for extra support.
Now if it’s an important piece of work I may slip a sheet of two of mat board in with the cardboard. Mat board is incredibly dense (unlike cardboard) so it is better at deflecting dents and stabs.
Using Mailing Tubes For Packing Artwork
How To Pack Artwork Using Tubes.
packing and shipping art using mailing tubes *Note: The art print featured in this photo is by Marion Gunderson Arts and was used with permission.
Whenever possible using tubes is my preferred method of shipping prints.
Most of the time I send my medium sized prints (say paper size) flat and in shrinkwrap as this not only makes for a nicer presentation when the customers opens the box, it also helps keep the art in mint condition until either being gifted or framed. But for prints ranging in larger sizes I send in a tube. It’s fast and nearly effortless. 5 minutes time is about all it usually takes.
What You’ll Need To Mail In A Tube
* The Mailing Tube (obviously)
* Plastic bag. (for packing option listed at the bottom)
* Sheet of paper slightly larger than the artwork being shipped. Usually a 1″ allowance all the way around is adequate and cut to fit the tube.
Using Heavy Duty Mailing Tube
The First thing to do is to roll up the print.
Lay your print in the center of you sheet of paper and roll them up together simultaneously. Slip this into the tube. DO NOT tape the paper roll. Just slip into the tube and allow it to expand to fit tightly inside the tube.
The paper serves a couple of functions
* First he keeps the print from sliding back and forth in the tube and potentially denting the print.
* Second most folks really don’t think about how clean their hands are when opening up a package. By having a bit of the paper surround it helps keep the print clear when being removed from the tube.
Be Sure To Include An Invoice Or Address On the Inside Of The Tube
It’s always recommended to have the destination included on the inside of any package you are shipping just in case it gets torn open and become separated from the original shipping contained.
Apply Label And Tape Shut
I always tape my tube ends securely no matter how snugly I think they are sealed.
Using A Reinforced Carriers Light Weight Tube
I have used USPS Priority Mail tubes (as is) for hundreds transit jobs and never had a problem. But then there was this one time that it arrived to the purchaser completely trashed and flattened. It’s rare but it does happen. So if you’re shipping something that’s not easily replaced either use your own heavy duty tube or modify the carrier’s tube.
Since Wild Faces Gallery is also a giclee publishing house we have plenty of extra heavy duty tubes from our rolls of paper. They are of course no end-caps so they are kinda useless as shipping tubes on their own. However they are exactly the extra durability I need when using one of the carriers triangular tubes. So the steps are pretty much the same as above.
The First thing to do is to roll up the print.
Lay your print in the center of you sheet of paper and roll them up together simultaneously. Slip this into the tube. DO NOT tape the paper roll. Just slip into the tube and allow it to expand to fit tightly inside the tube.
Affix Mailing address or label to the outside of the inner stabilizing tube
Slip tube into plastic bag
This has to do with common carrier cardboard triangular tube are made of a light weight cardboard. Occasionally a postal delivery person may leave the tube outside of someone’s home. The bag is just that little bit of extra insurance that if it rains, the print will arrive in perfect condition. And yes this has happened to me.
Slip tube into carrier triangular shipping tube And tape the ends shut.
Packing Framed Artwork
Packing and Shipping Framed Artwork
A Few Things To Consider
I have shipped large framed items from one end of the country to the other and have yet had anything arrive broken. That being said the amount of work involved in shipping a large framed piece of work is substantial and as an artist you must figure out whether the cost of packing materials coupled with the amount of time involved is the worth the “net” value on what you’re earning with framing charge. You may find it is much easier to simply sell only unframed items.
Since we have a full service frame shop in out gallery our net on framing is pretty good so we do ship framed prints and on rare occasion framed originals.
Note: Whenever shipping framed originals I replace the Conservation Clear glass that all my artwork is framed in, with a conservation grade picture framing acrylic. This won’t shatter (unless the shipper runs over it or something, and then you’ve got bigger worries) in transit. Broken glass inside a packing parcel will slice and shred as the box is handled.
Since Conservation grade framing acrylic is expensive you can also use just regular acrylic or plexiglass. Another less desirable option would be to put some sort of masking tape of film over the glazing so if it does happen to break the broken glass won’t be slipping around the box.
Steps For Packing Framed Artwork
Apply Cardboard Corners to the Frame This is sort of an optional step because if you’ve done your job correctly you won’t need them at all.
Wrap The Frame Artwork in copious amounts of bubble wrap How much depends on the kind of bubble wrap your using. If using large pocket bubble wrap you can use less, and the tiny bubble pocket bubble wrap you should use more of. I generally like a good 3″ inches of bubble wrap surround.
Wrap This In An Additional Layer of Either Flexible Foam Wrap Or Corrugated Cardboard Role I use the cardboard role primarily because it’s what I have on hand. The purpose is to add a firmer shell to the bubble wrap and create a tight package.
Write Address or Include it On The Package Once again it’s always wise to include the mailing address inside the package in case the contents ever get separated from the packing box. (Heaven forbid)
The Box Needs To Be Sufficiently Larger than The framed item Most shipping companies like to have a stabbing depth of a couple of inches so bear this in mind when packing. You should have a durable product that will hold your framed item in the center of the box. I often use styrofoam for this as it’s lightweight, stab resistant and cuts easily to fit my needs.
* Cut two sheets foam the size of your box
* Lay Foam Sheet In Bottom of Box
* Set wrapped framed artwork in center of box.
* Cut Strips to tightly fit between package and box wall. If you think it necessary tape in place so package won’t slip.
* Apply Other styrofoam sheet over top
* Put Lid On Box
Tape Shut and Add Mailing Label Packing is very easy to do but rather time consuming. Judge for yourself if it’s worth the effort.
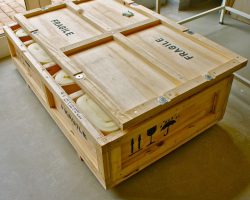
Note: Many art exhibit require you to ship your artwork not only to them but then they need to use the containers and wrapping to return it back to you. And if it’s a traveling exhibition the packing materials need to be sturdy enough to be reused time and again. This often means you need to build a special wood crate. I won’t go into how to do this specifically since different galleries and shows have different requirements for this. Just be aware that simplicity and durability are what is required above all else for this kind of packaging.
Earth Friendly Ideas For Packing Your Art
Recycling Products For Shipping Your Art
Packing & Shipping materials In this economy it forces people to rethink how they can better save money in areas where they won’t feel the pinch. Packaging your artwork is one of those areas. I pack and ship a fair amount of stuff, (about 100 good sized boxes a year) which could potentially be a huge expense in packing materials. Not to mention we’re all getting more Earth conscious and knowing that so much packing materials just wind up in the landfill after just one use. This strikes me a kind of appalling.
Anyone who has ever bought a role of bubble-wrap at your favorite business supply store knows that boxes, and bubble-wrap can add big costs to your bottom line if you do ship often. So I’m going to share a little free packing supply secret …well it’s not really a secret, it’s just no one ever asked me) Yup I get much of my packing and shipping stuffs free.
So I’m going to share a little free packing supply secret … (well it’s not really a secret, it’s just no one ever asked me.)I reuse much of the packing materials that I get in my gallery most of which comes in from my framing orders. But the bulk of my packing supplies comes from other sources. The absolute best place for excellent packing materials that are free? A furniture store.
At one time I had an artist friend who worked at a furniture store and when he was doing a delivery in my home town, he’d pull the truck around and drop off a truckload (literally) of huge sheets of bubble-wrap and flexible foam sheeting. Most furniture stores throw tons of it away and it just sits in our landfills. The furniture store he worked for was thrilled because that was a little less that they had to pay to get hauled to the landfill. And of course I was thrilled because it saved me fortunes (the savings of which I passed on to my customer.) And frankly, I have no way of buying huge sheets of wrap like that. (Picture blanket sized for wrapping up beds and couches. Lovely, glorious packing stuffs.)
Also, our local vet clinic is very green oriented. They get in heavy duty air packing pillows and sheets that from their delicate bottles of medicine they receive. Our small local vet clinic can usually supply me a 30 gallon garbage bag full of the stuff in a week. These tend to be smaller bits which work well for shipping smaller works or dimensional items.
So I guess the point of this is if you are looking to save a little money and are willing to be creative with who you approach, you may well save a substantial amount in your packing materials costs. Plus a little less goes in the landfill because it was recycled at least once. This way the landfills, the furniture store, my customers and I, all win.
Free Shipping Supplies Sent To Your Door
Free Materials & Supplies Available From The Common Carrier Companies
The big name shipping companies like UPS and USPS provide free boxes and envelops that will be delivered to your door … yes for free.

