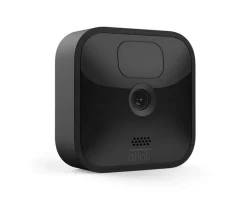
The Blink Outdoor 2 Camera System is a great way to keep an eye on your home or business. The system includes two cameras, a base station, and a Blink Sync Module. The Blink cameras are battery-powered and can be placed anywhere. The base station is plugged in to an AC outlet and connects to your home network. The Blink Sync Module connects wirelessly to the base station and allows you to sync your Blink cameras to your smartphone or tablet.
Here are some tips on how to use the Blink Outdoor 2 Camera System:
1. Choose the right location for your Blink cameras. The cameras should be placed in an area where they can get a good view of the area you want to monitor.
2. Install the Blink base station. The base station should be placed in a central location, such as a living room or office.
3. Place the Blink Sync Module. The Blink Sync Module should be placed in a location where it can get a good signal from the base station.
4. Install the Blink cameras. Follow the instructions that come with the cameras.
5. Sync the Blink cameras to your smartphone or tablet. Open the Blink app and follow the instructions.
6. Place the Blink cameras in the locations you want to monitor.
7. View the Blink cameras from your smartphone or tablet. Open the Blink app and you will see the live video feed from each camera.
8. Use the Blink app to set up motion alerts. You can choose to receive alerts via push notification, email, or both.
9. Access the Blink cameras from anywhere. The Blink cameras can be accessed from any internet-connected device.
10. Use the Blink cameras to record video. The Blink cameras can be set to record video when motion is detected. Video is stored in the cloud and can be downloaded to your smartphone or tablet.
The Blink Outdoor 2 Camera System is a great way to keep an eye on your home or business. With the tips above, you can make the most out of your Blink cameras.
An Overview of the Different Types of Wacom Bamboo Series of Drawing Tablets
If you’ve never tried a drawing tablet before, but you’re looking to get into the world of graphic art, getting one of the Bamboo drawing tablets made by Wacom is an excellent place to start, because they are extremely functional and easy to use. However, if you’ve been looking around the market at all, you may have noticed that there are a few different types of Bamboo pen tablets out there, and it’s not necessarily that easy to tell the differences between them all unless you really devote some time and energy to research.
I’m here to lay it all out for you, giving you the specifics you need in order to decide which Bamboo drawing tablet is the right one to buy. Whether you’re looking for yourself or as a gift for a loved one, I aim to provide you with enough accurate and detailed information in order to make an informed decision that you’ll never regret. (Hint: you may also want to check out all of The Best Drawing Tablets.)
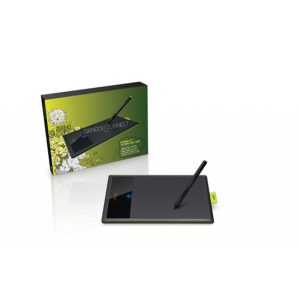
The Bamboo Connect Tablet
Wacom Bamboo Connect Pen Tablet (CTL470)
Key Features – Size: Small – Pen Eraser: No – Multi-Touch: Not compatible – Wireless Option: Not compatible
Free Bundled Software
Autodesk SketchBook Express
Review of the Bamboo Connect
The simplest and most lightweight Bamboo model in terms of size and functionality, this is excellent for either a beginner artist or someone who needs the ability to write by hand or annotate documents. It’s not great, however, for those who are looking to practice graphic art as a serious hobby or profession. If you’re looking to get your creative child something cool for a holiday or special occasion, this would make a great gift, but be aware that they may soon grow beyond the capabilities of this tablet.
The Bamboo Connect was designed with the professional communicator in mind rather than the professional artist. It is perfect for people who are frequently in meetings online and needs to draw something to the screen. It’s also the perfect tool for making notes in documents, signing signatures, writing annotations, and other activities that require hand-written text.
From an artist’s perspective, it’s quite lacking. There are no extra buttons or shortcut keys in order to quickly move through in-program menus or change tools, and it doesn’t support easy zooming or scrolling control due to the lack of multi-touch. I would however, recommend this to anyone who travels and uses a laptop a lot. Because of its small size and weight, it’s very portable, and it is great for getting out a quick sketch or doodle when inspiration hits.
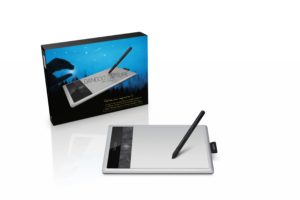
The Bamboo Splash Tablet
Bamboo Splash Summary and Review
Key Features – Size: Small – Pen Eraser: No – Multi-Touch: Not compatible – Wireless Option: Not compatible
Free Bundled Software
Autodesk SketchBook Express; ArtRage 3 Studio
Review of the Bamboo Splash
I like to think of the Splash as the older brother of the Connect. It can do all the same things and little more. It’s designed to be more of a step in the artistic direction, but the only notable difference is that it includes a copy of ArtRage. Don’t get me wrong, that’s a great deal, and it’s really good for anyone still working on building their skills as an artist. This extra feature may not seem like much, but it allows you to view the tablet in a new light. It teaches the user the basics of art programs (they all can do pretty much the same basic things), and any child who’s given a drawing tablet without an environment to use it in that’s geared towards art will probably be inclined to treat it as a toy instead of the sophisticated tool that it really is.
The size and weight make this just as portable, but it also allows it to be durable. If it gets dropped, thrown, bumped, or anything else, unless it’s been attacked with heavy machinery or dropped from a couple of stories high, there isn’t anything heavy or bulky about it to cause it (or anything else) any damage. This also makes the Splash quite easy to store away when it’s not in use.
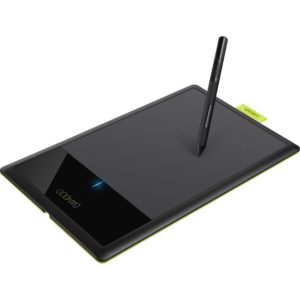
The Bamboo Capture Tablet
Bamboo Capture Summary and Review
Key Features – Size: Small – Pen Eraser: No – Multi-Touch: Compatible – Wireless Option: Compatible
Free Bundled Software
Adobe Photoshop Elements; Nik Color Efex Pro Filters (Wacom Edition); Autodesk SketchBook Express
Review of the Bamboo Capture
As far as an artist is concerned with the Bamboo line of Wacom tablets, this is where it starts to get interesting. Of course, you can do all the same stuff that you could with the other models (annotating documents, signing papers, etc.), but this is the model where Wacom started to design things specifically for artists.
If you take a look at the software that’s included with this tablet, you’ll notice that there are two new programs: PS Elements, and Nik Color Efex. These programs are specifically designed for more serious photographers who want to spice up their pictures with effects, filters, cleaning tools, and more. As you probably know, Adobe is the industry leader in the field of creative software, boasting a track record that includes Flash CS, Photoshop, Illustrator, inDesign, and a ton more.
If you want to get into photography, image editing, vector art, and other popular design media, this is a great tablet to use to get started. Though, it’s not the perfect fit for you if you’re into digital art that looks more realistic such as painting, drawing, watercolors, and rubber-stamping. And it’s a bit overkill if you’re just looking to get your feet wet and not quite a serious artist yet.
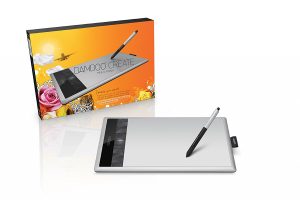
The Bamboo Create Tablet
Bamboo Create Summary and Review
Key Features – Size: Medium – Pen Eraser: Yes – Multi-Touch: Yes – Wireless Option: Yes
Free Bundled Software
Adobe Photoshop Elements; Corel Painter Essentials; Nik Color Efex Pro (Wacom Edition)
Review of the Bamboo Create
This right here is the mother of all Wacom Bamboo Drawing Tablets. With an active work area of 8.5″ x 5.4″ it has the largest amount of work space you can get. This is definitely something for serious artists to consider, because it scales the best to whatever screen size you’re looking at, and it allows you to use full motions with your drawing.
While it still includes PS Elements and Nik for photography work and image editing, you’ll notice that it also comes with a copy of Corel Painter Essentials, which is an absolutely excellent program for any artist to work in if you’re more interested in classical media. Realistic oil, watercolor, pencil, marker, and other tools allow you to make full use of this tablet when you’re working to create your best works of art.
If you’re familiar with other Wacom tablets, you’ll probably already know about the Intuos series. What you should know is that this models of Bamboo is only a small step below an Intuos in that the only real differences are the potential in size (this only goes up to medium size, when an Intuos can go up to large), and in the shortcut keys. The Create only has a couple of buttons, but if you’re not yet a professional graphic designer or artist (and by that I mean making steady money off your artwork), then this is a fine investment for you to begin with. It will increase your productivity and allow for a vast improvement in the quality of your work, depending on your skill of course 😉
What gift does someone get the artist friend or relative? I’ve listed a few ideas here. As an artist, I’ve always enjoyed getting gifts on holidays that I can use in my creative work. I’ve been a watercolor artist for 15 years. I’ve painted in oil, acrylic, and have created collage work. I’m now working with metal and creating jewelry. I find that a new book or new art medium can give me inspiration in work that I’m currently working on. On this page, I’ve listed the top gifts for artists of all mediums. You can vote or add your ideas as well. Leave your gift ideas in the comments section at the end of this page.
Sketchbooks
The Gift that Bridges All Mediums
No matter what medium your gift recipient works in, they can use a sketchbook to draw out their ideas, whether it be for planning a painting, a jewelry piece, or a sculpture, or to journal. My most cherished sketchbooks are those with quality paper that will hold up to both pencil and paint. They also have spiral binding so that I can bend back the cover when I’m outside which makes it easier to sketch without a table or drawing surface. It must also have a hard cover to withstand abuse. Here is my favorite sketchbook.
A Gift that Gives Year Round
A subscription to a great inspirational magazine that came to the recipients mailbox throughout the year, would be a great gift for an artist. I know of no other inspirational magazine that could top, “Cloth, Paper, Scissors”. I keep my back copies to look at whenever I need an art idea or to get me motivated to create.
A Camera?
A good camera may not come to mind as a great gift for an artist. But I use mine all the time. I’m constantly taking pictures of possible scenes to paint, textures to use in my designs or color combinations I want to remember. I love a good digital camera so that I can download pictures of my work to my blog or my online shopping site.
A Collection of Decorative Paper
I collect decorative paper. I use paper all the time in my design work. I do collage, scrap booking, greeting cards, experiments in watercolor painting…all requiring different types of decorative paper. When inspiration strikes, an artist needs different papers on hand.
A Book on Creative Living
This book by author Julia Cameron is the one I turn to first whenever I need to be reminded of how to live creatively. It is easy for an artist to live day to day and miss opportunities to keep their minds thinking creatively. This is a must have for those wanting to live a creative life.
With Photoshop Elements I can do more than just enhance my photos, I can manipulate them to make digital artwork. Photoshop Elements also gives me tools to edit and combine my videos clips to produce a finished movie. My daughter recently used this software to create a how-to video using digital video clips she took and combined them with music. I edit my artwork and handmade jewelry photos before I upload the photos online. Great tools for the price.
One question I get asked again and again is, ‘What is the best graphics tablet?’ as I’m a digital artist, it seems only natural to ask me.
It’s easy to understand why this is perhaps the most frequently asked question to not just me, but every digital artist. The reason for this is because graphic tablets are a unique and confusing technology!
So, the first step to finding the right graphics tablet for you is to understand the technology that’s being offered!
Thank you to Nekoni for her thoughts as an artist on graphics tablets.
First I’ll explain the words that are used
Then look further down, to find out about sizes.
At the end, I’ve recommended the best tablets, in my opinion, depending on various types of artwork.
Important!
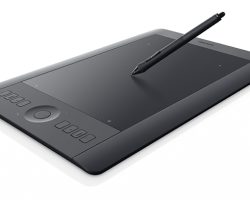
What is a graphics tablet?
The graphics tablet (or ‘digital design tablet’) is an input device (like a mouse, or keyboard) which acts like a giant and highly accurate touchpad, controlled by a stylus (digital pen). It allows artists to draw directly into their graphics programs on PCs, Macs and Laptops.
What can one do?
TRON – speedpainting by SaZo
Pen-specific technobabble:
The language that is used by graphics tablets sellers is very confusing.
Here is a list of the most popular phrases used in relation to the graphics tablet pens and what they actually mean!
“stylus”
The term specific for digital input pens used with graphics-tablets and other hardware. It’s not always used, but is the actual term. (imagine if you were told your new ipad came with a free ‘pen’? Why would you want a pen? Now imagine you were told it came with a free ‘stylus’? Awesome!) “ergonomic pen” “grip pen” “easy to hold pen”
Almost all graphic tablets today come with a comfortable, easy to use variety of stylus (the exact shape and features vary). These don’t affect the quality of your digital artwork, but they do affect how comfortable you are while using them, and there’s no ‘right’ choice. “cord/cable/wired stylus”
Refers to a stylus that is attached to its tablet by a cable. The stylus is therefore slim and light. It’s pretty rare today, as wireless is the standard for most models. “battery operated stylus”
Sends a signal from the pen to your tablet. The stylus needs to be large enough to contain a AAA battery, but is shaped in a way so that it’s narrower at the point at which you hold it. “battery-less stylus”
The tablet powers the stylus via electro-magnetic resonation, which means these styluses are slimmer and lighter than the battery powered alternatives. “tilt sensitivity”, “tiltability” “rotation””tilt recognition”
What most artists are looking for when they chose a stylus with one of these descriptions is a stylus which has a sense of ‘right way up’ and ‘upside-down’ so that it can make more complex digital brush strokes (this is a great feature, especially for painters!). But these terms also may simply mean that the stylus still works when you’re holding it at an angle, (and I’ve never found a stylus that doesn’t). For this stylus it’s best to rely on reviews, as less scrupulous retailers and second-hand sellers who don’t understand the terms can easily use the wrong term, and lead you to disappointment if you don’t know what you’re buying. “levels of pressure sensitivity”
The range of pressure sensitivity starts at 256 levels of pressure, and reaches 3000. 1024 levels of pressure can be registered by most graphics programs, and only the newest and more advanced programs can register anything higher. Levels of pressure sensitivity literally explains how sensitive your pen is, the more sensitive pens will be able to tell the difference between different pressures, but this will only be shown to have an effect if you’re using extremely large brush sizes (upwards of 1000 pixels, in the latest software), or, in some cases, very light pressure (the quality of the pen’s nib and the drawing surface can effect the pressure you need to apply just as much). I suggest 256 and 512 for the beginner or sketcher, 1024 for the student or professional artist, and 2048 or above for the super-professional or any artist who uses a tablet for poster-sized art-work. “Interchangeable right and left-handed pen”
This is one of those marketing oddities, I assume the companies must say this in order to assure left-handed individuals that they too can use graphics tablets… though I’ve yet to find any evidence of a left-handed pen having ever existed.
Tablet-specific technobabble:
So now you know what they’re saying about the pens… how about the tablet themselves.
The tablets are all important and have their own range of specialist phrases.
Here’s a list of the phrases and their meanings.
“programmable hotlinks/ buttons/ scrollers / wheels?”
Most artists find the wheels/scrollers to be useful for controlling the zoom in graphics programs, and for rotating canvas in those that allow it. But neither they nor programmable hotlinks are a actually a required function on any tablet, they’re more of an extra feature that you can use, if you like, to save time. “lines per inch” or “accuracy”
Much like dpi or dots per inch, this is the sensitivity of your graphics tablet and how accurately it recognizes the location of your pen. Unfortunately, not only is this rarely mentioned, but the effect this number has also changes depending on your computer’s settings, and the size of the tablet itself. The end result is that the pen does not follow the path you draw exactly, or makes your lines jagged. The way to avoid this is to read customer reviews, even if a number is given, and bear in mind that the cheapest of these tablets usually come with this disadvantage. For the beginner, or casual artist, or someone who does not intend to use their tablet for fine art, this isn’t much of a problem. It can usually be compensated by working zoomed in, but that has the disadvantage of letting you see less of your artwork at once, and takes longer to draw the same lines. “work area/ live area”
Pay attention to this, a graphics tablet will be described as 10 by 15 inches, but the actual numbers you need to actually pay attention to those of the ‘work’ or ‘live’ areas, the space on which you can draw, which measure much less- say 5 by 8 inches. These numbers are possibly the most important thing when it comes to buying a tablet! What you need to look for is a graphics tablet that matches the size and ratio of your screen as much as possible.
What happens when you buy a tablet that is much smaller than your screen?
It’s very simple, when you draw in real life, say, on a piece of paper, you draw to a scale of 1:1. The motions you make with your hand equal the size of lines you end up with on paper exactly. When you draw on a graphic tablet, these sizes never match completely, but it’s best to get as close to reality as you can.
An example of a size mismatch:
Here is a small tablet and a large screen. You can see the actual line which is input into a tablet, then the line that comes up on screen.
imput: what is drawn in real life. result A mismatched size also has the disadvantage of being less sensitive.
If your tablet is half the size of another tablet, but only has the same level of sensitivity, your small tablet is only half as sensitive. Then add to that the fact your hand is only so accurate, and you are in effect trying to draw, really, really tiny.
If you’ve ever tried to draw a nice picture, but really, really tiny, then you can see the obvious flaw with that. There’s a limit to just how accurately you can control your hands.
There are ways to compensate for a small tablet, as you can simply zoom in until the size matches, or you can set your tablet to only represent a smaller part of your screen.
However, drawing on a smaller part of your screen has obvious flaws…andjust like with a tablet with low accuracy, drawing while zoomed in isn’t a flawless solutution either.
As well as being unable to see what you’re doing in relation to the rest of your artwork, or being unable to edit it quickly, you will end up taking slightly longer and each and every line. Proffesional artists should try to avoid this.
My own screen is actually 18 by 12 inches, and the tablet is smaller (around 12 by 7.5 inches of work area) but it is a much closer match and easier to draw with than my other tablet, which only has 5 x 3.5 inches of work area.
Another thing to take into account is screen ratio. I have a widescreen monitor. And so, I have a widescreen tablet.
Some tablets allow you to set a ratio for you to use, but remember, they can not ‘expand’ the work area outwards if you need a wider area to match your screen; they can only narrow it, vertically. If you anticipate keeping your screen for a long time, and it’s an unusual shape, try and buy accordingly.


 Photos of artwork by Gayle Dowell
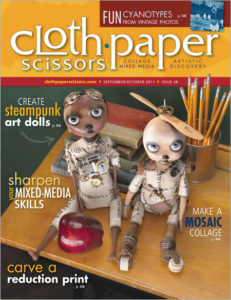