How To Create 3D Nail Art

How To Create 3D Nail Art

Three-dimensional (3D) nail art is a type of nail decoration that adds depth and dimension to your nails. It can be achieved by using a variety of techniques, including layering, sculpting, and embossing. 3D nail art is a great way to add interest and drama to your nails, and it’s perfect for special occasions or simply when you want to stand out from the crowd.

If you’re new to 3D nail art, don’t worry – it’s not as difficult as it looks. With a little practice, you’ll be creating stunning 3D designs in no time. In this article, we’ll show you everything you need to know about 3D nail art, including how to choose the right products, how to create different 3D effects, and some top tips for perfect results.

What You Need

Before you start, you’ll need to gather together a few supplies. You’ll need a base coat and top coat of nail polish, as well as a color polish for your design. For the best results, choose a polish that is not too thick or too thin. You’ll also need some clear acrylic powder, a small brush, a dotting tool, and a toothpick.

If you’re planning on creating a lot of 3D designs, it’s worth investing in a few specialized tools, such as a 3D mold or a silicone mat. These can make it easier to create certain shapes and effects, but they’re not essential.

Creating a 3D Effect

There are lots of different ways to create a 3D effect on your nails. One of the simplest is to create a layered design using your chosen polishes. Start with a base color, then add a second color in a contrasting shade. Use a dotting tool or a toothpick to create dots or lines of the second color. Finally, use a dotting tool or your brush to slightly swirl the colors together.

If you want to add more dimension to your design, you can try sculpting with acrylic powder. Start by painting your nails with a base color and letting it dry completely. Next, use your dotting tool to apply a small amount of acrylic powder to your nails. Use a small brush to shape the powder into the desired design. You can create all sorts of shapes and effects, from flowers to geometric patterns.

Another way to add dimension to your nails is to emboss them. You’ll need a special embossing plate for this technique. Start by painting your nails with a base color and letting it dry completely. Place your embossing plate over your nail and use a dotting tool to apply polish to the plate. The polish will transfer onto your nail, and you can then use a brush to shape it into the desired design.

Top Tips

Here are a few top tips to help you get the best results from your 3D nail art:

-Start with clean, dry nails. Make sure your nails are free from any oils or residue, as this can interfere with the polish and cause it to chip.

-Take your time. Don’t try to rush your designs – the key to perfect 3D nail art is to take your time and be patient.

-Use a top coat. A top coat will help to protect your design and make it last longer.

-Be creative. There are no rules when it comes to 3D nail art, so let your imagination run wild!

With these simple tips, you’ll be creating beautiful 3D designs in no time.

Brayer Techniques

Brayer Techniques

Brayer techniques in ink and acrylics for art journaling, mixed media, and collage work

My brayer is one of my favorite art tools – it’s incredibly versatile and can provide precision results and serendipitous beauty depending on what brayer technique I’m using. The brayer is an incredibly multi-purpose tool and I’d like to share with you all the brayer techniques I know – so far – and add to this page as I learn more about this amazing artistic tool.

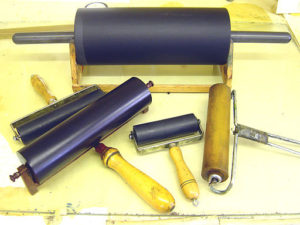
What exactly is a brayer? A quick introduction to brayers…

Basically, a brayer is a paint roller. Not the soft, fuzzy kind like for painting walls and ceilings, but similar. They are smaller, handheld tools that are frequently used for printmaking, but are growing in popularity as a scrapbooking, rubber stamping, and mixed media tool.

Mixed Media Brayer Technique with Kaleidacolor Inkpad

I made the colorful layered background on this art print in just seconds. It took me longer to photograph it than to create it! I used a simple brayer technique involving a specialty ink pad called Kaleidacolor. Each Kaleidacolor pad comes with five individual color that snap together to create a lovely rainbow striped stamp pad. The innovative design allows you to unsnap the colors when you’re not using it so that the inks don’t bleed together like they do with other multicolor ink pads.

TIP: Always store any ink pad upside down and wrapped with a rubber band to keep the lid tight. This increases the lifespan of you ink pad by allowing the ink to settle towards the top of the pad, and minimizing evaporation due to a loose lid.

An example of using the Kaleidacolor Brayer Technique

Here’s a video that some one made with a brayer technique very similar to how I created the rainbow poster. She is using a glossy cardstock and going for a smoother, more blended brayer technique but I purposefully left my colors a bit uneven and blocky and brayered on watercolor paper to get more texture and layers. (Also, she stamps a resist image before starting with her brayer technique.) Either way is very fun, and as you can probably tell there is a lot of room for playing around with this technique.

Acrylic Paint Brayer Techniques

Using a brayer with acrylic paints to create amazing layered texture
Acrylic Paints Acrylic paints are pretty much my number one pigment of choice, be it cheap craft paints or the higher-quality, artist-grade acrylic paints. I’m always on the lookout for new and exciting ways to use it. Using a brayer to apply acrylic paints to your artwork can have all kind of interesting effects – it’s a bit of an adventure because it can be very hard to predict exactly what will happen, but I’ve rarely been disappointed. (The only times were when I used too much paint – a little acrylic paint goes a LONG way with a brayer, it can be far too easy to use too much and end up with a muddy mess.)

Probably my first encounter with using a brayer with acrylic paint was during a the first annual retreat for my local ATC group. One of our members led about fifteen of us through the exercise “Mail Art To The Self” from the book Kaleidoscope: Ideas & Projects to Spark Your Creativity. The exercise was created by artist Juliana Coles and I can’t recommend it enough – I’ve done it several times since and it’s always invigorating. Part of the exercise involves applying paint to a large surface as fast as you can, and she suggests using a brayer for that. Our exercise leader let me borrow hers and I was thrilled with the results!

As you can see from the close-up on the left here, the white paint I brayered onto my project picked up and highlighted all the textures on the surface. To achieve that highlighting effect I used a very small amount of paint and not too much pressure when rolling the brayer. You can also see some interesting peaks and valleys in the paint, which I love the look of. That’s another great thing you get with brayering that you can’t really replicate with any other painting tool. The amount of peaks and valleys varies depending on how much paint you use, and thicker, high-quality paint will also give this effect more.

Note that this is an example of what brayering looking like with just one color – the browns and greens you see are the original cardboard surface and the paint I’d applied with brushes and my fingers before I got my hands on the brayer.

Click on the image, it will take you to the full image of this page so you can see all the details.

An art journaling video showing an acrylic paint brayer technique

For a while I ended up forgetting about my brayer – I learned so much in one weekend that it was hard to keep track of it all! But when a friend of mine posted this video to her blog it got me right back to it!

https://www.youtube.com/watch?v=A56wx1v0Fo8

Art Journal Page: Anecdotal Evidence

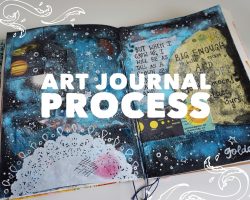
The art journal spread I created using my brayer and bright craft acrylics

If you look closely, you may notice this is where the photo at the top of the page came from!

Here’s the journal spread I created after I watched the above video the first time. I grabbed a handful of my favorite bright colors of craft paint and dripped just a little bit of each color at a time, rolling the brayer back and forth at varying angles each time I added a new color. The brayering process smoothed the paint out so thinly that it dried very quickly and I could add more colors almost instantly without getting muddy results. It probably helped that it was a chilly day and my space heater made my studio nice and dry and warm!

Thanks for stopping by my brayer technique guide!
I hope you found the info you were looking for today, and that I’ve inspired you to go make fun and exciting new art and craft projects using your brayer. Please let me know what you think, and be sure to let me know if there are any brayer techniques I’ve missed! Thanks!

Great Easy Acrylic Painting Projects

Great Easy Acrylic Painting Projects

Find Great Easy Acrylic Painting Projects

Find easy acrylic painting projects. It has great ideas and acrylic painting projects and access to other painting projects too. Discover the joy of painting in acrylic and explore this great medium with these projects.

Finding an Easy Acrylic Painting Project

Finding things to paint can be a trial sometimes. But it need not be. There are things to paint all around. For instance did you know that Vincent van Gogh spent months and months painting nothing but flowers. It doesn’t matter that he used oils it was the dedication to finding a subject no matter how difficult the task.

Often us painters cannot see what to paint, we are too busy looking for that amazing landscape or capturing rare lighting which is all great. But in doing so we miss the little things. We forget that it is the beauty in what we see and paint that makes it amazing.

Below are projects for you to try. Depending on where you are in the world will depend on when and if you have winter, summer or seasons or monsoons. But there is no reason why you cannot adapt each project for your own needs. OK here goes.
Find Great Acrylic Painting Projects on Amazon
Finding great acrylic painting projects is a great idea as it expands your learning and techniques and gives you plenty of ideas. Below are some project ideas for your acrylic painting

Easy Acrylic Painting Project 1

Project 1

For this project we are going back to basics. For those of you who haven’t done any color mixing start here.

Watch this video on basic color mixing as you will need to be able to mix colors for future projects.
Then practice until you can confidently get most of the basic colors.
Orange
Green
Purple etc

Easy Acrylic painting project 2

painting project Two

Van Gogh may not be to everyone’s taste, however his work was based on feeling and color. If you are a beginner without much experience it is important for you to get the feel of the paint, how it works, how quickly it dries and what it looks like. The best way to do this is to play.

To do this project we are stepping into Van Gogh shoes. We are aiming not for an artistically correct piece, but one with color and feeling. Using your new found color mixing skills from project one we are going to create a simple painting.

1. Pick a subject that you love. Make sure it is fairly simple to do. Try to keep it natural. Flowers in a bottle or vase would be great, your favorite part of a garden, a cliff a tree etc. If you think a vase is too much keep it to one flower. Painting outside can be a challenge so only do this if you feel comfortable. Remember this isn’t about making a perfect picture but playing with color. do not paint from a picture or photo from other artists.
2. Gather together all your art colors and canvases and brushes.
3. Spend time looking at your image. Break your image down into both color and light.
4. Just paint the very basic shapes and basic colors. Don’t worry about detail just the overall image.
5. Make sure your colors are over vibrant and your paint thick. Keep your brushes larger to prevent fussiness.

Project 3 – Simple Acrylic Winter Landscape Project Challenge

Project 3

This is a lovely painting to do, it reminds me much of the Bob Ross style which is well known for bringing art to everyone. So challenge yourself to get out those brushes and explore the colors of winter!

Easy Painting Project 4 – A Simple Landscape

Project 4

This is a beautiful little painting to do. Not only is it a project but it also teaches you techniques all done by a 3 hour video tuition after which you should have some useful knowledge to apply to any local landscape painting you might fancy doing.

Project 5 – Fun Cave Horse Painting

This Comes With a Popularity Warning

One of my favorite projects was one I didn’t think I would enjoy but it was really fun. This is the cave horse painting. This is a beginners project however lots of people af all skill levels love to do this one. You recreate the stone walls by building up the paint much as you would for any other painting though it is designed to look really messy! The cave horse is painted much as the cave men would have done and he looks fats and dumpy.

Cave horse and other cave animal pictures are on the open domain if you want to get one.

WARNING: Very Popular. I didn’t think anyone would like a picture of a cave horse, but have found that it is very popular. My sister napped mine when my tiny house got crowded with art. Then my other sister wanted one too and I have to repaint one for me! So be warned you might have to do more than one! It isn’t a problem it is fun to do and can be done quite quickly.

Lots of Painting Projects for the Beginner to Advanced Painter

This is absolutely amazing! I came across this site while searching for inspiration and wow did they give it. This site has to be the best and most comprehensive site for art courses on the net. If you don’t agree and have found another one feel free to pop it on the comments as I am always in search of the best information and ideas out there. But I think this will be very hard to beat!

This is definitely the site by artists for artists of all levels and skills. These guys cover everything from easy acrylic painting projects like the one above right through to the more complicated projects and courses. If in doubt they do a free course and a free magazine just to get you started – these should keep you occupied for a while. However if you want to plunge right in there are some great courses and they start at low prices or you can buy modules.