The Reception: Fun Ideas For Making It A Night To Remember

The Reception: Fun Ideas For Making It A Night To Remember

Your wedding reception is the time to let your hair down, enjoy some delicious food and drink, and dance the night away with your friends and family. But how can you make sure it’s a night to remember?

Here are a few fun ideas to get the party started…

1. Serve up some fun

Your guests will love tucking in to a fun and unique wedding reception menu. So why not get creative with your catering? Serve up mini burgers or hot dogs for a fun take on the traditional sit-down meal, or go for a street food style with a selection of different dishes from around the world.

2. Get the party started

Get your guests in the party mood from the moment they arrive with a fun and funky wedding reception playlist. Think upbeat tunes that will get everyone on the dance floor – from classics like ‘I Will Survive’ to current chart-toppers.

3. Create a photo booth

What’s a wedding reception without some fun photos to remember it by? Create a DIY photo booth with props and backdrops, or hire a professional photographer to capture all the action.

4. Set the scene

Transform your wedding reception venue into a magical setting with some simple decorations. Think fairy lights, lanterns, candles and flowers.

5. Give your guests some entertainment

Keep your guests entertained during the speeches with some fun and interactive entertainment. Why not hire a caricaturist or a photo booth? Or, if you’re having a summer wedding, set up a giant outdoor games area with giant Jenga and Connect 4.

By following these simple tips, you can be sure that your wedding reception will be a night to remember!

How to Set Prices for Your Decorated Cakes

How to Set Prices for Your Decorated Cakes

Cake Decorating and Pricing Tips

Many people who handcraft their own decorated cakes don’t charge for the time they invest in the cake. Maybe they feel because the cake is made in their own kitchen, that it is not worth the high price of a bakery  cake. For whatever reason, a person who makes cakes in their home often believe their craft is inferior to cakes created in the bakery section of a local store.

But, the cake you bake and decorate is no less a thing of beauty than any cake you find in your local bakery. Decorated cakes can be found in a variety of grocery stores, and they are decorated by hourly wage people that may or may not have had previous decorating experience.

Look at some of the handwriting on store bought cakes. It isn’t perfect, in fact sometimes the words are misspelled or placed incorrectly. On the other hand, you take the time to make everything as perfect as possible, you care about the product you make, and deserve to receive as much compensation for your work than anyone else.

Often, people who are just starting a cake decorating business offer lower prices than bakery shops. This is a big mistake! Actually, your prices should be slightly higher than the ones sold in stores. Most likely you precisely place the decorations on the cake, carefully write the message on the cake, and never take shortcuts when it comes to presenting the customer with a more personable cake than they’d get from a store.

Don’t under price your works of art, and don’t set your prices below the cakes found in bakery shops. Setting low prices might be your way to attract business, but people who are shopping for birthday or wedding cakes will question the low price. In effect, you can be eliminating yourself from the competition with low prices, because customers might think the quality of your cakes will be inferior.

Of course, when you first start in the cake decorating business, you need to set the prices comparable to other cake bakers in your local community. Never, never under price your cakes and set them apart from the going  prices set from specialty bakers. The reason someone comes to you is because they are looking for a better product or a technique that bakers will not or cannot provide. Then as you gain experience and improve your techniques, you can steadily increase the price of your specialty designed cakes.

Setting your cake decorating prices too low, can actually price yourself right out of business! Sure, you might get many orders for decorated cakes, but if you lose money on every one, how long will you be able to stay in business? Your cakes might be beautiful and unique, but if you are not being paid the true worth than you might as well just close your doors.

In addition to supplies, you must be compensated for your time, as well. Before setting a price, you need to take into consideration the time it takes to mix the cake, bake the cake, mix the icing, make the decorations and decorate the cake. For instance, if a customer wants a custom design, then you need to figure the cost of supplies, an hour to mix and make the cake, maybe another two hours to make the decorations, and another hour to decorate the cake. If you believe your time is worth $5 or $10 per hour, then the price of the cake should be a minimum of $40 to $60. Do not under compensate yourself.

Sure, cake decorating might begin as a hobby to present cakes to family members or friends and neighbors. But, before long, the word gets out about your skills and it turns into a business. You need to be smart about what you’re doing or it will become a drain on your time and finances.

In addition to cake and icing ingredients, cake decorating tips, cutters, colors, bags, racks, mixers, tables and classes to learn more or advanced techniques do not come free. You must charge a reasonable amount in order to buy the tools of the trade. No one can tell you how much to charge for a decorated cake. You need to be comfortable with the prices you charge. But, do your homework, learn how much bakers are charging for designed cakes in your community.

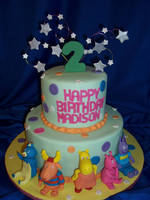
Compile a gallery of photos so customers can see the work you’ve done, and can feel confident in the product you have to offer. Here again, if your work is substandard to local bakeries, then why should customers pay  more to buy their cake from you? Photographs, good quality cakes, and unique designs are important in order to set your price a bit higher than store bakeries. Always strive to do better work, maintain good tasting cakes and icings, and give personable, caring service to your customers.

Three Fresh Ideas for Holiday Decorating

Three Fresh Ideas for Holiday Decorating

Decorations really set the mood for the holiday season. As soon as trees start popping up in store display windows and every house on the block begins donning multicolored lights, you can feel the spirit of the season in the air.

While every family has their own special traditions, token decorations, and collection of ornaments, there’s nothing wrong with adding some new decorations to your assortment and extending the decorations to every room in the house. Try these tips for decorating this holiday season!

In the living room

If you’re bored by the same ol’ tree and ceramic Santa that you put up every year, try sprucing up your living room with a themed tree. All the rage this season, themed trees are cute and easy to assemble. Some of the most popular themed trees are the “Grinch” tree, modeled after the classic holiday movie, and the snowman tree, complete with snowman head, bulb buttons and boots. Both trees are a great option for spicing up your holiday decor, and everyone (especially the kids!) will love them.

In the kitchen

Decorations don’t have to stop with the living room—embrace the holiday season by adding a touch of Christmas to every room. Hang a string of classic white lights above your kitchen cabinets for a romantic feel, or purchase festive red and green dish towels, wash cloths or oven mitts. Add the aroma of chocolate cookies baking in preparation for Santa, and the kitchen might become your favorite room in the house!

In the bedroom

Who says you can’t have a tree in your bedroom? Add a smaller tree in your bedroom (and the kids’ rooms, too!) so you can stay in the holiday spirit even after hours. If space is limited, purchase a pencil tree or a tabletop tree. If you’re really committed to the holiday spirit, having a separate set of bedding that is just for the holidays is a great way to decorate your sleeping quarters. Red sheets, green pillow shams and a decorative comforter will keep you warm and merry all night long.

Making a Puppet Stage

Making a Puppet Stage

How to Build a Puppet Theater Out of a Cardboard Box

How do you make a puppet theater that is inexpensive and simple to make and use?
It’s quite easy to craft a simple stage in which your puppets can perform. All you need is a large cardboard box or appliance box, utility knife, paint, glue,and fabric.
Children will need the supervision of an adult for this project.

Transforming a box into a puppet stage

Table top puppet stage in processIt’s easy and inexpensive to build a puppet stage. This one was made out of a large cardboard computer box. It folds up and it’s light and easy to carry. This one was designed to sit on a table. If you want a taller, free-standing one, use an appliance box. Refrigerator boxes make wonderful puppet stages.
Just cut out the top, the bottom and the back of the box, leaving the front section and two sides. If you don’t need a stage that folds up, leave the bottom in as it will add stability. If you need to cut the bottom out so it will fold, you can glue wood strips or molding on for stability and weight so the stage won’t fall over easily.
Cut a square or rectangular opening in the front of the box, closer to the top of the stage than the bottom. Add a prop shelf if you like. Attach a fabric backdrop curtain about ten inches behind the front of the stage opening.
Make two small holes in the upper part of the stage and fit a dowel rod through the holes, like a curtain rod.
Make sure the curtain fabric is lightweight so you can see through it as you sit behind it. You will need to be able to see what the puppets are doing. If desired, you can put a clip-on reading light on the top of the stage. This makes your little actors more visible and makes it difficult for the audience to see the puppeteer.
Decorate your stage with paint or fabric.

Hint: Tacky glue, available at craft stores, is the best kind of glue for a project such as this. It adheres well to fabric and is very strong.

Have a great show!

Make a Cardboard Puppet Theater
Tom Knight gives excellent instructions for building a puppet theater out of a cardboard box.

Cute Puppet Theater

If you go to Google Images, you can find hundreds of ideas for puppet stages. Just enter “puppet theaters” or “puppet stages”
Here is a lovely example of a beautifully decorated home made puppet theater.
Many of the images come from websites with directions for building the stage.

Photo from Google Images

Puppet StagesYou Can Buy

If you don’t have the time or inclination to build a stage, you can buy one!

Build a Puppet Theater
Books on making Puppet Theaters and other cardboard projects that may be adapted for stages or theaters. A castle, for example, makes a great stage for fairy tales.

Decorate Your Puppet Stage with Wall Decals
You can add some decorations to your puppet theater – not too many so that it distracts from the action, but just enough to make it interesting.