From its humble beginnings as a way to pass the time, to its current status as a cutting-edge artistic medium, 3D paper art has come a long way.
It all started with the humble origami crane. This simple piece of paper folding became popularized in Japan, where it was seen as a symbol of good luck. From there, it wasn’t long before other cultures began to adopt origami as their own.
3D paper art really began to take off in the 1970s, when artists started experimenting with using multiple sheets of paper to create complex three-dimensional sculptures. This new medium quickly gained popularity, and soon there were 3D paper artists all over the world.
Today, 3D paper art is more popular than ever. Thanks to the advent of new technologies, artists are now able to create even more intricate and detailed sculptures. And with the rise of social media, it’s easier than ever before to share your work with the world.
So whether you’re a paper artist yourself, or simply someone who appreciates the art form, be sure to check out some of the amazing 3D paper sculptures out there. You’ll be sure to be impressed!
Paper folding is an age-old practice that has been used to create a wide variety of objects, from animals and flowers to boats and houses. The art of paper folding has been passed down through generations, and has been adapted and innovated upon by artists and designers from all over the world.
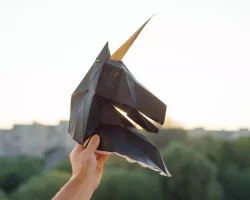
3D paper art is a relatively new art form that has only emerged in the past few decades. It takes the traditional art of paper folding and adds an extra dimension, literally. By folding paper in to three-dimensional shapes, artists are able to create sculptures and installations that are both intricate and beautiful.
3D paper art has been used by a number of artists and designers to create a variety of different objects and sculptures. Some artists use paper as their primary material, while others use it as an accent or as a way to add texture and interest to their work. No matter how it is used, 3D paper art is a unique and fascinating way to create art.
If you’re interested in learning more about 3D paper art, there are a number of resources available online and in libraries. You can also find a number of books on the subject, which can help you get started in creating your own 3D paper art.
3D paper art is a type of art that is created by folding and cutting paper. This type of art is also known as origami. 3D paper art can be used to create a variety of objects, including animals, flowers, and other objects.
There are a few things that you need to know in order to create 3D paper art. First, you need to choose the right type of paper. You can use any type of paper, but you need to make sure that it is thin and strong. Second, you need to fold the paper in half. You can use a ruler to help you fold the paper correctly.
Once you have folded the paper, you need to cut it into the desired shape. You can use a variety of scissors to do this. Once you have cut the paper, you need to glue it together. You can use a variety of glues, but you need to make sure that the glue is strong enough to hold the paper together.
Once you have glued the paper together, you need to let it dry. Once it is dry, you can add details to the paper. You can use a variety of markers and pens to add details to the paper.
Once you have added all of the details to the paper, you need to cut it out. You can use a variety of scissors to do this. Once you have cut the paper out, you can glue it to a piece of cardboard.
You can also use a variety of other materials to create 3D paper art. You can use paper clips, ribbon, and other materials to create 3D paper art.
If you want to learn more about 3D paper art, you can check out a variety of books and websites. You can also attend a class or workshop.
3D paper art is a type of sculpture that is made by folding, cutting, and gluing paper. The finished product can be very intricate and detailed, and it can be used to create both two-dimensional and three-dimensional sculptures.
Here are some tips and tricks for creating 3D paper art:
-Start with a simple design. If you are new to 3D paper art, it is best to start with a simple design. Once you have mastered the basics, you can move on to more complex designs.
-Use a variety of paper types. You can use different types of paper to create different effects. For example, you can use construction paper for a more sturdy sculpture, or tissue paper for a softer look.
-Be creative with your folds. There are no set rules for how you must fold your paper. Get creative and see what kinds of interesting shapes you can create.
-Use a glue stick for a stronger bond. If you are using construction paper or another type of paper that is not self-adhesive, you will need to use a glue stick to hold your paper together.
-Let your imagination run wild. The possibilities are endless when it comes to 3D paper art. So let your imagination run wild and see what you can create!
Paper is a versatile medium that can be used to create art in a variety of different forms. One of the most popular ways to use paper is to create three-dimensional art.
Three-dimensional paper art can be created using a variety of different techniques. One popular technique is to cut paper into shapes and then assemble the shapes into a three-dimensional object. This can be done by hand, or with the help of a cutting machine such as a Cricut or Silhouette.
Another popular technique for creating three-dimensional paper art is to fold paper into shapes. This can be done by hand or with the help of a paper-folding machine.
Once the paper has been cut or folded into the desired shapes, it can then be assembled into a three-dimensional object. This can be done by gluing the pieces together, or by using other methods such as stitching or wire-wrapping.
Three-dimensional paper art can be used to create a variety of different objects, including sculptures, jewelry, ornaments, and more. It is a versatile medium that can be used to create a wide variety of different art forms.
Adding some dimension to your paper crafts is a great way to add interest and depth to your projects. One way to do this is to create three-dimensional paper art. This type of art can be made using a variety of materials, but the most common is paper.
Paper is a great medium to work with when creating three-dimensional art because it is relatively easy to cut and shape. It is also inexpensive, so you can experiment with different techniques without breaking the bank.
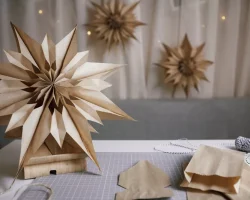
There are a few different ways to create three-dimensional paper art. One popular method is to use paper folding techniques, such as origami or kirigami. This type of art is often made by folding paper into intricate shapes and then stacking the pieces to create a three-dimensional effect.
Another way to create three-dimensional paper art is to use paper cutting techniques. This involves cutting paper into shapes and then gluing or taping the pieces together to create a three-dimensional effect.
You can also create three-dimensional paper art by using a variety of different types of paper. For example, you can use construction paper, cardstock, or even recycled paper. By using different colors and textures of paper, you can create a unique and interesting three-dimensional effect.
If you are looking for a creative way to add dimension to your paper crafts, try creating three-dimensional paper art. This type of art is relatively easy to make and can add a lot of interest and depth to your projects.
In the early days of cinema, artists would often create short films that featured three-dimensional images, but it wasn’t until the 1950s that 3D art really began to take off.
The first 3D artworks were created using a technique known as anaglyph 3D, which involved using two different colors of film to create the illusion of depth. This technique was used in a number of early 3D films, such as “Bwana Devil” and “House of wax”.
However, anaglyph 3D had a number of drawbacks, such as the fact that it could only be viewed using special glasses. This meant that it was not suitable for use in mainstream cinema.
A breakthrough came in the early 1980s with the development of the polarized 3D system. This system used polarized lenses to filter out the different colors of light, meaning that viewers no longer needed to wear special glasses to see the 3D effect.
Polarized 3D quickly became the standard for 3D cinema, and is still in use today. It is also used in a number of 3D televisions and computer monitors.
3D art is not just limited to the world of film and television. A number of artists have also experiment with creating three-dimensional paintings and sculptures.
The Dutch artist MC Escher is one of the most famous creators of 3D art. His work often features optical illusions and impossible objects, such as his famous “Drawing Hands” painting.
More recently, a number of artists have been experimenting with creating 3D art using computers. This has led to the development of a new genre known as digital 3D art.
Digital 3D art is created using a variety of software programs that allow artists to create three-dimensional images on a computer. These images can then be printed out using a 3D printer.
3D art is a fascinating and ever-evolving field. As new technologies are developed, it is likely that we will see even more amazing and innovative 3D artworks being created in the future.
However, there are many other types of 3D art that are becoming increasingly popular. Here are some of the most popular 3D art styles:
1. Photorealism
Photorealism is a type of 3D art that attempts to recreate an image or scene as realistically as possible. This can be achieved through the use of advanced rendering techniques and software.
2. Vector Art
Vector art is a type of 3D art that uses mathematical algorithms to create images. This technique can create images that are very detailed and accurate.
3. Pixel Art
Pixel art is a type of 3D art that uses pixels to create images. This technique can create images that are very detailed and accurate.
4. Sculpting
Sculpting is a type of 3D art that involves the creation of three-dimensional objects. This can be done using a variety of materials, including clay, wood, metal, and plastic.
5. Modeling
Modeling is a type of 3D art that involves the creation of three-dimensional objects. This can be done using a variety of software programs.
6. Animation
Animation is a type of 3D art that involves the creation of moving images. This can be done using a variety of software programs.
7. Digital Painting
Digital painting is a type of 3D art that involves the creation of images using a computer. This can be done using a variety of software programs.
But what’s the difference between the two?
Pixel art is made up of small pixels that are put together to form an image. Low poly art is made up of bigger polygons that are put together to form an image.
Pixel art is usually more detailed than low poly art. Low poly art is usually more abstract than pixel art.
Pixel art is usually more time consuming to create than low poly art. Low poly art is usually less time consuming to create than pixel art.
So, which is better?Pixel art or low poly art?
It depends on what you’re looking for. If you want something more detailed, then pixel art is probably better for you. If you want something more abstract, then low poly art is probably better for you.
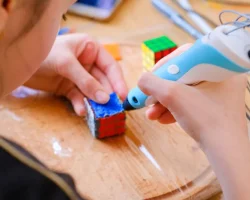
3D pen art is a new and upcoming art form that is becoming increasingly popular. It is a form of art where you use a 3D pen to create three-dimensional designs and sculptures.
3D pen art is a great way to express your creativity and is a lot of fun to do. It is also a great way to learn about three-dimensional art and how to create it.
If you are interested in learning how to do 3D pen art, there are a few things you need to know before you get started. First, you need to purchase a 3D pen. Second, you need to find some tutorials or books on how to use the pen.
Once you have your 3D pen and some tutorials, you are ready to start creating your own 3D art. Start by practicing on some simple designs and then move on to more complex ones.
3D pen art is a great way to express your creativity and is a lot of fun to do. With a little practice, you will be able to create some amazing 3D art.
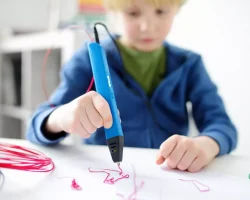
3D pen art is a new and exciting way to create three-dimensional artwork. It’s perfect for those who love to draw and sculpt, but don’t have the time or patience for traditional methods. All you need is a 3D pen and some imagination!
If you’re new to 3D pen art, the first thing you need to do is choose the right pen. There are many different types of 3D pens on the market, so it’s important to find one that suits your needs. Do some research and read reviews before making your purchase.
Once you have your pen, it’s time to start creating! Begin by drawing a simple outline of your desired object. Then, start filling in the details with your 3D pen. Be sure to go slowly and carefully, as it takes some time to get used to the pen’s controls.
As you become more comfortable with your 3D pen, you can start experimenting with different techniques and styles. There are no limits to what you can create, so let your imagination run wild!
If you’re looking for some inspiration, there are many online resources that offer step-by-step tutorials and examples of 3D pen art. You can also find helpful tips and tricks from other 3D pen artists.
With a little practice, you’ll be creating amazing 3D art in no time!
3D pen art is a relatively new and exciting art form that allows you to create three-dimensional objects with a pen-like device. While it may sound complicated, it’s actually quite easy to get started with 3D pen art. In this article, we’ll give you some tips and tricks for creating beautiful 3D pen art.
One of the most important things to keep in mind when creating 3D pen art is to start with simple shapes. You can gradually increase the complexity of your shapes as you become more comfortable with the 3D pen. It’s also important to use a light hand when you’re first starting out. The pressure you apply to the pen will determine the thickness of the line you create.
Another important tip is to use a variety of colors when you’re creating 3D pen art. This will give your art more dimension and make it more interesting to look at. You can also experiment with different line thicknesses to add more interest to your art.
When you’re first starting out, it’s a good idea to practice on paper before you start working on three-dimensional objects. This will help you get a feel for how the 3D pen works and how to control it. Once you feel comfortable with the pen, you can start experimenting with different materials.
There are a few different types of 3D pens available on the market. Some of the more popular brands include the 3Doodler and the Lix 3D pen.
No matter what type of 3D pen you choose, the most important thing is to have fun and be creative. With a little practice, you’ll be able to create amazing works of art with a 3D pen.
3D pen art is a relatively new and exciting form of art that allows you to create three-dimensional objects with a special pen. This type of art is becoming increasingly popular, as it allows you to create unique and intricate designs that can be displayed in your home or office.
If you’re interested in trying your hand at 3D pen art, there are a few tips and tricks that you should keep in mind. First, it’s important to choose the right pen for your needs. There are a variety of 3D pens on the market, and each one has its own set of features and benefits. Do some research to find the pen that’s right for you and your artistic goals.
Once you have the right pen, it’s time to start practicing. Draw some simple shapes and objects to get a feel for how the pen works. Then, you can start working on more complex designs. When you’re first starting out, it’s a good idea to use a template or stencil to help you create your design. This will make it easier to get the hang of using the pen and create a consistent look for your art.
As you become more comfortable with using a 3D pen, you can start experimenting with different techniques. You can create different textures by varying the speed at which you move the pen, or by using different types of plastic. You can also create different colors by mixing different colors of plastic together. The possibilities are endless, so have fun and be creative!
3D wall art is available in a wide range of styles, so you’re sure to find something to suit your taste. Whether you’re looking for something abstract or something more realistic, you’ll be able to find 3D wall art to suit your taste.
One of the great things about 3D wall art is that it can be used to create a focal point in a room. If you have a blank wall that you’re not sure what to do with, a piece of 3D wall art can really help to bring the room to life.
3D wall art is also a great way to add a bit of personality to your home. If you have a favourite quote or saying, you can find 3D wall art that features that quote. You can also find 3D wall art that features your favourite sports team or band.
If you’re looking for a truly unique piece of 3D wall art, you may even want to consider having a custom piece made. There are a number of companies that specialise in creating custom 3D wall art, so you’re sure to find something that you love.
3D wall art is a great way to add a bit of style and personality to your home. If you’re looking for something unique and eye-catching, 3D wall art is definitely worth considering.
3D wall art is a new and innovative way to decorate your home. It is an exciting and unique way to add dimension and texture to your walls. 3D wall art is made up of three-dimensional objects that can be hung on your walls. These objects can be made of anything from metal to glass to wood.
3D wall art is a great way to add interest to your walls. It can be used to accentuate a certain area of your wall or to create a focal point. 3D wall art can also be used to fill an empty wall space.
3D wall art is a great way to express your personality and style. It is a fun and creative way to personalize your space. 3D wall art is a great way to make a statement in your home.
Corporate trophies and plaques have been given out since time immemorial. Initially carved out of wood, today corporate trophy is made from different materials, come in different shapes and are given for different reasons and on different occasions. As clients keep searching for unique ideas to make their trophy the most prestigious, designers have come up with the latest – 3D trophies.
So after movies and TV, now you can even have 3D corporate trophy in your house (of course you need to win it and not just buy it off the shelf if it is to be of any real value). Corporate trophy trophies and plaques are essentially not advertising or marketing material but they still do carry brand value. When you choose the 3D corporate trophy to represent your company you send out a message that you are not only forward thinking in ideas and technology but in the way you treat and recognize your employees too.
3D corporate trophies definitely look state-of-the-art but do not cost a lot compared to its peers. Initially the 3D effect was used only in promotional materials like paper weights. But with the arrival of latest technology three dimensional engraving has become cost effective. This has aroused great interests in the corporate world and many of these ideas are currently being used in form of corporate gifts and marketing material. The visual impact of a three dimensional trophy cannot be undermined. It connotes high tech capabilities.
The three dimensional image in a trophy is generally given form using laser engraving devices. These are invariably sophisticated. The images or logos or words to be engraved are first produced as a draft image in a computer file. This file is then fed into the engraving device which ultimately brings out the 3D effect in the trophy. It is very important that the first draft image is perfect keeping in mind the effect the final 3D image will bring out. It is also important that the high quality laser engraving is done by professionals only and not by any fly-by-night operators. After all it represents your company and you definitely do not want to settle for anything sub-optimal.
When designing the file for the three dimensional image focus on the follow criteria
– The message you want to communicate should be direct and relevant to your target audience. Avoid designing abstract figures, vague messages etc
– Avoid having big messages as the font will become smaller and the ultimate 3D effect will be lost
– Ensure that only trained technicians are working on your designing and engraving or the ultimate result on the corporate trophy will be less than acceptable.
What is foreshortening? Some answers and drawing examples and video tutorial
What is foreshortening? Foreshortening in the arts refers to a specific way to depict three dimensional objects on the two dimensional paper planes. One of the most famous examples of foreshortening in visual arts is the painting by Andrea Mantegna, the mourning of Christ. The painting on wood shows the dead body of Christ from an extreme perspective. The viewer is put on the same eye level as the mourning figures at the side in close distance at the very end of the bed near the feet.
The painting was done in the 15th century in Italy, a period called Renaissance. During that time depiction of three dimensional spaces was fully explored and displayed in visual arts with almost scientific “correctness”.
Foreshortening in this painting means the perspective compression of the body and it’s proportions to a fraction of the actual size. Feet and head come very close together; the limbs are foreshortened in perspective. Mantegna created a stunning and very dynamic piece by choosing this extreme perspective.
Foreshortenings are inseparable connected with the depiction of illusionist three dimensional spaces. Until the 13th century pictures were mostly flat, at least space often was not depicted “correctly” and thus lacked the illusionist effect. Since Mantegna and others renaissance artists drawing and painting foreshortenings has become the standard of illusionist painting.
Andrea Mantegna – the mourning of Christ
An impressive example for foreshortening in visual arts
Image credit: Wiki media commons An impressive example for foreshortening in visual arts
Using a grid to draw foreshortening
The image above is from the 18th century. In the old days using grids in drawing was the state of the art method to produce exact perspective drawings. The draughtsman has a paper with the same grid proportions on his drawing table. All he has to do is to transfer important points where outlines in the scenery cut the vertical grid on the grid on his paper. Then he can connect those points to reproduce the outlines of trees and other objects in the drawing to get an exact flat projection of his view on the drawing paper.
There is a very famous illustration by Albrecht Dürer in his tutorial on how to measure in drawing. It illustrates perfectly how foreshortening in perspective drawings of the human body can be obtained. There is also the vertical grid used to transfer a flat projection of a there dimensional space on the flat surface of the drawing paper.
The effects of foreshortening in drawing
Extreme perspective with foreshortening effect changes a couple fo things. What are the effects of foreshortening in drawing?
1. Foreshortening changes geometric forms: circles will change to elliptic forms, squares will change to rectangles and cylindrical subjects change to a more conical shape for example
2. Foreshortening changes proportions: foreshortening on the human body will change the proportions for example. Parts which are closer to the viewer’s eye can appear much bigger than from a “standard” figure drawing. Limbs might look much shorter, hands or feet might look bigger.
Super retro comic hero thinks about a fly
Video lesson in drawing foreshortening
In this video lesson you can see an example of a manga or cartoon figure stretching the hand directly to the viewer in extreme perspective. As the hand is much closer to the viewer than the body the hand is bigger in size than the head of the figure. This is one of the dynamic effects of an extreme perspective look. The artist shows in real time how he develops the position of hand, palm and fingers in relation to the perspective extremely shortened arm. The video demonstrates the characteristics of foreshortening very well.
Drawing Tutorial: Foreshortening by markcrilley
Extreme foreshortening as means of a drawing composition
Foreshortening in drawing, charcoal drawing, houses and street
This charcoal drawing of mine (Basic tips for charcoal drawing) uses an extreme perspective with foreshortening as dynamic composition concept. The viewer is massively forced to follow the fence line from the foreground in to a mad dash down the road to the center of the image.
Foreshortening applied in a street sketch
foreshortening in a street sketch
This is a detail of one of my humble sketches of the city of Stuttgart. In the center there are some cars parked and the effect of foreshortening is compressing the outlines of the chassis. It is rather difficult to draw the wheels not as circles but as flat ellipses and the wheel wells so very narrow to shorten the sideview of the vehicle according to the perspective. It helps a lot to close one eye to observe and see the object as it would look as flat projection on paper.
Exercises to learn foreshortening in drawing
One can think of many exercised to learn foreshortening. The first one I did was taken from Bert Dodsons classic book “Key to drawing”. He request the reader to draw is/her own hand with the fingers pointing towards the viewer. It sounds easy but it is a quite tricky thing to do.
Drawing still life subjects like bottles , that are lying flat on a table for example, are also good exercises. Foreshortenings on the human body are a great challenge to
Drawing books that can help to understand foreshortening
In architecture drawing the term foreshortening is rarely used. Foreshortening mostly is mentioned in connection with drawing the human body. Here are two books that deal among others with this topic. especially in comic drawing foreshortening is an often used means to create dynamic and stunning sceneries.
The batman comics are well knwon for their extreme vertiginious perspective views of skyscrapers and the comic hero moving within this environment
Foreshortening in a tree sketch
This sketch is an exercise in drawing foreshortening. The base of old treet trunk pointed towards me. As a result the branches are very close together and the shape of the trunk appears to become a lot thinner from base to top.


