3D Paper Art Around The World

3D Paper Art Around The World

The intricate and beautiful designs that can be created using just paper are amazing. 3D paper artists are using this medium to create some of the most incredible art pieces we have ever seen.

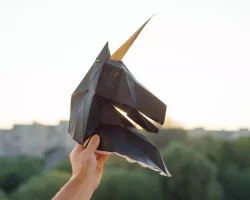
Whether it is a 3D paper sculpture or a 2D illustration, the results are always impressive. 3D paper artists are able to create such detailed and realistic art because of the many different techniques they use. Some of these techniques include paper cutting, folding, and layering.

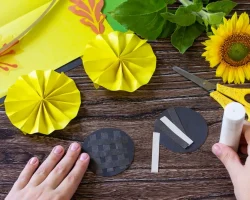
Paper cutting is probably the most essential skill for a 3D paper artist. This technique is used to create the basic shape of the sculpture or illustration. Once the basic shape is created, the artist can then begin to add details and layers.

Folding is another important technique for 3D paper artists. This is how they are able to create more complex shapes and add depth to their sculptures. By folding the paper, the artist can create all kinds of different shapes that would be impossible to create with just a piece of flat paper.

Layering is the final technique that is often used by 3D paper artists. This is how they are able to create dimension and add details to their sculptures. By layering different colors of paper, the artist can create a realistic effect.

3D paper art is truly incredible. The artists who create these pieces are extremely talented and skilled. If you have ever wanted to try your hand at 3D paper art, now is the time!

This is because it is a very versatile medium that can be used to create a wide variety of different pieces. It can be used to create 3D sculptures, paintings, and even jewelry.

There are a few things that you need to know in order to create your own 3D paper art. First, you will need to choose the right kind of paper. You can use regular printer paper, but it is not as sturdy as cardstock. You will also need to get some double-sided tape or glue dots.

The next step is to start cutting out your paper. You can use a template or freehand your design. Once you have your design cut out, you will need to score the paper. This will help the paper fold evenly.

After you have scored the paper, you will need to start folding it. You will want to start with the large pieces first and then work your way down to the smaller pieces. Once you have all of the pieces folded, you will need to glue or tape them together.

The final step is to add any embellishments that you want. You can use sequins, beads, or anything else that you can think of.

3D paper art is a great way to add a unique touch to any room in your home. It is also a great gift idea for any occasion.

The History Of 3D Paper Art

The History Of 3D Paper Art

From its humble beginnings as a way to pass the time, to its current status as a cutting-edge artistic medium, 3D paper art has come a long way.

It all started with the humble origami crane. This simple piece of paper folding became popularized in Japan, where it was seen as a symbol of good luck. From there, it wasn’t long before other cultures began to adopt origami as their own.

3D paper art really began to take off in the 1970s, when artists started experimenting with using multiple sheets of paper to create complex three-dimensional sculptures. This new medium quickly gained popularity, and soon there were 3D paper artists all over the world.

Today, 3D paper art is more popular than ever. Thanks to the advent of new technologies, artists are now able to create even more intricate and detailed sculptures. And with the rise of social media, it’s easier than ever before to share your work with the world.

So whether you’re a paper artist yourself, or simply someone who appreciates the art form, be sure to check out some of the amazing 3D paper sculptures out there. You’ll be sure to be impressed!

Paper folding is an age-old practice that has been used to create a wide variety of objects, from animals and flowers to boats and houses. The art of paper folding has been passed down through generations, and has been adapted and innovated upon by artists and designers from all over the world.

3D paper art is a relatively new art form that has only emerged in the past few decades. It takes the traditional art of paper folding and adds an extra dimension, literally. By folding paper in to three-dimensional shapes, artists are able to create sculptures and installations that are both intricate and beautiful.

3D paper art has been used by a number of artists and designers to create a variety of different objects and sculptures. Some artists use paper as their primary material, while others use it as an accent or as a way to add texture and interest to their work. No matter how it is used, 3D paper art is a unique and fascinating way to create art.

If you’re interested in learning more about 3D paper art, there are a number of resources available online and in libraries. You can also find a number of books on the subject, which can help you get started in creating your own 3D paper art.

Tips And Tricks For Creating 3D Paper Art

Tips And Tricks For Creating 3D Paper Art

3D paper art is a type of art that is created by folding and cutting paper. This type of art is also known as origami. 3D paper art can be used to create a variety of objects, including animals, flowers, and other objects.

There are a few things that you need to know in order to create 3D paper art. First, you need to choose the right type of paper. You can use any type of paper, but you need to make sure that it is thin and strong. Second, you need to fold the paper in half. You can use a ruler to help you fold the paper correctly.

Once you have folded the paper, you need to cut it into the desired shape. You can use a variety of scissors to do this. Once you have cut the paper, you need to glue it together. You can use a variety of glues, but you need to make sure that the glue is strong enough to hold the paper together.

Once you have glued the paper together, you need to let it dry. Once it is dry, you can add details to the paper. You can use a variety of markers and pens to add details to the paper.

Once you have added all of the details to the paper, you need to cut it out. You can use a variety of scissors to do this. Once you have cut the paper out, you can glue it to a piece of cardboard.

You can also use a variety of other materials to create 3D paper art. You can use paper clips, ribbon, and other materials to create 3D paper art.

If you want to learn more about 3D paper art, you can check out a variety of books and websites. You can also attend a class or workshop.

3D paper art is a type of sculpture that is made by folding, cutting, and gluing paper. The finished product can be very intricate and detailed, and it can be used to create both two-dimensional and three-dimensional sculptures.

Here are some tips and tricks for creating 3D paper art:

-Start with a simple design. If you are new to 3D paper art, it is best to start with a simple design. Once you have mastered the basics, you can move on to more complex designs.

-Use a variety of paper types. You can use different types of paper to create different effects. For example, you can use construction paper for a more sturdy sculpture, or tissue paper for a softer look.

-Be creative with your folds. There are no set rules for how you must fold your paper. Get creative and see what kinds of interesting shapes you can create.

-Use a glue stick for a stronger bond. If you are using construction paper or another type of paper that is not self-adhesive, you will need to use a glue stick to hold your paper together.

-Let your imagination run wild. The possibilities are endless when it comes to 3D paper art. So let your imagination run wild and see what you can create!

How To Create 3d Paper Art

How To Create 3d Paper Art

Paper is a versatile medium that can be used to create art in a variety of different forms. One of the most popular ways to use paper is to create three-dimensional art.

Three-dimensional paper art can be created using a variety of different techniques. One popular technique is to cut paper into shapes and then assemble the shapes into a three-dimensional object. This can be done by hand, or with the help of a cutting machine such as a Cricut or Silhouette.

Another popular technique for creating three-dimensional paper art is to fold paper into shapes. This can be done by hand or with the help of a paper-folding machine.

Once the paper has been cut or folded into the desired shapes, it can then be assembled into a three-dimensional object. This can be done by gluing the pieces together, or by using other methods such as stitching or wire-wrapping.

Three-dimensional paper art can be used to create a variety of different objects, including sculptures, jewelry, ornaments, and more. It is a versatile medium that can be used to create a wide variety of different art forms.

Adding some dimension to your paper crafts is a great way to add interest and depth to your projects. One way to do this is to create three-dimensional paper art. This type of art can be made using a variety of materials, but the most common is paper.

Paper is a great medium to work with when creating three-dimensional art because it is relatively easy to cut and shape. It is also inexpensive, so you can experiment with different techniques without breaking the bank.

There are a few different ways to create three-dimensional paper art. One popular method is to use paper folding techniques, such as origami or kirigami. This type of art is often made by folding paper into intricate shapes and then stacking the pieces to create a three-dimensional effect.

Another way to create three-dimensional paper art is to use paper cutting techniques. This involves cutting paper into shapes and then gluing or taping the pieces together to create a three-dimensional effect.

You can also create three-dimensional paper art by using a variety of different types of paper. For example, you can use construction paper, cardstock, or even recycled paper. By using different colors and textures of paper, you can create a unique and interesting three-dimensional effect.

If you are looking for a creative way to add dimension to your paper crafts, try creating three-dimensional paper art. This type of art is relatively easy to make and can add a lot of interest and depth to your projects.

Setting Up Your Home-Based Arts and Crafts Office

If my clients are any indication of how arts and crafts businesses are managed, many arts and crafts businesses are home based. Even if you need to rent studio space to make your craft, you are probably managing the business aspect of your arts and crafts company out of your home.

If you are thinking about starting an arts or crafts business, operating it out of your home will save on overhead and reduce the amount of startup cash you’ll need. Here are some tips to running your craft business out of your home.

Converting a Spare Room

This is kind of the holy grail of home businesses – that much bally-hoo’d spare room! Many folks new to crafts start a craft business later in life preparing to segue into it full time when they retire. In that case, there just may be a child’s bedroom that is no longer in use that can be converted into a workroom.

I also once owned a house that had a weirdly-shaped two car garage that was very deep – giving an extra fifteen feet by the width of the garage at its front. The prior owners had installed ductwork to have it under heat/air making it a perfect workroom.

After I moved, I purchased a portable rolling floor air conditioner to convert the new garage space into a workroom. The unit was somewhat pricey but it’s paid for itself many times over for both the business and for home use when we’ve had repair issues. The one I purchased does triple duty as a dehumidifier and regular fan too. The only problem is that your garage must have a window to connect the exhaust tubing when using as an air conditioner .

Converting a Closet

Once again, most people just don’t have extra closet space. But if you do, taking the doors off a regular closet will allow you to fit a desk and other equipment inside (I know from experience!). A walk-in closet with a window is ideal.

I find working on my business paperwork without natural light somewhat depressing. I have a large Verilux light that I use at night.

Investigating Unused Space for the Home Office

Look around your home to see where you can setup operations in an unused corner. Here are some suggestions:

  • Basement – it’s been so long since I lived in a house with a basement I almost forgot about it. Still there is the lack of natural light problem. You could try using a Verilux or similar lighting solution.
  • Unused space on stair landing – install a drop-down shelf that leaps into action when you need it and folds flush to the wall when you don’t.
  • Laundry room – you could think about buying a full-sized stacking washer and dryer to free up enough space to install a workstation. Just about any washer/dryer that has a flat top can convert to stacking using the correct kit. Plus most kits have a pull-out shelf for folding the fresh laundry.
  • Stow and go desk – I was in the market for a stow and go work area last year. After hours of searching, I found this great one at Furniturexo.com. We had to put off moving for another year so I’m waiting to buy it until after the move. It seem ideal in many ways. Sturdy, lots of room for storage, somewhat attractive in appearance and folds to a minimal footprint.
  • Expand a windowsill – install a folding shelf to the sill itself or to the wall immediately beneath. This has the extra advantage of all that natural light. You can install sheers to block excess sunlight when the sun is directly at window height.
  • Weirdly walled space – if you have an area of your house that is between rooms anchored by two walls creating wasted space, considering putting your workspace in there and hanging a matchstick shade from the ceiling long enough to extend to the floor to hide the area when you are finished working.

For more ideas, check out your local bookstore magazine stand. Since living in small houses for the last ten years, I have noticed there is just a plethora of magazines devoted to organizing and living in small spaces.

Fun at the Drive-In Theater

Fun at the Drive-In Theater

The Classic Drive-In Movie Theater

Enjoy the nostalgia of a drive-in movie theater. Do you remember those days?

Maybe you have heard your parents or grandparents talking about how they would go to an outdoor theater. Here the latest featured movies would be on a giant outdoor screen that stood larger then life in front of many carloads of families. Double features were the norm. Although at times one could see a triple movie feature.

Back in time as late as the 1970’s, it was common to see two and sometimes three movies in even the walk-in movie theaters.

Present time, there is one movie for the walk-in theaters for one large price, though up to a few dollars cheaper if you go to the matinee show. However, if you happen to live close enough to go to an outdoor drive-in theater (yes, they still exist), then you can see two movies for the price of one matinee ticket.

Theatre or Theater

The first drive-in opened in New Jersey on June 6, 1933. The American name is theater. Though many drive-ins located in America have theatre within the name.

Drive-in Theaters: A History from Their Inception in 1933 [Paperback]

Learn the history
Drive-in Theaters: A History from Their Inception in 1933 Available in paperback, hardcover and Kindle Edition.

Look inside before you buy. Many books on Amazon have this option. It gives the customer the chance to see what is in store in a particular book before they decide to purchase it.
Along with history of the drive-in theater are historical photos that you will enjoy to look at as much as read the book!

Do you know the history of the drive-in theater?

This book will enlighten you with how Richard M. Hollingshead, Jr. came up with the idea of an outdoor movie. How he started this with test in his home driveway with a 1928 Kodak projector.

This is not a picture book with light information. This is for the research enthusiasts. It goes deep into the history of the outdoor theater. The book takes you through the golden years and the decline to near extinction of this entertainment pastime of a great movie watching experience.

Drive-In Theater Poster

Our Hometown Theater History

In our hometown we had two outdoor movie theaters until the early 1980’s. One being on the west side and the other one on the east side of town. But then the times had changed and the theaters closed down to make room for apartment buildings.

This is the common scenario across America. The outdoor drive-in theaters were disappearing. It looked as though this would soon be a thing of the past. This is something that you would tell your grand kids about, “When I was your age, we would load up the car with snacks and blankets. See not one, but two movies outdoors. It was a lot of fun.” And if the grand kids are teenagers, you may not want to mention in detail all of the fun that you had at the drive-in.

There is a smaller percentage of drive-in theaters presently then back in the good o’ days. Though many places are revitalizing this historical treasure and bringing back the outdoor theaters.

As for where I live, we have three outdoors, with the furthest being in Door County at 1 1/2 hours away. To the closest, at a little more then a half hour drive.

Two of the three allow you to bring in your own food and beverages. However they encourage you to order from their snack bar. We do bring our own snacks but we usually end up ordering nachos and sometimes a pizza.

Drive-In Movie Theater Wall Art Snack Metal Signs

Best part of the movie

Often the best part of the movie is the old time commercials for the snack counter. It would be so disappointing if these weren’t shown before the movie.

At the same time it is a bit eerie thinking that the food and beverages are alive with hands, feet and faces.

Things to Bring to the Drive-in Theater

Besides yourself and children

What I love about going to the drive-in is that all the family is included. Even our dog Buddy. For the price of an afternoon matinee, you can watch two movies at the outdoor. We find it fun sitting outdoors getting fresh air and wrapped up in blankets, while watching a great movie.

Note: Links are included to take you to the items you will need.

Bring the dog along. Be sure to bring the leash, water and a dog blanket.
Outdoor folding chairs
If planning on laying on the ground. Be sure to have an outdoor blanket that is water resistant.
Sitting in your folding chair, you will want a nice warm fleece blanket to wrap up with. The temperatures do drop and the night can get cold.
Bring a cooler for those beverages and snacks that need to stay cold.
Make sure to have mosquito repellent. You may be there to enjoy the movies. But the mosquitoes are there to enjoy you.
A rechargeable portable radio is good to have if there is no movie speakers. Some theaters have them and some do not. Plus if you plan on sitting outside, a portable radio is ideal to have.