How To Get The Best Deals With A Freepik Promo Code

How To Get The Best Deals With A Freepik Promo Code

When it comes to online graphic design resources, Freepik is one of the best. With a huge library of high-quality photos, vectors, and illustrations, it’s a great resource for both professional and amateur designers. And, with a Freepik promo code, you can get access to all of this for a fraction of the price.

What is Freepik

If you’re not familiar with Freepik, it’s a website that offers a huge library of royalty-free photos, vectors, and illustrations. This means that you can use any of the resources on the site for your personal or commercial projects without having to pay any royalties.

There are two ways to access the Freepik library: through the website or through the Freepik app. The website is the more comprehensive option, with more than 1 million resources available. However, the app is a great option if you’re looking for on-the-go access to Freepik’s resources.

Both the website and the app are free to use, but if you want to download resources without any watermarks, you’ll need to sign up for a premium account. Premium accounts start at $9.99 per month, but you can get a significant discount by using a Freepik promo code.

Freepik promo code

There are a few different ways to get a Freepik promo code. The easiest way is to simply do a Google search for “Freepik promo code“. This will bring up a variety of results like Wethrift, dontpayfull, couponvario, including codes that will give you a discount on your first month of a premium account.

Another way to find a Freepik promo code is to sign up for the Freepik newsletter. This is a great way to stay up-to-date on the latest discounts and codes, as well as to get exclusive access to resources that are only available to newsletter subscribers.

Once you have a Freepik promo code, simply enter it at checkout when you sign up for a premium account. You’ll see the discount applied to your total, and you can start downloading high-quality resources without watermarks.

So, if you’re looking for a great way to save on graphic design resources, be sure to use a promo code. With a wide variety of codes available, you’re sure to find one that will give you the biggest discount on your premium account.

5 top tips for using a Freepik promo code

1. Check the terms and conditions

When you’re looking for a Freepik discount, the first thing you need to do is check the terms and conditions. Make sure you understand the offer and what you need to do to redeem it.

2. Follow the instructions

When you find a Freepik coupons that you want to use, make sure you follow the instructions on how to redeem it. Sometimes you’ll need to enter the code in a specific field during the checkout process, while other times you’ll need to click on a special link.

3. Know the expiration date

Most Freepik promo codes have an expiration date, so make sure you use them before they expire. Once a promo code expires, it’s no longer valid and you won’t be able to redeem it.

4. Watch out for minimum purchase requirements

Some promo codes come with minimum purchase requirements. This means that you need to spend a certain amount of money in order to redeem the code.

5. Check for exclusions

Make sure you check for any exclusions that might apply to your promo code. For example, some codes can’t be used on certain products or services.


10 Free Animated Website Templates To Download

10 Free Animated Website Templates To Download

Animated websites are a great way to show your company’s personality and make your web presence more interesting. They can also be used as a marketing tool to reach new customers.

There are a lot of free animated website templates to download today. However, not all of them are created equal. So, which ones are the best for you? To answer this question, we’ve put together a list of the 10 best free animated website templates.

Freetype

Freetype is a free online font editor that you can use to create free online logos, icons, and other designs. It’s easy to use and has a wide range of features, so you can create any kind of website you want.

Canva

Canva is a free online platform that allows you to create beautiful illustrations, logos, and infographics. It’s easy to use and has a wide range of features, so you can create any kind of website you want.

Adobe Photoshop

Adobe Photoshop is one of the most widely used creative software programs on the internet. It’s known for its user-friendly interface and powerful features. You can use it to create illustrations, logos, and infographics, and it’s easy to use.

Sketch

Sketch is a free vector graphic editor that’s popular among artists and designers. It’s easy to use and has a wide range of features, so you can create any kind of website you want.

Inkscape

Inkscape is a free vector graphic editor that’s popular among artists and designers. It’s easy to use and has a wide range of features, so you can create any kind of website you want.

Canva for android

Canva for Android is a free online platform that allows you to create beautiful illustrations, logos, and infographics. It’s easy to use and has a wide range of features, so you can create any kind of website you want.

Inkscape for mac

Inkscape is a free vector graphic editor that’s popular among artists and designers. It’s easy to use and has a wide range of features, so you can create any kind of website you want.

GIMP

GIMP is a free software program that’s popular among artists and designers. It’s easy to use and has a wide range of features, so you can create any kind of website you want.

WordPress

WordPress is a free content management system that’s popular among webmasters. It’s easy to use and has a wide range of features, so you can create any kind of website you want.

Adobe Photoshop for web designers

Adobe Photoshop for web designers is a powerful tool that can be used to create beautiful illustrations, logos, and infographics. It’s easy to use and has a wide range of features, so you can create any kind of website you want.

The Top 3 Breaking News Intro Video Templates

The Top 3 Breaking News Intro Video Templates

Breaking news intro videos are an effective way to present important news stories to your audience. These videos can help engage and motivate your viewers, and can help keep your audience engaged throughout the story.

Here are three of the best break news intro videos you can use to start your story:

Breaking News: Trump Plans to End DACA

Breaking News: North Korea tests New Missile

Breaking News: Trump Announces Plans to End DACA

Breaking News Intro Video: A Look at the News Situation

Breaking News Intro Video: News stories and events are being released quickly

Breaking News Intro Video: News anchors discussing the latest breaking news

Breaking News Intro Video Template

This breaking news intro video template is perfect for any newscast or media outlet. It features a basic intro and a short transcript of the news. You can also add your own captions and graphics to make it more engaging.

Breaking News Intro Video Template

This breaking news intro video template is perfect for any newscast or media outlet. It features a basic intro and a short transcript of the news. You can also add your own captions and graphics to make it more engaging.

Breaking News Intro Video Template

This breaking news intro video template is perfect for any newscast or media outlet. It features a basic intro and a short transcript of the news. You can also add your own captions and graphics to make it more engaging.

How To Create Kinetic Typography In Adobe Premiere Pro

How To Create Kinetic Typography In Adobe Premiere Pro

In this post, we will learn how to create kinetic typography in Adobe Premiere Pro. Kinetic typography is a typeface style that is characterized by its fast, Active Type feature. Kinetic typography is used to create text that is rapidly moving and animated. Kinetic typography can be used for text, elements, logos, and more.

Kinetic typography is created by using the Active Type feature. This feature creates text that is quickly moving and animated. The Active Type feature can be used to create text that is in motion, making it more engaging and visually appealing.

Kinetic typography is used to create text that is quickly moving and animated. This typeface style can be used to create text that is in motion, making it more engaging and visually appealing. Kinetic typography is used to create text that is quickly moving and animated. This typeface style can be used to create text that is in motion, making it more engaging and visually appealing. Kinetic typography is used to create text that is quickly moving and animated. This typeface style can be used to create text that is in motion, making it more engaging and visually appealing.

There’s no need to overthink it when it comes to typography in Adobe Premiere Pro. With just a few simple steps, you can create powerful, kinetic effects that help make your videos and photos more visually appealing.

To get started, start by opening the Type tool and choosing a font. Once you’ve chosen a font, select the “font family” field and choose a typeface that you’re familiar with. Next, select the “font size” field and choose a size that’s comfortable for your video or photo.

When you’re finished, click the “Create type” button and your type will be created in the “fonts” field. You can now use the type to create titles, subtitles, and other text elements in your videos and photos.

Adobe Premiere Pro is a versatile Adobe video editing software that is used for creating motion pictures, commercials, and other professional video content. One of the features of Premiere Pro that is often used to create kinetic typography is the ability to create motion graphics that are animated.

To create kinetic typography in Premiere Pro, you first need to create a document that is large enough to contain all the motion graphics that you will need. Then, you will need to create a document style that is similar to the typeface that you will be using for yourMotion Graphics. You can use the same typeface that you would use for your document’s main body, or you can use a typeface that is specifically designed for kinetic typography.

Once you have created your document style, you will need to create a document that contains all of the motion graphics that you will need. You can use the same graphics tools that you would use for other types of document creation, such as the graphics editor, the graphics tools palette, or the graphics tools bar. However, you will need to use the motion graphics tools in a different way to create kinetic typography.

To create a motion graphic that is animated, you will need to use the motion graphics tools in the same way that you would use the other tools to create a document. However, you will need to use the motion graphics tools in a way that creates a moving graphic. You can use the tools to create a basic graphic, or you can create a more complex graphic that is animated.

Once you have created your motion graphic and created the motion graphics style that is similar to the typeface that you will be using for your document’s main body, you will need to create a document that contains all of the motion graphics that you will need. You can use the same graphics tools that you would use for other types of document creation, such as the graphics editor, the graphics tools palette, or the graphics tools bar. However, you will need to use the motion graphics tools in a different way to create kinetic typography.

To create a motion graphic that is animated, you will need to use the motion graphics tools in the same way that you would use the other tools to create a document. However, you will need to use the motion graphics tools in a way that creates a moving graphic. You can use the tools to create a basic graphic, or you can create a more complex graphic that is animated.

Once you have created your document style, you will need to create a document that contains all of the motion graphics that you will need. You can use the same graphics tools that you would use for other types of document creation, such as the graphics editor, the graphics tools palette, or the graphics tools bar. However, you will need to use the motion graphics tools in a different way to create kinetic typography.

To create a motion graphic that is animated, you will need to use the motion graphics tools in the same way that you would use the other tools to create a document. However, you will need to use the motion graphics tools in a way that creates a moving graphic. You can use the tools to create a basic graphic, or you can create a more complex graphic that is animated.

In Adobe Premiere Pro, you can create kinetic typography, which is a style of typography that uses motion to create a more engaging and stylish experience. Kinetic typography is easy to use and can create a variety of effects, such as moving text, shapes, and logos.

To create kinetic typography in Premiere Pro, first make sure that you have the following tools installed:

Adobe Photoshop

Adobe After Effects

Adobe Illustrator

Once you have the tools installed, open Photoshop and open the file “Kinetic_Typography.psd”. This file contains the basic template for creating kinetic typography.

In the left-hand column of the PSD, you will see a list of types of motion. You can choose to use a linear motion, or you can use a gestural motion.

To create a linear motion, choose the Linear Motion option in the left-hand column.

Next, in the right-hand column, you will see a list of properties for the motion. You can choose to use a single or multiple motion nodes.

Now, in the left-hand column, you will see a list of animated properties. You can choose to use a linear or gestural motion animation.

In the right-hand column, you will see a list of properties for the motion. You can choose to use a linear or gestural motion animation.

Now, in the left-hand column, you will see a list of motion options. You can choose to use a linear or gestural motion option.

You can now add the motion to the document. In the left-hand column, you will see a list of motion options. You can choose to use a linear or gestural motion option.

In the right-hand column, you will see a list of motion properties. You can choose to use a linear or gestural motion property.

Next, in the left-hand column, you will see a list of motion options. You can choose to use a linear or gestural motion option.

Breaking News App: The Top News App For Android

Breaking News App: The Top News App For Android

Breaking News App is the perfect news app for Android. It provides breaking news, live updates, and more from all around the world, making it the perfect tool for keeping you up-to-date on the latest news. Plus, Breaking News App is free, so you can use it for as long as you like.

Breaking News App is the perfect news app for Android. With information on the latest breaking news, you can stay up to date with the latest news and events. Breaking News App is also a great app for keeping up with the latest news on your social media accounts.

Breaking News App is a top news app for Android that offers users quick and easy access to the latest breaking news stories. With the app, users can see all the latest breaking news stories as well as the latest updates and events. Breaking News App is also a great app for keeping up with the latest news in your favorite countries.

Breaking News App is a great news app for Android that lets you get the latest breaking news as soon as it happens. It also has a lot of other features that make it a great news app for Android.

Breaking News App is designed to help you stay up to date on the most important news stories. It has a live feed of the latest news stories so you can see what is happening right now. You can also access the app’s news articles, videos and pictures.

Breaking News App also has a rich search engine that lets you find the news you’re looking for. You can also add your own articles and stories to the app so you can keep up with the latest news.

Breaking News App is a great news app that is perfect for people who want to stay up to date on the latest news.

Dad Creates Awesome Sandwich Bag Art from Dinos to Monsters to Mold

Sometimes it’s the little things with your kids: the big smile before going to bed, that extra hug at school drop-off, or that one more round of peek-a-boo. David Laferriere has a tradition that he been doing for years that brings a little extra fun, whimsy, and wonder into his kids’ lunchtime. Every single day he draws a different awesome image on their sandwich bags, and he has chronicled his art and posted more than a thousand photos of his lunch bag creations on Flickr. Check out a collection of his amazing sandwich bag creations below as well as our interview with very talented and clever dad!

When did you start your project, and why?

I was looking for a way to jump-start my creative juices. I was already making their lunches and wanted to do something fun for them and me. I actually tried drawing with food coloring directly on the bread. That was too time intensive and the texture of the bread is terrible to draw on. I’ve always had some black Sharpie Markers kicking around and they worked well on the sandwich bag. Over time I added other colors and have experimented with different techniques.

Do you have an art background?

I am a graphic designer and illustrator working in the Communications office at Wheaton College in Norton, Massachusetts. I have always loved to doodle, draw, paint, etc. [and] was lucky enough to graduate from Rhode Island School of Design.

How old are your kids?
Thirteen and 15. They were at the end of second and fourth grades when I started doing this.

Do your kids get excited about the drawing you surprise them with?
In the beginning they might say something about what I drew. I’d sometimes ask them something about what was on their bag, get a blank stare and then they respond, oh yeah. Once I drew an alarm clock because my son has a problem getting up. He replied sarcastically, “Thanks Dad.”

What kind of sandwiches are in those bags?
My oldest likes almost anything. My youngest has always had peanut butter and jelly. They also get a juice, fruit and a snack.

Which graphics tablet?

Which graphics tablet?

What’s the difference anyway?

One question I get asked again and again is, ‘What is the best graphics tablet?’ as I’m a digital artist, it seems only natural to ask me.

It’s easy to understand why this is perhaps the most frequently asked question to not just me, but every digital artist. The reason for this is because graphic tablets are a unique and confusing technology!

So, the first step to finding the right graphics tablet for you is to understand the technology that’s being offered!

Thank you to Nekoni for her thoughts as an artist on graphics tablets.

First I’ll explain the words that are used

Then look further down, to find out about sizes.

At the end, I’ve recommended the best tablets, in my opinion, depending on various types of artwork.

Important!

What is a graphics tablet?

The graphics tablet (or ‘digital design tablet’) is an input device (like a mouse, or keyboard) which acts like a giant and highly accurate touchpad, controlled by a stylus (digital pen). It allows artists to draw directly into their graphics programs on PCs, Macs and Laptops.

What can one do?

TRON – speedpainting by SaZo

Pen-specific technobabble:

The language that is used by graphics tablets sellers is very confusing.

Here is a list of the most popular phrases used in relation to the graphics tablet pens and what they actually mean!

“stylus”
The term specific for digital input pens used with graphics-tablets and other hardware. It’s not always used, but is the actual term. (imagine if you were told your new ipad came with a free ‘pen’? Why would you want a pen? Now imagine you were told it came with a free ‘stylus’? Awesome!)
“ergonomic pen” “grip pen” “easy to hold pen”
Almost all graphic tablets today come with a comfortable, easy to use variety of stylus (the exact shape and features vary). These don’t affect the quality of your digital artwork, but they do affect how comfortable you are while using them, and there’s no ‘right’ choice.
“cord/cable/wired stylus”
Refers to a stylus that is attached to its tablet by a cable. The stylus is therefore slim and light. It’s pretty rare today, as wireless is the standard for most models.
“battery operated stylus”
Sends a signal from the pen to your tablet. The stylus needs to be large enough to contain a AAA battery, but is shaped in a way so that it’s narrower at the point at which you hold it.
“battery-less stylus”
The tablet powers the stylus via electro-magnetic resonation, which means these styluses are slimmer and lighter than the battery powered alternatives.
“tilt sensitivity”, “tiltability” “rotation””tilt recognition”
What most artists are looking for when they chose a stylus with one of these descriptions is a stylus which has a sense of ‘right way up’ and ‘upside-down’ so that it can make more complex digital brush strokes (this is a great feature, especially for painters!). But these terms also may simply mean that the stylus still works when you’re holding it at an angle, (and I’ve never found a stylus that doesn’t). For this stylus it’s best to rely on reviews, as less scrupulous retailers and second-hand sellers who don’t understand the terms can easily use the wrong term, and lead you to disappointment if you don’t know what you’re buying.
“levels of pressure sensitivity”
The range of pressure sensitivity starts at 256 levels of pressure, and reaches 3000. 1024 levels of pressure can be registered by most graphics programs, and only the newest and more advanced programs can register anything higher. Levels of pressure sensitivity literally explains how sensitive your pen is, the more sensitive pens will be able to tell the difference between different pressures, but this will only be shown to have an effect if you’re using extremely large brush sizes (upwards of 1000 pixels, in the latest software), or, in some cases, very light pressure (the quality of the pen’s nib and the drawing surface can effect the pressure you need to apply just as much). I suggest 256 and 512 for the beginner or sketcher, 1024 for the student or professional artist, and 2048 or above for the super-professional or any artist who uses a tablet for poster-sized art-work.
“Interchangeable right and left-handed pen”
This is one of those marketing oddities, I assume the companies must say this in order to assure left-handed individuals that they too can use graphics tablets… though I’ve yet to find any evidence of a left-handed pen having ever existed.

Tablet-specific technobabble:

So now you know what they’re saying about the pens… how about the tablet themselves.

The tablets are all important and have their own range of specialist phrases.

Here’s a list of the phrases and their meanings.

“programmable hotlinks/ buttons/ scrollers / wheels?”
Most artists find the wheels/scrollers to be useful for controlling the zoom in graphics programs, and for rotating canvas in those that allow it. But neither they nor programmable hotlinks are a actually a required function on any tablet, they’re more of an extra feature that you can use, if you like, to save time.
“lines per inch” or “accuracy”
Much like dpi or dots per inch, this is the sensitivity of your graphics tablet and how accurately it recognizes the location of your pen. Unfortunately, not only is this rarely mentioned, but the effect this number has also changes depending on your computer’s settings, and the size of the tablet itself. The end result is that the pen does not follow the path you draw exactly, or makes your lines jagged. The way to avoid this is to read customer reviews, even if a number is given, and bear in mind that the cheapest of these tablets usually come with this disadvantage. For the beginner, or casual artist, or someone who does not intend to use their tablet for fine art, this isn’t much of a problem. It can usually be compensated by working zoomed in, but that has the disadvantage of letting you see less of your artwork at once, and takes longer to draw the same lines.
“work area/ live area”
Pay attention to this, a graphics tablet will be described as 10 by 15 inches, but the actual numbers you need to actually pay attention to those of the ‘work’ or ‘live’ areas, the space on which you can draw, which measure much less- say 5 by 8 inches. These numbers are possibly the most important thing when it comes to buying a tablet! What you need to look for is a graphics tablet that matches the size and ratio of your screen as much as possible.

What happens when you buy a tablet that is much smaller than your screen?

It’s very simple, when you draw in real life, say, on a piece of paper, you draw to a scale of 1:1. The motions you make with your hand equal the size of lines you end up with on paper exactly. When you draw on a graphic tablet, these sizes never match completely, but it’s best to get as close to reality as you can.

An example of a size mismatch:
Here is a small tablet and a large screen. You can see the actual line which is input into a tablet, then the line that comes up on screen.
imput: what is drawn in real life. result A mismatched size also has the disadvantage of being less sensitive.

If your tablet is half the size of another tablet, but only has the same level of sensitivity, your small tablet is only half as sensitive. Then add to that the fact your hand is only so accurate, and you are in effect trying to draw, really, really tiny.

If you’ve ever tried to draw a nice picture, but really, really tiny, then you can see the obvious flaw with that. There’s a limit to just how accurately you can control your hands.
There are ways to compensate for a small tablet, as you can simply zoom in until the size matches, or you can set your tablet to only represent a smaller part of your screen.

However, drawing on a smaller part of your screen has obvious flaws…andjust like with a tablet with low accuracy, drawing while zoomed in isn’t a flawless solutution either.

As well as being unable to see what you’re doing in relation to the rest of your artwork, or being unable to edit it quickly, you will end up taking slightly longer and each and every line. Proffesional artists should try to avoid this.
My own screen is actually 18 by 12 inches, and the tablet is smaller (around 12 by 7.5 inches of work area) but it is a much closer match and easier to draw with than my other tablet, which only has 5 x 3.5 inches of work area.

Another thing to take into account is screen ratio. I have a widescreen monitor. And so, I have a widescreen tablet.

Some tablets allow you to set a ratio for you to use, but remember, they can not ‘expand’ the work area outwards if you need a wider area to match your screen; they can only narrow it, vertically. If you anticipate keeping your screen for a long time, and it’s an unusual shape, try and buy accordingly.

What is good drawing? How to make a difference

What is good drawing? How to make a difference

Good drawing – better drawing , how to make a difference

What is good drawing is a question that I was confronted with on my first day in school. The answer I got to that question changed a lot in my life for quite some time. The dimensions of this seemingly innocent question are much wider than one would assume on first sight.

But this question is not put up here to stage a controversy or to seek late revenge for an early injury by a stupid teacher. Rather I want to use it to arouse interest in the many facets of drawing. The question what is good drawing forces to analysis and development of criteria which allow to make a difference in quality between drawings. As a result this process will lead not only to better understanding, but also to enhanced enjoyment of drawings.

At this point it might be clear that this site is not about construction or instruction drawings, but about drawing in arts and in particular about the artistic value of drawings.

How to analyse a drawing

The analysis of a drawing often consists in separating certain aspects of a drawing. Usually it starts with the level of technical skill that the artist shows. As second aspect the content or the picture idea is examined further and finally the artistic value might be considered.
Such an approach is not without difficulty, because it is impossible to separate these three aspects from each other as their combination is what makes for the quality of a drawing. The use of simple lines might indicate a lack of technical skill, but in fact simple lines might be used with purpose as a means of artistic expression for example.

However this method is still a good way to explore drawings and therefore I want to discuss these three different layers of a drawing further.

Craft and dexterity – technical skills and quality of a drawing

What are drawing skills ?

Postcard Forest diary ink drawing postcard

I remember the tale of an artist and his king in China. The king commissioned a drawing of a cockerel to a famous artists and the artists agreed. After waiting one year as the works was still not finished the King got impatient and started to send out messengers to the artists cabin a long way in the woods.
They returned and reported that the drawing was not done yet. This happened a couple of times until the King got so angry in the 10th year of waiting that he made the journey himself ready to punish the artist on site, if he had not finished the work yet.

In the cabin the king urged the artist to do the drawing otherwise he would be killed. The artist replied that the king just came on time as he was ready no to do the drawing. He fetched a piece of beautiful rice paper, prepared the ink and laid down the drawing with his brush within a few minutes. The king was totally amazed and pleased with the quality of the work, which was a perfect piece of art and a beautiful representation of a cockerel.

The king asked the artist, why for heaven sake didn’t you do this quick drawing already ten years ago? The artist said nothing but turned to his big wall cupboard to open the doors. As the doors opened hundreds and hundreds of drawings fell to the floor, documenting that the artist had done nothing but drawing cockerels over the years until he thought that his skills were good enough. The King was ashamed and fell silent.

The most realistic or illusionistic representation in a drawing is often seen as the ultimate proof of quality in a drawing. The more a drawing conjures with a photographic image the better the quality it seems. Indeed it takes very long and talent is needed to achieve skills that enables the artist to depict a subject in aphoto realistic way.

Training of drawing skills was a major task of art academies during centuries. These academic skills were abandoned in modern art not because artist were too lazy to do the exercises, but the value of academic drawing was questioned by modern artists. Pure imitation no matter how skillful it is conducted seemed to be without artistic value.

These are two main position that have been discussed in art for a long time and it seems there is no end to this. I think that there cannot be an end or a final valid judgement on these issues. The interesting thing is the discussion itself, the different views on drawing which open new perspectives for the participants in this discussion.

Content , image idea, meaning of a drawing

Drawing as visual language

The formal content of a drawing is what we recognise first. Our perception is constantly and immediately interpreting what we see and offers meanings to us saying : This is a dog or a house what I see for example. This is a rather simple level of understanding and usually we perceive a lot more of impressions which go much further than that at the same time. Apart from rational thoughts drawings like any other picture evoke emotions.

The quality of a drawing can also literally be seen in the way and in the efficiency the artist manages to communicate with the viewers and in his capacity for original inventions and modes of execution. Drawings can be seen as a kind of visual language and some artists are better speakers than others.

At this point the connection to the previous paragraph has to be considered. What happens if the viewer is not capable to understand the visual language of the artist properly ? There are many misunderstandings regarding the quality of drawings simply for this reason. As the artist improves the skills of his visual voice with exercise the viewer improves his skills of listening i.e. understanding drawings by looking and examining drawings on a regular basis.

Artistic value in a drawing

academic versus artistic drawing

To determine the artistic value of a drawing is the most difficult task. People who might agree in considerations about technical skills and image idea still can come to totally different conclusions about the artistic value of a drawing.This disagreement is based on different ideas about what artistic value is.
It is very interesting to study many different opinions and to compare the points of view. The more one tries to define artistic value the more it seems to vanish into something vague and undefined. Words seem not to be able to grasp what is meant. “The there is a harmonic sense in lines and their relationships, a music of line that is found at the basis of all good art” This quote from the book: ThePractise and Science Of Drawing, by Harold Speed, might illustrate this difficulty.
I heard drawings praised because the artist was able to draw lines that were considered fast, suspenseful or dynamic and so on. All these attempts to address the quality of a drawing are very much based on personal standards which have beenacquired.
Over the years my own standards are changing constantly and I am eager to see drawings that are executed in a way I did not see before.

Almost every art lover has a kind of internal hit list of works or artists he likes or dislikes. The comparison and ranking of different artworks is a good method to learn about the quality of a work,especially when we want to know why we like something better than the other and start to ask questions in that direction. It can take some time to evaluate the quality , works that had been in a lower ranking might advance to a better position after some time when the work is better understood.

What is good drawing ?

The one that does not wear off !
I had the opportunity to attend workshops given by a great artists and watercolour landscape painter named Simon Fletcher. Simon Fletcher has a traditional point of view on landscape depiction and puts great emphasise on graphic skills in his work. The underlying drawing, the visual grid that constitutes a painting, establishes according to him the potential of a painting. If the drawing or graphic skeleton is not good the painting cannot be good. He also explained to his students that once the drawing has been established successfully the artist gains maximum of freedom to do with thecolours whatever he wants. His works illustrate these principles, that I tried to lay down here in short, very well.
This alone does not get us a step forward to an answer to the question what good drawing means. I found the answer Simon Fletcher gave for pictures in general applies also to drawings very well.

This is a very simple criterion, that covers all aspects and conditions of the picture itself and those of the viewer. There is indeed the phenomenon that we consume certain pictures with the blink of an eye and move over, others intrigue us, stay in our memory and attract our curiosity again and again. This is also a holistic approach that is valid without sophisticated intellectual analysis.

Must have resources for the figure drawing artist

Must have resources for the figure drawing artist

The Artwork of Lacy Chenault – from Heart people to Belly Dancers

I Believe I have always been an artist – from a very young age I remember having a huge interest in drawing things – but it’s always been one thing – Women – which started as heart people and evolved to women.

Through High School I got bad grades in everything but art class, even if I skipped a week of school I would always finish my art projects on time, and sometimes do other people’s projects as well. But I feel like my art is at its peak right now – though I secretly hope it isn’t – I would like this to just be the beginning of a mountain rather than it being all downhill from here.

A few years ago – right around the time I moved in with Mark I started to really pick it up again, and since then I have gotten much better. I started my very own website and found the people who really like my art. At least I think they do?

I think the biggest thing for me is when I just recently signed a contract – I will be receiving 12% royalties from a company selling my artwork on cross-stitch patterns, and sales at my cafepress shop seem to have taken off. I am not one to usually have an ego about things, but at the very least at this point I can say I am proud of myself.

I can look at my art now and really see that I have gotten better – sure it has taken years and many drawings have been thrown in the trash, but after all that it has actually gotten better…wow.

Earlier this year I had my first “Art Show” at a local coffee house – my art was up for one entire month. MY ART was the sole décor for this coffee house for all of the month of February – sure when it happened, I didn’t think I deserved it, but looking back – I did. I loved that people could see my art up close and personal – not only on the web – my scanner never does them justice anyway. It was really nice to see that people really did like my art – lets be truthful here – a lot of people lie on the internet, I can’t read their expressions when seeing my art, so I never really know what they think of it – that is of course, unless they buy it.

It started as just Fairies here and there, some Goddesses – then it grew to include the Zodiac collection, and just recently I started Drawing Belly Dancers, as I myself am now one – it has inspired me in so many ways with my art.

I draw dancers from my class whether they know it is them or now – they are at the very least my inspiration – I have drawn my teacher twice and I think she likes them. I take tons of pictures at every show – just to take them home at get ideas for my next drawing.

It is really ever evolving – you put the effort it and you will see results – it may take years – but it is always about patients – with anything you want to get good at.

Giovanni Civardi – Drawing the Female Nude

Lots of different poses, real looking women
For many years I have been drawing women, and only women. The female figure I think is just nicer to look at.

The problem I would always run into when starting a drawing is thinking of a pose, and actually pulling it off. That is why I purchased “Drawing the Female Nude” at my local Barnes and Noble. The only other option I could think of was to hire an actual model, and that’s just too expensive and awkward.

Drawing the Female Nude is written (and illustrated) by Giovanni Civardi, an Italian artist and instructor who also wrote and illustrated “Drawing Human Anatomy” and “Drawing the Male Nude”. His drawings are as realistic as they come, which is how I like it.

In this book he uses two models, one that is tall and has more boyish figure and one who is a bit womanlier in the hips and butt. Both of them are definitely European, you can tell by the furry armpits, which you can “edit out” in your own drawings easily, but it really doesn’t detract from the book at all unless you are tremendously shallow. That is also part of the reason I really like this book.

The women in this book look like real women. Their breasts are not super-round and perfect, their brows are not perfectly plucked, and they do not have washboard abs. I am not saying they are fat (I am probably bigger than them), they are real.

These two women are drawn in many different poses including standing, sitting, stretching, twisting, turning, lying, and even some yoga positions from just about every different angle. Each pose includes his own tips on pulling it off, and information on different techniques and materials. He uses charcoal and pencil to sketch out the women. There are also a few actual photographs of the models in this book.

I really like his tips on shading and shaping the muscles. He really teaches you a lot about the female muscular structure in this book too, which is something every artist should study a bit about to reach his or her full potential. He encourages every artist to find his or her own unique style, not just to copy.

This book was definitely worth the $14.95 I paid over three years ago. I still use this book as a reference, and I do feel that it has made me an improved artist. This book I think would be an excellent gift for all artists who like to draw real looking women, whether amature or professional

The Nude Figure – a visual reference for the artist

I know you will find what you want in this book. It is full of good poses, which are lit very well.
I browsed through this book at a Barnes & Nobles a few weeks ago, and almost immediately fell in love with it. But I did have to wait to go online as it was nearly 30.00 at B&N and I knew I could get it cheaper at amazon.com, which I did for a mere 22.00 with shipping.

Before “The Nude Figure” my best reference book was “Drawing the Female Nude” by Giovanni Civardi, which featured his drawings of two models in various poses. It is a great book for the beginner, but after five years of using it I needed something new – and Playboy just wasn’t working.

The Nude Figure by Mark Smith featured only photographs of various models and all kinds of different poses. All of the photographs are in black and white which is a definite plus in my mind, helping you to see the defining lines and edges. The poses are divided into chapters as follows:

Standing Poses – This chapter is full of your basic standing poses. Arms up, arms down, from the side, from the back.

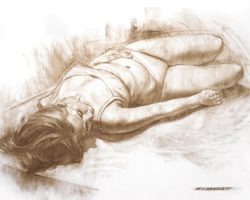
Reclining Poses – All kinds of laying down positions, all from different perspectives. Some look quite easy to draw and others are quite hard.
The Figure on a stool – These I find quite difficult simply because of the stools – I am not good at any kind of still life, even if it has a woman sitting on it.

Bending Poses – Most of these look like stretching before a workout poses. I don’t se how they could be useful in a work, but for practice everything is good.

The Figure in motion – I am very happy with this section as I do a lot of fairies and it is full of people jumping up in the air – something you could never get a live model to hold.
The Pregnant Figure – There are only a few pages of this, and I’m glad they put in here. It’s not too often that you get to see a nude pregnant woman to draw from. I think this will come in handy someday.
Unusual Poses – Just like it sounds, many of these aren’t very practical, but very useful in learning how different muscles shift in different positions.

The bulk of the photo’s are in Standing, Seated, and reclining poses. Those fill up most of this book.

Also the people in this book are all pretty fit. There aren’t any fat people in here, not a big scope of different shapes. Again, I am happy with this as I don’t want to draw fat people, but other artist might be disappointed by this lack of diversity. Some of the women have hairy armpits though, and some don’t – that’s diverse enough for me.

Take More Risks – Dynamic Figure Drawing

I highly recommend this book for any artist who just wants to tweak what they already know.
The moment I browsed through this book I knew it could help me tremendously. Dynamic Figure Drawing is a book for the already knowledgeable artist, wanting to better understand the human anatomy – something very important in drawing the figure.

I would start out with a book such as “Drawing the Female (or male) nude” by Giovanni Civardi, which only has poses of women or men, and Giovanni is much easier to read, easier to understand as a beginner.

What I found most helpful is the artist examples drawings; he shows different ways of looking at the figure to get a good realistic drawing of it. I have found that breaking the body down into simple shapes makes it so much easier to put it all together, adding muscle structures and curves after. He also breaks down the perspective drawings quite nicely,

There aren’t many full poses in this book as he beaks most down to the parts. He has sections on feet, legs, arms, chests, etc. My hands have gotten so much better since practicing them with this book. But I definitely recommend using another book or source for getting you poses, then using this book for the parts you have a hard time with. I recommend “The Figure Nude”, which is full of photographs of both men and women nude in all sorts of poses. If not, a magazine is always a good alternative.

This book is in no way easy reading, in fact it seems like it should be in college art classes all over the place. It is very technical, and I usually have to read over the same section a few times to really get what he is trying to say. So, again, I don’t recommend this book for beginners at all.

For the figure drawing artist who’s been at it for a while, and just has a hard time with certain parts, or has a hard time putting more action into their poses, I can’t say enough good about this book. It has helped me out in so many ways in just the short time I have had it. You can see it in my most recent works (some are featured on my profile) such as Gaia – I would have never tried such a difficult pose before reading this book. I also am not afraid to show hands anymore, because he has made them so much simpler.

I have truly been inspired by this book, since getting it I have been much more creative with my art, and I take more risks. I am very pleased with what this book has done for me.

Jobs in the art field

get serious about your passion

Artist
BSM – Phoenix, AZ
Designer About our company: Our company is one of the leading export companies in China. Our products range from giftware, toys, houseware, hardware, party… …

Graphic Artist
Sodexo – Altamonte Springs, FL
is seeking Graphic Artists for layout, design and… design artwork for proposal and presentation production for new sales and retention. The graphic artist… …

Graphic Artist
L-3 Communications – Atlanta, GA
Graphic Artist – Requisition ID 050503 USA… Solutions – STRATIS The Graphic Artist creates graphic designs, artwork, and documentation layout, for… …

Deals on not so new books
Soometimes it’s a good idea to go the cheap route
I know there are many starving artists out there as well (myself included) but art lesson/reference books aren’t the kind you want to just borrow from the library, it is a good idea to have them in your collection. Sometimes I open up my old books I haven’t looked at in years and it’s like I’ve never looked through them before – turn old inspiration into new – eBay is a good place to get good – and cheap art reference books.