Painting shadows – resources for realistic painted shadows
This site tries to give some help on painting shadows in realistic, representational painting.
To establish the right form of a shadow is one thing, but to get the colour of a shadow “right” is at the centre of mastership in painting, I think.
Imagine a meadow in sunlight and a tree that casts a shadow on it. There will be different shades of green, some in light and some in shadow.
Especially the capability of the human eye to adapt quickly to low light levels adds to the difficulty to draw and paint true shadows. As you look into a shadow it seems to get lighter. When you look back into the sunlit areas the shadows suddenly seems so much darker again.
In the end painting shadows is painting light, a particular form of light: shadows are reflections of indirect light whereas the sunlit parts of a subject are exposed to direct sunlight.
Some basic steps to paint shadows are discussed here from dark to light and vice versa. Depending on the medium used there are limitations and different potentials to depict shadows. Two example paintings in oil colour (Plein Air) and dry pastels (studio still life) are discussed in detail. The tips can be used in studio work as well as in works on site, Plein Air.
Basics of the colour theory are explained together with links for more extensive studies. Finally some comprehensive “how to books” on painting light and shadow can be purchased from this website.
Image credits: All images on this webpage ,if not otherwise stated, are creations by the author.Images and illustrations of products (in affiliate links) are used according to Squidoo TOS.
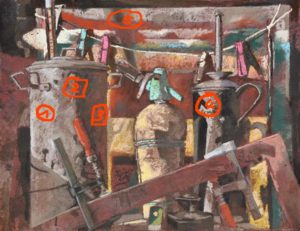
The theory of light and shadow explained with a pastel still life painting as example
This is a great explanation of the theory of light and shade in drawings.
Understanding the categories of direct light, highlights, form shadow, reflected light and cast shadows can help a lot to see and depict the effects of lights in nature much better.
I lit the still life set above with a strong side light from the left and a weaker top light. With a bright piece of cardboard I reflected light back into the composition from the right side because otherwise those shadows would turn into a massive dark and partly almost black area. This is a method that photographers use a lot in portrait work to reduce the contrast between light and shadow areas.
What categories of light an shadow can be seen in this pastel painting?
1.) In area one there is the brightest part, the area of high light on this particular vessel
2.) In area two you see the darkest form shadow (core shadow) that contrasts the most with the area in direct light. This is partly an optical effect rather than a “true” observation. On curved surfaces you will see a more or less wide zone of transition from the brightest direct light into the form shadow. The core shadow will fade more and more
as you move away from the light source and will finally get brighter again when you get in to area 3
3.) Area three is a form shadow that receives some reflected light, often the reflected light has a different color and it will change the color of the form shadow. In this particular case I added some more red that was reflected from the background panel onto the vessel.
4.) Area four is interesting as a cast shadow falls directly into the zone of bright direct light. That dark shadows cast from the soda bottle is lit up on the lower edge of the other vessel by some reflected light from the lower body of the soda bottle.
5.) The shadow in area 5fice is a special case. There is a soft, somewhat blurry cast shadow with a darker core. That effect occured because I used two sources of light. The darker core is in fact a more precisely cast shadow from the strong side light, whereas the soft broader outer part of the shadow originates from the further away light bulb under the room ceiling.
Light, shade and shadown in drawing and painting a beginners guide
Is there a formula to mix the colour of shadows?
An example in oil colors -Some problems and questions that occur in painting shadows
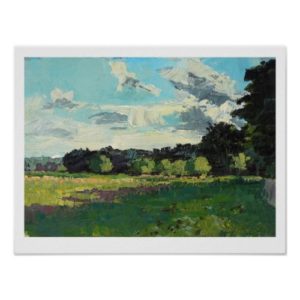
Artprint plein air landscape painting by editionha
Large format printing by Zazzle
In this plein air oil painting light and shadow are the main features. I did this study because I wanted to find out what is the colour of grass and foliage in sun and in shadow and whether there is a way or maybe a kind of formula how I could get the best or convincing results.
But from which colour or shade should I start from? Should the colour of the grass in sun be the starting point and I would mix from bright to the darker shadow, or should I come from the dark side and establish the colour of the grass in shade first and brighten that colour somehow up to paint the areas in direct sunlight?
The most irritating thing is that the human eye adapts always to the light conditions. When I looked at the grass in sun the shadows seemed to be very dark. But when I studied the areas in shadow it seemed that the shadow was not that dark anymore the longer I looked at it. It seemed to get brighter and many different shades of grass emerged, which disappeared again when I studied the sunlit parts of the landscape. Particularly the border between light and shadow presented a difficulty. The contrast seemed so very strong there, but my logic told me that the amount of light and as a consequence the colour of the grass directly at this border line and a few meters away from it had to be the same. In other words the shadow would not get darker close to the sunlit area and also the sunlit area would not be brighter close to the shadow area. This effect again has to do with the way our eyes handle strong contrasts. There are limits for what our eyes can discern and for that reason leaves of trees observed against a bright sky always seem very dark, almost black even though we know that they are green.
Finally I had to realise that I never would be able to reproduce the very same sensation and experience of seeing light and shadow in my painting. Instead I could try to imitate the “effect” of light. For that reason I painted the grass near the border to the sunlit area in a darker and cooler green than the grass close to the edge of the forest. Also I tried to put in some variations within the sunlit and shadow areas.
Also my idea of a kind of a mixing formula vanished; instead I understood that I needed to establish the right tonal values between light and shadow and that I had to find the true colours of grass or leaves etc in shadow and light. Plein air painters often have a small card board frame with a small hole in it with them. By looking through this hole they can isolate certain spots of colour to determine the true colour of objects. I used the palm of my hand to form a kind of monocular and thus isolated certain spots of the landscape for my eyes to get an idea what the true value and colour. This helped me to establish the basic tonality of the shadow and the sunlit meadow. Then I started from these middle values and expanded the range by mixing slightly lighter and darker colours of dark greens and greens in sun.
Some people mix their shadow colours by adding blue, violet to the colour of the sunlit areas or objects in a rather schematic way. These shadows often look artificial. The same applies for the other method that starts with the object colours in shadow which then is brightened up with white and yellow to imitate the sunlit appearance. Both methods are based on the assumption that shadow or sunlight can be understood as some sort of colour filter. Sunlit areas contain more white and yellow, whereas shadows contain more blue and violet components. of course these basic assumptions are correct and helpful on the way, but for more sophisticated painting one has to drop “recipes” I think.
So how do you mix dark shadow colours with oil colors ?
There are many ways to mix dark colors, in fact the possibilities are endless. However there are only a few starting points.
1. Add black color to your base color
Let’s say you need a dark red. By adding black to red color you can mix a darker red, but the red will get more and more muddy the more black you add. You can tell by the greyish look of a paintings that a lot of black has been used in mixing. If you want that look it is fine, but if you prefer bright colors this method most probably will not be the preferred one
2. Start with a dark version of your base color and add dark blue
If you want to keep your colors bright and virbrant adding dark blue to the base color will give you a dark, but blueish version of the base color
3. Mix a dark color with the three primary colors : magenta,blue and yellow
This is the most demanding version to mix the color as seen from the primary colors. You might want to experiment with dark versions of the primary colors or similar colors for example you could subtitue magenta by burnt siena and use prussian blue instead of a primary blue etc..
4. Use Schmincke van Dyke brown to darken colors
I have used Schmincke van Dyke brown with great success to darken colors, especially for painting shadows on green foliage or very dark foliage.
In fact I consider van dyke bewon the best black you can get. It does not kill the clarity of your base color as black does. In combination with variation of no.2. and 3. one can get great results.
I commend to experiment with all four starting points. The shadows and dark greens in the landscape above were painted by using variations of the no.2–no4.
What is the colour of shadows ?
A bit of colour theory
The colour of an object is determined by the light, or more exactly by the wave length of the light that is reflected by the object.
An object in direct sunlight reflects stronger and different light in comparison to an object that receives no direct light or only a fraction of the available light because some other object is casting a shadow on it by stopping the light from the primary light source. Nevertheless the object receives indirect light from the surrounding, which is reflected light, when in shadow. The colour of this indirect light can vary of course depending where it is coming from especially from where it is reflected or maybe even filtered.
Example1:
Very well known is the effect of blue and grey shadows on snow. Snow in shadow receives mainly indirect light from the sky. As snow is white i.e. without colour or more correctly reflects all colours, the shadows in snow look blue under a blue sky without clouds or greyish on an overcast day with a closed layer of grey clouds.
Example 2:
The shadows under a red sun umbrella are influenced by the colour of the umbrella for example. A blue drinking cup under a red umbrella might change to a violet colour due to additive colour mixing theory : blue + red=violet.
Also it is interesting to observe that the colour of the primary light produces shadows in the complementary colour. If you chose a red bulb as your primary light source in a still life painting the shadows cast by that bulb will have a greenish colour.
How to paint shadows – basic approaches
From light to dark and vice versa
1. From light to dark
In water colour and in acrylics it is a very common method to lay down the colours of an object in “normal light”. Then the artists waits until the colours are dry. In a second step those areas in shadow will be covered with a transparent layer of colour that will darken the original colours in order to get a shadow effect. A similar approach is also used in oil colours by adding blue and darker colours to tone down from light to dark shadows. That way the colour hue of the sunlit area is always present in the colour mix for the shadows.
Usually the primary source of light as the sun contains warm yellow light and the colour of shadows are mixed with blue colours as cool complementary hue.
2. From dark to light
Of course it is also possible to start from the dark side and to establish the colours in shade first. The colours of the sunlit parts are then mixed by adding white and yellow to the shadow colours to brighten up or tone up the shadow colours.
3. Mixing the colours as seen
The other way is to paint the colours as they appear in front of the painter. In principle there is no difference in mixing the colour of the sky and the colours of a wall in sun and in then in shadow. In any case the painter has to observe the colours and to translate his observation into a colour mix.
Very bright hues can be mixed by adding white and if the source of light is “warm” i.e. yellowish, as direct sunlight mostly is, with a little bit of yellow in addition. In general it is wise not to overdo the mixing with white because the result will be washed out or almost bleached colours. Overdone highlights can really ruin an otherwise well done painting.
A major difficulty is to mix dark or very dark colour hues. To know the extreme dark and bright colours that are possible with your medium is very important. The gamut of oil colours and other painting media is just not sufficient to represent the wide range of tonalities which are there in nature. Therefore a very bright light can only be represented by emphasising the contrast with dark colours around.
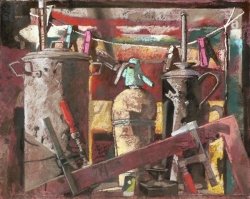
Painting or drawing shadows with dry pastels
A studio still life study with controlled light
This is a still life in dry pastels on medium rough watercolour paper from life in my basement studio. During a week I studied light and shadow colours in artificial light. I tried to find the right colours as seen on the objects to get the realistic look of light and shadows.
It was very helpful to have different colour shades in the Schmincke set of pastels colors. For example the ochre tonalities in light and shadow on the lamp on the right are only very slightly mixed. For the most part I applied the pastel without mixing in that case.
The green glass bottle in the middle however required quite a lot of careful mixing as the set of pastels colour did not contain greens in a suitable gradation of tonalities. I also used bits of grey or charcoal to darken certain areas. With purpose I avoided to use a lot of white in the brightest areas. I would commend to establish small areas with the brightest colours and the darkest colours very early in the painting process to keep control over the contrast or tonality range. It might be very difficult to establish highlights later if the medium tonalities are to high already. If you set your middle values too dark the deepest darks in shadows can become a problem. I found that it is more difficult to create the darkest darks in pastel than the lightest lights.
As you may observe the tonality varies in shadows, by darkening the shadows close to the contact with the bright areas I tried to imitate the sensation for the eyes when it looks at strong contrasts as described in the previous paragraph. There was a rather complicated mixture of shadows cast by the objects onto themselves and on others as well as effects of reflected coloured light, particularly in the green glass vessel at the centre of the composition.