The Most Popular Glow In The Dark Paintings

The Most Popular Glow In The Dark Paintings

Many people are fascinated by the night sky and the mystery of the universe. These paintings can be very beautiful and calming. They can also be used to teach about the night sky.

Glow in the dark paintings can be made with different mediums. Some people use glow in the dark paint, while others use phosphorescent powder. Phosphorescent powder is a fine powder that glows in the dark. It is made from minerals that have been phosphorescent.

Glow in the dark paintings can be made with different techniques. One popular technique is to paint the background with a dark color. Then, the artist uses a light color to paint the stars. The stars will appear to be floating in the dark background.

Another popular technique is to paint the background with a light color. Then, the artist uses a dark color to paint the stars. This technique makes the stars appear to be falling from the sky.

Glow in the dark paintings can be made in any size. They can be made to hang on a wall or to be placed on a table. Glow in the dark paintings can be made with different colors. The most popular colors are blue, green, and red.

Glow in the dark paintings can be made with different themes. Some people like to make paintings of their favorite constellations. Others like to make paintings of famous landmarks or buildings.

Glow in the dark paintings can be made for any occasion. They make great gifts for birthdays, Christmas, or any other holiday.

I have found that the best way to make these is to use a black light. Black lights are available at most hardware stores.

To make a glow in the dark painting, you will need:

-A black light

-Glow in the dark paint

-A dark room

-A canvas

Start by painting your canvas with the glow in the dark paint. You can use any color you like, but white works best. Let the paint dry completely.

Turn off all the lights in the room and turn on the black light. The glow in the dark paint will now start to glow. You can use this light to paint stars and planets on your canvas.

Let your painting dry completely before turning on the lights. Your glow in the dark painting is now complete!

3D Paper Art Around The World

3D Paper Art Around The World

The intricate and beautiful designs that can be created using just paper are amazing. 3D paper artists are using this medium to create some of the most incredible art pieces we have ever seen.

Whether it is a 3D paper sculpture or a 2D illustration, the results are always impressive. 3D paper artists are able to create such detailed and realistic art because of the many different techniques they use. Some of these techniques include paper cutting, folding, and layering.

Paper cutting is probably the most essential skill for a 3D paper artist. This technique is used to create the basic shape of the sculpture or illustration. Once the basic shape is created, the artist can then begin to add details and layers.

Folding is another important technique for 3D paper artists. This is how they are able to create more complex shapes and add depth to their sculptures. By folding the paper, the artist can create all kinds of different shapes that would be impossible to create with just a piece of flat paper.

Layering is the final technique that is often used by 3D paper artists. This is how they are able to create dimension and add details to their sculptures. By layering different colors of paper, the artist can create a realistic effect.

3D paper art is truly incredible. The artists who create these pieces are extremely talented and skilled. If you have ever wanted to try your hand at 3D paper art, now is the time!

This is because it is a very versatile medium that can be used to create a wide variety of different pieces. It can be used to create 3D sculptures, paintings, and even jewelry.

There are a few things that you need to know in order to create your own 3D paper art. First, you will need to choose the right kind of paper. You can use regular printer paper, but it is not as sturdy as cardstock. You will also need to get some double-sided tape or glue dots.

The next step is to start cutting out your paper. You can use a template or freehand your design. Once you have your design cut out, you will need to score the paper. This will help the paper fold evenly.

After you have scored the paper, you will need to start folding it. You will want to start with the large pieces first and then work your way down to the smaller pieces. Once you have all of the pieces folded, you will need to glue or tape them together.

The final step is to add any embellishments that you want. You can use sequins, beads, or anything else that you can think of.

3D paper art is a great way to add a unique touch to any room in your home. It is also a great gift idea for any occasion.

How To Create 3d Paper Art

How To Create 3d Paper Art

Paper is a versatile medium that can be used to create art in a variety of different forms. One of the most popular ways to use paper is to create three-dimensional art.

Three-dimensional paper art can be created using a variety of different techniques. One popular technique is to cut paper into shapes and then assemble the shapes into a three-dimensional object. This can be done by hand, or with the help of a cutting machine such as a Cricut or Silhouette.

Another popular technique for creating three-dimensional paper art is to fold paper into shapes. This can be done by hand or with the help of a paper-folding machine.

Once the paper has been cut or folded into the desired shapes, it can then be assembled into a three-dimensional object. This can be done by gluing the pieces together, or by using other methods such as stitching or wire-wrapping.

Three-dimensional paper art can be used to create a variety of different objects, including sculptures, jewelry, ornaments, and more. It is a versatile medium that can be used to create a wide variety of different art forms.

Adding some dimension to your paper crafts is a great way to add interest and depth to your projects. One way to do this is to create three-dimensional paper art. This type of art can be made using a variety of materials, but the most common is paper.

Paper is a great medium to work with when creating three-dimensional art because it is relatively easy to cut and shape. It is also inexpensive, so you can experiment with different techniques without breaking the bank.

There are a few different ways to create three-dimensional paper art. One popular method is to use paper folding techniques, such as origami or kirigami. This type of art is often made by folding paper into intricate shapes and then stacking the pieces to create a three-dimensional effect.

Another way to create three-dimensional paper art is to use paper cutting techniques. This involves cutting paper into shapes and then gluing or taping the pieces together to create a three-dimensional effect.

You can also create three-dimensional paper art by using a variety of different types of paper. For example, you can use construction paper, cardstock, or even recycled paper. By using different colors and textures of paper, you can create a unique and interesting three-dimensional effect.

If you are looking for a creative way to add dimension to your paper crafts, try creating three-dimensional paper art. This type of art is relatively easy to make and can add a lot of interest and depth to your projects.

The History Of 3D Art

The History Of 3D Art

In the early days of cinema, artists would often create short films that featured three-dimensional images, but it wasn’t until the 1950s that 3D art really began to take off.

The first 3D artworks were created using a technique known as anaglyph 3D, which involved using two different colors of film to create the illusion of depth. This technique was used in a number of early 3D films, such as “Bwana Devil” and “House of wax”.

However, anaglyph 3D had a number of drawbacks, such as the fact that it could only be viewed using special glasses. This meant that it was not suitable for use in mainstream cinema.

A breakthrough came in the early 1980s with the development of the polarized 3D system. This system used polarized lenses to filter out the different colors of light, meaning that viewers no longer needed to wear special glasses to see the 3D effect.

Polarized 3D quickly became the standard for 3D cinema, and is still in use today. It is also used in a number of 3D televisions and computer monitors.

3D art is not just limited to the world of film and television. A number of artists have also experiment with creating three-dimensional paintings and sculptures.

The Dutch artist MC Escher is one of the most famous creators of 3D art. His work often features optical illusions and impossible objects, such as his famous “Drawing Hands” painting.

More recently, a number of artists have been experimenting with creating 3D art using computers. This has led to the development of a new genre known as digital 3D art.

Digital 3D art is created using a variety of software programs that allow artists to create three-dimensional images on a computer. These images can then be printed out using a 3D printer.

3D art is a fascinating and ever-evolving field. As new technologies are developed, it is likely that we will see even more amazing and innovative 3D artworks being created in the future.

The Most Popular 3D Art Styles

The Most Popular 3D Art Styles

However, there are many other types of 3D art that are becoming increasingly popular. Here are some of the most popular 3D art styles:

1. Photorealism

Photorealism is a type of 3D art that attempts to recreate an image or scene as realistically as possible. This can be achieved through the use of advanced rendering techniques and software.

2. Vector Art

Vector art is a type of 3D art that uses mathematical algorithms to create images. This technique can create images that are very detailed and accurate.

3. Pixel Art

Pixel art is a type of 3D art that uses pixels to create images. This technique can create images that are very detailed and accurate.

4. Sculpting

Sculpting is a type of 3D art that involves the creation of three-dimensional objects. This can be done using a variety of materials, including clay, wood, metal, and plastic.

5. Modeling

Modeling is a type of 3D art that involves the creation of three-dimensional objects. This can be done using a variety of software programs.

6. Animation

Animation is a type of 3D art that involves the creation of moving images. This can be done using a variety of software programs.

7. Digital Painting

Digital painting is a type of 3D art that involves the creation of images using a computer. This can be done using a variety of software programs.

But what’s the difference between the two?

Pixel art is made up of small pixels that are put together to form an image. Low poly art is made up of bigger polygons that are put together to form an image.

Pixel art is usually more detailed than low poly art. Low poly art is usually more abstract than pixel art.

Pixel art is usually more time consuming to create than low poly art. Low poly art is usually less time consuming to create than pixel art.

So, which is better?Pixel art or low poly art?

It depends on what you’re looking for. If you want something more detailed, then pixel art is probably better for you. If you want something more abstract, then low poly art is probably better for you.

How To Create 3D Nail Art

How To Create 3D Nail Art

Three-dimensional (3D) nail art is a type of nail decoration that adds depth and dimension to your nails. It can be achieved by using a variety of techniques, including layering, sculpting, and embossing. 3D nail art is a great way to add interest and drama to your nails, and it’s perfect for special occasions or simply when you want to stand out from the crowd.

If you’re new to 3D nail art, don’t worry – it’s not as difficult as it looks. With a little practice, you’ll be creating stunning 3D designs in no time. In this article, we’ll show you everything you need to know about 3D nail art, including how to choose the right products, how to create different 3D effects, and some top tips for perfect results.

What You Need

Before you start, you’ll need to gather together a few supplies. You’ll need a base coat and top coat of nail polish, as well as a color polish for your design. For the best results, choose a polish that is not too thick or too thin. You’ll also need some clear acrylic powder, a small brush, a dotting tool, and a toothpick.

If you’re planning on creating a lot of 3D designs, it’s worth investing in a few specialized tools, such as a 3D mold or a silicone mat. These can make it easier to create certain shapes and effects, but they’re not essential.

Creating a 3D Effect

There are lots of different ways to create a 3D effect on your nails. One of the simplest is to create a layered design using your chosen polishes. Start with a base color, then add a second color in a contrasting shade. Use a dotting tool or a toothpick to create dots or lines of the second color. Finally, use a dotting tool or your brush to slightly swirl the colors together.

If you want to add more dimension to your design, you can try sculpting with acrylic powder. Start by painting your nails with a base color and letting it dry completely. Next, use your dotting tool to apply a small amount of acrylic powder to your nails. Use a small brush to shape the powder into the desired design. You can create all sorts of shapes and effects, from flowers to geometric patterns.

Another way to add dimension to your nails is to emboss them. You’ll need a special embossing plate for this technique. Start by painting your nails with a base color and letting it dry completely. Place your embossing plate over your nail and use a dotting tool to apply polish to the plate. The polish will transfer onto your nail, and you can then use a brush to shape it into the desired design.

Top Tips

Here are a few top tips to help you get the best results from your 3D nail art:

-Start with clean, dry nails. Make sure your nails are free from any oils or residue, as this can interfere with the polish and cause it to chip.

-Take your time. Don’t try to rush your designs – the key to perfect 3D nail art is to take your time and be patient.

-Use a top coat. A top coat will help to protect your design and make it last longer.

-Be creative. There are no rules when it comes to 3D nail art, so let your imagination run wild!

With these simple tips, you’ll be creating beautiful 3D designs in no time.

Brayer Techniques

Brayer Techniques

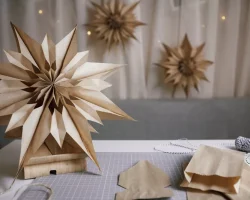
Brayer techniques in ink and acrylics for art journaling, mixed media, and collage work

My brayer is one of my favorite art tools – it’s incredibly versatile and can provide precision results and serendipitous beauty depending on what brayer technique I’m using. The brayer is an incredibly multi-purpose tool and I’d like to share with you all the brayer techniques I know – so far – and add to this page as I learn more about this amazing artistic tool.

What exactly is a brayer? A quick introduction to brayers…

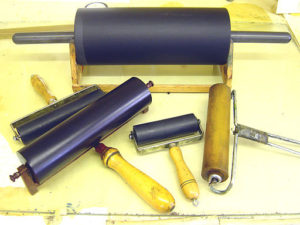
Basically, a brayer is a paint roller. Not the soft, fuzzy kind like for painting walls and ceilings, but similar. They are smaller, handheld tools that are frequently used for printmaking, but are growing in popularity as a scrapbooking, rubber stamping, and mixed media tool.

Mixed Media Brayer Technique with Kaleidacolor Inkpad

I made the colorful layered background on this art print in just seconds. It took me longer to photograph it than to create it! I used a simple brayer technique involving a specialty ink pad called Kaleidacolor. Each Kaleidacolor pad comes with five individual color that snap together to create a lovely rainbow striped stamp pad. The innovative design allows you to unsnap the colors when you’re not using it so that the inks don’t bleed together like they do with other multicolor ink pads.

TIP: Always store any ink pad upside down and wrapped with a rubber band to keep the lid tight. This increases the lifespan of you ink pad by allowing the ink to settle towards the top of the pad, and minimizing evaporation due to a loose lid.

An example of using the Kaleidacolor Brayer Technique

Here’s a video that some one made with a brayer technique very similar to how I created the rainbow poster. She is using a glossy cardstock and going for a smoother, more blended brayer technique but I purposefully left my colors a bit uneven and blocky and brayered on watercolor paper to get more texture and layers. (Also, she stamps a resist image before starting with her brayer technique.) Either way is very fun, and as you can probably tell there is a lot of room for playing around with this technique.

Acrylic Paint Brayer Techniques

Using a brayer with acrylic paints to create amazing layered texture
Acrylic Paints Acrylic paints are pretty much my number one pigment of choice, be it cheap craft paints or the higher-quality, artist-grade acrylic paints. I’m always on the lookout for new and exciting ways to use it. Using a brayer to apply acrylic paints to your artwork can have all kind of interesting effects – it’s a bit of an adventure because it can be very hard to predict exactly what will happen, but I’ve rarely been disappointed. (The only times were when I used too much paint – a little acrylic paint goes a LONG way with a brayer, it can be far too easy to use too much and end up with a muddy mess.)

Probably my first encounter with using a brayer with acrylic paint was during a the first annual retreat for my local ATC group. One of our members led about fifteen of us through the exercise “Mail Art To The Self” from the book Kaleidoscope: Ideas & Projects to Spark Your Creativity. The exercise was created by artist Juliana Coles and I can’t recommend it enough – I’ve done it several times since and it’s always invigorating. Part of the exercise involves applying paint to a large surface as fast as you can, and she suggests using a brayer for that. Our exercise leader let me borrow hers and I was thrilled with the results!

As you can see from the close-up on the left here, the white paint I brayered onto my project picked up and highlighted all the textures on the surface. To achieve that highlighting effect I used a very small amount of paint and not too much pressure when rolling the brayer. You can also see some interesting peaks and valleys in the paint, which I love the look of. That’s another great thing you get with brayering that you can’t really replicate with any other painting tool. The amount of peaks and valleys varies depending on how much paint you use, and thicker, high-quality paint will also give this effect more.

Note that this is an example of what brayering looking like with just one color – the browns and greens you see are the original cardboard surface and the paint I’d applied with brushes and my fingers before I got my hands on the brayer.

Click on the image, it will take you to the full image of this page so you can see all the details.

An art journaling video showing an acrylic paint brayer technique

For a while I ended up forgetting about my brayer – I learned so much in one weekend that it was hard to keep track of it all! But when a friend of mine posted this video to her blog it got me right back to it!

https://www.youtube.com/watch?v=A56wx1v0Fo8

Art Journal Page: Anecdotal Evidence

The art journal spread I created using my brayer and bright craft acrylics

If you look closely, you may notice this is where the photo at the top of the page came from!

Here’s the journal spread I created after I watched the above video the first time. I grabbed a handful of my favorite bright colors of craft paint and dripped just a little bit of each color at a time, rolling the brayer back and forth at varying angles each time I added a new color. The brayering process smoothed the paint out so thinly that it dried very quickly and I could add more colors almost instantly without getting muddy results. It probably helped that it was a chilly day and my space heater made my studio nice and dry and warm!

Thanks for stopping by my brayer technique guide!
I hope you found the info you were looking for today, and that I’ve inspired you to go make fun and exciting new art and craft projects using your brayer. Please let me know what you think, and be sure to let me know if there are any brayer techniques I’ve missed! Thanks!