There is no one-size-fits-all answer to this question, as the best Wish promo codes 2018 will vary depending on the company and product. However, some tips on finding the best Wish promo codes include using online search engines, subscribing to newsletters, and visiting the company’s website.
If you’re looking for a Wish.com coupon code, you’ve come to the right place! At Couponvario, they have a huge selection of coupons, promo codes and deals for Wish.com.
How to save money on online purchases
When it comes to online shopping, it’s important to be aware of the various ways to save money. Some common ways to save money on online purchases include using a coupon code, shopping around, and researching the different prices before making a purchase.
Looking for the best Wish promo codes ? Look no further than our website! Here, we provide you with all the latest Wish promo codes and deals. So don’t miss out and get the best deals on Wish products!
There is no one-size-fits-all answer to this question, as the best Wish promo codes will vary depending on the company and product. However, some tips on finding the best Wish promo codes include using online search engines, subscribing to newsletters, and visiting the company’s website.
When it comes to online shopping, it’s important to be aware of the various ways to save money. Some common ways to save money on online purchases include using a coupon code, shopping around, and researching the different prices before making a purchase.
When it comes to finding the best wish promo codes for, it can be hard to know where to start. However, here are five easy tips to help you get started:
Check out our website – We have a wide range of wish promo codes that you can use to get the best deals.
Scroll through our blog – We have a variety of posts that will help you find the best promo codes for 2018.
Check out our social media – We have a number of posts on our social media outlets that can help you find the best wish promo codes for 2018.
Sign up for our email newsletter – We send out tips and updates about the latest wish promo codes and deals.
Use our search engine – We have a search bar on our website that you can use to search for wish promo codes.
When you’re shopping for a Wish promo code, make sure to read the fine print. Sometimes, the promo code may be exclusive to a certain store and may not be available to others. Also, be sure to check the expiration date on the promo code.
When you use a wish coupon or promo code, you’re essentially telling the store that you want to buy something but don’t actually have any money. The store will then issue you a discount on your purchase.
If you’re looking for ways to save at Wish.com, one of the best things you can do is take advantage of coupon codes from Couponvario. You can often find coupons for percent-off discounts, as well as dollar-off coupons that can be used on specific items or categories.
To use a wish coupon or promo code, you first need to find the code or coupon code on the shop page of the store you plan to purchase from. Once you have the code, you can enter it into the store’s computer system.
Once the store has received your code, the store will issue you a discount on your purchase. The discount will usually be a percentage of the total sale price, so be sure to multiply the discount number by 100 to get the actual discount.
If you’re using a wish coupon or promo code at a store that does not accept PayPal, you’ll need to use a different payment method.
When you use promo codes and wish coupons, you can save money on your next purchase. promo codes and wish coupons can be found all around the internet, and many stores offer them as part of their regular sales. The best way to use these coupons is to read the fine print before you use them. Some promo codes and wish coupons may require you to buy something in addition to save money, so be sure to read the terms and conditions before using any of these codes.
When you use a promo code, the store will often give you a discount on your purchase. However, the discount may not be total and may vary depending on the store. You also can use a wish coupon if the store does not have the product you are looking for. However, please be sure to read the terms and conditions of the wish coupon before using it.
When you see a coupon or promo code on a product, be sure to take advantage of it! Coupons and promo codes can save you a lot of money on your next purchase.
There are many different types of coupons and promo codes. Here is a brief overview of the most popular types:
Coupons: These are short, specific-time codes that can be used to save you money on your next purchase.
Promo Codes: These are long, general-time codes that can be used to save you money on your entire purchase.
There are many different stores and websites where you can find coupons and promo codes. You can also look online for coupons and promo codes.
When you find a coupon or promo code, be sure to take advantage of it! This can save you a lot of money on your next purchase.
Kids are fearless when taking photos. Their creativity knows no bounds. But one of the most common questions moms ask me goes something like this, “How do I give creative direction to my kids, so I don’t end up with 100-plus photos of the family dog?”
Anyone relate? Your child gets a hold of your smartphone or camera, and you end up having endless photos of your hardwood floors. Never fear; there is an artist in your child that just needs a little direction. With Blaze and Pascaline’s permission, I’m sharing a handful of their photos along with Thirteen Ways to Engage the Photographer in Your Kids!
1: Set Your Child Up for Success
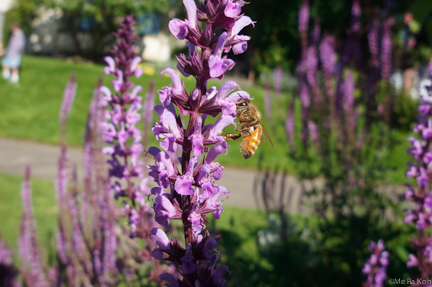
Before handing the camera over to the kids, set the camera settings to P (Portrait Mode) or A (Aperture Priority Mode). Either of these shooting modes will help soften the background while keeping the subject/object in focus. Depending on your child’s age, explain what the camera setting will do and have them try it out on flowers! If your kids are going to use your SmartPhone, encourage them to take photos near a big window so they have the most light possible for best results!
2: Defining Details
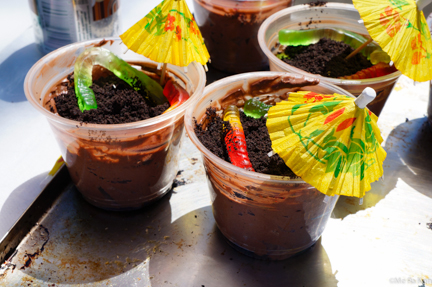
Defining Details is one of the key-story telling elements that I coach moms to capture in my book. But kids can do this too! The next time you have a special event or holiday, hand the camera over to your child and ask her to capture close up photos of all the special details, like Pascaline’s Dirt Cups with Worms at their lemonade stand! Depending on your child’s age, take the challenge up a notch and encourage them to get “as close as possible” to the object.
3: Copy YOU!
This is one of my favorite photo exercises to do with the kids. I take a photo, and then I show it to Pascaline and Blaze. They have to take the same photo I took. We don’t do this all the time, but when I am wanting them to experiment with where they put the sun in their photo, or how much empty space they leave in the frame, or where to stand to compose the shot, instead of giving them a big lecture, I ask them to copy me. Whether it’s blurry, dark, too bright, doesn’t matter. On a subconscious level, they are practicing all the wonderful basic elements of composition by trying to replicate what I’ve captured. Mimicking the masters is an old practice that we do in piano, violin and painting lessons. Photography isn’t any different. Blaze took this photo when he was five years old on a trip we made to Angkor Wat, Cambodia at sunrise. Click here to see the second photo down on a previous blog post from Cambodia. That’s the one Blaze was trying to copy.
4: Favorite Things
Give your child the assignment to capture 10 of his favorite things! This is a wonderful exercise to have him do every six months! You’ll find yourself smiling at what takes priority in his life right now. Six months ago it may have been trains, now it’s his Legos. And then there are those items that remain their favorites, no matter how much times goes by, like Blaze’s Ba-Bas.
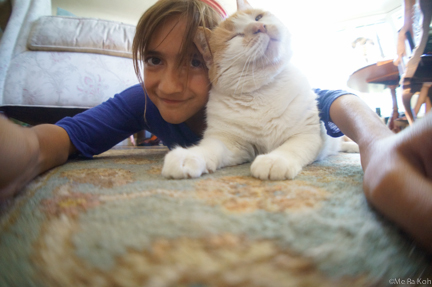
5: Experiment with the Camera’s Picture Effects Mode
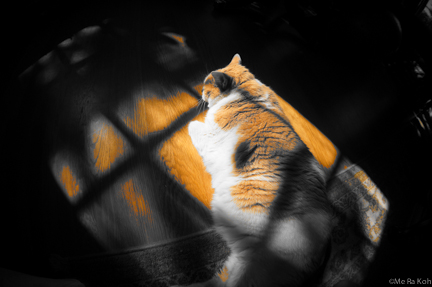
This is always a funny one for kids. Point-and-Shoots, SmartPhone apps, or DSLRs all have Picture Effects that you can now play with to alter your original photo. One of Pascaline’s favorite is to use the “partial color” effect on her SONY NEX 6. She can choose to have everything in her image be black and white, except for one color — like orange — to bring out the BEST side of her kitty!
6: Favorite Places
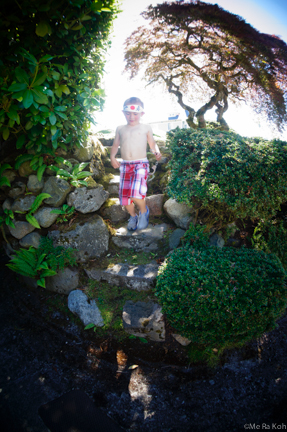
Encourage your child to take a photo of their favorite places around the house or outside. This can be their bedroom, mom and dad’s big bed, that cozy spot in front of the heater where they like to get dressed in the morning, or the neighbor’s yard. At the end of our block is an older couple, both grandparents, and for some reason the kids LOVE playing in their yard. I’m not sure if Pascaline meant to, but I LOVE how the neighbor boy has a Japanese bandana on with the neighbor’s Japanese maple behind him! You never know what they are going to get!
7: Photos of Mom and Dad
Time to get a dose of your own medicine! Your kids are going to LOVE this challenge! Think of all the thousands of photos you’ve taken of your kids — now it’s their turn. Give your child the challenge to capture mom and dad doing something they do every day. Encourage them to be sneaky, like spies! This makes it even more fun! And don’t worry about whether or not the photo is blurry. Some of my favorite, most inspiring photos are the blurry ones that the kids have taken.
8: Kid Self Portraits
Kids, especially at the grade-school age, love to take self-portraits. Ask your child to take six different photos of themselves throughout the day. They can take the photos in the backyard, in their bedroom, but challenge them to make each one different whether it’s a silly face, serious face, or a different room. Don’t worry about fingers getting in the shot: that too documents their stage of childhood!
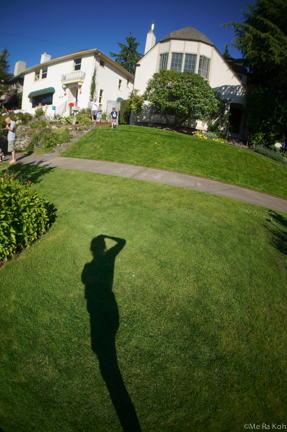
9: Their Shadow!
Kids LOVE to see their shadows grow in height, especially as the Winter’s end draws near and days become longer. Give your child the photo challenge to capture five different photos of their shadow, and be as silly or tall as they’d like!
10: What Makes Me, Me
Ask your child to take ten photos of specific things that show who they are, and what makes them unique in the family. Kids love to highlight how they are different than the rest of the family!
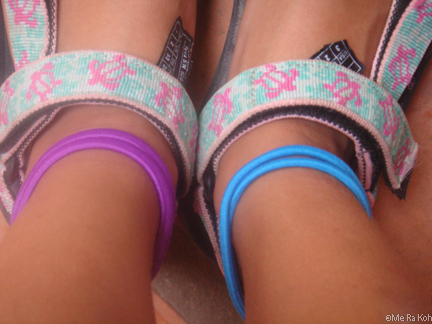
11: Siblings Self Portraits
This is another personal favorite! I LOVE to challenge my kids with taking “Sibling Self Portraits”. The only rule, they can’t look at the camera. That simple, little rule helps enforce the idea of ignoring the camera when mom brings it out, as well as creating the cutest results! Pascaline held the camera down low and shot up for this photo of her and Blaze at the beach.
12: Play with Fun Lenses
Our kids love to experiment with lenses as much as we do, especially SONY’s Fish Eye lens that curves all the corners. To help ensure good care of your lens, set parameters, like a time limit and certain room, so your kids can experiment with a fun lens but not stress you out in the process.
13: A Day in the Life
Give your kids the photo assignment of capturing different photos that represent “A Day in the Life.” For little ones, they can take a photo of their meals, the park, their bed before bedtime. Older kids especially love this exercise! They fearlessly take photos of everything they do and feel throughout the day, like the satisfaction of convincing mom to get frozen yogurt! I guarantee you will be so entertained by their photo results! Want more photo prompts for your kids?! How about if Elmo and I help ever week between now and May! Sesame Street and I have teamed up to bring you and the kids a special photo challenge each week for the My World Photo Contest we are doing! Keep reading for more details!
For companies that are interested in starting an employee recognition program here are some tips that will help you along. Firstly you need to you need to evaluate how management deals with your employees and evaluate if they operate on an open door or closed door philosophy and also evaluate the atmosphere as to whether it is business like, production driven, fun filled or customer orientated. You also need to define what the current mood is in the office and define if the employees trust management. Once you have established these factors then the second step is to determine the objective of such a program, by defining if such a program will benefit your employees and your company.
When setting up a recognition program you need to define the behaviours and performance you would like to encourage, as the certain type of behaviours you want to encourage will likely be repeated, not only the staff member you are issuing staff awards but your entire staff will start following this example. Make sure you get input from your employees and management with regards to the expectations required for a recognition program to be put into place effectively. Allow your management team and employees to make suggestions as to the behaviours and performance they would like to see rewarded and then use these suggestions as guidelines to identify the type of performance that will be recognized and rewarded with corporate Trophies and Plaques.
Once you have an agenda then discuss this with your staff to see if the measures are reasonable and worthwhile and most important if the program will increase productivity and incentive. Once you have a program in place then you need to define who will be eligible for each awards program and make sure once the program is running that there is no misunderstanding or misinterpretation. Define clearly if only certain divisions are eligible for awards or if all employees are eligible for awards. You then need to appoint a decision maker of which may vary depending on the type of program put in place. For example, you do not need a decision maker for people receiving awards for their extended services.
An ideal situation would be to distribute the responsibility and authority among as many employees as possible and at the same time demonstrate the type of work behaviour that will warrant employee awards, which will make it far easier for them to judge and understand the required outcomes. By distributing the responsibility, this will ensure timely recognition, as it is vital that employees are thanked for their effort promptly, otherwise such program will lose their effectiveness.
Brayer techniques in ink and acrylics for art journaling, mixed media, and collage work
My brayer is one of my favorite art tools – it’s incredibly versatile and can provide precision results and serendipitous beauty depending on what brayer technique I’m using. The brayer is an incredibly multi-purpose tool and I’d like to share with you all the brayer techniques I know – so far – and add to this page as I learn more about this amazing artistic tool.
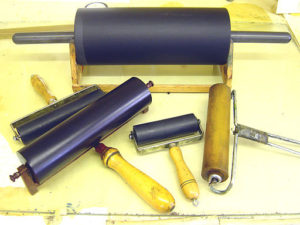
What exactly is a brayer? A quick introduction to brayers…
Basically, a brayer is a paint roller. Not the soft, fuzzy kind like for painting walls and ceilings, but similar. They are smaller, handheld tools that are frequently used for printmaking, but are growing in popularity as a scrapbooking, rubber stamping, and mixed media tool.
Mixed Media Brayer Technique with Kaleidacolor Inkpad
I made the colorful layered background on this art print in just seconds. It took me longer to photograph it than to create it! I used a simple brayer technique involving a specialty ink pad called Kaleidacolor. Each Kaleidacolor pad comes with five individual color that snap together to create a lovely rainbow striped stamp pad. The innovative design allows you to unsnap the colors when you’re not using it so that the inks don’t bleed together like they do with other multicolor ink pads.
TIP: Always store any ink pad upside down and wrapped with a rubber band to keep the lid tight. This increases the lifespan of you ink pad by allowing the ink to settle towards the top of the pad, and minimizing evaporation due to a loose lid.
An example of using the Kaleidacolor Brayer Technique
Here’s a video that some one made with a brayer technique very similar to how I created the rainbow poster. She is using a glossy cardstock and going for a smoother, more blended brayer technique but I purposefully left my colors a bit uneven and blocky and brayered on watercolor paper to get more texture and layers. (Also, she stamps a resist image before starting with her brayer technique.) Either way is very fun, and as you can probably tell there is a lot of room for playing around with this technique.
Acrylic Paint Brayer Techniques
Using a brayer with acrylic paints to create amazing layered texture
Acrylic Paints Acrylic paints are pretty much my number one pigment of choice, be it cheap craft paints or the higher-quality, artist-grade acrylic paints. I’m always on the lookout for new and exciting ways to use it. Using a brayer to apply acrylic paints to your artwork can have all kind of interesting effects – it’s a bit of an adventure because it can be very hard to predict exactly what will happen, but I’ve rarely been disappointed. (The only times were when I used too much paint – a little acrylic paint goes a LONG way with a brayer, it can be far too easy to use too much and end up with a muddy mess.)
Probably my first encounter with using a brayer with acrylic paint was during a the first annual retreat for my local ATC group. One of our members led about fifteen of us through the exercise “Mail Art To The Self” from the book Kaleidoscope: Ideas & Projects to Spark Your Creativity. The exercise was created by artist Juliana Coles and I can’t recommend it enough – I’ve done it several times since and it’s always invigorating. Part of the exercise involves applying paint to a large surface as fast as you can, and she suggests using a brayer for that. Our exercise leader let me borrow hers and I was thrilled with the results!
As you can see from the close-up on the left here, the white paint I brayered onto my project picked up and highlighted all the textures on the surface. To achieve that highlighting effect I used a very small amount of paint and not too much pressure when rolling the brayer. You can also see some interesting peaks and valleys in the paint, which I love the look of. That’s another great thing you get with brayering that you can’t really replicate with any other painting tool. The amount of peaks and valleys varies depending on how much paint you use, and thicker, high-quality paint will also give this effect more.
Note that this is an example of what brayering looking like with just one color – the browns and greens you see are the original cardboard surface and the paint I’d applied with brushes and my fingers before I got my hands on the brayer.
Click on the image, it will take you to the full image of this page so you can see all the details.
An art journaling video showing an acrylic paint brayer technique
For a while I ended up forgetting about my brayer – I learned so much in one weekend that it was hard to keep track of it all! But when a friend of mine posted this video to her blog it got me right back to it!
The art journal spread I created using my brayer and bright craft acrylics
If you look closely, you may notice this is where the photo at the top of the page came from!
Here’s the journal spread I created after I watched the above video the first time. I grabbed a handful of my favorite bright colors of craft paint and dripped just a little bit of each color at a time, rolling the brayer back and forth at varying angles each time I added a new color. The brayering process smoothed the paint out so thinly that it dried very quickly and I could add more colors almost instantly without getting muddy results. It probably helped that it was a chilly day and my space heater made my studio nice and dry and warm!
Thanks for stopping by my brayer technique guide!
I hope you found the info you were looking for today, and that I’ve inspired you to go make fun and exciting new art and craft projects using your brayer. Please let me know what you think, and be sure to let me know if there are any brayer techniques I’ve missed! Thanks!
Choosing the Right Markers and Sketch Pads for Teenagers
These Markers And Sketch Pads For Teens have been handpicked to include the best quality, most popular, top rated and best selling styles for you to choose from.
The basics will get you started in drawing with markers (copic, permanent, anime, manga, and more). Watch the drawing lessons and videos showing step by step drawing instruction and techniques. Discover the best selection of markers and sketch pads (sketch books) that your teen artist will love.
Featured: Bee Paper Bleedproof Marker Pad, 8-1/2-Inch by 11-Inch
COPIC Manga Wallet Set B- 24 Sketch Markers in a Travel Wallet
Good for teens to carry with them in a backpack or purse
This is a great little wallet that teens will love – there is a wide range of colors, 24 in total, that are a great start for young artists. The handy wallet means they are easy to carry. These markers are alcohol based, acid free markers that are non toxic. They can be used with the Copic air brush for the adventurous. These are best used with Copic marker paper.
Letraset Pro Marker Comic Art Set 2, Twin-Tip, 10-Pack
Good for Manga drawing or any animated cartooning
When buying markers in the ‘set series’ look at each set and evaluate how important the items in each set are to the overall project you are working on. In most cases you will find each set has a varied purpose. And, the primary reason each set is sold separately is because they are used more or less often. The rule of thumb then is to buy one of each and then replace each as they run low.
More Magic Markers
suggested basic sets
Included in this section are suggested basic sets your teenager will need depending on their art styles and preferences.
For any type of drawing there is a basic requirement for markers or colored pencils for skin tones like the ones here. A blending kit is essential and from there you can add on additional supplies depending on their art work. For example comic artists will prefer vibrant tones like those provided by the Letraset Pro comic markers while manga artists will need the more subtle colors provided by specific manga markers.
Our choices are based on the best value and best quality marker pens that are smudge-resistant when dry, they won’t bleed into other colors but can be blended into tones and shades using duel tips and blending pens.
Of course, using the right type of paper is also essential to great results.
How important is using the right paper for marker art?
won’t any old paper serve???
The simple answer is really really important. If you pick a sketch pad on how cheap it is, you are likely to get light-weight paper that marker ink will saturate to the point colors will bleed into the paper and into other colors. Of course that is the worst case and pretty obvious but with the huge variety of papers available today it can be more than just confusing when you start out. If you consider how expensive it can be if you pick the wrong sketch pad, you’ll see how advisable it is to do a little research beforehand.
Many manufacturers make it easier by specifying on the front cover the type of art work their paper is good for. At the very least you need to target paper that is guaranteed not to bleed colors like this bleed-proof paper available on Amazon.
What to bear in mind when buying sketch pads for marker art
Because markers are alcohol based they will soak ordinary paper and bleed colors together unless the paper has been pre-coated with a solvent to prevent this.
For the same reason, unless you use the proper paper you will find your colored ink from the marker edging outward from the line you intended, the professionals call this feathering.
You want to pick a paper that will allow you to blend colors.
Pick the right paper for the right effect.
Best Bleedproof Paper For Markers
The Top Pick For Markers And Sketch Pads For Teens
If you want to go for the best paper for using with markers, go for the Copic range designed specifically for marker art. This pad holds 50 sheets of thin paper that is completely bleed-proof. This paper is designed to get the best out of alcohol based markers, the smooth surface allows for artistic blending of colors that are ideal for anime, manga and comic art.


