The best Camera shoulder strap reviewed

The best Camera shoulder strap reviewed

Carry your camera in comfort and style with a camera shoulder strap

Camera shoulder strap reviewed and compared. The camera shoulder strap is by far the best way to carry your digital SLR camera. SLR cameras are big, bulky and heavy and carrying one around all day is going to take its toll. If you want to carry your camera around with you all day, totally pain free the camera shoulder strap is the best option.

There are many different brands and models of camera shoulder strap available, but not all of them are worth buying. There are many cheap camera shoulder straps that are made out of inferior materials. A cheap camera shoulder strap will have no padding hence they are uncomfortable and will cut in to your skin, and will last about five minutes. A digital SLR camera is expensive and scrimping on a cheap camera shoulder strap that could break and let your camera hit the deck at any time, is not worth the risk and could end up costing you a lot of money. It is far better to pay a little more on a good quality camera shoulder strap in the first place.

So, what are the best camera shoulder straps? Carry on reading and you will soon find out since this article reviews and compares the top three camera shoulder straps currently available.

Best camera shoulder strap – Cotton Carrier

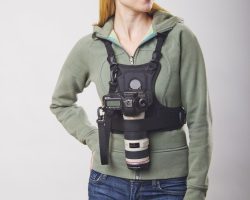
Cotton Carrier Vest System For 1 or 2 Cameras

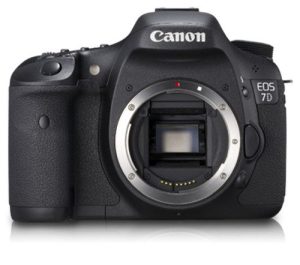
The Cotton Carrier is a chest carrier that goes over your shoulders, but it isn’t a camera shoulder strap per se. Out of all the camera straps I have owned and used, and I have tried many different types, the Cotton Carrier is the best camera strap ever. The Cotton Carrier camera vest allows you to carry your camera safely on your chest, out of harms way, leaving your hands totally free. The Cotton Carrier can securely hold a fully gripped digital slr camera and large telephoto lens, such as my battery gripped 7d and Canon 100 – 400 lens. With the Cotton Carrier I can carry this heavy set up around with me all day, and totally pain free which is brilliant.

Releasing the camera from the Cotton Carrier is quick and easy, and simply involves twisting the camera and pulling upwards. It is possible to get the camera off the vest and up to your eye in a matter of seconds, which means you will never miss a shot.

The Cotton Carrier isn’t cheap, but it is worth each and every cent. Before I bought my Cotton Carrier I did lots of reading and research and was in two minds, partly because of the cost and partly because I couldn’t find many non-professional reviews about the product. However, I finally bit the bullet and purchased one, and I have never looked back. I only wish I bought one sooner, but then hindsight is a wonderful thing isn’t it.

In my opinion, the Cotton Carrier is the best camera holding system currently available and it is well worth buying, especially if you regularly use heavy camera and lens combinations.

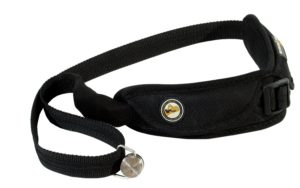
Best Camera shoulder strap – Sun Sniper

Sunbounce Sun Sniper Strap Pro, Black

The Sun Sniper is the original camera shoulder strap and, even today, it is one of the most popular amongst all types of photographers, and when you get to see and try the Sun Sniper camera shoulder strap you will soon see why.

The Sun Sniper has a wide strap, which means it doesn’t cut in to your torso. I can confirm the Sun Sniper is exceptionally comfortable to wear and use, even with heavy camera/lens combinations. The strap is made out of good quality materials and is tough and durable, which means it is a camera shoulder strap that is built to last.

The camera is attached to the strap using a small ring that is screwed in to the tripod plate screw of the camera. Once the ring is screwed in to the camera it is totally secure and won’t go anywhere. When using the Sun Sniper you can be sure your camera will remain safely attached to your body at all times. The ring on the strap is a loose fit, which means it easily slides along the strap with little effort. When using the Sun Sniper you can get your camera from your waist to your eye in a matter of seconds, so you will never miss a shot.

Compared to other camera shoulder straps the Sun Sniper is priced at the top end, but it is well worth buying. If you want a camera shoulder strap that will provide years of trouble free service the Sun Sniper is the camera strap for you. It really is an excellent product.

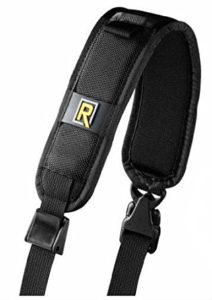
Best camera shoulder strap – Black Rapid RS

Black Rapid RS-7 Camera Strap, black

The Black Rapid is another popular camera shoulder strap amongst photographers. The Black Rapid, just like the Sun Sniper, has a wide strap meaning it won’t cut in to your shoulders, which in turn makes it very comfortable to wear. Even with the heaviest camera/lens combinations, the Black Rapid receives a lot of praise from its users. The Black Rapid is also made from top quality materials, that don’t fray, which means it is going to stand the test of time.

The camera is attached to the Black Rapid via the tripod screw, but unlike the Sun Sniper there is a quick release clip. Some photographers rave about the quick release system, however I am not so sure. I always have my doubts over quick release systems and always think they are going to fail. My camera and lenses are worth a lot of money and I would hate to see them hit the deck and break. As such, I steer clear of quick release systems regardless of how good and secure other users claim they are.

Would I recommend the Black Rapid over the Sun Sniper? Since I ended up buying the Sun Sniper I would have to say no, but I did try the Black Rapid camera shoulder strap. As I previously mentioned, I don’t trust quick release clips. In addition to this, I just found the Sun Sniper camera shoulder strap more comfortable with my set up. That said, there are many people that find the Black Rapid more comfortable than the Sun Sniper.

Other shoulder straps for your digital slr camera

In my opinion the Black Rapid, Sun Sniper and Cotton Carrier are the best camera shoulder straps currently available and having owned and use all three I can guarantee you would be happy with either of them. In order to cover ALL situations I recommend having a Cotton Carrier and the Sun sniper or the Black Rapid.

The best camera for sports photography

The best camera for sports photography

Improve your action images with the best camera for sports photography

The best camera for sports photography will improve your sports and action images no end. If you are looking for the best camera for sports photography you have come to the right place since this article focuses solely on the best camera for sports photography as well as all the lenses and accessories you are going to need to capture those awesome sports and action photos.

Sports is an excellent subject to photograph but due to the speed and fast nature of sports capturing those stunning images can be a real challenge. If you want to increase your hit rate and the number of “keepers” you need the best camera for sports photography. This is obvious, but what is the best camera for sports photography? Carry on reading, and you will find out.

So, if you are looking to improve your sports photography and need a new camera make sure you read this article before parting with your hard earned cash.

When choosing the best camera for sports photography there are a couple of key things you need to consider.

Sports and action photography is fast and quick moving. In order to increase the number of usable images, i.e. your hit rate, you need a camera with a high burst rate. The more photographs you can take in quick succession the higher the chance of getting the shot.

Full frame digital cameras with a high burst rate are very expensive and can cost several thousand dollars. Many people simply don’t have this amount of money to spend on the best camera for sports photography, or can’t justify spending this amount of money on a digital camera. Fortunately, there are some very good crop sensor digital slr cameras with burst rates that offer great image quality and are far more affordable. If you want the best value for money, and want to get the most bang for your buck these crop sensor cameras are the ones to buy.

If you want a camera specifically for sports and action photography a digital slr camera is the only digital camera you should consider, so don’t even bother investigating point and shoot cameras or micro four thirds and mirrorless cameras.

All the major camera manufacturers sell at least one digital SLR camera that is ideal for sports and action photography, so there is something for everyone. For the best sports photography cameras take a look at the products below:

Best camera for sports photography – Canon eos 7d

In my opinion the Canon 7d is the best camera for sports photography for the masses. The Canon 7d is tough, durable and, what I consider bulletproof. The magnesium body and seals ensure it is dustproof, waterproof and shockproof, which makes it ideal out in the field

The Canon eos 7d

The Canon 7d has an impressive 18MP sensor that allows you to capture high levels of detail and images that can be blown up real big. This makes it possible to crop and enlarge every photo taken, which is ideal for subjects that you consider “too small” in the frame because they were just a bit too far away for the focal length of lens used to take the photograph.

The Canon 7d has an impressive 8fps burst rate that allows you to fire off loads of shots all in one go, so you will never miss the action again. Just remember you are going to need to have plenty of spare and make sure you have some backup batteries.

The Canon 7d is affordable and the best camera for sports photography for budding sports photographers on a budget. The Canon 7d is an awesome camera and I highly recommend it, and it is for the reasons above I consider it the best camera for sports photography.

Best camera for sports photography – Canon 1DX

Best camera for sports photography – Canon 1DX

The Canon eos 1DX is the flag ship of the Canon dslr range and when you look at the specifications of the 1DX it is easy to see why, I mean 18MP full frame sensor, dual-digic 5 processors for a staggering 12fps burst rate, tough magnesium alloy body and an ISO range of 100 – 51,200 (which is expendable to 204,800) is jst some of the features.

Whilst I don’t own a Canon eos 1DX I have been fortunate to use one and I can say it is an awesome camera. The 1DX is bullet proof, the burst rate is something else (although it does eat memory cards), and the images it produces are exceptional, but would I pay the $6,000 + asking price?

If I were a professional photographer and could make a living out of sports photography I would, but as I am not there is no way I could justify the cost. Buying the 1DX is one thing but then there are the lenses to go with it. The 1DX doesn’t have a crop factor so if you need a lens over 400mm you are going to have to buy a lens extender (which is not ideal for sports photography because it leads to a loss of light and hence slower shutter speeds) or spend a few thousand bucks on a long reach lens, such as the EF500mm.

The Canon 1DX is a camera for professional photographers or enthusiasts with exceptionally deep pockets. A cheaper alternative, and one that is best suited to enthusiasts.

Nikon D7000

A popular camera for sports photography

Best camera for sports photography – Nikon D7000

The Nikon D7000 is a popular camera with sports photographers and it is easy to see why. The first thing you will notice about the Nikon D7000 is the build quality, which is superb. This is a tough and durable camera that is built to last, which is a good job given sports photographers spend a lot of time out in the field.

With a 16.2MP sensor the Nikon D700 is a powerful camera that is capable of capturing some stunning sports images that will impress family and friends. Sports photography requires a lot of cropping and with this impressive sensor it is possible to get 100% crops and still get excellent image quality.

The 39 point auto focus points helps to ensure the Nikon D700 finds the target, locks on and stays locked on and it does this very well. The Nikon D700 has a fast Expeed 2 processor which is essential for sports photography. This sensor allows for 6fps, so you can fire off a lot of images in quick succession, which is vital to ensure you don’t miss the shot.

One of the best things about the Nikon D700 is the twin SD card slots, which means you don’t have to faff around swapping over memory cards and can continue to capture the action as it unfolds instead.

Overall the Nikon D700 is an excellent camera and therefore has to be included as a best camera for sports photography.

Top Sports lenses for your digital slr camera

Capturing awesome sports and action photographs requires more than the best camera for sports photography. Oh yes, if you want to capture the best sports photographs possible you also need the right lens.

When capturing sports photographs you are likely to be quite far away from the action, therefore a long reach telephoto lens is needed. If you want to “freeze” the action and still get sharp shots you also need a fast lens, which allows you to keep the shutter speeds up.

There are plenty of great sports photography lenses available for all brands and models of digital slr camera. It doesn’t matter whether you shoot a Canon, Nikon, Pentax, Sony or Olympus, there is the perfect sports lens for your particular digital slr camera.

For some of the best sports and action photography lenses currently available check out the lenses below:

Best Canon lens for sports photography – Canon 100mm – 400mm L IS USM

Canon 100mm – 400mm L IS USM Lens

My most used lens for motorsports photography is the Canon 100mm – 400mm f4.5 – 5.6L IS USM lens, which is awesome. This lens is tough, durable and built to last. This lens is also fully sealed, which means it is weatherproof making it excellent for out in the field. This lens isn’t particularly fast but then given the affordable price tag this is to be expected. Besides, the image stabilization technology is awesome and helps to ensure tack sharp shots each and every time.

One of the best things about the Canon 100mm – 400mm is the push/pull zoom which makes it super quick and easy to change between focal lengths. With this lens it is possible to zoom right in close and personal or pull back to capture more of the background.

The image quality of this lens is simply superb and it is possible to capture some awesome images. If you want the best sports photography lens to go with your Canon digital slr camera the Canon 100mm – 400mm f4.5 – 5.6L IS USM lens is the lens to buy.

Top rated Nikon sports lenses

If you shoot a Nikon digital slr camera there are a few long reach zoom lenses available to buy, although the best (and most popular) are detailed below.


nikon 70 – 200 2.8

nikon 80 – 400nikon

nikon 300

Top rated Sigma sports lenses

Canon and Nikon branded tele lenses are expensive however there is a cheaper alternative, which is a Sigma lens. Sigma lenses are tough, durable, well made and the image quality is very good. Sigma produces lenses that will fit both Canon and Nikon digital slr cameras, so it really doesn’t matter what you shoot.

For the best Sigma sports and action photography lenses check out the products below, all of which are worth looking in to if you want to buy a Sigma sports photography lens.

Sigma 70 – 200Sigma

Sigma 150 – 500 Sigma


Sigma 120 – 400Sigma

An essential bit of kit of sports photography

The Monopod
Sports photography with big zoom lenses requires some support, otherwise you are going to experience camera shake and get some blurry photos. There’s no doubt about it, a tripod is the best type of camera/lens support you can buy however a tripod is not ideal for sports photography. Focusing on a moving object using a tripod is nigh on impossible, besides most sports venues prohibit the use of tripods.

The best camera/lens support for sports photography is the monopod, which is an upright pole that screws in to the bottom of the camera or the lens ring. The foot of the pole is place on the ground, hence providing a support for big and heavy lenses. The monopod is small (when collapsed), light and easily transportable, which makes is a doddle to carry around all day long. The monopod is a simple but very effective product that doesn’t cost much but will improve your sports photography photos no end.

Compared to other types of photography monopods aren’t expensive however it does pay to get the best one you can afford. Cheap monopods are heavy but made out of inferior materials that tend to flex and bend once loaded up with a heavy camera/lens combo. The best monopods are made out of carbon fibre and these are both lightweight, but most importantly strong.

Manfrotto are well known for making top quality tripods and their range of monopods is equally as good and the 680B is one of Manfrotto’s top rated monopods. This monopod is very strong and can easily support the heaviest of camera/lens combinations. I always use a fully gripped 7d combined with a 500mm prime (a seriously heavy set up) and the 680B can easily cope with this and never bends or flexes.

The weak part of all monopods is the joints, however this is not the case with the 680B . The joints on this monopod are second to none. The isn’t the cheapest monopod but it is worth every cent.

Best camera for macro photography

Best camera for macro photography

The best camera for macro photography for close up images

If you are looking for the best camera for macro photography you have come to the right place since this article focuses solely on the best macro cameras, and macro lenses, currently available to take your macro images to the next level.

Digital cameras, especially digital slr cameras, are expensive so if you want to buy the best camera for macro photography make sure you take a look at the rest of this article before shelling out your hard earned cash. After all, you don’t want to waste it right?

If you really want to get the most out of your macro photography there are other things you need to consider besides the camera. Lenses are one such consideration, and the best macro lenses are also covered in this article.

If your macro subjects consist of moving things, such as insects, butterflies and the like, the best macro camera needs a high burst rate. The top end Canon and Nikon digital SLRs are full frame and have a high burst rate but these are very expensive. Cheaper alternatives include crop sensor cameras with dual processors and these are the best value for money cameras.
macro shot of flower If you take macro images of static subjects, such as flowers and still life things, the best camera for macro photography need not have a high burst rate. In these circumstances the best camera for macro photography is the one with the best image quality, and highest number of pixels.

Point and shoot cameras and mirrorless cameras have a macro photography mode however these don’t capture “true” macro photographs. I would not recommend either a point and shoot or a mirrorless camera for macro photography, and the only real options are digital slr cameras, as detailed below;

Best camera for macro photography – Canon dslrs

Arguably you can use any digital slr camera for macro photography however many photographers claim the best camera for macro photography is a full frame slr camera since these have the largest sensors and produce some exceptional images. If you are capturing macro and close up images of flowers and still life subjects then I agree the best camera for macro photography is the full frame digital slr camera.

If, however, you are taking macro and close up images of insects I think the best camera for macro photography is one with the highest burst rate. Capturing images of insects can be tricky and to get the keeper shots you need to fire off a load of shots in quick succession and choose the best. You can buy full frame digital slr cameras with a high burst rate, such as the Canon 1D X, but these cost several thousand dollars and are out of reach of most enthusiasts. There are alternatives, but these are not full frame cameras.

Best camera for macro photography – Canon 5d

If you want an affordable full frame camera the Canon eod 5d is the camera of choice, which is Canon’s top selling digital slr camera of all time and when you get to have a go with this camera it is easy to see why. The 21MP sensor captures a lot of information and the image quality of the 5d is simply awesome. This camera captures images that will impress family and friends, and images that you can easily sell on and make some extra cash.

The Canon 5d is superb. It is a relatively small dslr camera that is tough, durable and well built. Like all Canon dslr cameras the Canon 5d is user friendly, intuitive and all the necessary controls are close to hand, which means you won’t have to go delving through the menu system.
The Canon 5d has a poor burst rate, but then given the cost of the 5d this isn’t surprising. Because of the poor burst rate the Canon 5d isn’t best suited to insect photography. If, however, you want to capture macro images of flowers and still life subjects the Canon 5d is the tool with which to do it.

Best camera for macro photography – Canon 7d

When I go chasing insects and mini beasts my camera of choice is the Canon 7d. With an 8 frames per second burst rate the 7d is ideal. The 7d has an 18mP sensor, and whilst it is not quite as impressive as that of the 5d, it is more than enough to capture some stunning macro images.
Like all Canon digital slr cameras the 7d is tough, durable and built to last. It also has a sensible menu system and user friendly interface, which makes it a doddle to use. All settings controls are close to hand, which means there is no need to go through the menu to change anything.
You can also use the Canon 7d for taking macro images of flowers and still life subjects, but it is insect photography where this camera is really good.

Best camera for macro photography – Nikon dslrs

Nikon D7000

If you prefer Nikon branded cameras my recommendation is the Nikon D7000. The Nikon D7000 is a top rated, and very popular, Nikon dslr camera you can use for macro photography. The D7000 has a high burst rate, which makes it ideal for insect photography, however you can also use it for close up and macro photos of flowers and still life subjects.

Like all Nikon dslr cameras the D7000 is a top quality camera that is made out of high quality materials and contains great optics, which means this camera is built to last and is capable of capturing some stunning photographs. If you prefer Nikon branded cameras and need a camera that has a high burst rate the Nikon D7000 is a camera you should look at.

Top macro lenses to get the most out of your macro photography

Macro lens When taking macro images you have to remember that you need a decent macro lens to get the most out of your best camera for macro photography. Macro lenses are prime, i.e. a fixed focal length, fast and very sharp. The image quality of all macro lenses is simply stunning and you won’t be disappointed with any of them. Macro lenses are available in a range of focal lengths from 50mm to 150mm so there is something for all types of macro subjects. Below are the best macro lenses currently available.

Top Canon macro lenses


Canon 100mm f2.8L IS USM macro lens

If you shoot a canon dslr camera the Macro lens of choice is the Canon 100mm f2.8L IS USM lens. With a 100mm focal length this lens has a large working distance, i.e. distance between the end fo the lens and the subject, which gives you a lot of room to move and also makes lighting that much simpler.

Being an L series Canon lens the 100mm f2.8L IS USM is bullet proof and built to last. The image quality is second to none and many photographers claim it is Canon sharpest lens of all, and I have to say I agree. The image stabilisation technology helps to keep camera shake at bay, and this technology works exceptionally well. If you want the best macro lens to go on your best camera for macro photography the Canon 100mm f2.8L IS USM lens is the lens to buy.

Nikon lenses for macro photography

Nikon 105mm f2.8G ED-IF AF-S VR macro lens

If you shoot a Nikon dslr camera the top end macro lens is the Nikon 105mm f2.8G ED-IF AF-S VR lens. This top quality lens is simply awesome and if you are serious about your macro photography this is the lens to buy.

The build quality is great, the image quality is amazing and boy, this is one sharp lens. In fact, many people consider it Nikon’s sharpest lens and I would have to agree. This lens produces images that are tack sharp from the centre to the edges.

The 105mm focal length gives a big working distance, i.e. distance between the end of the lens and the subject, which makes it perfect for insect photography, although this lens can obviously be used for taking macro images of flowers and still life subjects as well. The vibration reduction “VR” technology keeps camera shale at bay and ensures images are tack sharp at all times.

If you want the best Nikon branded macro lens for your Nikon camera you have to have the Nikon 105mm f2.8 lens. It really is an awesome lens that won’t disappoint.

Top Sigma macro lenses

If you want an alternative to a Nikon branded or Canon branded macro lens there are a few third party manufacturers out there, but the best is Sigma by far. Sigma has some excellent lenses and all of them are available in both Nikon and Canon fit.

Sigma 105mm macro

Sigma 50mm macro

Sigma 70mm macroSigma 70mm macro

Things to Do With Pictures

Things to Do With Pictures

What Fun Stuff Can You Do with All of Those Pictures?

You’ve made the step and gone to digital photos. You can view them on your computer, e-mail them to friends, and take them to the store to get prints or maybe even print them at home. But after that you think, what can I do with these images that would be fun or interesting? How else can I enjoy them?

Well, let’s talk about that. There are a lot of great products, activities, services and more that will allow you to use those digital images in so many ways. Read on to learn more.

Photo Sharing Sites That Offer More

Photo sharing sites give you a place to keep your photos, a place to share them. However, some photo sharing sites offer more things to do with pictures. Shutterfly.com for instance also allows you to make a variety of things using your photos. Photo books, cards, calendars, coasters, tote bags, mouse pads, stickers, canvas prints, mugs, key rings, ornaments, puzzles, keepsake boxes, address labels, and notebooks are just some of the options.

Scrapbooking and collages are another creative way of dealing with your photos. Photomix, Google’s Picasa, Snapfish, and ScrapBlog are just a few that offer this ability.

Get Some Motion from Your Pictures

If you remember the little books you made as a kid by drawing a series of pictures in sequence, stapling them together, and then flipping through them to simulate motion, then you understand this concept.

This is another one of those fun things to do with pictures; make your own, more adult, version of these flip books. There are a number of sites that can produce some pretty nice flip books either from a series of digital photos or the still images grabbed from your camera’s video recordings. Flippies, Glitterfy, and FlipClips are just three of the options.

Of course there are also a number of tutorials out there to help you if you want to go it on your own. Two of the most useful that can be found are at a blog called The Curious and another called Short Courses.

If you’d like to make a 3-D movie from your images you can try Make3D but if you want to make a movie with some great music added you can try Animoto or even Google Picasa.

Wacky Things to Do With Pictures

Your pictures may be sentimental, they may be precious, but they should also be fun. At CaptionBubble you can make a joke of almost any picture by adding captions just like you see in cartoons.

There are a number of fun services at Flickr based BigHugeLabs. You can make a magazine cover, add captions, or make motivational posters among other things with your images.

If you want to really get silly, you can also use a number of sites to distort photos to create that “house of mirrors” effect. Sites like Gooifier allow you to do this without having to even download anything. Or perhaps you would rather insert your face, or the face of someone you know, into a well known picture, on the body of another person, or somewhere else where it doesn’t belong at FaceinHole. However, if you want a lifesized cutout of someone you’ll need to go to PhotoCutOuts or to get a caricature, visit osoq.

If you have kids, another kind of cool project can be found at FlattenMe where you can use your kids pictures to insert them into existing books. Suddenly your son or daughter can be the main character in the storyline.

Getting Artsy with Your Photos

There are a number of more artistic things to do with pictures. Various sites will allow you to change your favorite photos into works of art. PhotoWow can give you some great looking pop art of your favorites, while PhotoFiddle gives you even more options for the style of art you prefer; oil paintings, watercolor paintings, abstract collages, and so forth.

A site called ReColored allows you to colorize your black and white photos. On the other hand, if you just want a photo enlarged and placed on canvas to hang on the wall, you can try CanvasRUs.

For those who prefer a line drawing, there are a number of tools to help get the job done. Here is a Photoshop tutorial for doing just that.

Be Sure You Put Your Photos Best Face On

Digital photo frames have become more interesting and more affordable in the past few years. They offer larger screens with higher resolution in many instances, allowing you to enjoy your photos in their most vibrant splendor. These modern frames are capable of storing more images and can be set up to display slideshows so that you can enjoy more of your photos.

In addition, some frames offer filters for special effects, the ability to add music for a full presentation, and remote controls for convenience. Digital photo frames really are the best way to capitalize on the digital nature of your photos. Because fading won’t occur with the digital file and those images will always be at their best, this is one of the smart things to do with pictures.

Portable Digital Devices That Let You Enjoy Your Pictures Everywhere

A digital camera gives you that potential connection with the other modern devices you may own. Clearly, uploading those photos to a media player or other portable device allows you to take those images with you to share with others or to enjoy while you’re out and about.

On the other hand, some of the traditional ways of enjoying printed images aren’t lost just because you’ve gone digital. In fact many of these just got better because you can tote along more images with less bulk when your photos are in the digital format. For instance, an old picture wallet could hold a handful of 2×3 photos before it became an unwanted bulk. A digital photo wallet on the other hand allows you store many times more pictures and it’s size doesn’t change. Aside from true wallets, there are also wallet sized digital photo albums that are easy to take along; they’re definitely a much lighter load than a traditional photo album which is three or four times the size.

Another item to keep your pictures close at hand is a digital photo keychain. These are affordable little devices and they don’t require much technical knowledge to use. They do best in displaying up close, portrait type shots due to the small screen size but they’re definitely a fun little gadget.

Editing: Making Those Photos Look The Way You Want

Many of us don’t go out and buy the more sophisticated editing tools that are available but instead use whatever came with our camera. However, editing is among the best things to do with pictures if you want to enjoy them.

There are some sites out there than can help you do things with pictures that are a bit fun. Picnik is one of those sites. It allows you to do some editing, which includes adding interesting borders, effects, shapes, and fonts to spice up your images. Of course, one of the best things is that you don’t have to download anything to your computer or take a course to understand it.

Of course there are other online photo editing tools such as FotoFlexer and SplashUp.

Another possibility is to study up a bit and consider some photo editing software to really get the most from your pictures.

The Mystique of Love – My Photography Class Project

The Mystique of Love – My Photography Class Project

My Experience Doing Outdoor Photoshoot at Night

I joined a photography class for beginner in June 2012 to learn the basic knowledge of this art. At the end of two months course, they gave an assignment to make a photography album consists of at least ten photos. There should be a meaningful story in the album, and the theme of the story is about Indian culture. There is no restriction for the subject of the photos and we should be able to finish this project within one week.

Thus, I decided to do this work, titled “The Mystique of Love”. I worked with two models (actually, they are my friends) to create a story about Indian culture. In this article, I wanted to share some of the photographs for this assignment. I am looking forward to your comments, feedback, and opinions.

The Preparation and Concept

It’s should be about “India”

Creating a photo shoot with a specific theme is not an easy work. You need to allocate a lot of time to do proper research, planning the costumes, locations, and poses. Moreover, I only had one week before the date line of this project. So, I contacted Nooreen and Varsha, two of my friends from Mauritius whom I worked with in a previous photo shoot titled “The Night Song”. I requested their help to participate in this project as models, and luckily both of them had completed their exams, so they could help me.

The story of these photos was created based on a traditional Indian folklore, about a painter who brings her subject to life with a magic power. For this project, I wanted to combine the modern as well as the traditional aspects of Indian culture. Thus, one of the model would wear a modern shirt, symbolizing a modern, liberal woman in the society; and one of the model would wear a traditional “saree”. I also wanted to capture both of the models in a frame, but they should not be aware of other’s existence. There should be no direct contact between the model, just as they live in different dimensions.

The Execution of the Concept

It’s more challenging than my other photo shoots.

To be honest, the pressure to do this work was much higher compared to my other works. It was because a requirement to get at least “B” for this assignment, otherwise I won’t be qualified to get the certificate. I was forced to think some very different concept that I have never done before, and this one should be better than my previous works.

I decided to do something different by doing an outdoor photo shoot at night. We went to Landscape Garden in Osmania University to get the “forest look” for these photos. Unfortunately, we had only less than an hour to complete the work because the garden were closed on 7 PM. I worked in a rush to complete my plan, before moving to another location.

The next location was just outside the garden, near a small tree. I wanted to create some “mythical” and “dream-like” environment without having to work with Adobe Photoshop. So, a tree under the orange bright light of street lamp would be suitable for this concept. Everything seemed well until a group of man who live in that area came and approached me. They watched from faraway, whistled to the models, said something in their local language, and laughed. Thankfully, me and the models did not understand their language, so we could carry on. Nonetheless, it wasn’t the most comfortable condition to work, for both the photographer and the models. Thus, I had to finish the photo shoot as soon as possible to avoid worse situation. Fortunately, we could finish our work in forty five minutes.

I submitted my photos the next morning, and I was very happy to know that they met the requirements of the course. I got a good mark, and happily received my certificate,

Tips to do an outdoor photo shoot at night

If you are a beginner photographer, try to avoid it
Technically, doing an outdoor photo shoot at night is a very difficult thing, especially for newbie. You will need a very good digital camera that enables you to shoot in high ISO without too much noise in the photo. Sometimes you will also need a very good lighting, as the default camera flash is not good enough for any serious photography work. So, if you can find another theme, just avoid to take photo in this condition.

Tripod is a must
You need to make the camera to be stable because small shakes can make your images to be blurry and out of focus. Even with a tripod, this happens a lot. So, tripod is a compulsory thing for any low-light photography.

Think about the environment
Be sure that the place you are going to do the photoshoot is a safe place. Try to do it in a family garden, tourist spot, or university park. Never try to do this kind of work in an unknown place, where you don’t know exactly who is its owner. Always have an assistant, and it would be better if the assistant is the local resident where you do the photo shoot.

Always set your camera to the best image quality
It is recommended taking the pictures in RAW format, so that later you have more freedom to work with the exposure. Post-processing is a vital work whenever you take photos in the dark. You might want to crop, desaturate, or highlight them. Thus, you should always select the highest resolution and highest image detail.

Lotus – My Photography Work with Mirrorless Camera

Lotus – My Photography Work with Mirrorless Camera

Capturing the Beauty of Lotus

Lotus is one of my first project in the world of photography. When working on this project, I don’t even know some most basic terms such as exposure, aperture, or shutter speed. I merely worked with my instinct and try to manually tweak the lighting. I was very surprised to find out that the result is not as bad as I thought. However, I found a lot of weaknesses that should be improved in my photo. Through this lens, I would like to share my experience working on one of my first photography project. Hope you will enjoy it. I am looking forward for your feedback and comments.

The Concept of “Lotus”

The idea behind the photo shoot
The idea was actually very simple. I wanted to finish this project assignment as soon as possible. The lecturer assigned me to work with Pema, my beautiful friend from Bhutan. At that time, I was very busy with exam preparations and my final research. Thus, I wanted to do a project which I could finish in one day. I didn’t think I am good at poetry or painting, so I decided to do photography.

Surprisingly, this project was my first step to the world of photography. Because of this photo shoot, I developed an interest to photography and digital art. I finally found my passion to create something beautiful for the society.

The title, “Lotus”, came from the translation of the model’s name, “Pema”. “Pema” is a common name that we can find in Bhutan. In Bhutanese language (Dzongkha) it means “lotus”. I also borrowed some concept from a Pearl S. Buck novel’s titled “A Good Earth” where there is a very beautiful character with that name. As I had no experience working with a model before, I just told her to dress with something that can make her look mysterious, beautiful, and graceful at the same time.

The Photo Shoot

My first experience as a photographer
As I already had the concept, at first there was only one thing in my mind: to finish this work as fast as possible. I still had a lot of things to do, and I felt that this thing kind of slowed me down. I didn’t expect that later I really enjoy working as a photographer.

As I arrived in the location, I immediately started my work. During the first ten minutes of working, I felt an excitement that I have never experienced before when making a painting, writing a poem, or in any other art related activities. At that moment, I realized that I fell in love with the world of photography.

The next two hours of working was very fun for me. I enjoyed the moment when I framed the model into different scenes, took her photos from different angles and composition, as well as directed her to pose to fit with my concept. We tried different locations and outfits, and I even did some experiment with some simple properties that I found in the location, such as books, playing cards, and mirror.

I worked with my Sony NEX-3 digital camera, which I am very satisfied with its performance. It can take beautiful images, almost as beautiful as DSLR camera and significantly more stunning compared to point and shoot camera. It also can be operated easily and requires very less knowledge in the world of photography. I set everything in “Auto Mode” as I was really blind about the basic concept such as exposure, ISO, aperture, shutter speed and so on. Later when I have complete understanding of those terms, I found that the image quality of “Auto Mode” for this camera wasn’t disappointing at all.

I completed my work in about four hours, with ten minutes break every hour. I spent about three hours to do little work with post processing. The result was satisfying. We got an “A”, and later some of the photos were featured in Bhutanese Girl Fashion Page.

Tips and thougts to do a photography with mirrorless camera

From an amateur point of view
Don’t hesitate to get a mirrorless camera
Because of the price that is significantly higher than point and shoot camera and slightly lower than DSLR, some people prefer not to buy this type of camera. Believe me, getting a mirrorless camera is a good investment. The image quality is comparable to DSLR, and it is much easier to operate. Moreover, it is cheaper and smaller. So, if you want to take good photos but don’t want to learn too much about technical aspects in photography, mirrorless camera is a perfect choice for you.

Use tripod
The image stabilizer in mirrorless camera is not as good as in DSLR, so using tripod during the photo shoot would significantly improve the quality of your photos. Some cameras such as Sony NEX series also hard to hold (as their center of gravity is in front part of the lens) so that you can get blurry and shaky images if you don’t use any tripod.

It is okay to use the “Auto Mode”
Especially if you are a beginner and don’t understand about when you should use flash, or when you should lower the ISO. The Auto Mode works very well in most of digital camera. Maybe later when you started to understand about some photography concepts, you can do experiment with Semi-Auto Mode or even completely Manual Mode.

Be confident
Although you have very less knowledge about photography, be confident that you can create good photos. Be confident with your camera, no matter how bad it is the quality. And, be confident to your model, trust her, and keep believing that both of you can create a good artworks. Believe it or not, this kind of positive thinking will influence the quality of your photos.

How to Transfer Pictures to Computer

How to Transfer Pictures to Computer

Need Help Getting Those Images to Your Computer?

If you’re new to digital photography you may have questions about how to download or transfer photos to computer where you can edit, save, or share them on the internet.

The process to transfer pictures from your digital camera to computer is usually very quick and simple but there are a couple of options, learn more about them here on this page.

The Primary Ways to Transfer Photos to Your Computer

Hear are the most common methods used to download or transfer photos to computer:

Connecting your camera to your computer via a USB cable or Firewire

Inserting the memory card from your camera into a memory card reader (or into your computer) and downloading directly from it rather than the camera.

Wireless transfer

How to Download Photos to Your Computer via USB Cable

A USB cable usually comes included with your camera purchase and is a fairly straightforward way to transfer pictures to computer.

In many instances, you’ll need to upload the image transfer software that came with your camera onto your computer.

Next you will need to connect your camera and your computer with the USB cable. Read your camera’s manual it will describe any specific instructions. For instance, some cameras need to be turned off when connecting and then turned on once the connection is made. Be sure to use AC power if you use this method to avoid draining the batteries on your camera.

Adjust the camera setting to allow image transfer. Again check the camera’s manual for the specific setting on that model.

At this point the computer will launch a wizard to walk you through the process of transferring the images.

For Windows XP owners this step by step guide for transferring images should be useful.

For Windows Vista owners there is this page about downloading and editing photos to help them.

For those with a Mac, here are helpful instructions for downloading pictures.

How to Download Pictures to Computer Using a Memory Card Reader

Memory Card readers can be a great way to transfer pictures to computer. They allow users to conserve their digital camera’s battery and make the transfer process even faster.

Users merely plug the memory card reader into the computer, remove the memory card from their camera, place it into the card reader, and transfer to the computer hard drive. This is very similar to moving files from a disk onto the computer hard drive.

The memory card reader can be attached one time and left in place so that each subsequent time you transfer pictures to computer there is no set up time involved.

Some newer computers also have a card reader built-in and allow the user to download by merely inserting the memory card directly into the computer.

Downloading Photos to Your Computer

Printing and Burning to Disk

How to Download Pictures to Your Computer Wirelessly

There are a couple of options that allow you to transfer pictures to computer without any wires or cable at all. Some digital cameras have WiFi cababilities or Bluetooth that allow the user to wirelessly download or transfer photos to computer through their wireless network. In fact, the photos can also be printed without the use of cables or a memory card reader.

For those without a WiFi digital camera, there’s also the Eye-Fi Share Memory Card. It has a built-in wireless connection and is able to transfer photos and video to photo sharing sites in the absence of any USB cables. The Eye-Fi Explore 2GB SD Card also adds geotagging information to images and the 2 GB Eye-Fi Home transfers wirelessly to a MAC or PC.

Eye Fi Memory Cards

Transferring Pictures from Your Cell Phone to a Computer

Images can be downloaded from your phone to a computer in much the same was as they are transferred from a digital camera.

Some camera phones have an appropriate USB cable to allow a connection in order to transfer photos to computer. These phones should also have the necessary software available to allow this downloading.

Some camera phones use memory cards to store images making transfer via memory card reader an option. A mobile media format card reader is often necessary, otherwise an adapter may be needed.

It depends upon the phone, but some Bluetooth capable phones allow you to transfer pictures to computer wirelessly.

Transferring Old Photos to Your Computer

If you have old photo prints that you would like to have in digital format you can easily do this with a scanner. Many modern printers offer a scanning function. In addition, affordable photo scanners are available if you have a lot of old photos, negatives, or slides.

After connecting the scanner, or your printer/scanner, you’ll need to be sure the glass is clean and you will want to select at what resolution you will scan the images. If you will be printing the images you will want a dpi of 300 or so. A lower resolution is acceptable if you will only be sharing these images online. As you scan the images you will want to name them so that they are easier to find. You can arrange them by year, by subject, or whatever suits your situation, but organization will be critical if you have many photos.

Sony DSCW800 Product Specification

Sony DSCW800 Product Specification

Capturing moments using camera is one way to capsule precious memories so that it will not be forgotten over the time which cannot be repeated twice, unless you have got some super power to travel back in time then it is going to be another topic to discuss. Sony DSCW800 is one to be talked about.

It is a cyber-shot camera released by Sony with a low price, but its exterior is designed with simplicity. Plus the size makes it easy to slip the camera into pocket. Talking about W800’s quality and performance, there are some cons and pros toward the product. Therefore, before you buy the product, it is better for you to review this specification first.

dscw800-1

Pros and Cons of Sony DSCW800

Let’s take a look to the pros. It is believed that the Sony DSCW800 has a good performance when you use it to take photos in a spot with good light. With a good light provided by nature, the result can be even better. Plus, the W800 is also said to have improved its manual control which now becomes easier to maneuver.

dscw800-2

If we see the size and weight, the W800 is suitable for those who hate heavy products, because W800 is lightweight and compact.

Jumping to the price, the shoot camera is on sale for a low price which is $89.99 on Amazon. Thus price completes the item with its goods such as the replacement battery, external charger, MC, and Deluxe starter kit, while if you buy the W800 that sits below price tag £79.50, you will not receive any goods mentioned previously; you will most likely to receive the Sony DSCW800 digital compact camera only.

So the price really does say something. However it also depends on where you buy the W800. Perhaps when you buy it, the coupons or discounts is happening so that you will be given even cheaper price.

But from the cons, the camera is also said to have a poor quality of lighting since it is only good when the nature provides its light, plus it can only zoom for five times. These cons are a few compared to many great quality you are getting once you buy the product. If you are curious and want to know more, with such a low price, it can be an opportunity to give it a try.

Interested in buying Sony DSCW800? Then you can effortlessly click below to order.