How To Create A Secret Fairy Garden And Attract Real Fairies This Summer

How To Create A Secret Fairy Garden And Attract Real Fairies This Summer

Fairies Do Exist

I couldn’t believe my eyes. For weeks, At first I thought it was a nest of fire flies. I never knew where they lived and I like taking pictures of bugs so I got out my camera and waited. For what seemed an eternity I hid behind the tree and was as quiet as I could be. Eventually the tree lit up and I snapped a picture quickly.

I nearly fell over when I saw what was on the screen. It was a real life Fairy and she was living in my tree. How lucky could I be.

If You Want To Attract A Secret Fairy You Must Give her A Place To Live – Fairy Cottages

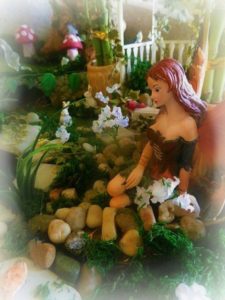
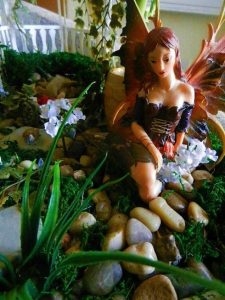
Fairies love a nice place to live and if you want to attract a Fairy to come live in your garden you must provide a safe place to live. They love cute cottages and beautiful flowers. They are very shy so make sure it is in a spot that is quiet and private.

The Fairy Spoke For The First Time

The day after I gave her the blanket I peeked into the hole and she walked right up to the door. She smiled at me and I smiled at her. That’s when she spoke for the first time. She said “Thank you” and backed up into the tree. She didn’t know I had bought her a new house to live in.

I told her to come out and see what else I had for her. She was very shy, but came back to the opening.

I place a very cute cottage by the tree and told her it was for her. She lit up very brightly. She flew down to the house and walked inside. I could tell she was very excited. The next thing I knew she was flying back and forth between the hole in the tree and the new house. She didn’t own very much so it didn’t take long for her to move in. She told me her name was Madeline.

Next I Bought Her Furniture

Madeline loved all the new things I bought for her. She told me that Fairies live all over and she wasn’t the only one. She said that they are very shy and usually live in tree holes. She was the only Fairy she knew that had her own house. The other Fairies were very jealous so I bought a few more houses and hoped to attract more.

Fairy Furniture

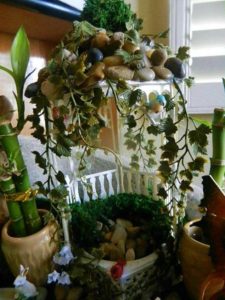
Once you buy your Fairy a house you must get her lots of furniture. The cuter the furniture the faster a Fairy will choose your garden to live in

My Indoor Fairy Garden


Fairy Babies Love Driftwood


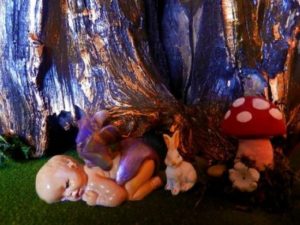
Fairies love drift wood so it’s no surprise that they would leave their babies sleeping peacefully on top of it or next to it. They love things that sparkle so if you really want to attract Mama Fairies with their little ones then you will love this.

I like to make the drift wood I put in my yard comfortable and keep it from drying out in the sun. I also don’t like bugs eating it so I get new piece I will sand it down, remove much of the loose bark, stain the wood with a soft cloth and some wood stain and then spray seal it. This will keep the wood from absorbing water from rain.

Once I am finished I add a drop of Rub N Buff to bring out the color. I love dark wood with a brass finish as in this photo.

New Cottages

These charming cottages are perfect for indoor or outdoor Fairy gardens. They are realistic and work well with any of the Primrose Fairy figures.

Fairy Number 3, Glenda

A month later Glenda moved in. She grew up with Tina and were friends since they were babies. Of course she had a house right next to Tina. Glenda is very out going. She loves to tease my dog and when he gets barking at her she giggles and throws cheese at him. I think my dog secretly likes the teasing because he gets very excited when he sees her.

Fairies Love To Garden

If you attract Fairies into your yard you can expect it to have a beautiful garden because it what Fairies do best. The love to make the garden grow. With Valentine’s Day on the way why not attract a bunch of Fairies for that someone special in your life.

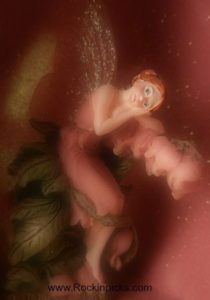
This Little Fairy Looks Sad

This Fairy Is Only 1 Inch And Has All The Details Of Her Bigger Sisters

Do you believe in Fairies. Are they living in your garden. Let me know what you have done to attract them.

Painting Easels For Teens and Adults

Painting Easels For Teens and Adults

Art Easels Can Make Oil and Acrylic Painting Much Easier for Teenage Artists

When shopping for the Painting Easels For Teens you will want to explore the size, materials, features, and portability of each easel you are considering. The smaller size, perhaps a table top (box type), or a folding compact style each have their own benefits.

Consider the lifestyle of the artist. Are they landscape artists needing to take their supplies on the go? If they prefer to be in the studio and stationary the set up can be less portable, but, consider the size of the teen. Find a size that fits the artist. Is the material suitable for outdoor use? As you browse these painting easels for teens you will find the best of each style is represented so you can quickly choose the best for your needs.

What to look for when buying an easel for outdoor use

Obviously, if you intend to use your easel out of doors it needs to be portable. That means buying one that a) fold flat to carry and b) is in a weight you can easily pick up and carry. One other thing you might consider though is how stable it is. Many outdoor easels these days are made of aluminium and fold down much like a photographer’s tripod into a carrying case. These are lightweight and can usually be carried on a shoulder strap. They will easily hold a small canvas and they have the added bonus of being weather proof. Many of them also come with attachments for you equipment like a holder for a water container or brushes.

As an alternative to these are the outdoor easels that are contained within a carrybox that also holds your paints and so on. The box usually has fold down legs and boards that you can easily assemble when you get there. They are generally wood and much heavier than the aluminium ones but you can generally get a harness or straps to carry them as backpacks. Some of these even come with a seat attached but remember anything like this is going to be heavy to carry.

A few other thinks you might consider: how easy it is to assemble or take down, how easy it is to adjust the angle of your drawing board, can you adjust the legs, after all you may not always be on level ground.

What to look for when buying an indoor easel

There are two types of indoor use easels a teenager might need, a free-standing studio easel or a table easel depending on a number of things like the type of art, space and of course budget. You can of course spend thousands on easels but for teens an A frame easel is probably all that he needs to start with. The A frames have the advantage of being able to fold flat quickly for storing away and they have all the stability he needs to be able to hold his work securely. The advantage of studio easels is that he can stand away from his work easily and see it from different angles.

If he is working with watercolors or just prefers to sit and bend over his work a table easel might be the best choice. If you are buying for a teen make sure you know what he is working with before you buy, for example, if his preference is for watercolor painting or amine drawing he will probably want an easel that has a solid board that paper can be attached to rather than one where you have to clamp a canvas to. Make sure it is sturdy enough to stay still while he is working on it, even then there might be small movements so you might want one with protective feet to protect your furniture. To ensure perfect stability of course you can always invest in one that clamps to the table or desk. The best easels can be adjusted to many levels from flat to vertical.

Best Painting Easels Videos

Demonstrations and Tutorials How to use Painting Easels

https://www.youtube.com/watch?v=DxSdep1QLLQ

The Shadow Princess – My Black and White Fashion Photography in Thailand

The Shadow Princess – My Black and White Fashion Photography in Thailand

My Photography Work in Thailand.

The photos in this article were taken during my photography project in Thailand. An art gallery sent me there to do a photo shoot with “Oriental Princess” as a theme. I asked one of my model friend from Bhutan to come along with mein order to accomplish this project. We went there for four night and five days in two different city, Pattaya and Bangkok. I created two series of photo shoot, the first titled “The Empress of Light”, consists of color photographs. The second album, which I want to share in this article is called “The Shadow Princess”, where the photos are darker and were taken in monochrome. Unfortunately, I can’t publish the best photos in this article because they have been published by my sponsor for an art magazine, and should not be published anywhere else. Thus, I could only present some of the photos that weren’t selected by the magazine. Hopefully you like them, and I’m looking forward to your feedback.

The Idea, Planning, and Creating the Concept

My Experience Working in Thailand

We were given only four effective days to work, and as an amateur photographer I found the time limit was very strict. Based on my plan, we had to do the photo shoot in eight different location in two cities, including on the beach and in a popular tourist spot.

We didn’t waste any time as we immediately departed to Pattaya as soon as we landed in Bangkok international airport. The journey took about ninety minutes by taxi. I had to say that Thailand has a very impressive transportation system, broad highway that allows the cab to drive in maximum speed without endangering the life of the driver and passenger. As soon as we reach Pattaya, we did our first photo shoot in the hotel. Based on my plan, I would do “The Empress of Light” photoshoot in the morning and afternoon, meanwhile “The Shadow Princess” would be done in the evening, where natural light were no longer exist.

The concept of this album was to present a beautiful, good looking oriental princess with her royal dress. Although the princess is very beautiful, she is also very cold, kind of cruel, and very proud with her royal blood. She is also very smart, emotionless, and can take important decision only based on her logic for the sake of her own kingdom.

It wasn’t very hard to get the concept correctly, as physically the model has a kind of face that fits with my concept perfectly. She named Pema, and we previously had been working on three different photo shoot. She brought her tradtional dress from her country, Bhutan. The dress was very great, beautifully created, and very lavish. It reflects perfectly the royal dress of an oriental princess.

The execution of the photo shoot

We spent the first night at Pattaya in the Southern Beach. To be honest, the beach was not very impressive compared to Bali, Indonesia or Goa, India. The beaches of Pattaya appear to be wilder and more dangerous compared to the other beaches I have visited before. Somehow, the beach perfectly reflects the personality of the shadow princess that I wanted to present in my photographs. The weather on that night was very friendly, and everything seemed to work properly. Thus, I could finish the shoot in less than an hour.
We spent the next day photo shoot in the hotel garden. It was much more easier compared to the photo shoot on the beach, as I had more freedom to experiment with the surrounding lights. I took about sixty pictures to complete the session.

The next morning, we immediately headed to Bangkok for the “real work”. I have visited Bangkok many times, but I felt this time the city was not as friendly as usual to me. The weather was incredibly hot, even at night. It was very difficult for the model to stay in the mood while wearing such a thick dresses in a hot night. The first night where we did an outdoor shoot was very hard, and took about three hours to get the images I really wanted. Thus, in second and third photo shoots I decided to spend more time indoor, in an air conditioned room.

We completed all of our work in our fourth day, then we had one free day to explore Bangkok before returning to Hyderabad.

Some tips based on my experience

Don’t be afraid to take a close-up image
Your photos would be more interesting if you take a close-up shoot of your subject. Don’t be afraid to put your camera in front of your subject’s nose for an extremely close-up result. Black and white photos always have more impact when the viewers feel that there is only small distance between them and the subjects. However, it is recommended using lens that is not wider than fifty millimeters to avoid distortion.

Focus on the eyes
It’s a classic rule that should be understood by any photographer. Any time you take a photo of a person, be sure that the focus of your camera is on her eyes. When you get it right, the photo will look great.

In the low light, most of the time viewing from LCD is more accurate than from viewfinder
For me, I prefer to put the camera on a tripod and view it from the LCD whenever I have to shoot in a low light condition. It is easier to get the focus by looking at the LCD, because there is a magnifying facility to check whether you really get the perfect focus or not.

It’s all about the subject’s expression
Black and white photos would leave more impact to the viewer if the subject shows a strong expression. Whether it is an anger, a cold stare, a wide smile, or tearful face; try to involve a strong facial expression whenever you take a close-up black and white photographs.