Best Action Cameras For Mountain Biking

Best Action Cameras For Mountain Biking

Mountain biking is a great way to get some exercise and fresh air, and it’s also a lot of fun. If you’re thinking about taking up mountain biking, or if you’re already an avid mountain biker, you may be wondering what kind of camera you should use to capture your rides.

There are a few things to consider when choosing a camera for mountain biking. First, you’ll want to make sure that the camera is durable and can withstand a few bumps and bruises. Second, you’ll want to choose a camera that is easy to operate while you’re riding. And finally, you’ll want to make sure that the camera you choose can capture high-quality video and photos.

The best action cameras for mountain biking

With those things in mind, here are a few of the best action cameras for mountain biking:
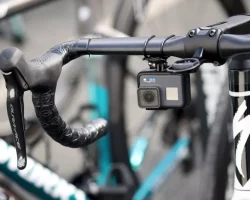
GoPro Hero7 Black

The GoPro Hero7 Black is one of the most popular action cameras on the market, and for good reason. It’s durable, easy to use, and it takes great video and photos. The Hero7 Black is also waterproof, so you don’t have to worry about it getting wet if you take a spill.
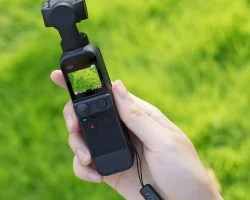
DJI Osmo Action

The DJI Osmo Action is another great option for a mountain biking camera. It’s durable, easy to use, and it takes great video and photos. The Osmo Action is also waterproof, so you don’t have to worry about it getting wet if you take a spill.

Sony FDR-X3000

The Sony FDR-X3000 is a great option for a mountain biking camera. It’s lightweight and easy to use, and it takes great video and photos. The FDR-X3000 is also splash-proof, so you don’t have to worry about it getting wet if you take a spill.

Yi 4K Action Camera

The Yi 4K Action Camera is a great option for a mountain biking camera. It’s lightweight and easy to use, and it takes great video and photos. The Yi 4K Action Camera is also splash-proof, so you don’t have to worry about it getting wet if you take a spill.

No matter which camera you choose, you’re sure to have a blast capturing your mountain biking adventures on film.

How to Choose the Best Action Camera for Mountain Biking

When it comes to mountain biking, having the right action camera can
make all the difference. After all, you want to be able to capture all
the amazing scenery as you speed down the trails. Not to mention, it’s
always nice to be able to re-live those moments of glory (or, let’s
be honest, embarrassing wipeouts). But with all the different action
cameras on the market, it can be tough to know which one is right for
you. Here are a few things to consider when choosing the best action
camera for mountain biking:

Whats Your Budget?

One of the
first things to consider when choosing an action camera is your budget.
There are a wide range of prices when it comes to action cameras, so
it’s important to find one that fits within your budget. Of course,
you’ll want to make sure that you don’t sacrifice quality for price,
but there are some great options out there that won’t break the bank.

What Features are Important to You?

When
it comes to action cameras, there are a lot of different features to
consider. Do you want a camera that’s waterproof? One with built-in
image stabilization? What about a camera that comes with a mount so you
can attach it to your bike? Think about which features are most
important to you and look for a camera that has them.

How Easy is it to Use?

You
don’t want to spend your time fiddling with your camera when you
could be out on the trails. So, it’s important to find an action
camera that’s easy to use. Look for a camera with a simple interface
and easy-to-use controls. That way, you can focus on your ride, not your
camera.

What Kind of Quality are you Looking for?

When it
comes to action cameras, there are a lot of different options when it
comes to quality. Some cameras can shoot in 4K, while others are limited
to 1080p. Think about the quality you’re looking for and find a
camera that can deliver it.

These are just a few things to keep in
mind when choosing the best action camera for mountain biking. By
considering your budget, the features you want, and how easy the camera
is to use, you can narrow down your choices and find the perfect camera
for your needs.

The Ultimate Guide To Using Your Dji Pocket 2 Camera

The Ultimate Guide To Using Your Dji Pocket 2 Camera

Dji has released a new product called the Dji Pocket 2 Camera. This camera is a great addition to any drone enthusiasts tool kit. The Dji Pocket 2 Camera is a very compact camera that is able to shoot 4k video and 12mp photos. The Dji Pocket 2 Camera is also very lightweight and can be used with most drones that are on the market today. In this article we are going to show you how to get the most out of your Dji Pocket 2 Camera.

We are going to start of with the basics of the Dji Pocket 2 Camera. The Dji Pocket 2 Camera is a very compact camera that is able to shoot 4k video and 12mp photos. The Dji Pocket 2 Camera is also very lightweight and can be used with most drones that are on the market today. The Dji Pocket 2 Camera has a 1/1.7 CMOS image sensor and a f/2.0 aperture. The Dji Pocket 2 Camera is able to shoot 4k video at 60fps and 1080p video at 120fps. The Dji Pocket 2 Camera also has a 3-axis gimbal which helps to stabilize the video and photos.

The Dji Pocket 2 Camera is a great camera for anyone who is looking to get into drone photography or videography. The Dji Pocket 2 Camera is very easy to use and is very compact. The Dji Pocket 2 Camera is also very affordable and is a great camera for anyone who is just starting out in drone photography or videography.

Now that we have covered the basics of the Dji Pocket 2 Camera, let’s get into how to use the Dji Pocket 2 Camera. The first thing you need to do is to make sure that your drone is compatible with the Dji Pocket 2 Camera. The Dji Pocket 2 Camera is compatible with most drones that are on the market today. Once you have confirmed that your drone is compatible with the Dji Pocket 2 Camera, you will need to mount the Dji Pocket 2 Camera to your drone.

Most drone manufacturers will have specific instructions on how to mount the Dji Pocket 2 Camera to your particular drone. Once you have mounted the Dji Pocket 2 Camera to your drone, you will need to connect the Dji Pocket 2 Camera to your drone’s remote control. Once the Dji Pocket 2 Camera is connected to your drone’s remote control, you will then need to power on your drone and the Dji Pocket 2 Camera.

Once your drone and the Dji Pocket 2 Camera are powered on, you will then need to calibrate the Dji Pocket 2 Camera. The calibration process is very simple and only takes a few minutes. Once the Dji Pocket 2 Camera is calibrated, you will then need to select the video resolution and frame rate that you want to use. The Dji Pocket 2 Camera is able to shoot 4k video at 60fps and 1080p video at 120fps.

Once you have selected the video resolution and frame rate, you will then need to select the photo resolution that you want to use. The Dji Pocket 2 Camera is able to shoot 12mp photos. Once you have selected the photo resolution, you will then need to select the photo mode that you want to use. The Dji Pocket 2 Camera has three photo modes which are single shot, burst shot, and time-lapse.

Once you have selected the photo mode, you will then need to select the video mode that you want to use. The Dji Pocket 2 Camera has two video modes which are standard and high definition. Once you have selected the video mode, you will then need to select the video resolution and frame rate that you want to use. The Dji Pocket 2 Camera is able to shoot 4k video at 60fps and 1080p video at 120fps.

Once you have selected the video resolution and frame rate, you will then need to start recording. To start recording, you will need to press the record button on the Dji Pocket 2 Camera. Once you have started recording, you will then need to press the stop button to stop recording.

Once you have stopped recording, you will then need to transfer the video or photo to your computer. To transfer the video or photo to your computer, you will need to connect the Dji Pocket 2 Camera to your computer using the provided USB cable. Once the Dji Pocket 2 Camera is connected to your computer, you will then need to open the Dji Pocket 2 Camera’s software.

Once the Dji Pocket 2 Camera’s software is open, you will then need to select the video or photo that you want to transfer to your computer. Once you have selected the video or photo,

The Features Of The Blink Outdoor 2 Camera System

The Features Of The Blink Outdoor 2 Camera System

For one, the Blink Outdoor 2 Camera System is an easy to install, wireless security system. It’s also weatherproof, so you don’t have to worry about it rusting or being damaged by rain or snow. The Blink Outdoor 2 Camera System also has a two-year battery life, so you don’t have to worry about recharging it frequently.

The Blink Outdoor 2 Camera System also has motion detection, so you can be alerted when someone enters your yard or home. The Blink Outdoor 2 Camera System also has night vision, so you can see what’s going on even when it’s dark outside. Finally, the Blink Outdoor 2 Camera System also has a siren, so you can scare off intruders or alert your neighbors if there’s an emergency.

The Blink Outdoor 2 Camera System is a great security system for your home or business. It’s easy to install, has a long battery life, and has many features that will keep you and your property safe.

This system is designed to be installed outdoors, and it includes two Blink XT2 cameras, a Blink Sync Module 2, a Blink Outdoor Mount, and a Blink Solar Charger. The Blink Outdoor 2 Camera System is a great choice for homeowners who want a top-of-the-line security system that is easy to install and use.

The Blink Outdoor 2 Camera System is a great choice for homeowners who want a top-of-the-line security system that is easy to install and use. This system is designed to be installed outdoors, and it includes two Blink XT2 cameras, a Blink Sync Module 2, a Blink Outdoor Mount, and a Blink Solar Charger. The Blink Outdoor 2 Camera System is a great choice for homeowners who want a top-of-the-line security system that is easy to install and use.

The Blink Outdoor 2 Camera System is a great choice for homeowners who want a top-of-the-line security system that is easy to install and use. This system is designed to be installed outdoors, and it includes two Blink XT2 cameras, a Blink Sync Module 2, a Blink Outdoor Mount, and a Blink Solar Charger.

How To Install Your Arlo Pro 2 Camera

How To Install Your Arlo Pro 2 Camera

Arlo Pro 2 is one of the most popular home security cameras on the market. If you’re thinking about getting one (or more) for your home, here’s a quick guide on how to install them.

1. Start by finding a suitable location for your camera. Arlo Pro 2 cameras are wire-free, so you can pretty much put them anywhere. Just keep in mind that they need to be within range of the Arlo base station (more on that later).

2. Once you’ve found a spot, use the included mounting plate to attach the camera to a wall or ceiling. If you’re mounting it outside, make sure to use the included weatherproof skin.

3. Now it’s time to sync the camera with the base station. This is done by pressing and holding the sync button on the back of the camera for a few seconds. The base station will emit a chime when the camera is successfully synced.

4. The last step is to connect the base station to your router (or directly to your modem, if you’re using a wired connection). Once that’s done, you’re all set! Your Arlo Pro 2 camera is now up and running.

In this blog, we’ll show you how to install your Arlo Pro 2 camera. This process is pretty simple and only takes a few minutes.

1. Find a good location for your camera.

You’ll want to find a spot for your camera that has a good view of the area you want to monitor. If you’re placing the camera outdoors, make sure it’s in a protected spot where it won’t be damaged by the elements.

2. Mount the camera.

Once you’ve found the perfect location for your camera, you’ll need to mount it. If you’re mounting the camera to a wall, you’ll need to use the included mounting hardware.

3. Connect the camera to power.

Now you’ll need to connect the camera to a power source. If you’re using the battery-powered option, simply insert the batteries. If you’re using the solar-powered option, make sure the solar panel is in a location where it will get plenty of sunlight.

4. Set up the camera in the Arlo app.

Now that your camera is all set up, you’ll need to add it to your Arlo account and configure it in the Arlo app. This process is pretty simple and only takes a few minutes.

We hope you found this blog helpful. If you have any further questions, please reach out to our support team.

Is the Best Printer with Cheap Ink Still Exist?

Is the Best Printer with Cheap Ink Still Exist?

Printers must be the special thing for people who highly active with printing things. It must be disaster when the only one printer that you have is on bad-mood. In this situation, you have to check it and change anything that have not been budget before which means there will be some unpredictable budget that taken out. The disaster one again and again!

So, you need the truly best printer with cheap ink. There must be some affordable printer yet the ink still expensive. It becomes the trouble one, because what we use everyday is the ink that must be refilled not the printer which does not need to be refilled to when it ruined.

Read also: Best Sites for Couponing and Saving Money

As the highly recommendation as the best printer with cheap ink, you can have Epson. One of the famous brand, Epson can be predicated as the best printer. However, the price of its printer itself is more expensive than the other brand.

It can be said that Epson can be classified to the high-price printer. In the other hand, when we looking deeper that Epson has more benefits that the other. Although it has more expensive price for the printer, but Epson gives the more affordable price for its ink.

It can be said that Epson offers the best price while you give the big mount for the first, but in daily you can save more your money. The printer can be seen as the expensive one yet the ink must be the affordable one. Even you have to take much money at the first but you can get the low price for the daily need of your printer, in this point is the most special thing is ink. So, it means that the best printer with cheap ink is Epson. Expensive first, inexpensive later.