The Features Of The Blink Outdoor 2 Camera System

The Features Of The Blink Outdoor 2 Camera System

For one, the Blink Outdoor 2 Camera System is an easy to install, wireless security system. It’s also weatherproof, so you don’t have to worry about it rusting or being damaged by rain or snow. The Blink Outdoor 2 Camera System also has a two-year battery life, so you don’t have to worry about recharging it frequently.

The Blink Outdoor 2 Camera System also has motion detection, so you can be alerted when someone enters your yard or home. The Blink Outdoor 2 Camera System also has night vision, so you can see what’s going on even when it’s dark outside. Finally, the Blink Outdoor 2 Camera System also has a siren, so you can scare off intruders or alert your neighbors if there’s an emergency.

The Blink Outdoor 2 Camera System is a great security system for your home or business. It’s easy to install, has a long battery life, and has many features that will keep you and your property safe.

This system is designed to be installed outdoors, and it includes two Blink XT2 cameras, a Blink Sync Module 2, a Blink Outdoor Mount, and a Blink Solar Charger. The Blink Outdoor 2 Camera System is a great choice for homeowners who want a top-of-the-line security system that is easy to install and use.

The Blink Outdoor 2 Camera System is a great choice for homeowners who want a top-of-the-line security system that is easy to install and use. This system is designed to be installed outdoors, and it includes two Blink XT2 cameras, a Blink Sync Module 2, a Blink Outdoor Mount, and a Blink Solar Charger. The Blink Outdoor 2 Camera System is a great choice for homeowners who want a top-of-the-line security system that is easy to install and use.

The Blink Outdoor 2 Camera System is a great choice for homeowners who want a top-of-the-line security system that is easy to install and use. This system is designed to be installed outdoors, and it includes two Blink XT2 cameras, a Blink Sync Module 2, a Blink Outdoor Mount, and a Blink Solar Charger.

How To Install Your Arlo Pro 2 Camera

How To Install Your Arlo Pro 2 Camera

Arlo Pro 2 is one of the most popular home security cameras on the market. If you’re thinking about getting one (or more) for your home, here’s a quick guide on how to install them.

1. Start by finding a suitable location for your camera. Arlo Pro 2 cameras are wire-free, so you can pretty much put them anywhere. Just keep in mind that they need to be within range of the Arlo base station (more on that later).

2. Once you’ve found a spot, use the included mounting plate to attach the camera to a wall or ceiling. If you’re mounting it outside, make sure to use the included weatherproof skin.

3. Now it’s time to sync the camera with the base station. This is done by pressing and holding the sync button on the back of the camera for a few seconds. The base station will emit a chime when the camera is successfully synced.

4. The last step is to connect the base station to your router (or directly to your modem, if you’re using a wired connection). Once that’s done, you’re all set! Your Arlo Pro 2 camera is now up and running.

In this blog, we’ll show you how to install your Arlo Pro 2 camera. This process is pretty simple and only takes a few minutes.

1. Find a good location for your camera.

You’ll want to find a spot for your camera that has a good view of the area you want to monitor. If you’re placing the camera outdoors, make sure it’s in a protected spot where it won’t be damaged by the elements.

2. Mount the camera.

Once you’ve found the perfect location for your camera, you’ll need to mount it. If you’re mounting the camera to a wall, you’ll need to use the included mounting hardware.

3. Connect the camera to power.

Now you’ll need to connect the camera to a power source. If you’re using the battery-powered option, simply insert the batteries. If you’re using the solar-powered option, make sure the solar panel is in a location where it will get plenty of sunlight.

4. Set up the camera in the Arlo app.

Now that your camera is all set up, you’ll need to add it to your Arlo account and configure it in the Arlo app. This process is pretty simple and only takes a few minutes.

We hope you found this blog helpful. If you have any further questions, please reach out to our support team.

The Walk Down The Aisle: What To Expect

The Walk Down The Aisle: What To Expect

When you’re planning your wedding, there are a million things to think about – the dress, the flowers, the venue, the guest list. But one of the most important things to think about is the walk down the aisle.

This is the moment when all eyes are on you, when you’re making your grand entrance as a bride. So it’s important to make sure you’re feeling confident and ready for your big moment.

Here are a few things to keep in mind as you’re planning your walk down the aisle…

1. The length of your aisle

The first thing to think about is the length of your aisle. If you’re getting married in a church or a large venue, chances are you’ll have a long aisle to walk down. But if you’re getting married in a more intimate setting, your aisle might be shorter.

Either way, it’s important to make sure you’re comfortable with the length of your aisle. If you’re not comfortable walking long distances in your wedding dress, consider a shorter aisle. If you’re worried about tripping on a short aisle, consider a longer one.

2. The width of your aisle

The next thing to think about is the width of your aisle. This is important because you’ll need to know how many people can walk down the aisle with you.

If you’re having a large wedding, you might want to consider a wider aisle so that more people can walk down with you. But if you’re having a smaller, more intimate wedding, a narrower aisle might be more appropriate.

3. The type of flooring

Another thing to think about is the type of flooring you’ll be walking on. This is important because you’ll want to make sure your shoes are appropriate for the type of flooring.

If you’re getting married on a carpeted floor, you’ll want to make sure your shoes are comfortable and won’t slip. If you’re getting married on a hardwood floor, you might want to consider wearing heels so you don’t slip.

4. The lighting

The lighting in your venue is also important to think about. If you’re getting married in a dark church, you might want to consider carrying a bouquet or wearing a veil so you’re not lost in the darkness.

If you’re getting married outdoors, you’ll want to make sure you’re not squinting in the sunlight. If you’re getting married in a dimly lit room, you might want to consider wearing brighter lipstick so you stand out.

5. The music

Last but not least, you’ll want to think about the music you’ll be walking down the aisle to. This is important because you want to make sure the music fits the tone of your wedding.

If you’re having a traditional wedding, you might want to consider walking down the aisle to classical music. If you’re having a more modern wedding, you might want to consider walking down the aisle to pop music.

Whatever you decide, make sure you’re comfortable with the music and that it fits the overall tone of your wedding.

Fun at the Drive-In Theater

Fun at the Drive-In Theater

The Classic Drive-In Movie Theater

Enjoy the nostalgia of a drive-in movie theater. Do you remember those days?

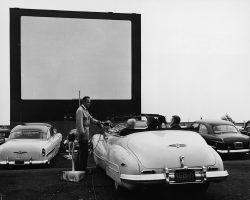
Maybe you have heard your parents or grandparents talking about how they would go to an outdoor theater. Here the latest featured movies would be on a giant outdoor screen that stood larger then life in front of many carloads of families. Double features were the norm. Although at times one could see a triple movie feature.

Back in time as late as the 1970’s, it was common to see two and sometimes three movies in even the walk-in movie theaters.

Present time, there is one movie for the walk-in theaters for one large price, though up to a few dollars cheaper if you go to the matinee show. However, if you happen to live close enough to go to an outdoor drive-in theater (yes, they still exist), then you can see two movies for the price of one matinee ticket.

Theatre or Theater

The first drive-in opened in New Jersey on June 6, 1933. The American name is theater. Though many drive-ins located in America have theatre within the name.

Drive-in Theaters: A History from Their Inception in 1933 [Paperback]

Learn the history
Drive-in Theaters: A History from Their Inception in 1933 Available in paperback, hardcover and Kindle Edition.

Look inside before you buy. Many books on Amazon have this option. It gives the customer the chance to see what is in store in a particular book before they decide to purchase it.
Along with history of the drive-in theater are historical photos that you will enjoy to look at as much as read the book!

Do you know the history of the drive-in theater?

This book will enlighten you with how Richard M. Hollingshead, Jr. came up with the idea of an outdoor movie. How he started this with test in his home driveway with a 1928 Kodak projector.

This is not a picture book with light information. This is for the research enthusiasts. It goes deep into the history of the outdoor theater. The book takes you through the golden years and the decline to near extinction of this entertainment pastime of a great movie watching experience.

Drive-In Theater Poster

Our Hometown Theater History

In our hometown we had two outdoor movie theaters until the early 1980’s. One being on the west side and the other one on the east side of town. But then the times had changed and the theaters closed down to make room for apartment buildings.

This is the common scenario across America. The outdoor drive-in theaters were disappearing. It looked as though this would soon be a thing of the past. This is something that you would tell your grand kids about, “When I was your age, we would load up the car with snacks and blankets. See not one, but two movies outdoors. It was a lot of fun.” And if the grand kids are teenagers, you may not want to mention in detail all of the fun that you had at the drive-in.

There is a smaller percentage of drive-in theaters presently then back in the good o’ days. Though many places are revitalizing this historical treasure and bringing back the outdoor theaters.

As for where I live, we have three outdoors, with the furthest being in Door County at 1 1/2 hours away. To the closest, at a little more then a half hour drive.

Two of the three allow you to bring in your own food and beverages. However they encourage you to order from their snack bar. We do bring our own snacks but we usually end up ordering nachos and sometimes a pizza.

Drive-In Movie Theater Wall Art Snack Metal Signs

Best part of the movie

Often the best part of the movie is the old time commercials for the snack counter. It would be so disappointing if these weren’t shown before the movie.

At the same time it is a bit eerie thinking that the food and beverages are alive with hands, feet and faces.

Things to Bring to the Drive-in Theater

Besides yourself and children

What I love about going to the drive-in is that all the family is included. Even our dog Buddy. For the price of an afternoon matinee, you can watch two movies at the outdoor. We find it fun sitting outdoors getting fresh air and wrapped up in blankets, while watching a great movie.

Note: Links are included to take you to the items you will need.

Bring the dog along. Be sure to bring the leash, water and a dog blanket.
Outdoor folding chairs
If planning on laying on the ground. Be sure to have an outdoor blanket that is water resistant.
Sitting in your folding chair, you will want a nice warm fleece blanket to wrap up with. The temperatures do drop and the night can get cold.
Bring a cooler for those beverages and snacks that need to stay cold.
Make sure to have mosquito repellent. You may be there to enjoy the movies. But the mosquitoes are there to enjoy you.
A rechargeable portable radio is good to have if there is no movie speakers. Some theaters have them and some do not. Plus if you plan on sitting outside, a portable radio is ideal to have.