The Exchange Of Vows: What To Say And How To Personalize Them

The Exchange Of Vows: What To Say And How To Personalize Them

Your wedding vows are the most important part of your wedding ceremony. They are your promises to each other, and they will be a lasting reminder of your love and commitment.

There are a few things to keep in mind when writing your vows:

1. Keep them personal

Your vows should reflect your relationship and your love for each other. They should be something that you both feel comfortable saying, and something that is meaningful to you both.

2. Keep them short

Your vows don’t need to be long, in fact, shorter vows are often more impactful. Keep them to a few sentences, or a paragraph at most.

3. Make them your own

You can use traditional vows as a starting point, but make sure to personalize them to make them your own. Add in your own words, thoughts, and promises.

4. Practice, practice, practice

Make sure you practice your vows before the big day. This will help you to feel more comfortable saying them, and will ensure that you don’t forget what you want to say.

Here are some ideas to get you started:

“I promise to love you, to cherish you, and to always be there for you. I will laugh with you, cry with you, and grow with you. I will support you and encourage you, and I will always be your biggest fan. I will love you unconditionally, for better or for worse, for richer or for poorer, in sickness and in health, until death do us part.”

“I take you to be my husband/wife, my partner in life, and my best friend. I will love and cherish you, and I will always be there for you. I will support you, encourage you, and be your biggest fan. I will love you unconditionally, for better or for worse, for richer or for poorer, in sickness and in health, until death do us part.”

“I promise to love you, to cherish you, and to always be there for you. I will laugh with you, cry with you, and grow with you. I will support you and encourage you, and I will always be your biggest fan. I will love you unconditionally, for better or for worse, for richer or for poorer, in sickness and in health, until death do us part.”

The Walk Down The Aisle: What To Expect

The Walk Down The Aisle: What To Expect

When you’re planning your wedding, there are a million things to think about – the dress, the flowers, the venue, the guest list. But one of the most important things to think about is the walk down the aisle.

This is the moment when all eyes are on you, when you’re making your grand entrance as a bride. So it’s important to make sure you’re feeling confident and ready for your big moment.

Here are a few things to keep in mind as you’re planning your walk down the aisle…

1. The length of your aisle

The first thing to think about is the length of your aisle. If you’re getting married in a church or a large venue, chances are you’ll have a long aisle to walk down. But if you’re getting married in a more intimate setting, your aisle might be shorter.

Either way, it’s important to make sure you’re comfortable with the length of your aisle. If you’re not comfortable walking long distances in your wedding dress, consider a shorter aisle. If you’re worried about tripping on a short aisle, consider a longer one.

2. The width of your aisle

The next thing to think about is the width of your aisle. This is important because you’ll need to know how many people can walk down the aisle with you.

If you’re having a large wedding, you might want to consider a wider aisle so that more people can walk down with you. But if you’re having a smaller, more intimate wedding, a narrower aisle might be more appropriate.

3. The type of flooring

Another thing to think about is the type of flooring you’ll be walking on. This is important because you’ll want to make sure your shoes are appropriate for the type of flooring.

If you’re getting married on a carpeted floor, you’ll want to make sure your shoes are comfortable and won’t slip. If you’re getting married on a hardwood floor, you might want to consider wearing heels so you don’t slip.

4. The lighting

The lighting in your venue is also important to think about. If you’re getting married in a dark church, you might want to consider carrying a bouquet or wearing a veil so you’re not lost in the darkness.

If you’re getting married outdoors, you’ll want to make sure you’re not squinting in the sunlight. If you’re getting married in a dimly lit room, you might want to consider wearing brighter lipstick so you stand out.

5. The music

Last but not least, you’ll want to think about the music you’ll be walking down the aisle to. This is important because you want to make sure the music fits the tone of your wedding.

If you’re having a traditional wedding, you might want to consider walking down the aisle to classical music. If you’re having a more modern wedding, you might want to consider walking down the aisle to pop music.

Whatever you decide, make sure you’re comfortable with the music and that it fits the overall tone of your wedding.

The Ultimate Guide to Finding the Best Wish Promo Code

The Ultimate Guide to Finding the Best Wish Promo Code

When it comes to finding the best deals on Wish, a little bit of research can go a long way. By taking the time to look for a Wish promo code, you can save yourself a lot of money on your next purchase.

Wish is a mobile shopping app that lets you shop for the latest fashion, beauty, and home décor trends. The app also gives you access to exclusive sales and discounts. But the best part about Wish is that you can use promo codes to get even more discounts on your purchases.

Mobile shopping app illustrated

There are a few different places to find Wish promo codes. The first place to look is the official Wish website. Here, you will often find codes for free shipping or discounts on your next order.

Another great place to look for Wish promo codes is on social media sites like Facebook and Twitter. Often, companies will post codes on their social media pages that can be used for discounts on Wish.

Finally, you can also try searching for Wish promo codes on Google. This is a great way to find codes that are not posted on the official Wish website or on social media sites.

Once you have found a Wish promo code, the next step is to apply it to your order. To do this, simply enter the code at checkout when prompted.

How to Find the Best Wish Promo Code

The best way to find a Wish promo code is to follow Wish on social media. Wish often posts promo codes on their social media accounts, so it’s a good idea to follow them on Twitter, Facebook, and Instagram.

You can also sign up for the Wish newsletter to get promo codes delivered to your inbox. To sign up for the newsletter, scroll to the bottom of the Wish homepage and enter your email address in the “Sign Up for Our Newsletter” section.

How to Use a Wish Promo Code

Once you’ve found a promo code for Wish, using it is easy. Just add items to your cart and proceed to checkout. On the checkout page, you’ll see a box labeled “Promo Code.” Enter your code in this box and click “Apply.” Your discount will be applied to your order total.

That’s all there is to it! With Wish promo codes, you can get great deals on the latest fashion, beauty, and home décor trends.

If you have any questions about using a Wish promo or discounts, you can always contact customer service for assistance.

Keeping your information safe when ordering from Wish

Keeping your information safe when ordering from Wish

That’s why we’ve put together this helpful blog post on how to stay safe when ordering from our site.

When you’re shopping online, it’s important to be aware of scammers who might try to take your money or personal information. Here are some tips to help you stay safe when ordering from Wish:

  • Only order from trusted sources. If you’re not sure if a website is legitimate, do some research before you make a purchase.
  • Be cautious of websites that offer deals that seem too good to be true. If a website is offering a product at an incredibly low price, be wary of ordering from them.
  • Don’t enter your personal or financial information on a website unless you’re sure it’s a secure site. You can tell if a website is secure if the URL starts with “https” and there is a lock icon next to the URL.
  • Keep your antivirus and anti-malware software up to date to help protect your computer from malicious software.
  • Be cautious of emails that claim to be from a company or website you’re familiar with but look suspicious. These are called phishing emails and they can be used to steal your personal information.

With these tips, you can help protect yourself from scammers and keep your information safe when shopping online.

When creating an account with Wish, be sure to use a strong password. A strong password is a mix of uppercase and lowercase letters, numbers, and symbols. Avoid using easily guessed words like “password” or easily accessible personal information like your birthdate.

We also recommend that you enable two-factor authentication on your account. Two-factor authentication is an extra layer of security that requires you to enter a code from your phone in addition to your password when logging in. This makes it much harder for someone to hack into your account, even if they have your password.

When ordering from Wish, be sure to only use your credit card or a secure payment method like PayPal. Avoid using public Wi-Fi when ordering, as this can make your information more vulnerable to hackers.

You can also stay safe by only ordering from sellers that have high ratings and positive reviews. You can check a seller’s rating by looking at their profile before placing an order.

These tips can help you order from Wish with confidence, knowing that your information is safe.

5 Ways To Make The Most Of Wish Promo Codes

5 Ways To Make The Most Of Wish Promo Codes

When it comes to online shopping, everyone loves a good deal. And with Wish promo codes, you can get some great deals on your favorite items. Here are 5 ways to make the most of your Wish promo codes:

Wish App

Use them right away

Wish promo codes are usually only valid for a limited time, so be sure to use them as soon as you can. This way, you’ll be sure to get the biggest discount possible. When you’re looking for promo codes, be sure to use a trusted site. This way, you’ll be sure you’re getting legitimate codes and you won’t waste your time with fake codes. The following are some websites that I often use to find coupon codes:

Compare prices

Before you decide to buy something, take a few minutes to compare prices. There are a lot of great deals out there, so you might be able to find the same item for a lower price if you look around. Take a few minutes to compare the prices of the items you want to buy. This way, you’ll be sure you’re getting the best deal.

Check the expiration date

Be sure to check the expiration date on your promo code before you use it. Some codes are only valid for a short period of time, so you’ll want to make sure you use it before it expires. Before you use a promo code, be sure to check the expiration date. This way, you’ll know if it’s still valid and you won’t waste your time trying to use a code that’s no longer valid.

Read the fine print

Be sure to read the fine print before you use a promo code. Some codes have restrictions, such as only being valid for certain items or only being valid for a certain amount of time. By reading the fine print, you’ll know exactly what you’re getting with your promo code. When you use a promo code, be sure to read the terms and conditions. This way, you’ll know what you’re agreeing to and you won’t be surprised by any hidden fees or charges.

Use multiple codes

You can often use multiple promo codes on the same order. So if you have more than one code, be sure to try them all out. You might be surprised at how much you can save. When you’re comparing promo codes, be sure to choose the one that gives you the best deal. This way, you’ll save the most money on your purchase. When you’re comparing promo codes, be sure to choose the one that gives you the best deal. This way, you’ll save the most money on your purchase.

By following these tips, you can get the most out of your Wish promo codes and save big on your next purchase.

JVC Everio GZ-HM1S Overview

JVC Everio GZ-HM1S Overview

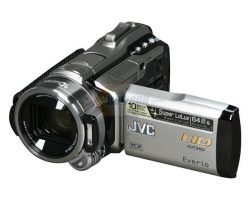
The JVC Everio GZ-HM1S is a high definition camcorder that records 1920 x 1080 video in the AVCHD format. It is one of the most expensive models in JVC’s lineup, even though it was introduced in 2010.

The GZ-HM1S carries a suggested retail price of $1199. Full technical specifications for the GZ-HM1S can be found here.

JVC Everio GZ-HM1S Video Features

The Everio GZ-HM1S uses the full AVCHD format for 1920 x 1080 high definition recording. It supports 24Mbps recording, the highest bit-rate available in the AVCHD video format. The HM1S features the same 10.6-megapixel 1/2.3-inch back-illuminatedCMOS image sensor found on most of the top-of-the-line 2011 Everios. Unlike JVC’s mid-range models, the HM1S cannot record in standard definition (not that you’d really miss it).

The camcorder uses JVC’s “Intelligent Auto” mode for automatically matching scene modes such as portrait, sunset, scenery, forest and macro mode, to shooting environments.

You can snap 9-megapixel still photos with the HM1S, and it has a built-in flash to aid in low light photography.

While it’s not quite a replacement for a standalone digital camera, it will deliver sharper pictures than camcorders without a built-in flash.

Optical Features

You’ll find a 10x optical zoom Konica Minolta HD lens on the Everio GZ-HM1S. This optical zoom is joined by two digital zoom technologies: a dynamic zoom can boost magnification to 16x without sacrificing video quality. There’s also a standard digital zoom, which increases magnification to 200x. The lens uses JVC’s “Enhanced Advanced Image Stabilizer” for keeping your footage relatively shake-free. According to the company, the image stabilization technology can compensate for camera shake at wide-angles and is four times as effective in combating shake than the Advanced Stabilization found on less expensive models in the Everio line. In our experience, JVC has some of the best image stabilization technology in the camcorder market.

The HM1S’s lens is conveniently protected by an automatic lens cap.

Memory and Display

The GZ-HM1S offers 64GB of internal flash memory in addition to a single SDHC memory card slot.

Unfortunately, it doesn’t accept higher-capacity SDXC cards for additional storage capacity, although with 32GB on board, you probably will not find yourself running out of memory. The HM 550 uses JVC’s “seamless recording” system, which automatically switches memory formats when one is full. The camcorder is Eye-Fi ready, so it will automatically recognize when a wireless Eye-Fi memory card is in use.

You’ll frame your recordings on a large 3.5-inch Laser Touch LCD display. The Laser Touch display is something of hybrid – it’s not a touch screen but there are no tactile buttons either. Instead, you’ll find a serious of touch-sensitive controls on the edge of the display, including a swipe bar, for navigating around the HM1S’s menu items. In our experience, this Laser Touch display can be more responsive than small touch screens although it takes some getting used to.

Design

Design-wise, the HM1S cuts an angular (in our view attractive) appearance with nice ergonomics. Thanks to the use of flash memory you’ll still enjoy a light weight body though not as light as JVC’s less expensive HD models (.67 pounds with battery inside). The HM1S measures in at 2.1 x 2.4 x 4.8 inches, roughly the same form factor as the entry-level series of Everios, and features a zoom lever on the top of the camcorder and a record shutter located on the side, next to the camcorder’s battery. Open the display and you’ll find buttons video playback, scrolling and info, plus the camcorder’s ports: component, HDMI, USB and AV. There is a manual focus wheel adjacent to the lens.

Aesthetically, the HM1S is available in one color – silver, with black accents.

Shooting Features

The Everio GZ-HM1S is outfitted with face detection and a a face flow playback, which highlights faces in a frame in the playback menu so you can search your footage by the people you’ve recorded..

Among the other features you’ll find on the GZ-HM1S is a time-lapse recording function that lets you record one frame at a time for a selectable time interval (between one and 80 seconds). There are several fast frame rate options for recording in slow motion. The effect is very cool but the video files are lower quality, so they won’t look as good on the big screen as they will on your computer.

Finally, you can add basic animated effects to video in the camcorder as well as to still images. JVC’s Everio Media Browser software is built-in the camcorder as well for disc-free loading when you attach the camcorder to a computer via USB. The software supports basic video editing (color changing, clipping, etc.) as well as sharing via YouTube and Facebook.

Connectivity

The Everio GZ-HM1S offers a built-in HDMI output for connecting the camera although the cable is not included. You can also connect to a PC via USB cable, which is included.

Impression

At $1,100, the HM1S is geared for video enthusiasts who want to exercise a high level of control over the look of their video. The HM1S has an attractive design and a solid feature set for the price but is getting old, in camcorder years, so you may want to wait to see what JVC replaces it with before purchasing (or wait until its replacement is named and the HM1S gets discounted further).

JVC Everio GZ-HD500 Overview

JVC Everio GZ-HD500 Overview

The JVC Everio GZ-HD500 is a high definition camcorder that records 1920 x 1080 video in the AVCHD format with a built-in hard disc drive.

The GZ-HD500 carries a suggested retail price of $549. Full technical specifications for the GZ-HD500 can be found here.

JVC Everio GZ-HD500 Video Features

The Everio GZ-HD500 uses the full AVCHD format for 1920 x 1080 high definition recording. It supports 24Mbps recording, the highest bit-rate available in the AVCHD video format. The HD500 features a 1/5.8-inch, 1.3-megapixel CMOS image sensor. Unlike JVC’s mid-range models, the HD500 cannot record in standard definition (not that you’d really miss it, would you?).

You can snap still photos with the HD500, however there’s no built-in flash so unless you’re operating in plenty of sunlight and keep steady, you’re likely to get blurry pics from it.

Optical Features

You’ll find a 20x optical zoom lens on the Everio GZ-HD500. This optical zoom is joined by a digital zoom which increases magnification to 200x. The lens uses JVC’s “Enhanced Advanced Image Stabilizer” for keeping your footage relatively shake-free. According to the company, the image stabilization technology can compensate for camera shake at wide-angles and is four times as effective in combating shake than the Advanced Stabilization found on less expensive models in the Everio line. In our experience, JVC has some of the best image stabilization technology in the camcorder market.

The HD500’s lens is conveniently protected by an automatic lens cap.

Memory and Display

The GZ-HD500 offers an 80GB built-in hard drive plus a single microSD/SDHC memory card slot. Unfortunately, it doesn’t accept higher-capacity SDXC cards for additional storage capacity, although with 80GB on board, you probably will not find yourself running out of memory. There is no seamless recording on the HD500, so you will need to manually switch between hard drive and memory card recording.

You’ll frame your recordings on a large 2.7-inch Laser Touch LCD display. The Laser Touch display is something of hybrid – it’s not a touch screen but there are no tactile buttons either. Instead, you’ll find a serious of touch-sensitive controls on the edge of the display, including a swipe bar, for navigating around the HD500’s menu items. In our experience, this Laser Touch display can be more responsive than small touch screens although it takes some getting used to.

Design

Design-wise, the HD500 is bulkier than JVC’s flash memory camcorders and much heavier at 1.82lbs (by contrast, JVC’s flash camcorders usually weigh about half as much). The HD500 measures in at 2.1 x 2.4 x 4.8 inches, roughly the same form factor as the entry-level series of Everios, and features a zoom lever on the top of the camcorder and a record shutter located on the side, next to the camcorder’s battery. Open the display and you’ll find buttons video playback, scrolling and info, plus the camcorder’s ports: component, HDMI, USB and AV.

The camcorder uses JVC’s two-way grip, which is a dual-purpose strap lets you hold it aloft or dangle the camcorder securely from your wrist.

Aesthetically, the HD500 is available in black.

Shooting Features

The Everio GZ-HD500 is outfitted with face detection and a face flow playback, which highlights faces in a frame in the playback menu so you can search your footage by the people you’ve recorded. There’s also an Auto Record function which starts recording automatically whenever an object moves into the frame. The camcorder will automatically end recording if motion stops after five seconds, so the camcorder can double as a motion-activated video camera (the battery won’t last long enough for it to truly replace a security camera though).

Among the other features you’ll find on the GZ-HD500 is a time-lapse recording function that lets you record one frame at a time for a selectable time interval (between one and 80 seconds).

Finally, you can add basic animated effects to video in the camcorder as well as to still images. JVC’s Everio Media Browser software is built-in the camcorder as well for disc-free loading when you attach the camcorder to a computer via USB. The software supports basic video editing (color changing, clipping, etc.) as well as sharing via YouTube and Facebook.

Connectivity

The Everio GZ-HD500 offers a built-in HDMI output for connecting the camera although the cable is not included. You can also connect to a PC via USB cable. There is a built-in button for YouTube uploading as well so you can send videos to the online sharing service when you camcorder is connected to your PC.

Impression

Hard disc camcorders are not nearly as popular as they used to be but still serve a niche for those who value large amounts of on-board camcorder storage. In our view, flash camcorders are more attractive options because they’re lighter, more energy efficient and tend to be more responsive. Still, if you want hours upon hours of recording capacity without breaking the bank, a hard drive camcorder is the way to go.

Guide to 3D Camcorders

Guide to 3D Camcorders

Camcorders and TVs have a symbiotic relationship (like those birds that pick food off of a rhino’s back). When TVs converted to high definition, it wasn’t long before high definition camcorders appeared. So it’s no surprise that with a new generation of 3D HDTVs hitting the market, 3D camcorders have trotted along behind. Here’s what you need to know about them.

How 3D Camcorders Work

To get a true 3D image or video, you need a camcorder that uses two lenses and two image sensors to capture two sets of images.

This creates the “stereoscopic” effect that fools our brain into thinking we’re seeing depth on the screen. In some cases, these two lenses are built into the camcorder itself. In others, a double-lens kit is sold as an accessory: it can be attached to the camcorder when you want to film in 3D and removed when you want to film in 2D.

Since two lenses and two image sensors can add cost and bulk to a camcorder, some manufacturers have opted to do 2D-to-3D conversions using software inside the camcorder. Many purists would object to the use of software since it’s not creating a full-resolution 3D image, but if you only want to dabble with 3D on occasion, the software conversion minimizes your costs.

Will You Pay More for 3D?

The short answer is basically yes, for now. There aren’t many 3D camcorders on the market as this is written, but based on the selection currently available, you’ll definitely pay more for a camcorder that offers 3D functionality than one without (there are exceptions: see this roundup of 3D camcorders for the latest prices and models).

Do You Need Glasses to View Your 3D Videos?

That depends. Some camcorders offer special LCD screens that can display 3D footage without the use of glasses. The technology is called a Parallax Barrier: it basically embeds the polarized glasses that you’d typically wear on your face, on the display itself.

If the camcorder does not require glasses to view your videos in 3D it will typically work with a dedicated media viewer – basically a small digital frame – that uses the same parallax barrier technology found in the camcorder’s display.

Other camcorders require you to output your video onto a 3D capable TV via an HDMI cable, where you will indeed need glasses to view your videos in 3D.

Can You Edit 3D Video Files?

Yes. Some of the major video editing programs such as Adobe Premiere Pro and Sony Vegas Pro have added 3D video editing options already. Software included with Panasonic’s first 3D camcorder also allows you to edit the 3D video file as you would a 2D file.

3D Doesn’t Mean HD

It may seem a bit obvious, but don’t assume that a 3D camcorder is recording in high definition. Some 3D camcorder models currently on the market record in standard definition.

Do You Need a 3D Camcorder?

You should definitely not consider buying a 3D camcorder unless you already own a 3D HDTV. Otherwise, you’re only other choice to view 3D movies will be on a small 8-inch media viewer – and that’s not the ideal viewing experience for your home movies. You should also steer clear of 3D camcorders if 3D footage makes you ill. For now at least, most consumers would be better off taking a wait-and-see approach with 3D.

Panasonic HDC-TM41H Overview

Panasonic HDC-TM41H Overview

The Panasonic HDC-TM41H is a high definition camcorder that records 1920 x 1080 video in the AVCHD format. It represents the entry-level of Panasonic’s high definition camcorder line-up with a retail price of $399.

Panasonic HDC-TM41 Video Features

Video is recorded at a maximum resolution of 1920 x 1080 at a bit-rate of 17Mbps in the AVCHD format. It uses a 1.5-megapixel 1/5.8-inch CMOS image sensor. Video can also be recorded at lower bit-rates (13Mbps, 9Mbps, 5Mbps) or in the iFrame format of 960 x 540 at 28Mbps. Still photos are recorded at 2-megapixels, which is fairly low-resolution as far as images go. It’s enough to email, but not to print.

The HDC-TM41H features Panasonic’s “Intelligent Auto” (iAuto) mode for automatically matching scene modes to shooting environments.

You’ll also have a choice of several scene modes including sports, portrait, low light, spot light, snow, beach, sunset, fireworks, scenery, night scenery and night portrait (for still images only) and a “soft skin” mode for minimizing blemishes when filming people.

Audio is recorded through a 2-channel stereo microphone in Dolby Digital. Audio can also be recorded in the ACC format when filming in the aforementioned iFrame video format.

TM 41 Optical Features

You’ll find a 16.8x optical zoom lens (42.9 x 721mm, 35mm equivalent) on the Panasonic HDC-TM41H. It uses Panasonic’s Power Optical Image Stabilization for keeping your footage relatively shake-free. In “active mode” the image stabilization can compensate at wide-angles.

You have the option for both automatic and manual focus on the TM41H. There’s also a digital zoom to boost magnification out to 1200x – though a digital zoom should be used sparingly, if at all.

Memory and Display

Video footage is recorded directly to 16GB of internal flash memory.

There is also a slot for SDXC memory cards for adding additional recording capacity.

You’ll frame your recordings on a 2.7-inch LCD display. There is no viewfinder.

Design

Thanks to its use of flash memory, the TM41 is very light weight (indeed, it’s the lightest model in the company’s lineup as of this writing). Without the battery it weighs just .37 pounds and measures in at 2.03 x 2.26 x 4.27 inches. It’s a traditional, barrel-style form factor with a zoom lever and shutter button on the top of the camcorder. Pop open the display and you’ll find buttons for switching between iAuto and manual shooting and activating image stabilization, among others.

Aesthetically, the TM41 isn’t much of a head-turner. It’s only available in black.

Shooting Features

You will have some degree of control over your video when shooting with the HDC-TM41. You’ll be able to automatically white balance the camcorder, in addition to manually adjusting the iris. The shutter is automatic. There is a tele-macro mode available too for focusing on objects up to 50cm away. When the lights go down, you can avail yourself to the built-in LED video light to give you some additional illumination. There is no flash, however, for aiding in still photography. Overall a fairly scant feature-set, but that’s to be expected given the price.

Connectivity

The Panasonic HDC-TM41 offers a built-in HDMI output for connecting the camera. You can also connect to a PC via USB cable.

Impression

For those looking for a low-cost camcorder that delivers better video quality than a pocket camcorder with a few extra controls (manual focus, manual iris control and white balance) with a much better zoom lens, the Panasonic HDC-TM41 is definitely worth a look. It’s small design and light weight build ensure it can be carried anywhere without being a burden. It won’t pack the same kind of feature-punch as higher-end models, but if you need a basic, no frills camcorder, give the TM41H a closer look.

Guide to Camcorder Software

Guide to Camcorder Software

These days, you’re just as likely to view your camcorder videos on a computer as on a TV (if not more so.) That’s why every camcorder is packaged with some basic video software that will let you perform some routine tasks with your camcorder video. Here’s what you can expect:

Basic editing: While you shouldn’t expect to edit your Hollywood blockbuster on the included software, the basic editing features are usually there – some color corrections, trimming, along with the ability to add titles and transition effects.

Sharing: Whether you want to post your videos to Facebook or YouTube or send them to friends and family via email, the software included in your camcorder usually contains tools for Web sharing.

Transcoding: If you want to watch your home movies on DVD, smartphone, portable media players or even a PlayStation Portable, you may need to transcode your video – i.e. turn it into a file format that can be recognized by these devices. Most bundled software will have an option to output your video file for viewing on various platforms.

Organize: The more videos and photos you record with your camcorder, the harder it is to keep track of all your digital files. Included software will offer a basic organizer that will let you keep track of your ever-growing digital library.

DVD Burning: One of the most routine tasks you’ll need to perform with your camcorder’s software is burning an archival disk of your footage. If it does nothing else, your software should allow you to burn DVDs of your home movies.

Perform Specialized Tasks: Some high-end camcorder features can only be accessed through specialized software applications not found on off-the-shelf software.

Sony’s GPS camcorders are a case in point: you can only access map views and “geo-tagging” if you use the company’s included software to organize your files.

Built-in Software

There’s a growing trend among camcorders to ditch the CD-Rom and load their software directly into the camcorder itself. The software will typically install itself on your computer the first time you connect the camcorder to the computer. The virtue with the built-in approach is that you can upgrade computer (of suffer a hard drive wipe out) without worrying about losing your software.