Tips on how to draw deciduous trees
This is an introduction to drawing deciduous trees in a realistic way from life. This site explains how to draw deciduous trees with a pen and with charcoal. If your looking for some inspirations or ideas for tree drawing have a look here.
The website discusses the main features of deciduous trees and how to draw them. First simple drawings point out to the basic proportions and parts of a tree. Then tree trunk, branches and tree tops are explained further. Examples and methods how to represent bark and foliage of trees in drawings are given. Finally the making of a very detailed ink drawing of an apple tree orchard is demonstrated in a sequence of intermediate states. Herre you can see the process of drawing step by step.
Let´s try to draw some simple apple trees !
A tutorial for beginners
In the beginning a simple four step approach to drawing trees with pen or ink might help.
In order not to get overwhelmed by the many details of a tree I commend to begin with studies from a distance.
First try to depict the shape or outline of trunk and tree top.
In a second step larger internal forms in the tree top are mapped. The confusing pattern of leaves in fact follows a certain order and on observation one can see that the leaves are organised in typical “groups” following the branch and twig structure of the specific tree species.
In a third step the larger forms can be described further by filling them with a typical smallpattern that the leaves are forming.
I a final fourth step one might add hatches to add shadows, thus the drawing gains more three dimensional look.
No.1 : Starting with the trunk
After the outer form was established I continued with drawing the trunk and then continued to represent the foliage in shade on the right side of the trunk in small circular movements with the pen.
Later the hatching was added for the shadows on the trunk and for the darker tonality in the shadowed area.
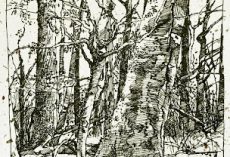
The trunk of a tree is a very interesting subject for further exploration. The ink drawing below shows the stem of an old apple tree.
No.2 Mapping the tree tops
detailed view of line pattern
The foliage of trees shows, depending on light, lots of different shades or tonalities. By squinting I identified darker and light areas or clusters of twigs with foliage that have different tonality. Then I try to map the borderlines between darker and the lighter areas by blind drawing.. With some experience you will notice that eqach tree species has a specific “organisation” of branches and twigs and therefore shows a typical pattern of leaves which are grouped by the twigs and branches. So the method here is to establish the bigger forms first and then proceed to the next lower level in the hierarchy.
No.3 Patterns of leaves and foliage
round or jagged outlines?
Each tree species has it´s own pattern or rythm of leaves. I tried to imitate the rythm I saw with my pen movements. The leaves seemed to be arranged a bit like little roof tiles. Also it makes a big difference whether the leaves have rounded edges like on fruit trees or more sharp distinct edges like a red oak or a maple tree. Jagged leaf outlines should be represented by a pattern of jagged lines if the natural character of the tree shall be displayed in the drawing.
With light or heavier pressure on the pen I tried to create thinner/lighter or thicker darker foliage.
How to draw foliage in tree tops
This sketchbook drawing shows a group of apple trees. In the detail below it can be seen how I tried to represent the variations tonalities in the foliage. A realistic impression can be achieved by putting emphasize on the outer branches and leaves of the tree tops and drawing them in very dark tonality. Leaves and twigs at the very tree top often seem to look very dark or almost black in contrast the bright sky. As soon as you move your eyes downwards from the very tree top the foliage seems to get lighter and colors become more visible, because the bright sky does not dazzle the eyes so much.
Apple tree orchard – tree drawing in ink
Development of a landscape drawing with trees
apple trees with ink drawing on site, plein air With more experience the draughtsman develops a strong feel for proportions and an excellent eye to hand co-ordination. The masters seem to know already how the finsished drawing will look on paper and all they need to do is to put it down with their drawing tool. I have not come that far yet, but meantime I can estimate proportions fairly well and I find myself starting a drawing without establishing the outlines visibly on paper first.
See here an example of a detailed landscape study, an apple tree orchard. I have documented the progress of the drawing on several subsequent days. I avoided cross hatching with purpose in this drawing as cross hatchings tend to obscure details and thus reduce the clarity of a drawing. Of course sometimes that can be a wanted effect too.
ink drawing apple tree orchard
I started the drawing with the base of the important tree trunk on the left and then proceeded further to the other more distant trunks and finally into the branches and tree tops. The tree trunks functioned as basic grid and reference for proportions and spatial order. Working all over the page helps to keep the drawing coherent and to make the right decisions about gradadtions of tonalities too. The best is to know from the very start which parts of the drawing shall be the lightest ones and which ones should be the darkest.
In the decidous forest – a charcoal drawing
Oak and beech forest in spring,strategies to deal with an abundance of detail.
The drawing on the right was done on site very near to my home. It shows a beech and oak forest in late spring. I remember those big leaves of Coltsfoots that bloom early along those machine path prepared for logging of timber. You can see those leaves in the foreground on the left.
I found the best way to adopt to the overwhelming amount of details in a forest scenery is to examine the subject before starting with the drawing. I decided to built the picture around the bright spot where the sun hits the grass. It was that light that attracted me to choose that subject.
The big trunks and some smaller ones established the composition grid in this drawing. I start with light marks and lines because mistakes can be wiped out with a cloth easily and the darkest darks should be placed at the end with consideration. The darkest and the lightest spots in a drawing attract the viewer eyes like strong magnets. Wrong placement, wrong form of those “highlights” can spoil the most beautiful drawing. In order to pull the viewer into the picture I placed the sunlit spot of grass at the end of the over grown path in the very center of the paper. To enhance the brightness I placed the darkest darks around the bright spot, which seems brighter than the blank paper in the sky or the foreground.
After the vertical grid was established I concentrated on typical structures of foliage and shrubs and added the background, which filled the spaces between tree trunks. I used a soft eraser to recover some lights in the background to imitate the impresionj that the pattern of light spots on the leaves evoke. To improve that illusion I added dark small marks that resemble the form of leaves.
Finally the foreground was put in. Instead of trying the impossible, to copy each and every grass or leave, I concentrated to represent samples of some of the typical forms and structures I saw. After all the drawing is a simplification of the real scenery, that is just detailed enough to keep up the illusion.
How to draw a tree – The book published on BLURB
A field guide to sketching and drawing trees
70 black and white images of pen, ink and charcoal drawings. You will find many of the illustrations on this lens, but others also from related lenses on drawing deciduous and coniferous trees and some extra images too in the book.
The book summarizes my experiences in drawing trees. The majority of drawings are deciduous trees, but there is also an explanations about pine tree drwaing and spruce.
Link to the book How to draw a tree There is a full preview available.
Quick tree sketch with charcoal
One day a thunderstorm surprised me when drawing. Quickly I seeked cover under a bridge and made a quick drawing of young trees in a rain shower
A look to the edge of a forest
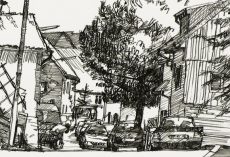
Drawing a forest with pen
This sketchbook drawing was part of an exhibiton project “A year in the vine yard”.
The full sketchbook can be seen here “A year in the vine yard”
Study of a willow tree
Ink drawing in four stages
drawing of a willow tree in four stages
This ink drawing was done in several short session of 20-30 minutes due to cold winter temperatures. The depiction of the many think twiges at the top of the willow tree was a challenge. Not all of those visible in reality found their way into the drawing. More than ofteb less is more in drawing.
Drawing the urban landscape – publication on Blurb
Exploring the city with pen and sketchbook
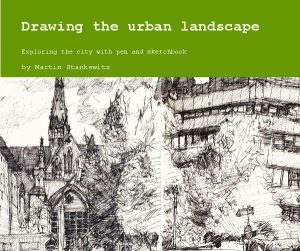 Between April 2006 and May 2007 I have
worked on an exhibition project about the urban landscape of the city of Stuttgart,Germany.
I have selected more than 30 drawings for a book now available online at BLURB.
The first 10 pages show panoramic drawings together with the essay about the urban landscape and the experience of drawing such a complex subject. The following pages show two panoramic drawings per page without text.